Designing a complicated power infrastructure, seeking inputs on my inputs and ouputs

rayra

Expedition Leader
Have and will.

/lol

Griswalds_zps9084b585.jpg


I was delighted to discover my 'new' Sub had an always-hot 12v 'PowerPort' in the back rear right side of the cargo area. Got a plug-in 100w inverter and some LED Christmas lights right away, as I'd bought the Sub right before Thanksgiving 2yrs ago.

But one measly rear power port just won't do...

But in truth, the Sub wasn't bad to begin with. Three 12v ports in the dash, one on the rear of the center console for the 2nd row, one at the rearmost corner. And a molded place for one inside the center console, which I added later. I also added a USB port on the front face of my upper console, to power my suction-cup mounted iPhone and DashCam, splicing into the power on the upper console's courtesy lights.

USBpower25.jpg


/I have come to wire **** and chew gum. And I'm all out of gum.
 
Last edited:

rayra

Expedition Leader
oh and thanks for the fine idea you just gave me. I'd inadvertantly bought some unsealed 5m LED strip lights, a couple months ago. After delving into the return hassle and shipping costs on the cheap lights, I decided to keep them, with no clear purpose in mind. But I believe they will fit inside 1/2"ID clear PVC tubing. Viola. Instant camping lights. I'll just wire a 12v cig lighter plug end on a long lead onto the strand, seal up the tubing. Then I can just plug them into my swell new 12V ports and string them up from my awnings. Whole 5m strand draws 2A.

OR

Maybe I'll wind them on a rod inside a clear acrylic tube and make a cheap LED work light. Total cost <$12.
 

rayra

Expedition Leader
Working on the front-facing end panel of the Power Module.
Most of the ~1500W inverters I'm looking at have built in cooling fans, but unfortunately they draw air in thru the plug outlet face and exhaust the warmer air out the opposite end. Which is inside the box. So that heat has to be encouraged to move along somewhere else. I'm messing around with adding a small 40-50mm DC computer fan and adding it among the array of power ports. But as I type this I realize I don't really need. The Inverter fan is doing the moving. All I need to is provide an opening or slots for the resulting overpressure to blow out.
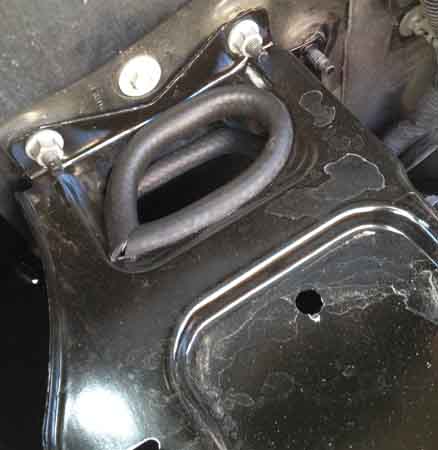
But here's what I worked out. I did a quick run on the router table with a 45deg chamfering bit to increase the standard port size to meet the ID of the computer fan. I didn't do the math, but I believe the standard opening mouth has as much area as that of the fan, net (fan dia. minus its own hub dia). Then I put some black paint on things to pretty it up.
I could have opened the port size to match the bezel diameter of the other power adapters, for a better visual match, but didn't care to.

auxbatt031.jpg
auxbatt032.jpg
auxbatt033.jpg


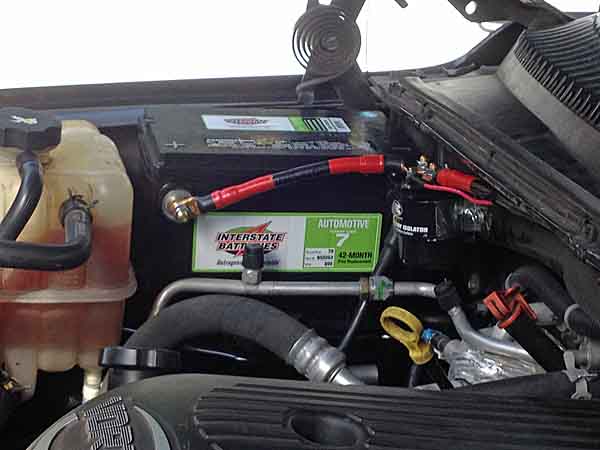
Then I spent some time with my mockup batteries, trying different layouts. As I look at the cargo sidewall some more, I realize that the likely cut-thru for the 1/0 power feeder is well forward of where I first thought. So as I'm envisioning the cable connections, the batteries would have to be more towards the rear or even spread apart in installation, with the cable connector passing between pairs of batteries. Or 3 on one side, 1 on the other. Four because they're cheaper that way -
https://www.amazon.com/dp/B00LRUGE0...UTF8&colid=QWZ1BSZYG6VW&coliid=I1HYG9HCU4E05B

I also did some other measuring to get an idea what is and isn't possible. The inch I had to take off the box is going to make things tougher. The way I'm going to have to route the 1/0 cables in the box is going to fill what remaining small gap there is between the small batteries and the box.

auxbatt034.jpg
auxbatt036.jpg


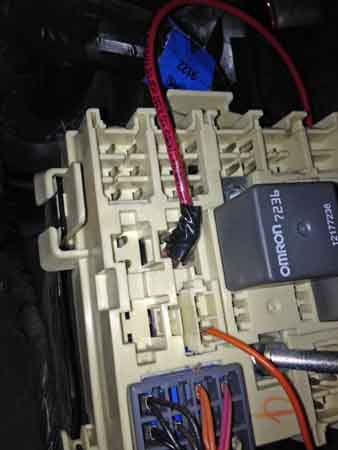
I've got about 4" of height over the batteries, I can double deck the solar charge controller arrangement later. Or even attach it to the box lid instead. I'm actually inclined to do that, anyway. Could even do the same with the fuze panel I'm considering. Still considering many layouts.

auxbatt035.jpg


Shifting the batteries rearward is more trouble, really encroaching on the space needed for a 1500w-class inverter.

auxbatt037.jpg


I could try running all the batteries end to end along the hinge side of the Module. With just a gap where the 1/0 cable connector has to pass thru. I think they might fit that way and that give me more room down the off-side of the box for fuse panels, marine rotary switch, bus bars etc.

The batteries are an 'option'. Ideally I'd like to cram as much in there as possible. They're 10.5Ah apiece. So four of them is almost as much runtime as a standard automotive battery, which I can't fit in my layout. If I can only fit a couple, that's ok. Still working out how to both integrate and isolate them, in various operating conditions.


And speaking of operating conditions, I also staged a couple photos related to mobile HAM, but this would go for just about any other electronic device. Radios, phones, laptops, lighting, re-charging just about anything.

I have a small bag I use as a handheld HAM radio kit bag. In it are a variety of power and recharging options. The only thing I'm lacking is a radio battery pack that uses AA batts. I also have a wallet-sized folding solar panel that recharges AA Eneloop batteries and will recharge USB-connected devices. That panel stays in my BugoutBag / Day Hike bag. Which now rides in the right-hand drawer of my storage platform setup.

Anyway, here's a few pics of the options.

auxbatt038.jpg
auxbatt039.jpg
auxbatt040.jpg
auxbatt041.jpg


All that stuff could be run out of a single 12v cigarette lighter / PowerPort, and with the battery clamps, right off any 12v battery.
But I want(ed) to be able to support the power needs of multiple people, simultaneously if necessary. Hunting camp, search party, post disaster (lost my home to the '94 Northridge quake, caught totally flatfooted, zero preparedness), anything.

My prior Marine service background working in and operating an Artillery Battalion CP and mobile command teams working out of upgraded Humvees is no small part of what drives and informs the projects I'm undertaking for this Suburban. That goes for my other build projects as well, roof deck / back boards, awnings, and more projects to come. I want this vehicle to be able to serve as a hub for, well, anything.

And it is part of why I'm not appreciating people taking the piss with me about 'too complicated' design.
 
Last edited:

rayra

Expedition Leader
Well I've confirmed this morning that my original battery ist kaput. It seemed to take a charge and hold it reasonable\y well, only dropping about 0.15V over three weeks of sitting around the garage. But I didn't like its peak voltage of 12.58. And it was 2 years old anyway. But I'd gone ahead then and hooked it up as I built my dual battery setup. And then watched as neither battery seemed to top 12.6V. I was expecting a bit more out of my new Interstate Grp75 Starter battery.

I got a cheap hygrometer over the weekend and got odd readings in cells 2 & 3 (from the (+) post). And today I went to the chain-brand source of that old battery to get a load test done and maybe get a pro-rate or haggle a price down. Load was under 9v, Bad Battery, no cookie. Not original purchaser, too bad for me. SO time to turn that dead thing in for the core on the battery I bought last month. And go ahead and buy another new battery.

It is at this point I consider buying a larger capacity battery. Searched out posts regarding disparate batteries in an aux / dual battery config such as I have, and it appears to be workable.
dwh's / Statler's own posts on it three years ago seem to confirm it - http://www.expeditionportal.com/for...ith-different-batteries?p=1359181#post1359181

So I'm thinking a group 34/78 will do nicely. This also presents another decision fork. My original design goal was to use identical batteries. My prior experience with battery banks requiring such (as well as thinking that if my Starter battery were to suddenly die, I would physically swap batteries and travel on). But that is NOT the configuration I'm using here. The Starter battery is isolated during regular use, key off. Key on, engine and alternator running, the usage(s) are moot re disparate batteries. So a 78 is in order. This other fork though is also related to usage. I'm considering a marine / deep cycle. It would better suit my planned uses, camping, mobile HAM radio ops, multivarious charging options, off-grid power tool usage.
Next trip to costco I'm going to take a look at their 34/78 options. I recall seeking marine / deep cycle there on the shelf, but wasn't paying attention to price. IIRC their 'normal' Interstate automotive 78 was $109. My fresh Interstate 75 was $89. Plus the fat core fee as I kept my old one. I'm out that fee regardless, since I'm buying 2 batts and turning in 1.

And please don't say Optima to me. I've read so much noise pro and con on those that I don't think they are worth the price premium. Akin to gold plated HDMI cables. Farcical and not worth the money.

And above all, I'm not chasing fads, brand names, or interested in paying Bro-pricing on anything.


Got my other power port stuffs today and filling up my shopping cart with other needful things for the Power Module. Mucking around with SLA battery mockups in different physical layouts. Checking other local shops in a seemingly futile quest for 1/0 welding cable, as opportunity presents. It would make connecting / disconnecting the SB175 plugs in the box easier. But the stiffer cable will work in my envisioned layout. Which I'll sketch out later.


I'm also re-considering the inverter choices. The ratings on the size and price ranges I'm shopping are not encouraging. Overall good, but the failures and negative reviews are spectacular. But I'm finding about the same failure rates in better / bigger products. Again, not encouraging. But at the same time, it's also a disincentive to spend 3x the money on a 'name' product.
I'm ALSO considering bumping up a class size, the 2000W range. Which leads ot other reconsiderations of design. My intent was to route the feeder cable into the box via the SB175 plugs, and use the marine rotary switch as both a terminal post for branchings INside the box and as a cutoff to a branching going back out of the box and on to the rear bumper for the future winch provision.
But if I go to the larger inverter, I can just treat it as another tool, stored with the tools, taken out as needed, instead of disruptively mounted inside the Power Module. In which case I would either use the bumper plug as the connection point for the bigger inverter OR only mount such a plug in the end face of the Power Module and drop the whole extension out of the box to the rear bumper. The plug connector in the rear face of the box would service all rear heavy power connection needs. I'd rig the winch with a 3'+ lead, which I could just run thru the Liftgate opening as needed.
The Module face plug could still be on a rotary cutoff switch.

And evicting the inverter opens room up for my desired smaller batteries and later integration of a solar charging solution.

Quite a bit still up in the air. Nothing decided until the moment the money is spent.


auxbatt042.jpg
 
Last edited:

rayra

Expedition Leader
Got a few more power ports in today. Just need one more Anderson PowerPole mount to be full up. $7 here, $16 there, $19 there, I don't want to add it up. Probably about $130 worth of bargain-priced connectors. The quality switches and fuse panel(s) will cost just as much again. The 4 pack of smaller SLA batteries is $72. A decent inverter is ~$100. 1/0 cable is $1.25/ft. The terminal lugs are about a buck apiece. This has got out of hand. But that's the bargain-basement price of building what I want to have, rather than trying to make do with 'simple'.

auxbatt044.jpg


Experimented with a different idea to evict the inverter from the power box, make it a tool I connect up only when needed, with a layout change to the heavy cabling. Thinking to put the heavy plug in the rear face of the box instead of the bumper. But it's kinda ugly and ruins any aesthetic symmetry

auxbatt045.jpg


The other thing I did today is probe around under the vehicle, considering the route for laying those two heavy cables from teh Aux battery back to the opposite corner. It's about 15' front to back and then 5' across plus a couple feet for risers on both ends. Call it 25' max for each run.
I spotted a couple access holes in the closed frame rails, started probing with a metal (wiring) fish tape and discovered the main frame rail is unobstructed. At least for a skinny fish tape. Ran it up inside the frame rail from behind the exhaust pipe all the way to the front bumper.
There's one elongated opening in the frame just behind the front wheel well that could be enlarged to pass two cables. Then it's a fully protected run all the way back to the spare tire.
If not that, I can place the cables in some flexible PVC conduit and mount that to the outer top face of the frame rail, above the body mount sponsons, all the way back to the rear axle arch and cut across there.

The location of the intended floor penetration is right behind the driver rear wheel well. just forward of the fuel filler plumbing. NOT the place you want to mix heavy power and gasoline. But again, considering conduit for this reason as well. I think it would be a good working solution and I can treat the floor at the penetration just like the wall of a junction box, in terms of mechanical fastening AND SEALING and abrasion resistance for the cabling. Just as well, since I've been using house cabling. ;)

auxbatt047.jpg
auxbatt046.jpg


3380
 
Last edited:

rayra

Expedition Leader
All I got done today was a 'bracketectomy' and I went ahead and bought a Group78 Interstate to serve as my Aux.

auxbatt048%20bracketectomy.jpg
.jpg


auxbatt049%20battery%20tray%20grommeting.jpg
auxbatt051%20Aux78.jpg


But now that I've put a 34/78-sized battery there, those protected openings are now obscured / inaccessible. Still eyeballing a narrow passageway down between the wheel well liner and the firewall as my path for my pair of 1/0 cables to the rear. I'll likely get my electrician neighbor's help pulling those fat cables thru the frame. But that isn't going to happen for another couple weeks.
And still can't decide what questionable inverter I'm going with. And the heavy power plug placement is going to wait until the cables are actually run. The storage drawers, cargo area trim panels will all come out at the same time, for work on all of it. Don't want to disassemble / reassemble 3x. So I have a bunch of things to prep before that gutting.
 
Last edited:

Bear in NM

Adventurer
Like I had noted earlier in the thread, I had no issues with running jumper cable wire inside the frame rail in my 800 Avalanche, front to rear. I really debated the safety concern of having a wire hidden, where it can not be inspected v. outside, where it would be more exposed to the elements. I also used the area you described between the wheel well liner and firewall. Obviously this is unsafe in terms of side impact, but proper fuses let me proceed. I also ran both positive and negative, as I am trying to avoid frame grounds for anything.

I guess in the greater scheme, any wiring we do anywhere on the vehicle is outside oem spec. and design for safety, and we have to pick our poison, so to speak. I do like the concept of having one to place to accommodate any possible charging scenario, but would anyone who needed the charge give you a hard time because you had to pop the hood and clamp a big inverter directly to the battery posts? We were camping in southern Colorado this last weekend, and had the chance to use my portable solar setup to charge other people's stuff. No one complained about the panel wires in camp, but complimented me on how fast their phones charged on my usb connections. I installed the higher mili-amp sockets, and these guys did not realize there was difference. Like you, I have tossed a lot of nickle and dimes at my system this summer, and am at the point that I need to focus on performance, rather than beauty. I would perhaps buy the inverter that looks reasonable, test the heck out of it at home, then decide where and how to place it.

Craig
 

rayra

Expedition Leader
well I'm not much concerned about 'complaints'. I wouldn't mind popping the hood in a 'base camp' sort of situation. But again my previous experience inclines me towards a built-in setup to retain mobility and greater convenience in use. I've had a few occasions to do some building work in the mountains, my mini-generator mostly sufficed. But I'd rather have the near silence of an inverter. That also applies in a post-disaster scenario. Last thing I want to do is run a generator at night.

Part of my future plans include a business building outdoor structures and ranges on rural properties. This sort of heavier inverter operation, 'off-grid power' will be part of that, so in part this is an experience-gathering trial installation. Much like that mini-generator was / is. Both were low budget entree into those sorts of endeavours.


Had a late night conversation with my electrician neighbor last night, talking about cabling options, merits of running in the frame vs weathertight conduit, and also the idea of running a triple 6ga conductor instead of 1/0. Six strands, really. Such would carry the same electrical load, while possibly being about 1/3 cheaper and more flexible and easy to run. The PVC flex conduit is good for about 6" radius 90deg turns, which is workable in my planned layout from front to rear. We're still talking about the current math.
Part of my dilemma is 1/0 isn't even enough for rear operation of a heavy winch. Not for much more than short easy pulls. Not on paper, anyway.

I could also run the 1/0 with each strand in its own conduit sleeve. One concern with pulling the 1/0 thru the frame is potentially inflicting the very sort of insulator damage that running in the frame is meant to preclude. I also like the idea of the conduit for the greater protection it affords. Again especially as my haunts are rocky desert roads. Running the wiring in a pair of conduits, with those clamped high up on the frame rails, would give a lot of protection against my expected offroad hazards. And on-road for that matter. Run over a lot of crap on L.A. Highways.

So right now it's between 1/0 or triple 6, and probably conduit either way. I think I need ~26-27' runs for my planned layout. ~15' axle to axle, ~5' across the cargo area, a few feet on each end for risers. ~200' of #6 should do, but needs to be continuous rather than 100' rolls, or there'll be a bunch of waste. Likely pull the wires in the conduit runs laid out in the driveway, then just rig the completed bundles in place. I'll likely need to solder the terminator lugs on the Aux battery end beforehand. Then clamp those in the correct relative position in the engine bay, before wrestling the rest into place. The lugs on the other end in the cargo area will have to go one once the cables are in place and all the twisting is done.

Another issue is that the 1/0 run is overkill for the smaller power ports, but is just a bit bigger than a ~1200W inverter would benefit from. And marginal for a 9500 or 12000 class winch at the rear. in reality I might never get around to the ~$1000 expense of the heavier winch kit. I also have reasons / plans that would benefit from a lighter winch at the rear. Which 1/0 would suffice for. So for all my various plans the 1/0 suffices for everything except a 12k winch at the rear. And even then it might work for short duration short distance pulls just fine. So I'm sort of sanguine about the capacity of a 1/0 (or equivalent) power feed. And 200A fusing.


3560
 
Last edited:

Bear in NM

Adventurer
I am in the same boat, with the winch decision. On my Jeep, I actually had an old Warn P2000 welded to a mount in the front. With a snatch block it was plenty. My Av weighs in the same as your Sub, so I have been looking at the same Warns that you noted. But upon reflecting, in almost 30 years of offroading in the PNW, Colorado and NM, I think I needed a winch maybe 2-3 times to unstuck myself. The rest was moving big rocks, winching dead elk, and the time we built a log cabin. I am not the type that needs to go anywhere that requires winching to get in, and my days of winching or tugging complete strangers on the trail are over. Playing super hero usually results in more damage, unless you haul enough gear to account for any scenario. I'll always offer a cell phone or ride out, but playing AAA Wrecker, no more. I think a big winch is off my list, and if I decide I want one, it will be a little smaller. This takes a load off my mind, and my wiring, so to speak.

I get the idea of mountain building off grid, as I have done a bit of that. On the last build, I think the ATV was the most handy tool, besides my Jeep....

Craig
 

rayra

Expedition Leader
Be careful what you suggest.
There are at least two guys accused & presumed guilty of mocking, there is no room for a third.

I'll just switch to using the Stooges' names to accommodate the third, if Proper would care to state his preference for Larry Curly or Mo. We'll save Shemp for the 4th ******* that wanders in here with snark instead of contributing some useful technical information or related experience.

/

Bear, I feel the same. My days of schlepping into the mud to help some damnfool ended decades ago. I'll still help people broken down in the road / roadside. But the flatbill Bro(s) with the glum look and busted $60k truck, they get a bottle of water and a ride / phone.


As for the topic, nothing new to report. Truck's packed for another 300mi jaunt for bathroom remodeling fun. I only stepped in because I saw Waldorf's name on the topic, was hoping he actually deigned to contribute something useful. ah well. Toujours pret.
 

proper4wd

Expedition Leader
I'm a Mo kind of guy myself.

My experience is that I installed a power system in my vehicle without near the complication or exasperation. Group 27 Marine battery, Blue Sea terminal mount fuse block with a 200A fuse, running 2/0 welding cable to the rear of the vehicle through a slit cut in an existing large grommet in the firewall and sealed up with RTV. 2/0 cable goes to the power stud on the 2000/4000W pure sine inverter (which doubles as a junction block). From there power is distributed to a ExtremeAire Outback compressor (4ga) via a 200A continuous duty solenoid also to a 8 circuit Blue Sea blade fuse sub panel (4ga).

The ground side of things is handled by another 2/0 cable from the ground stud on the inverter to a heavy rear seat mounting bolt. I use the ground stud on the inverter as a junction block on the ground side.
 

rayra

Expedition Leader
Been working on bathroom remodeling projects for relations, still doing so, so not much installation progress on this lately. Parts are trickling in as I make my decisions and hunt for bargains. I got my marine battery switch today.

auxbatt052%20marine%20sw1.jpg


Poked around with it a bit, looking at installation placements. Can't really nail it down until I blow open the cargo area and run my heavy feeder cabling and establish the cargo connector plug placement. The gray plug will wind up roughly where pictured. Likewise the marine rotary switch. The power cable will form an inverted L-shape curve, with the cable laying along the right side wall of the Power Module box. Which will just clear the optional batteries in a crowded layout.

auxbatt052%20marine%20sw02.jpg
auxbatt052%20marine%20sw03.jpg


I'm also still considering making the interior a double deck arrangement. Batteries and main cabling 'below decks', like a submarine. With a plywood mid-deck with the fuse panel, marine switch and potential solar controller mounted on it.

Also still under consideration is placing the fuse panel and solar controller on the box lid, such that they are right-reading when the lid is open. Wiring routed accordingly and it puts fuses and readouts in an easy to access and read location. And it would solve a lot of crowded layout and access and readability issues.

The marine battery switch is also going to serve as a distribution terminal. It has a decent amount of room under it, around the bolts / lugs. Like other similar products it has removable side panels on its base, allowing almost 360deg cable routing access. And the bolts will allow at least (3) 1/0 copper lugs to be stacked.

So my 1/0 feeder cables come into the box via the APP SB175 connector plug(s). The positive will go right to the marine switch. The negative will go to a standalone terminal mount. Or it may go to a ground bus. Haven't decided yet.
That same marine post will have an 8ga (4ga?) line branching off to a new fuse panel inside the Power Module to which all the end panel power ports will be wired. The negatives of all those devices will go to the ground bus bar.

On the 'output' side of the marine cutoff switch will be the heavy cable connections feeding the 1500W inverter and sending power to the rear winch power plug.

Vaguely like this:

auxbatt052%20marine%20sw04.jpg
auxbatt052%20marine%20sw05.jpg


All this stuff winds up being 'fixed infrastructure' once installed. No need to fiddle with anything except a couple switches.
Most of the box will thus be 'hot' all the time. Main-fused and switched at the Aux battery up front. The marine switch inside the box only cuts power to the rear winch plug and the inverter.
Since I'm doing a bunch of this in stages, I might use that marine switch in different ways. Might use it as a cutoff for the whole box, initially. Not yet decided.


4230
 
Last edited:

Bear in NM

Adventurer
As to the deck, I did a hinged deck on my portable control center (large pelican case). I have all of the wires, fuses and plugs affixed to the hinged part that swings up. In my case, it was to allow access to the lower area, that I use for storage. But also with the wires affixed to the bottom of this hinged area, I have easy access to all connections, etc. A piano hinge cut to length looks clean.

Craig
 

rayra

Expedition Leader
yes, I think it will be quite possible to things that way. I was going to bundle and route all the power port wiring around the edge of the box a la a telecom install, anyway. Just as simple to route it to the hinge side and with enough slack to make the transition to the devices being mounted to the lid instead.


I think I mentioned earlier in the topic how I'd used a keyed circuit in the factory aux panel under the dash to drive my battery charging circuit solenoid. It's a ~4x6" panel low on the firewall between the e-brake and brake pedal. It has several relays and 5-6 clusters of connectors for factory and aftermarket connections, like electric trailer brakes etc.

The other day on a long trip I managed to kick my added wire and loosen my improvised connection. Solenoid started jackhammering as the connection sparked. Stopped and pulled the wire completely loose. The problem lay in part with the panel using oddball connectors. I'd jury-rigged a standard F-type spade connector to fit the small narrow pins in the panel.

The panel and my kludged temporary connection, the type of connector.

auxbatt057%20solenoid%20connector5.jpg
auxbatt055%20solenoid%20connector3.jpg
auxbatt056%20solenoid%20connector4.jpg


I went to the local Chevy dealer yesterday, willing to pay up to $10 for this connector. They could find the panel in their digital references but nothign about what connectors would fit it. They dug out a laminated color prin flip book of electrical connectors to browse thru and I then identified these two as likely suspects -

auxbatt053%20solenoid%20connector1.jpg
auxbatt054%20solenoid%20connector2.jpg


From my re-exam today and the fresh pictures, it's plainly the latter of the two.
The parts counter guy opened with 'they'll be expensive', I said, 'I know, can't find anything like them at local parts stores'. So after plugging in their inventory numbers he says, 'well the good news is one of them is $3 cheaper than the other'
'what's the bad news?
'that cheaper one is $50.'
'that's ridiculous'
'yes it is'.
Thanked him for his efforts and split.

GMPartsDirect wants a mere $32. http://www.gmpartsdirect.com/oe-gm/88988482

Rockauto has them for $31. http://www.rockauto.com/en/partsearch/?partnum=88988482

I'll find one (or more) the next time I'm I'm trolling for parts at the auto scrapyard. I don't expect they'll charge me more than $1 apiece. in the meantime I'm tweaking my improvised connector again and routing the excess wire in a way that I can't kick it loose.


I've priced out my pair of 1/0 cables and PVC flex conduit, (2) ~25' runs of each and a few fittings, at about $100. plus tax minus mil discount. Going to check with my electrician neighbor and see if he can get the stuff much cheaper from his supply house (he's offered). Then after my next couple of remodeling road trips, I'll see about getting these feeder cables installed and getting on with the rest of my systems installs.

4400
 
Last edited:

Forum statistics

Threads
186,822
Messages
2,889,574
Members
227,160
Latest member
roamingraven
Top