Hey Vortec Guys! / Sierra pickup / Suburban / Yukon etc - Finally has Index!

rayra

Expedition Leader
bah humbug. Tried to replace my pitman arm, idler arm and inner and outer tie rods today and only bat .500. Could not maneuver my pitman arm puller tool into place to separate the 'relay rod' (aka center link) from both arms. And due to the diagonal frame end boxing that forms part of the mount location of the lower control arms, there wasn't enough clearance to get the puller on the arms themselves. If I could have done that I'd take the whole mess out in one piece and break it apart on my workbench.
So I balked and re-tightened things and settled for putting the new tie rods in.
Didn't take any pictures.
My old tie rods ends were worn, one worse than the other, and the worse one appeared to be original equipment / different from the other end. And even with the new tight tie rods in, I've still got the 1/2" of side play in my steering range of motion. I've got to get to the pitman and idler.
So tomorrow I'm going to shape my pitman puller a bit on my grinder wheel, shave it down a small bit to fit where it needs to and at least get the center link off. And then I will likely have to dismount both the steering box and the idler mount, to be able to swap those arms. That's the procedure in the Haynes manual, anyway. I was trying to get away with NOT removing all that.
Just turned 130k mi. Definitely a former Mom-taxi, for the steering to be so worn. Our Tahoe with nearly 180k mi is still tight, it's almost entirely freeway miles on it.

eta
on the plus side, the OEM replacement inner tie rods were also a spindly 1/2" dia, so the tie rod sleeves swapped over just fine. This time I remembered to coat the inner rods with grease before putting the sleeves on. There was already a good bit of trapped water and rust forming in one of them.
 

rayra

Expedition Leader
What a ginormous pain in the ***, today. I had my entire steering system apart and on the ground. Had to grind / shape my puller tool a couple times to get it to fit properly in various places. Found a lot of slop in the idler arm and none in the steering. Didn't get the new parts in until about 1430, started about 1000, but reassembly was quick enough after that.

Got it back together but while putting my tools up I realized I'd forgotten to do the final tighten on the "Jesus nut"* on the pitman arm. Couldn't get leverage on my workbench, didn't want to put the load on the steering gear teeth, so put everything else together with the intent of tightening that nut once the vehicle was back on the ground. And plum forgot until I had that big crescent wrench in my hand again during cleanup. Made a note to take care of it first thing tomorrow.

Couple days ago I tried all this and got defeated when I couldn't get my puller tool seated properly to remove the center link from the idler and pitman arms. So I only got the tie rods done. So This morning I set up my bench grinder and modified that tool slightly, enlarging the gap of the jaws, thinning the claw ends a bit and also putting a bit of a radius curve to the jaw ends, instead of the sharp squared off edges, to make it easier to drive the tool in on the rubber boots between the parts.

Then I got the nose of the Sub up on jackstands and started clearing the way. Decided to dismount the sway bar to improve access to things. And popped the freshly installed tie rods out of the steering knuckles on the rotors. And once I got the center link pried off I just laid the whole linkage assembly down across the lower control arms.

Put the air hammer on the big 22mm bolts holding the idler arm mount to the frame, then broke that assembly down on my workbench and installed the new idler and put it right back in the vehicle.

steeringrebuild09.jpg
steeringrebuild101.jpg
steeringrebuild10.jpg


Then it was on to the steering box / gear. First was the 15mm bolt / nut that holds the steering shaft together. Then I immediately took care of another 'target of opportunity' I've been wanting to get at, the 'steering clunk' that often plagues these vehicles. With the steering shaft apart it was very easy to grasp the intermediate shaft and work it back and forth (it's a sliding union, thru the firewall, meant to collapse on itself in a major accident, instead of impaling the driver) to redistribute the grease within the assembly and thus bind the parts back together so they don't clunk around. Free easy fix, works fine.

steeringrebuild11.jpg


Then it was remove the steering hoses, which was a bit messy. More so that I had to dismount the steering box just to get access to loosen the nut on the high pressure hose. Tipping, moving, balancing, dribbling steering fluid all the while. With half the steering shaft and the pitman still hanging off. But it was easy enough to extract after the hoses were off.

steeringrebuild12.jpg
steeringrebuild13.jpg


After a long period of frustrating efforts and penetrating oil idleness, I finally got the pitman taken care of. And amazingly to me I was able to juggle-balance the steering gear back in place and get all three mounting bolts started before my arm gave out.

After that it all went back together pretty quickly. Especially since I forgot to fully tighten the pitman arm steering shaft nut.


One other note. Since I had the sway bar dismounted I went ahead and lubed the rubber bushings where they contact the sway bar. Got it all together, everything fully lubed - and that's another thing, the zerk fittings atop the idler mount and the pitman arm are very difficult to get to. Mine apparently never were grease before I did it. The weak goop that was flushed out of my idler mount was pathetic. Anyway, all together, fully lubed, took it for a test drive around my neighborhood and man the front end was lively. And I haven't even done anything about the control arm bushings or done more than lube the balljoints.

Time to see if I can get this thing properly aligned, next.


* stole that from the helicopter world, the slang name for the big nut that keeps the rotor blades on. If it comes off in flight you are gonna see Jesus. Pretty much the same if your pitman arm comes off while you're going down the highway.
 
Last edited:

rayra

Expedition Leader
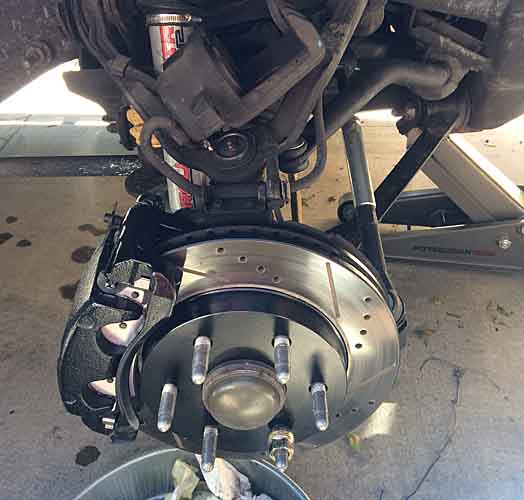
This week it was a front brake upgrade, courtesy of a generous deal by member Stryder. Drove across L.A. to pick up the parts and (and talk about his recent Death Valley trip, watch for his write-up, they went all over the place). IIRC it's a Powerstop Z36(?) upgrade kit, slightly used. Drilled / slotted rotors, composite pads, OEM calipers in much better shape than mine. A nice low-cost improvement for me, as two years ago when I bought my Sub, I only replaced my worn brake pads. Didn't even bother to cut the rotors. A few weeks ago I rebuilt my rear brakes with OEM replacement parts. And was ramping up to do the fronts as I was completing all the installs of front end components.

So I unpacked the parts and looked things over and decided to give it all a thorough cleaning and some fresh paint.

frontbrakes01.jpg


Auto parts stores have 'brake caliper' spray paint for $8-20 (some kits), rated for 500F temps. Home Depot has BBQ paint rated to 1200F for <$4 (flat) and $7 (gloss) , And I happen to need some for a BBQ, too...

Scrubbed things down with various solvents, cleaned and dried it all, then I masked off the braking surfaces and various mountings and threads and put on 2-3 light coats.

frontbrakes02.jpg
frontbrakes03.jpg
frontbrakes04.jpg


Not really complete, but here's what it looks like.

frontbrakes05.jpg
frontbrakes06.jpg


I didn't install the freshly painted calipers today. Thinking about installing some braided brake lines as well. That way I only need to breach and bleed the brake system once. Have to dismantle and paint my rear brakes also, anyway, as those rotors rusted orange in just a matter of weeks. That just won't do.
 
Last edited:

rayra

Expedition Leader
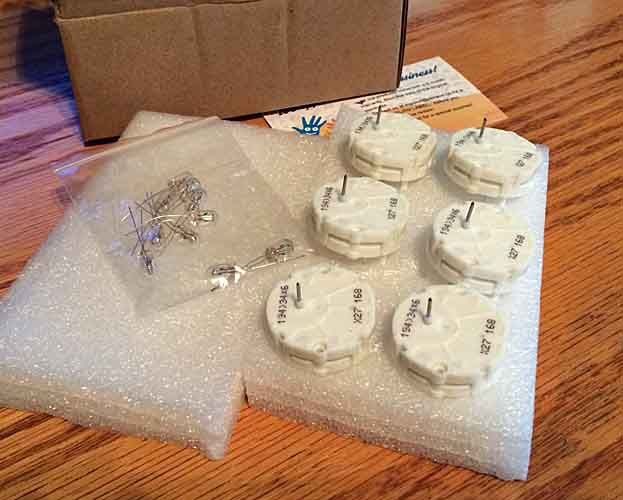
Got an instrument panel 'refresh' kit this weekend, set of six stepper motors for the dash gauges and a set of solder-in bulbs. Half the bulbs I soldered into the panel of the Tahoe just a year ago have already crapped out. So trying again with a different vendor.

But I also have a plan for the stepper motors. Previously mentioned the quest for a transmission temp gauge. I've found enough info to believe I can solder one of these mechanisms to the instrument cluster circuit board contacts and it will work. Everything else appears to be in place for the gauge. So I'm going to try putting the motor in and temp-borrow a needle from one of the other small gauges. And can make a gauge face that will work / mimic the factory face. Or buy one of the aftermarket gauge face update kits.

So I'm giving that a try this week sometime.

instrument%20gauges%20stepper%20motors.jpg
 
Last edited:

Burb One

Adventurer
Got an instrument panel 'refresh' kit this weekend, set of six stepper motors for the dash gauges and a set of solder-in bulbs. Half the bulbs I soldered into the panel of the Tahoe just a year ago have already crapped out. So trying again with a different vendor.

But I also have a plan for the stepper motors. Previously mentioned the quest for a transmission temp gauge. I've found enough info to believe I can solder one of these mechanisms to the instrument cluster circuit board contacts and it will work. Everything else appears to be in place for the gauge. So I'm going to try putting the motor in and temp-borrow a needle from one of the other small gauges. And can make a gauge face that will work / mimic the factory face. Or buy one of the aftermarket gauge face update kits.

So I'm giving that a try this week sometime.

instrument%20gauges%20stepper%20motors_zpspuuqs1lp.jpg

Rayra,

Not sure if my posts were part of the info you had but I put in a stepper for the transmission gauge on both of my trucks (one of them is an ex) and one of them was plug and play the other had to be programmed (used an ebay tuner service) Works great. They even sell the backplates with transmission gauge on ebay for 30 bucks,
 

rayra

Expedition Leader
Yes, your posts were instrumental, pun intended. I expect it to work on my '02 Sub, which is where I really want it. Notsomuch on our '05 Tahoe, but I can use my tablet / OBDII dongle for that.

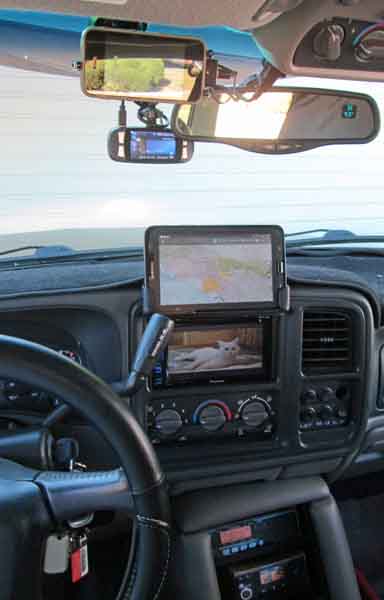
Speaking of which, in re-reading your posts about it, I saw you liked the tablet mount. If you'd like something like it I can fab it up for you. I still have some of that plastic on hand. Get me the close dimensions on the device you want to mount in it and I can get the tabs close enough and you can heat-adjust them for a best fit.

I need to mod my design on that, too, as it is it extends and is double-stick taped to the dash proper and I have to peel it off whenever I open the dash. I should have made it attach to the bezel only, come right off still attached to the bezel. I've already damaged my dash skin peeling it loose previously. Will probably do so again when I go after my cluster again. I could probably even bend the mount plastic to make it grip the back edge of the dash bezel. I'll explore that while I have it apart for my trans gauge attempt. Might even be possible to have that be THE attachment method, no tape at all. Just pry out the bezel and snap the mount in. We shall see. Plastic's probably too thick for that and any thinner would make the mount to flimsy. Maybe aluminum would be the way to go.


another project -

I'm also thinking of upgrading my trans cooler to this unit. 4x the area of the factory unit, easy install. Airbrush it with some 'aluminum black' instead of coating it in paint, would be like anodizing it black instead of coating it in paint.

https://www.amazon.com/Tru-Cool-LPD4739-4739-Pressure-Transmission/dp/B00803CTDA

https://www.google.com/url?sa=t&rct...KYdaOs96VJ5oXa1Aw&sig2=2_4KVHDmgcPNqTcJqcXDfg
 

rayra

Expedition Leader
Is it just meant to stick better to bare metal, or is it formulated for better heat transfer?
 

Burb One

Adventurer

VERY cool I did not know this stuff existed.

I have the Transmission cooler Rayra was talking about, and I love it. On my last trip, wheeling at slow speed, with high throttle input, in 83 degree weather It keeps the truck under 190. I have the cold weather thermostat (some people said it limits the flow capacity even when wide open but I haven't noticed) The transmission temp simply gets up to 160-170 and then stops cold (pun intended). Has to be seriously hot outside and doing some serious towing to get it to move above 190 when moving, I haven't seen it above 195 since install, even towing 6k trailer with 33's, loaded up and going up the grapevine in 90 degree weather with slow traffic.

The BW cooler people install (and I had before) is nice as well and ~ half the price, and more than works as well. This thing really does work though for all scenarios though

You can see it behind my grill, will definitely be buying the black paint.

20161002_113548.jpg
 

Burb One

Adventurer
Yes, your posts were instrumental, pun intended. I expect it to work on my '02 Sub, which is where I really want it. Notsomuch on our '05 Tahoe, but I can use my tablet / OBDII dongle for that.

Speaking of which, in re-reading your posts about it, I saw you liked the tablet mount. If you'd like something like it I can fab it up for you. I still have some of that plastic on hand. Get me the close dimensions on the device you want to mount in it and I can get the tabs close enough and you can heat-adjust them for a best fit.

I need to mod my design on that, too, as it is it extends and is double-stick taped to the dash proper and I have to peel it off whenever I open the dash. I should have made it attach to the bezel only, come right off still attached to the bezel. I've already damaged my dash skin peeling it loose previously. Will probably do so again when I go after my cluster again. I could probably even bend the mount plastic to make it grip the back edge of the dash bezel. I'll explore that while I have it apart for my trans gauge attempt. Might even be possible to have that be THE attachment method, no tape at all. Just pry out the bezel and snap the mount in. We shall see. Plastic's probably too thick for that and any thinner would make the mount to flimsy. Maybe aluminum would be the way to go.


another project -

I'm also thinking of upgrading my trans cooler to this unit. 4x the area of the factory unit, easy install. Airbrush it with some 'aluminum black' instead of coating it in paint, would be like anodizing it black instead of coating it in paint.

https://www.amazon.com/Tru-Cool-LPD4739-4739-Pressure-Transmission/dp/B00803CTDA

https://www.google.com/url?sa=t&rct...KYdaOs96VJ5oXa1Aw&sig2=2_4KVHDmgcPNqTcJqcXDfg

Thanks for the offer Rayra! I actually got an arm mount I am really liking, I'll post some pictures in my thread. I Like your design, but the arm mount lets my passenger reach the tablet, even though it is kind of in the way....
 

rayra

Expedition Leader
whipped up a gauge face in Photoshop, using an online dash cluster image as a guideline. The gauge seems to have a 90deg sweep and a 200F range of display.
It's a ~2" gauge face, I've printed it on inkjet peel-and-stick label paper. About to go out and whip that stepper motor into my cluster and give this a try. I'll pull my oil pressure needle temporarily and use my OBDII/Tablet setup to read the actual temp before pressing the needle on. Good times.


transmisison%20gauge%20redux.jpg
 
Last edited:

rayra

Expedition Leader
Dammit, thwarted by the GMT800 mid-series split yet again. 2000-2002, 2003-2006. Not only are my '02 bulbs totally different from my '05, but the stepper motors are different too. Didn't think to check.


transgageoverlay.jpg


The white disc on the right is for the later model years. My '02 cluster has much more robust-looking stepper motors.

transgauge04.jpg


They nestle into a socket built into the clear plastic later of the cluster and have four robust pins that penetrate thru adn make contact with the circuit board layer, making the electrical contacts that drive the motor / gauge.

transgauge05.jpg


I'm going to price it at my GM dealer, but I'll probably wind up just adding the parts to my wreckign yard shopping list. I'll find a 2500-series and strip the cluster gauge mask and motor and needle, while I'm looking for other things.


Also took the opportunity to modify my tablet mount. In the past it had a 4" wide top flat, that was attached to the top of the dash, hanging over and trapping the dash bezel. I went ahead and trimmed it down and taped it directly to the bezel itself. No longer have to tear it off the dash to get the dash apart.

tabletmount20.jpg
 
Last edited:

Forum statistics

Threads
188,337
Messages
2,905,699
Members
229,959
Latest member
bdpkauai

Members online

Top