Hey Vortec Guys! / Sierra pickup / Suburban / Yukon etc - Finally has Index!

Stryder106

Explorer
Hey Rayra - Nice meeting you and hanging out last week and glad the brakes worked out for you. I need to get some time to sit down and write up the DV trip report - it was a big trip and I've been too slammed to do it justice. But - here's a lesson I learned on that trip - rough trails with steep grades and big drops don't mix too well with ABS. There were a few pucker factor moments before I figure out what was going on - as my truck would not stop while on a steep rough downhill shelf road with a 90 degree turn and 6000' drop. I finally figured it out and yanked the ABS fuse. Interestingly, not only did my offroad braking improve, but the on road braking got much firmer (felt how it should). So, I've traced the wires and will be putting in a switch to disable the ABS for whenever I'm offroad - just going to have to get used to the two trouble lights.
 

rayra

Expedition Leader
so almost exactly a year from the last time (on page one of this topic), I'm soldering new bulbs on the gauge cluster in the Missus' Tahoe. She told me a couple weeks ago that things were dim, only one bulb seemed to be working. Took a glance, and that's when I ordered the combo kit with both bulbs and steppers, from a different vendor than the bulbs used before.
Cracked it open again today, replacing the bulbs was straightforward operation. I found most of the bulbs installed last year had a sheen almost like they were burnt out, but sort of like black chrome. No idea from what. They actually were still lighting, but the tops of the bulbs were so silvered that very little light was making it where it needed to go.

instrumentbulbsredo.jpg


Just in case it was skin oils, I wore nytril gloves this time. All replaced and I used my OBCII blue tooth device and android tablet / Torque app to recalibate most of the gauge needles.


eta
tomorrow it's brake disassembly and painting and brake bleeding. The 'new' front brakes are working nicely. Soon I'll give it all a good road test by hauling my neighbor's Evolution II off-road pop-up camper trailer up the Interstate 5 'Grapevine' ascent. Trans temps with load, roof deck revised aerodynamics, brakes on the downhill return. Maybe even my bumper mount giant CB whip too. Maybe stop for some poser pics at Vista del Lago / Pyramid Lake or Frazier Park.

looks just like this -

e2c-jpg.655105
 
Last edited:

rayra

Expedition Leader
Rear glass and Liftgate interior latch releases, Mk1

liftgateinteriorlatches01.jpg


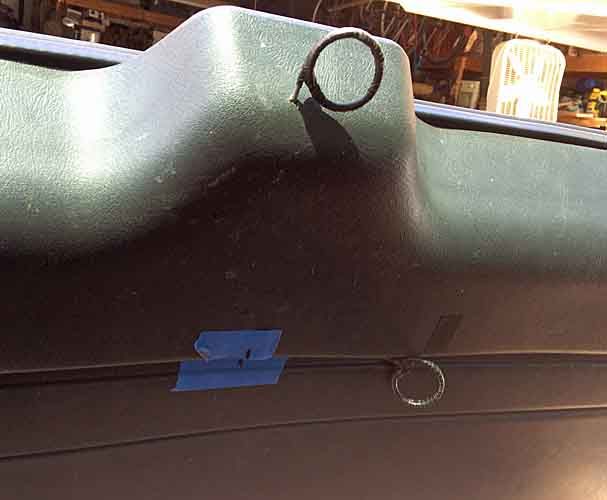
Used thicker / stiff wire coat hanger, interior end looped and crimped on suitable parts of the latch mechanism linkages. Pull up on the ring by the glass to release the glass. Pull horizontally towards the driver side to release the entire hatch.
I clamped the other end of the wire (deliberately left long) to the end of a dowel and twisted / wrapped the wire around the dowel, then taped up the resulting wire loops. I intend to find some sort of ready made pull ring molded on to a wire or cable.
Only vehicle modification was a 1/8" hole drilled in the trim plastic, where the top wire passes thru. It MIGHT be possible to use a thicker stiffer metal rod with some intricate bending and make a version of this that passes around the trim and still stands off from the glass.
The Liftgate release wire just passes thru an existing seam between the upper and lower halves of the interior trim plastic. There's a sort of shiplap overlap between the pieces, the wire is between them. It might work better if the underlying piece is trimmed back some. Then again if there's clearance the wire would probably rattle going down the road.
And the height of the middle seam works very well with my drawer platform, it falls about 1-1/2" above it. Immediately to head / hand if sleeping in the back.

I have more pictures of the interior latch mechanisms and attachment points, to follow later.
I'd rather have a more finished and fitted latch mechanism a la a dash-mounted emergency brake release handle. But this works well enough for now.

I might pull the wires tonight and dip the rings in red tool handle dip / liquid electrical tape, let them dry overnight. Or do something silly like stripe them black and yellow like ejection handles.
 
Last edited:

Burb One

Adventurer
Rear glass and Liftgate interior latch releases, Mk1

liftgateinteriorlatches01_zps6phojz7b.jpg


Used thicker / stiff wire coat hanger, interior end looped and crimped on suitable parts of the latch mechanism linkages. Pull up on the ring by the glass to release the glass. Pull horizontally towards the driver side to release the entire hatch.
I clamped the other end of the wire (deliberately left long) to the end of a dowel and twisted / wrapped the wire around the dowel, then taped up the resulting wire loops. I intend to find some sort of ready made pull ring molded on to a wire or cable.
Only vehicle modification was a 1/8" hole drilled in the trim plastic, where the top wire passes thru. It MIGHT be possible to use a thicker stiffer metal rod with some intricate bending and make a version of this that passes around the trim and still stands off from the glass.
The Liftgate release wire just passes thru an existing seam between the upper and lower halves of the interior trim plastic. There's a sort of shiplap overlap between the pieces, the wire is between them. It might work better if the underlying piece is trimmed back some. Then again if there's clearance the wire would probably rattle going down the road.
And the height of the middle seam works very well with my drawer platform, it falls about 1-1/2" above it. Immediately to head / hand if sleeping in the back.

I have more pictures of the interior latch mechanisms and attachment points, to follow later.
I'd rather have a more finished and fitted latch mechanism a la a dash-mounted emergency brake release handle. But this works well enough for now.

I might pull the wires tonight and dip the rings in red tool handle dip / liquid electrical tape, let them dry overnight. Or do something silly like stripe them black and yellow like ejection handles.

Really like the rings!
 

rayra

Expedition Leader
Thanks and thanks for posting your string solution, I totally stole the drill-thru location / idea from you.

I tried some old nasty cheap red electrical tape I had as an overwrap, as I was cleaning up / retreating from the heat. But that crap started peeling off before I could even take a picture of it. Thus the coating idea.

liftgateinteriorlatches02.jpg


I can cut the bottom off of a dixie cup, real short, and use it as a dipping tray. Pour some coating material in it, lay the loop flat in it and flip it over and dip the other side, set it aside and dip the other and work back and forth until it's built up some. It will probably work well enough that I'll never get around to MkII heh
 
Last edited:

rayra

Expedition Leader
heh, thought you'd be interested in this.

Don't get too excited yet, I've found an interference issue with the Liftgate locking solenoid motion, when things are all cinched back down. Hatch jammed up and I couldn't unlatch it no matter what I did, had to crawl back there and pry the trim apart, cycle the latch lock with the rear switch and reach in and unlatch it.

So I'm taking another look at that tomorrow when I re-install the pull rings. I tried some liquid electrical tape, came out ok-ish, a little rough as it's brushed over windings of black electrical tape. But it will do until I find some other 'found object' pull rings. I'm trying to find something with a fixed ring, so there's nothing to rattle around.

liftgateinteriorlatches03.jpg
 
Last edited:

rayra

Expedition Leader
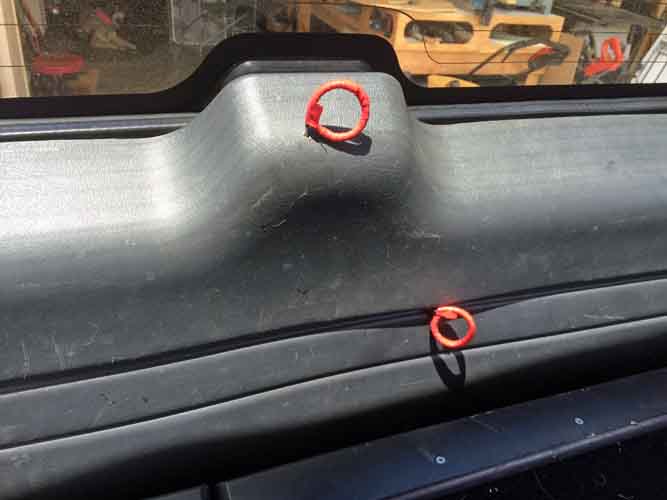
Mk1 is done and functional. I did brush the loops with 'liquid electrical tape', a little rough and over wrapped electrical tape anyway, so call it "50' pretty".
I made a bit of a relief cut on the lower half trim panel, inside the shiplap joint where the Liftgate latch release pullring slides. That removed some of the binding against the internal mechanisms.


Some of the latch details.

The glass latch. The wire pull is basically straight up. So I found the spot on the latch mechanism that I could readily attach to and had some clearance and a straight shot to the top of the latch housing part of the trim panel. The clear screwdriver handle is a scratch awl that makes a great tool for stabbing thru plastic interior trim or making guide marks for drilling. The red circle is where I hooked my wire pull. You could attach much higher, right at the latch catch, but that was too tight a fit for my hands and I didnt' want to screw with completely removing the trim.

liftgateinteriorlatches04.jpg


And a closeup of how off-center my pull is. But that works well in conjunction with my offset pull ring layout. The ring itself is centered.

liftgateinteriorlatches05.jpg


The Liftgate exterior handle triggers a cable that loops around on the driver side and up to a central pivot which in turn pulls on cables connected to both the right and left side latches to the body. The direction / action on that pivot, at the exterior latch cable connection, is horizontal and towards the driver side. So I just fashioned another pull to attach to that pivot so it could be pulled in that same manner / direction.

liftgateinteriorlatches08.jpg


But this location is roughly 2" below the level of the seam in the trim panels. So my wire pull traverses up and to the driver side at about a 45deg angle. And coupled with bending up and over / thru the overlapping seam in the trim panels, the wire ended up interfering with the electric lock solenoid / mechanism and bound up the action of the latch.

liftgateinteriorlatches06.jpg


So I re-bent the wire somewhat and made a relief cut in the hidden edge of the lower trim panel, allowing my pull wire to be more direct and not impinge on anything. Works easily with everything full assembled. MkII will likely use some stiffer 3/32 steel rod, with some cleaner bends in it and maybe just a half-circle trigger-shaped pull handle, rather than a large ring. Something a little less obtrusive. And as a single rod I can just put some white (for high viz in low light) heat shrink on it as a covering. TBD.

Without the relief cut you see how the panels distort

liftgateinteriorlatches02.jpg


Here I was marking the range of motion / interference and figuring what I wanted to trim off, highlighted in yellow

liftgateinteriorlatches09.jpg


Prying things apart a bit, you can see the relief cut

liftgateinteriorlatches10.jpg


And fully mounted, the panels lay flat, the pull handle moves freely

liftgateinteriorlatches11.jpg


It's a little rough, but it works. 'Mk1' proof of concept. I'll keep looking for a better handle / pull-ring.
 
Last edited:

rayra

Expedition Leader
I don't think so. THere's a metal barrel end on the cable, you'd realyl have to generate a lot of slack and pull it around about 150deg to get it free. And the way I set my LIftgate pull wire, I'm trapping the factory cable anyway. And the movement is only about 2-3" to unlatch.
 

boll_rig

Adventurer
Hey! seems like it will work though and thats all you need for now. Mk2 will be a little prettier I'd imagine. Glad to see you do this mod
 

rayra

Expedition Leader
Thx. I'm still casually googling around looking for a prettier pull ring to use.

--

xTooltipElement
Service Information 2003 Chevrolet Chevy K Silverado - 4WD | Sierra, Silverado (VIN C/K) Service Manual | Document ID: 2176126
--------------------------------------------------------------------------------

#03-06-04-060B: Information on New Spark Plugs and Gapping - (Jul 30, 2008)


Subject: Information on New Spark Plugs and Gapping


Models: 2004 Buick Rainier

2002-2004 Cadillac Escalade, Escalade EXT

2003-2004 Cadillac Escalade ESV

2004 Cadillac CTS-V

1997-2004 Chevrolet Corvette

1998-2002 Chevrolet Camaro

1999-2004 Chevrolet Silverado

2000-2004 Chevrolet Suburban, Tahoe

2002-2004 Chevrolet Avalanche

2003-2004 Chevrolet Express, SSR, TrailBlazer

1999-2004 GMC Sierra

2000-2004 GMC Yukon, Yukon XL

2001-2004 GMC Yukon Denali, Yukon XL Denali

2002-2004 GMC Sierra Denali

2003-2004 GMC Envoy XL

1998-2002 Pontiac Firebird

2004-2005 Pontiac GTO

2003-2004 HUMMER H2

with 4.8L, 5.3L, 5.7L or 6.0L V-8 Engine (VINs V, P, T, Z, G, S, N, U -- RPOs LR4, LM4, LM7, L59, LS1, LS6, LQ9, LQ4)


Attention: Please disregard the Set Gap Per Vehicle Specification statement on the side of an ACDelco® Iridium Spark Plug Box. The statement will be removed from the boxes in the future.


--------------------------------------------------------------------------------

This bulletin is being revised to add the Chevrolet SSR and the 2005 Pontiac GTO. Please discard Corporate Bulletin Number 03-06-04-060A (Section 06 -- Engine/Propulsion System).


--------------------------------------------------------------------------------

• A new spark plug has been released for use in the above vehicles. The new spark plug has an Iridium tip instead of the current Platinum tip. Due to the different tip design, the gap of the spark plug has also changed.

• The new spark plug, P/N 12571164 with AC Delco P/N 41-985, is gapped to 1.01 mm (0.040 in) when the spark plug is made.


Notice: The spark plug gap is set during manufacturing and should not be changed or damage to the spark plug may result. Any new spark plug found to not be properly gapped should not be used.


GM bulletins are intended for use by professional technicians, NOT a "do-it-yourselfer". They are written to inform these technicians of conditions that may occur on some vehicles, or to provide information that could assist in the proper service of a vehicle. Properly trained technicians have the equipment, tools, safety instructions, and know-how to do a job properly and safely. If a condition is described, DO NOT assume that the bulletin applies to your vehicle, or that your vehicle will have that condition. See your GM dealer for information on whether your vehicle may benefit from the information.

WE SUPPORT VOLUNTARY TECHNICIAN CERTIFICATION


© 2010 General Motors.


-------------

GMT800 platform PCM location and changeout

https://www.youtube.com/watch?v=fnhLHsIGDrU
 
Last edited:

rayra

Expedition Leader
I dunno, I think I'm going around in circles with superceded TSBs. Pg4 of this thread I show my shiny new 962 plugs for my Sub. And I'm talking about 985 being superceded by something else altogether.

Forgetting all that, I recently ordered some plugs for our '05 Tahoe, it's turned 180k mi now and and I don't think its plugs have EVER been changed and to no apparent detriment. Anyway I just went and looked and they are 962 too. I hadn't even paid attention, just went with what they showed.

... and just looked and rockauto is indeed showing 962 as the pick for double platinum
http://www.rockauto.com/en/catalog/chevrolet,2005,tahoe,5.3l+v8,1431156,ignition,spark+plug,7212


Autozone is also currently showing 962 for our '05 Tahoe. So I guess 962 is the new hotness. Or they are both just clearing their old superceded inventory.

...now if I can only find my tube of antiseize and find the nerve to try and break loose the plugs on her Tahoe...
 

Forum statistics

Threads
188,334
Messages
2,905,610
Members
229,959
Latest member
bdpkauai
Top