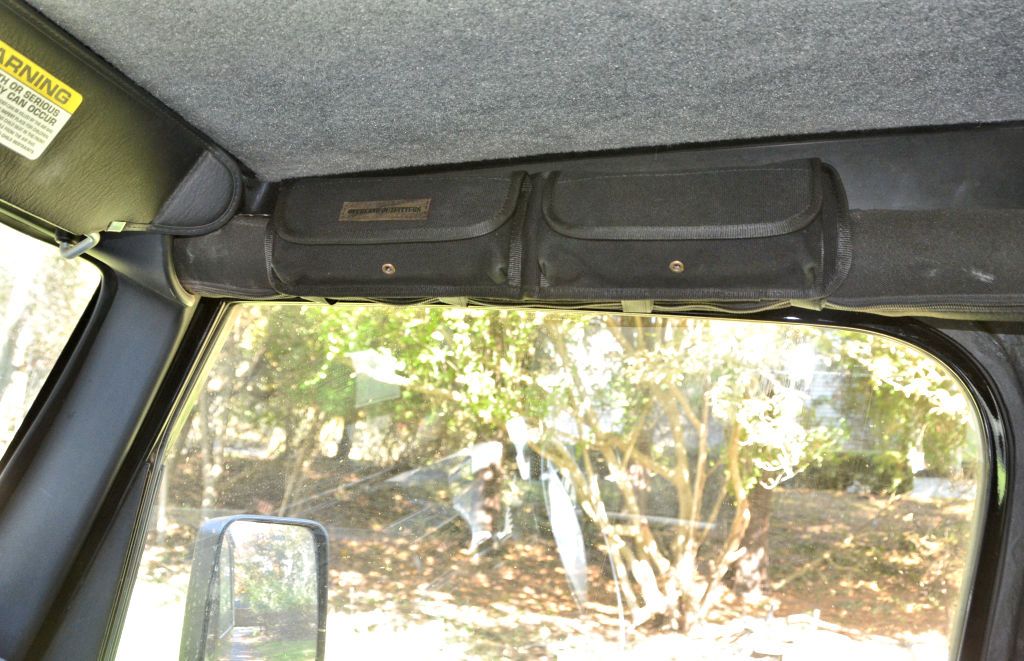
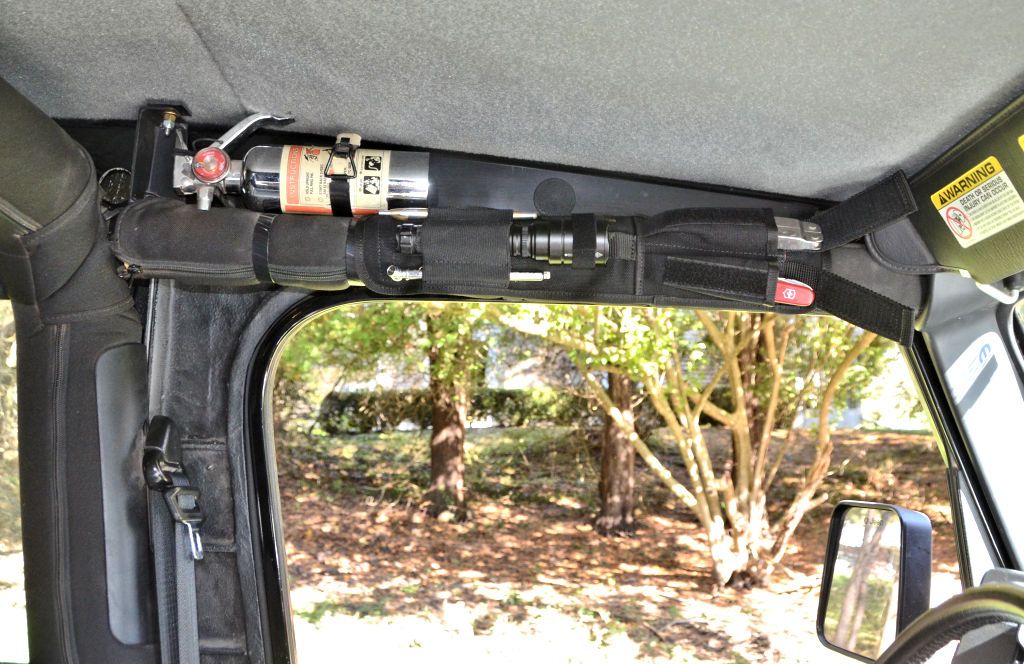
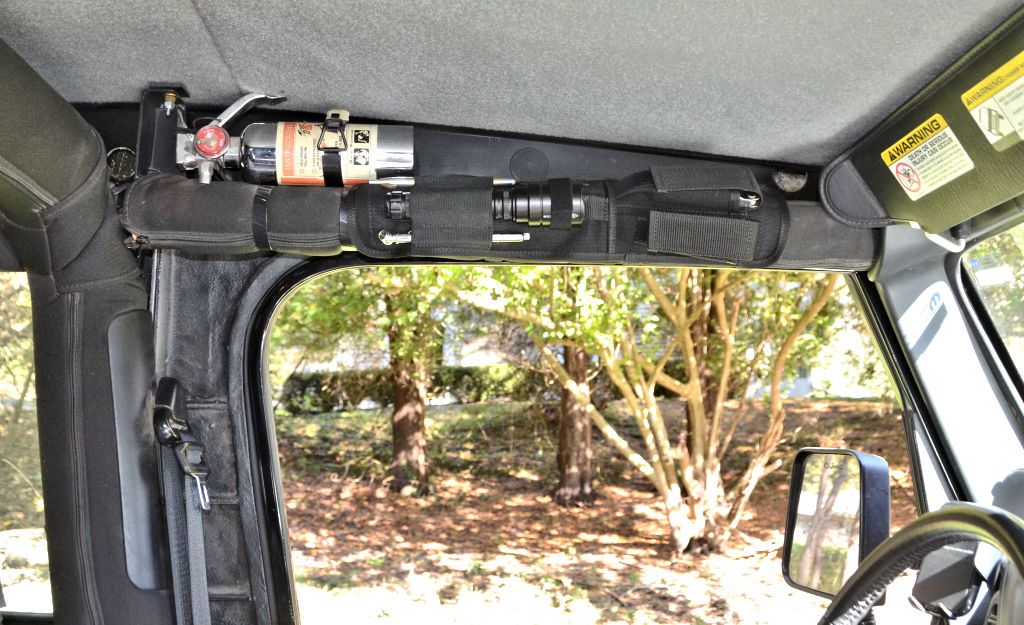
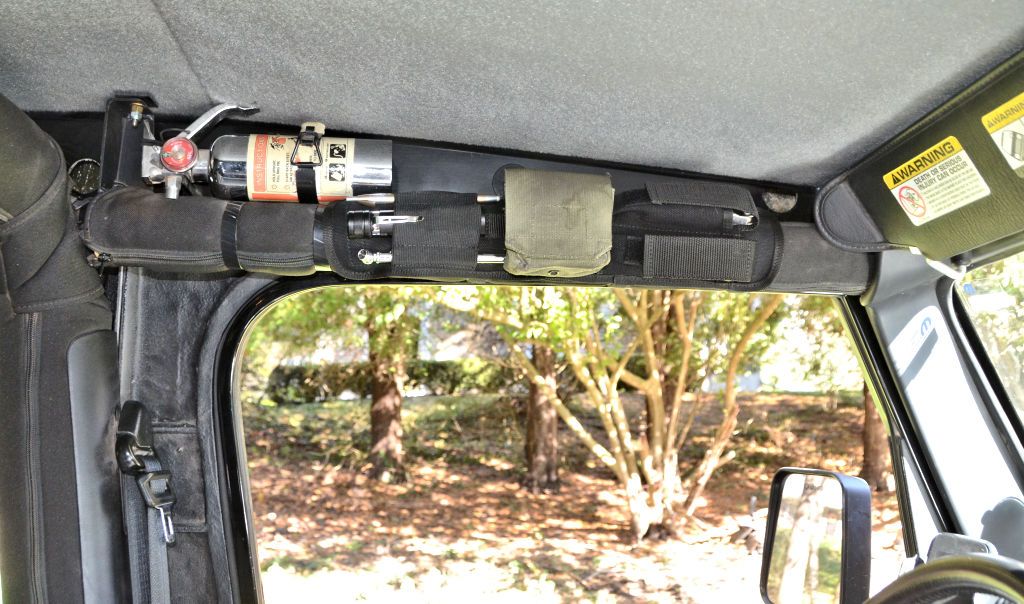
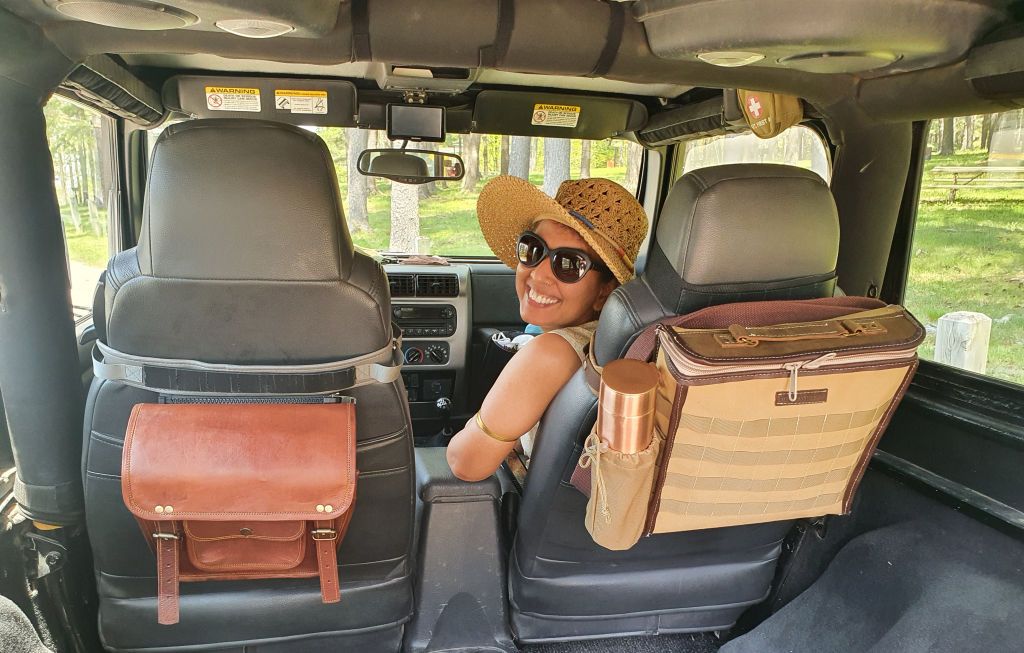
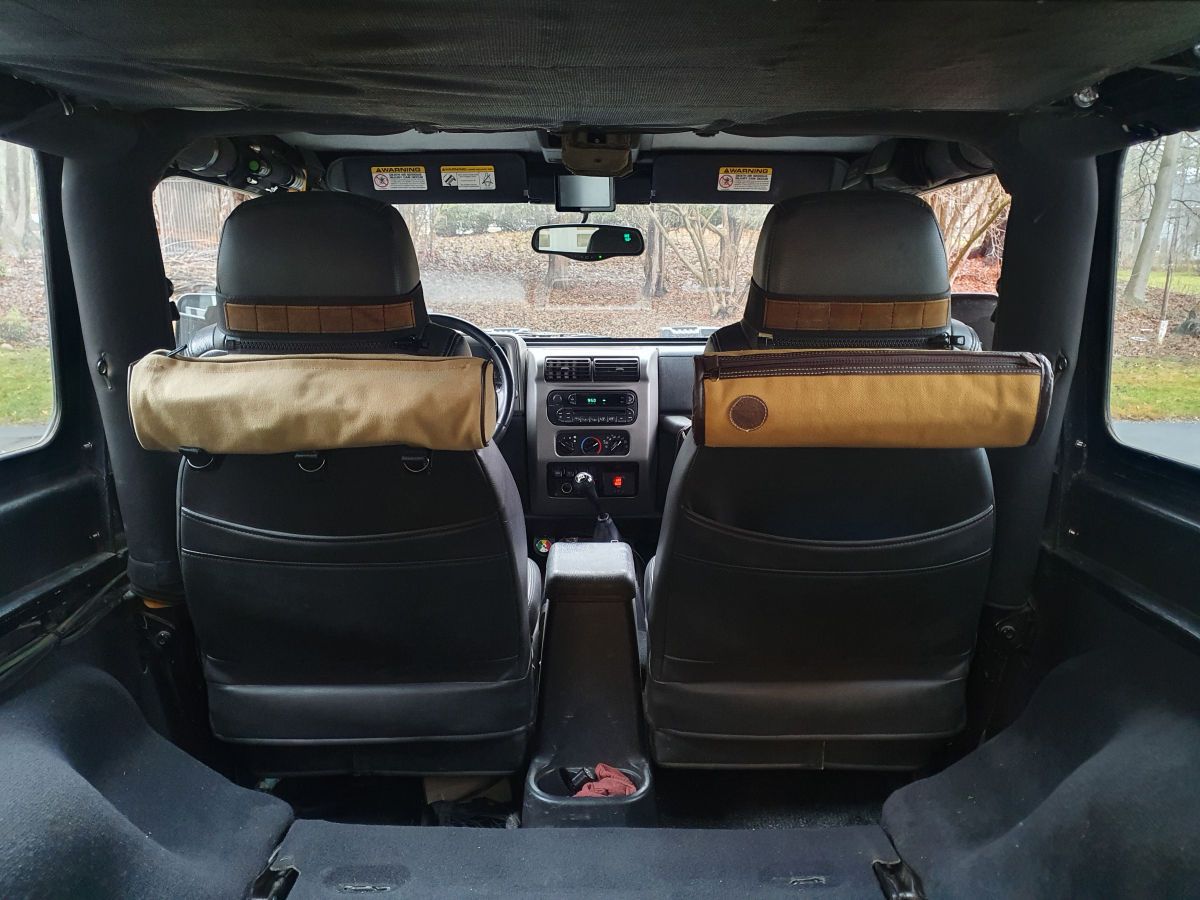
How would you outfit this custom LJ?

jscherb

Expedition Leader
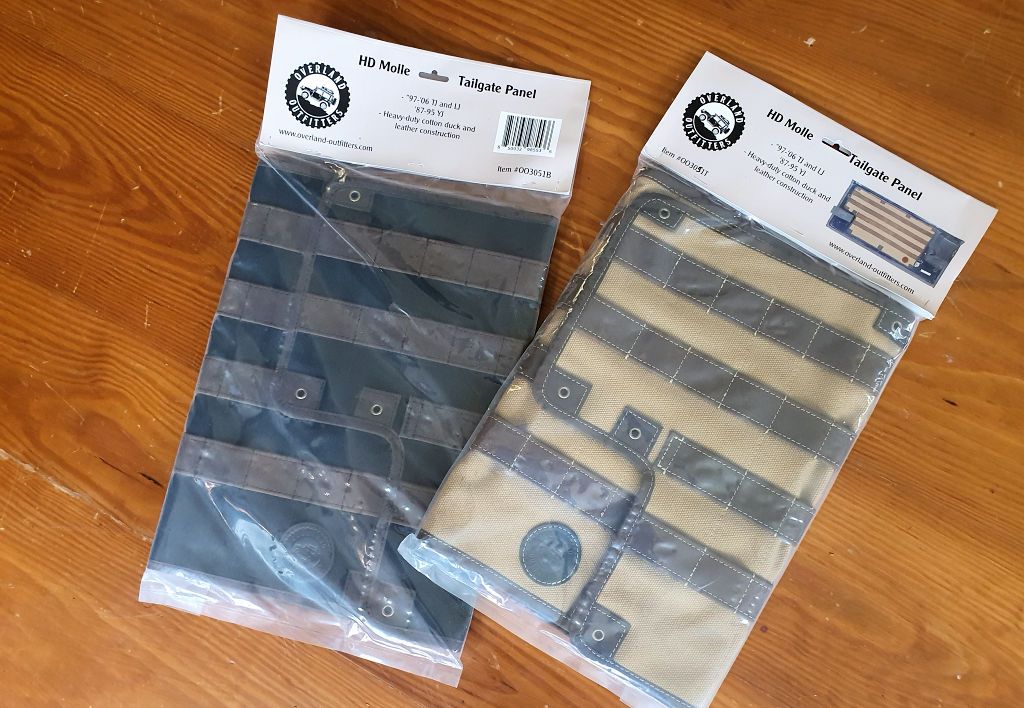
Just arrived from Overland Outfitters - production TJ HD MOLLE Tailgate panels in two colors; base is heavy canvas in black or tan and the PALS grid, trim and reinforcements are leather.

TJHDMolleProductionPkg.jpg


Since my LJ has a MORryde Storegate on the tailgate I won't be using these but it's nice to see that they're now in production. If they're not on the OO web site yet they probably will be soon.
 

Chorky

Observer
Dodged a big bullet. I'll post about it so hopefully others with a TJ/LJ can dodge the same bullet.

About 2 months ago, it felt to me like the ignition switch operation wasn't right - it felt a little "soft" and less "notchy" than normal. Two years ago the lock cylinder in the pickup failed (also a 2006 LJ), so thinking that might be the problem in this Jeep, I replaced the cylinder (an easy job BTW). It felt a little better, but still wasn't right. Everything was working ok other than the "feel", so I decided not to diagnose it any further at the time.

Since then I did the Colorado trip and lots of other miles in the LJ.

The other day the key release pushbutton stopped working right - I couldn't shut off the engine without pushing in the key release button, so I decided it was time to do some further diagnosis. I removed the cover from the steering column and looked at the mechanism of the key release button - it's connected to the ignition activator.

For those who haven't had their steering column apart, the lock cylinder connects to the ignition switch activator and the activator turns the electrical ignition switch. The activator also performs several other functions, such as the key release button and the steering column lock.

I decided the ignition switch activator was failing and if it failed completely, the Jeep would not start, so this was becoming urgent. Turns out Autozone carries the activator, so I went out and bought one.

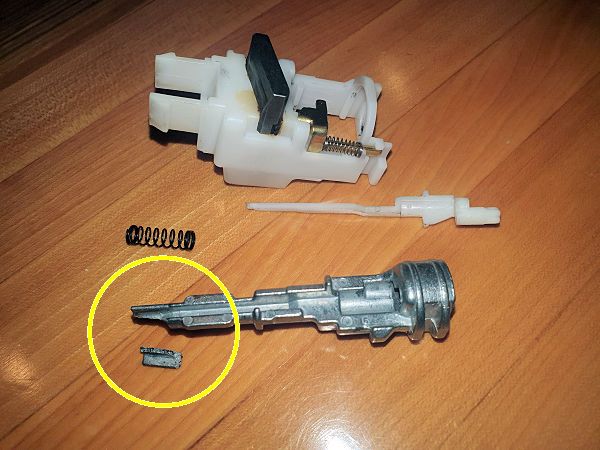
This is what the activator looked like when it came out:

IgnitionSwitchActivator.jpg


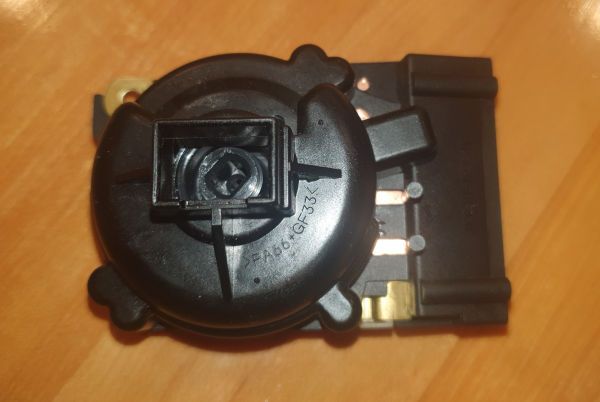
The rod that turns the ignition switch is a pot metal casting and prone to breakage, mine was broken in the typical failure mode. Luckily it was still able to turn the ignition switch. The end of the rod goes in the recess in the center of the switch:

IgnitionSwitch.jpg


With the activator replaced, it's working fine and turning the key feels "notchy" like it's supposed to.

This has obviously been broken since it first felt soft to me a few months ago, and could have let us down 20 miles from the nearest road in Colorado.

The lead Jeep mechanic at the dealer tells me this is a common failure mode for the ignition assembly and the potmetal rod is the weak link. He says he's replaced quite a few over the years.

So forewarned being forearmed, if the feel of turning your key starts to feel a bit soft, your activator is likely heading for failure. Don't ignore it for too long.

Couple years ago i had the EXACT thing happen. Drove it to work, something felt just weird. when i started it to go home, i felt something 'click' but the jeep kept running. Having seen these fail in fords years ago when I still was a tech for them, knew immediately what had happened. Fortunately the jeep was already running, so drove home for the night, straight to the parts department the next day.

funny thing is the new one is all cast - probably from china. it looks significantly weaker. but, 3 years strong so far and no issues yet. I think this will be a common problem for TJ/LJ's in the near future as they all get older. Hopefully the amount of failure components is few. I say always have a spare of one of these...
 

jscherb

Expedition Leader
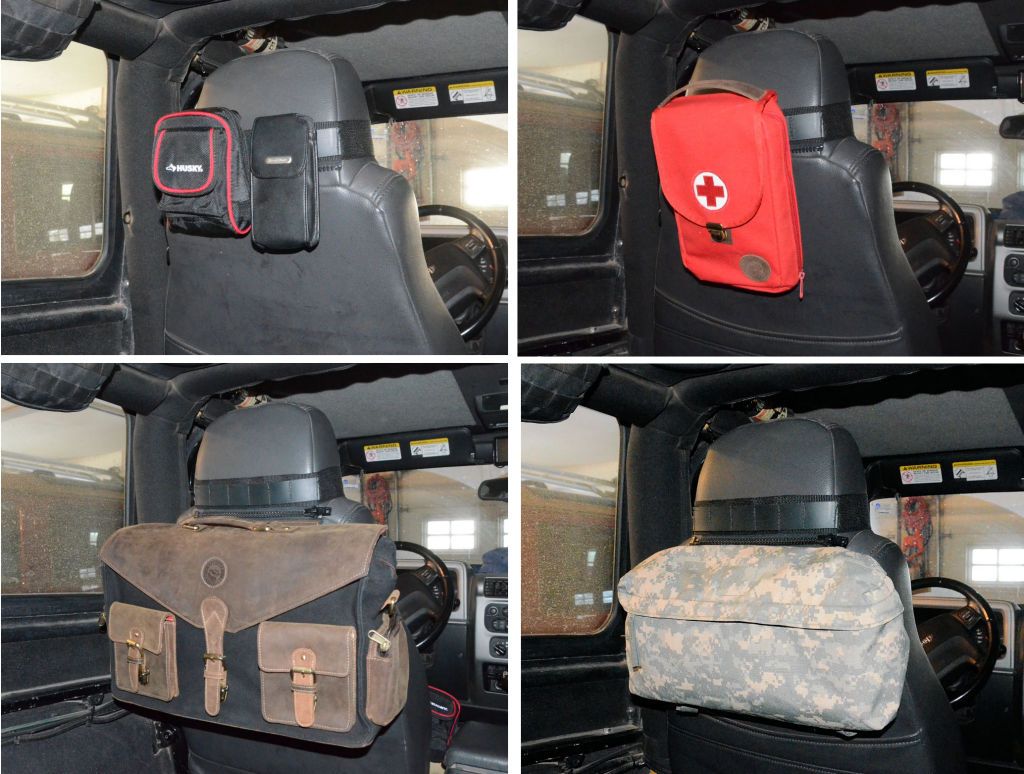
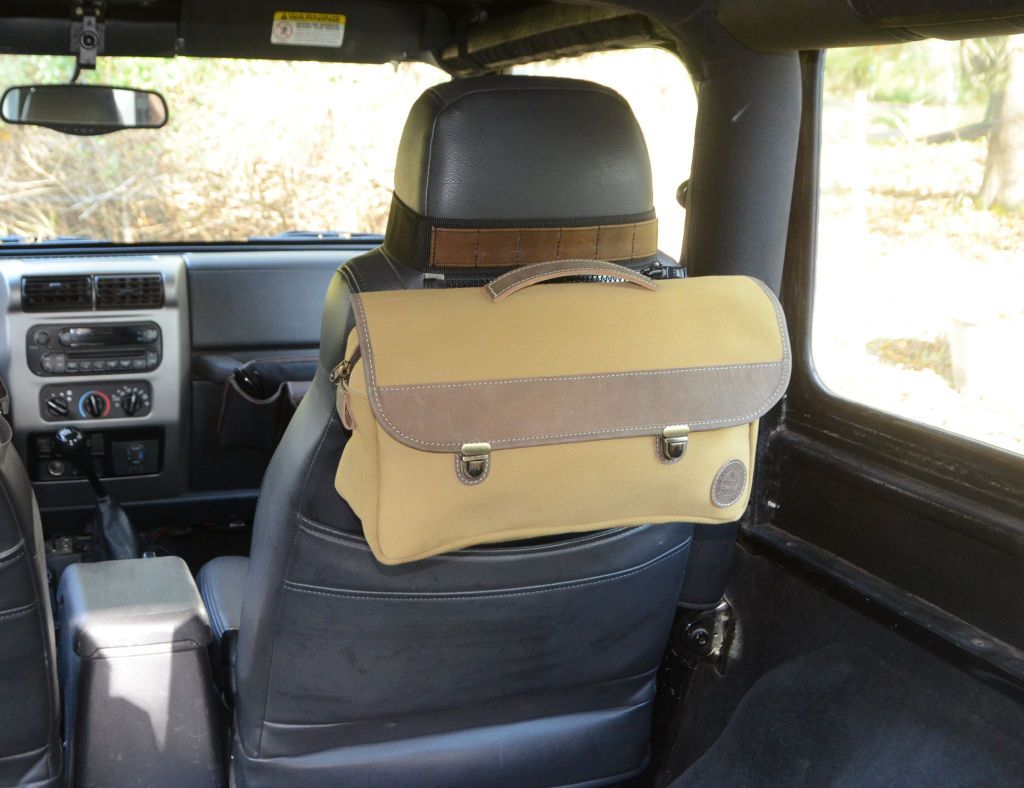
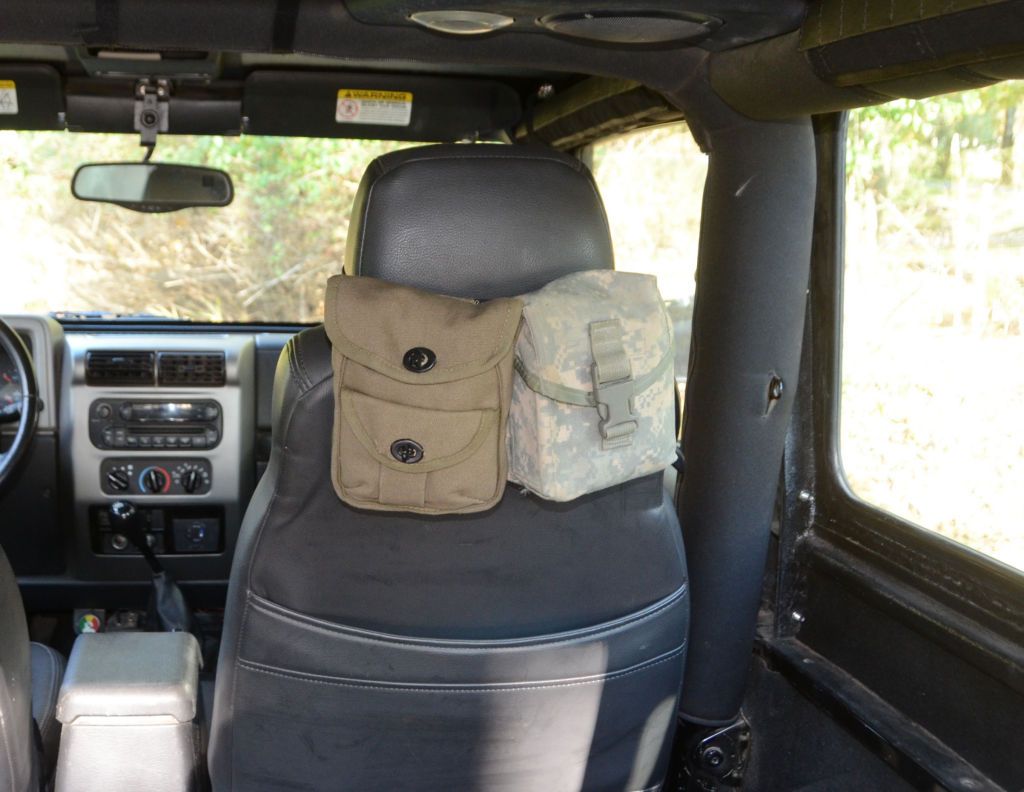
About a year ago I made a MOLLE/Zip & Go band for TJ/LJ seats. It slips over the seat and has both a PALS/MOLLE strip and a Zip & Go zipper, so standard MOLLE pouches can be hung on it as well as Overland Outfitters Zip & Go bags. Some examples in my LJ:

HeadrestBandLJExamples.jpg


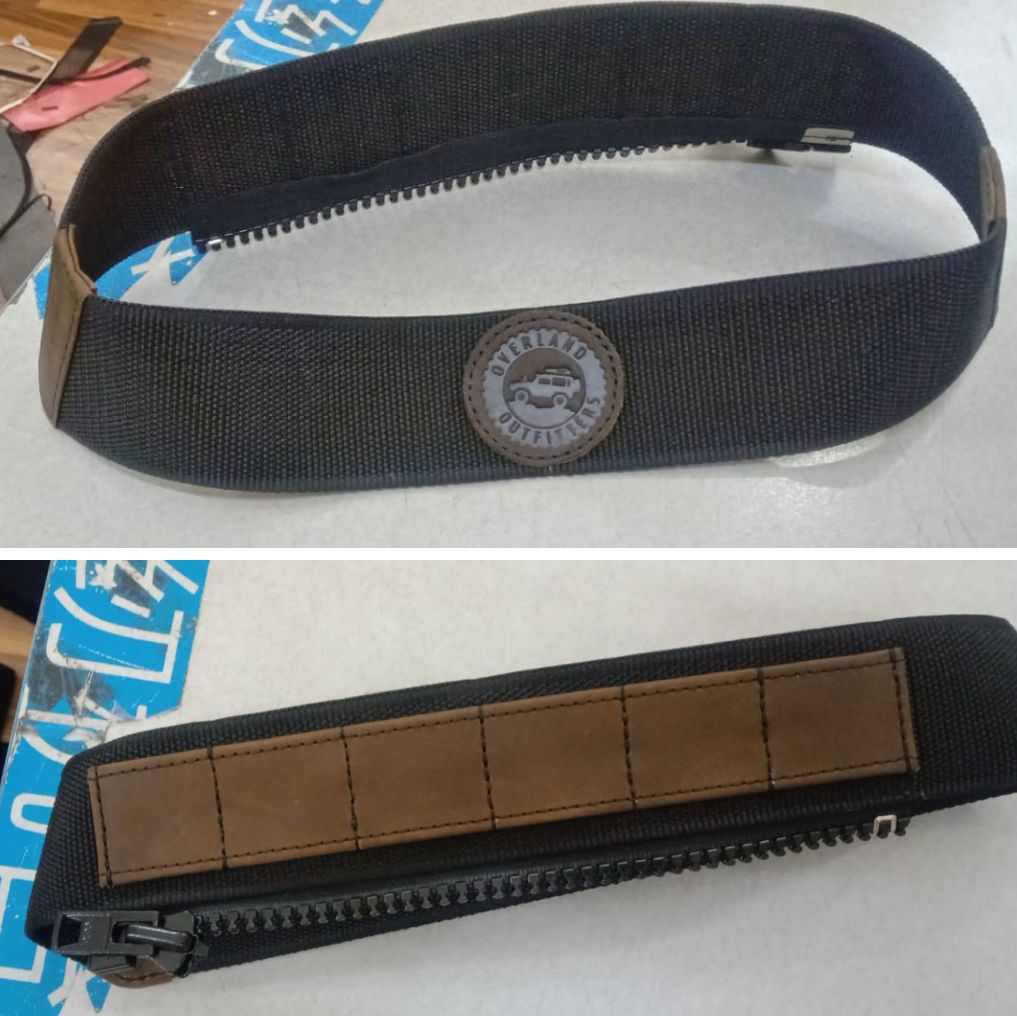
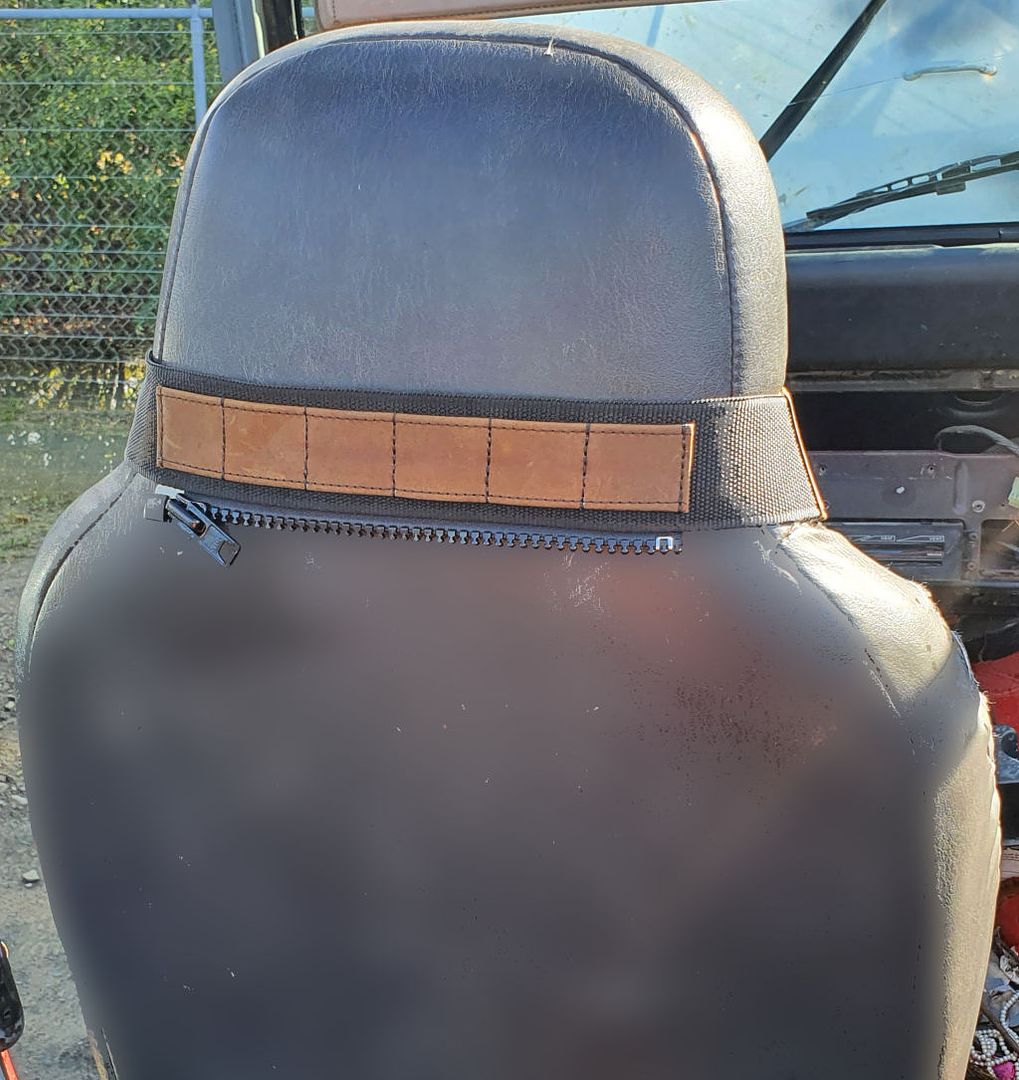
I had sent the design to OO back when I first sewed a few prototypes but the pandemic and other priorities kept them from doing anything with the design until now. The other day they sent me these photos of a work-in-progress preproduction sample.

SampleTJBand2.jpg


They say they'll send me a few for me to verify and test their version; assuming they got it right I expect these will be available before too long.

BTW I made prototypes for both 97-02 and 03-06 seats (the seats are different) and they'll be producing both.
 

jscherb

Expedition Leader
Road trip shopping...

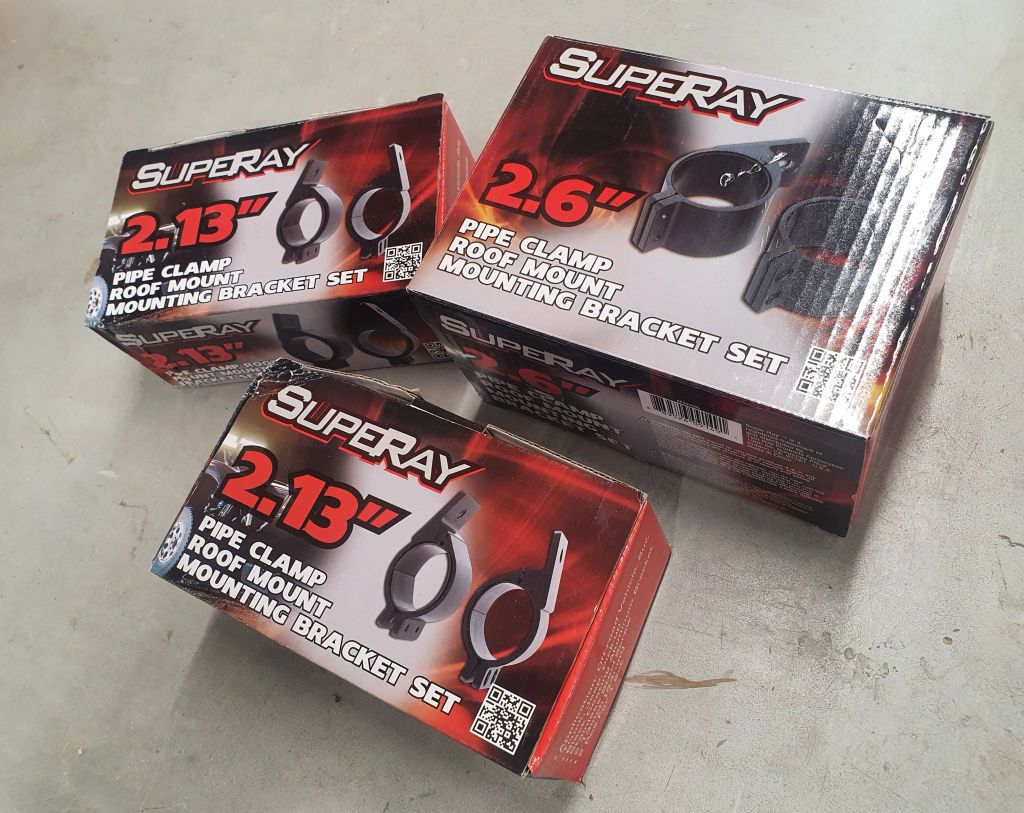
The other day I spotted these in one of my favorite surplus stores (Surplus City, a hardware and fabric surplus store in PA: https://surpluscityinc.com/).

RollBarBracket1.jpg


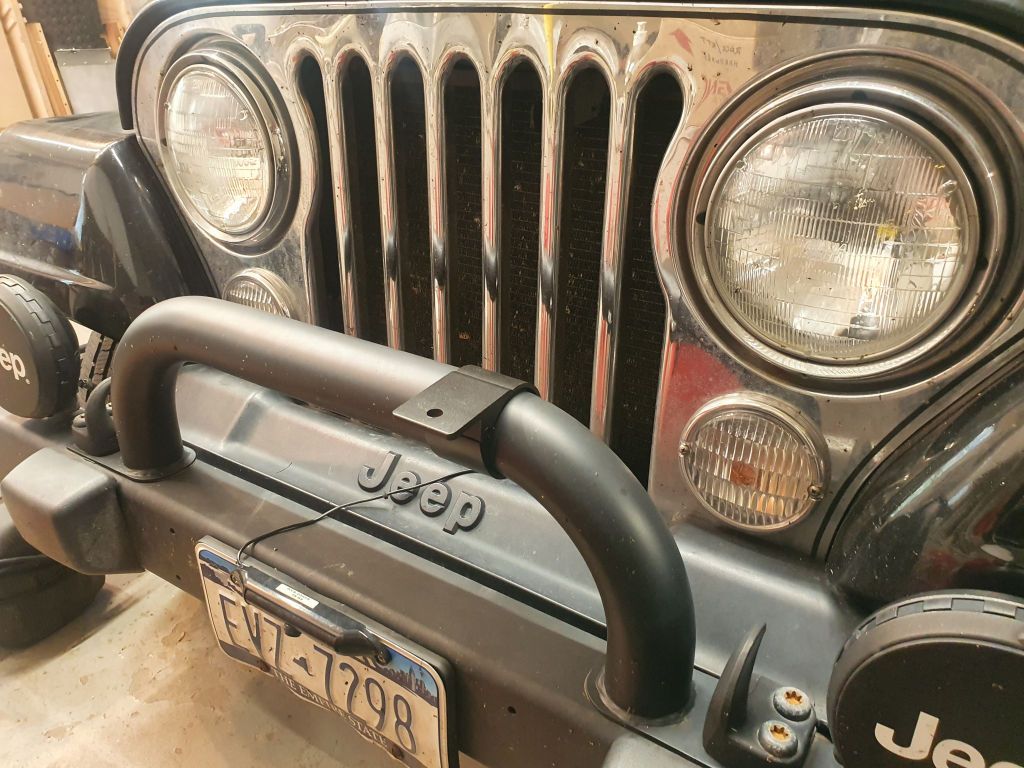
The smaller ones are the right size for Jeep roll bars (both the LJ and the JK roll bars) and the larger size fits the factory bumper hoop:

RollBarBracket2.jpg


They were only $2.99 a pair and even though I have no use for them right now I couldn't resist picking up a few for that price.

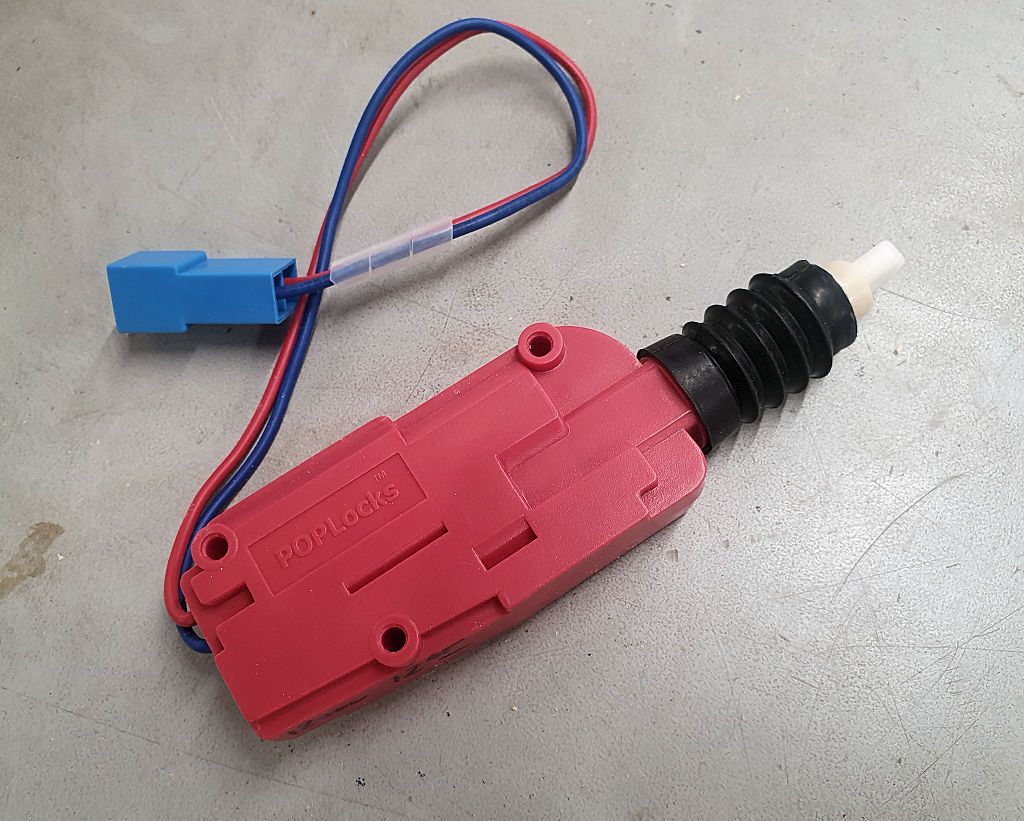
I was driving the LJ to Florida to see mom, and I also stopped one of my favorite electronics surplus stores (Skycraft Surplus (https://skycraftsurplus.com/). I picked up a thin door lock actuator:

NewLockActuator.jpg


Back when I built the Safari Cab hardtop and barn door for the LJ, I installed a lock actuator in the tailgate so I could lock/unlock it from the driver's seat. That actuator seems to have lost strength and sometimes can't unlock the tailgate so I'll replace it with this one, which is thin enough to fit inside the thin LJ tailgate. When I did the original installation the only actuators I could find were a little too thick so I had to mill the housing a little thinner to fit it inside. This one should fit in an LJ tailgate without modification.

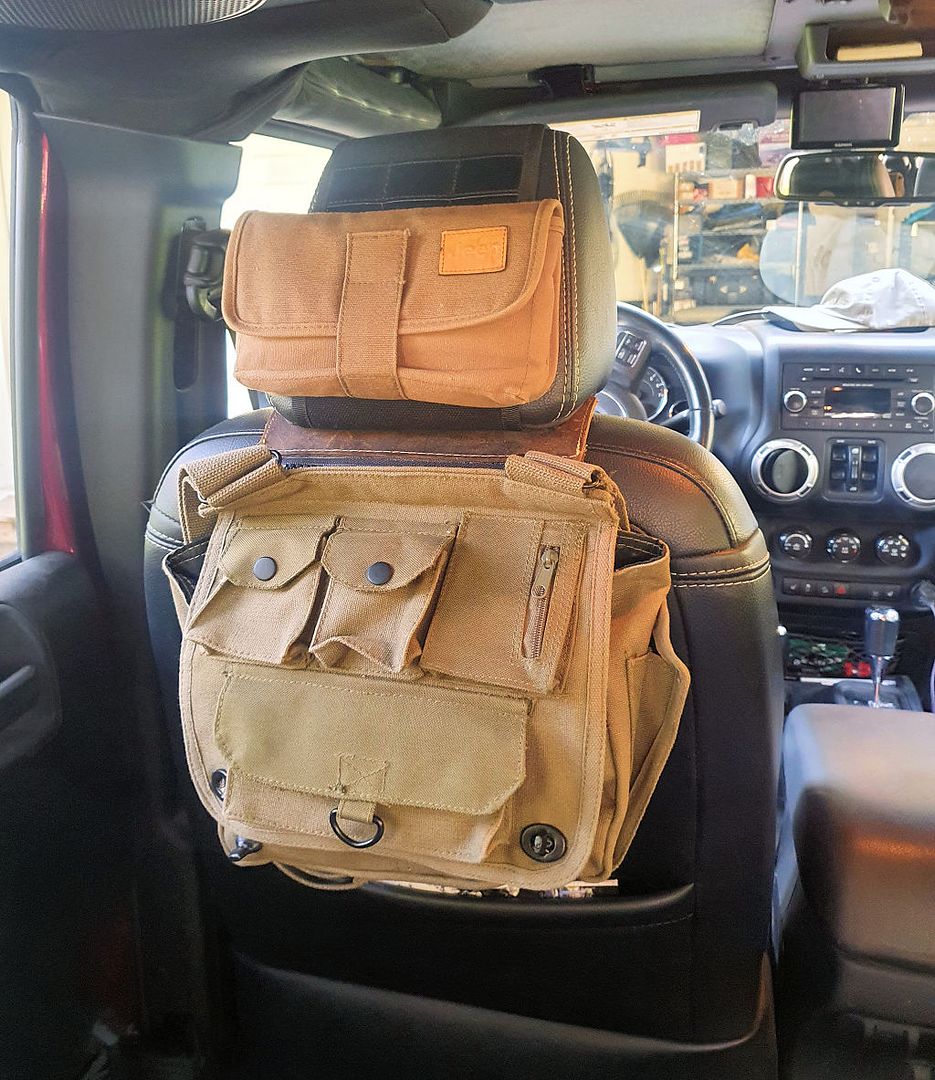
And finally, a stopping point on every trip to Florida is the Kenly 95 Truck Stop, which is part of the Iowa 80 Truck Stop group (Iowa 80 bills itself as "the World's Largest Truck Stop" and they have several other locations besides Iowa. In North Carolina: https://kenly95.com/). I often find things useful for Jeeps in their very large truck "chrome shop". This time I picked up a Rothco "Venturer Survivor Shoulder Bag" (https://www.rothco.com/product/rothco-venturer-survivor-shoulder-bag). It was about twenty-one bucks and it made me think a tactical bag for the Jeep seat bag might be useful so when I got home I sewed a Zip & Go zipper on the back so it can hang on the seat:

RothcoTacticalBag.jpg


The Rothco bag isn't exactly what I'd want for the Jeep, and it's not very good quality, but I bought it for inspiration. I'm going to design something a little more suited to Jeep needs and sew one to try out. Probably won't get to this sewing project (or installing the lock actuator) until after I get back from SEMA, I'm leaving Friday.

BTW the Jeep bag on the headrest is a stock document bag as found in the gloveboxes of most Jeeps; I sewed MOLLE straps on the back so it can hang on the Headrest MOLLE :).
 

monele

Adventurer
Dodged a big bullet. I'll post about it so hopefully others with a TJ/LJ can dodge the same bullet.

About 2 months ago, it felt to me like the ignition switch operation wasn't right - it felt a little "soft" and less "notchy" than normal. Two years ago the lock cylinder in the pickup failed (also a 2006 LJ), so thinking that might be the problem in this Jeep, I replaced the cylinder (an easy job BTW). It felt a little better, but still wasn't right. Everything was working ok other than the "feel", so I decided not to diagnose it any further at the time.

Since then I did the Colorado trip and lots of other miles in the LJ.

The other day the key release pushbutton stopped working right - I couldn't shut off the engine without pushing in the key release button, so I decided it was time to do some further diagnosis. I removed the cover from the steering column and looked at the mechanism of the key release button - it's connected to the ignition activator.

For those who haven't had their steering column apart, the lock cylinder connects to the ignition switch activator and the activator turns the electrical ignition switch. The activator also performs several other functions, such as the key release button and the steering column lock.

I decided the ignition switch activator was failing and if it failed completely, the Jeep would not start, so this was becoming urgent. Turns out Autozone carries the activator, so I went out and bought one.

This is what the activator looked like when it came out:

IgnitionSwitchActivator.jpg


The rod that turns the ignition switch is a pot metal casting and prone to breakage, mine was broken in the typical failure mode. Luckily it was still able to turn the ignition switch. The end of the rod goes in the recess in the center of the switch:

IgnitionSwitch.jpg


With the activator replaced, it's working fine and turning the key feels "notchy" like it's supposed to.

This has obviously been broken since it first felt soft to me a few months ago, and could have let us down 20 miles from the nearest road in Colorado.

The lead Jeep mechanic at the dealer tells me this is a common failure mode for the ignition assembly and the potmetal rod is the weak link. He says he's replaced quite a few over the years.

So forewarned being forearmed, if the feel of turning your key starts to feel a bit soft, your activator is likely heading for failure. Don't ignore it for too long.
Thanks for the Heads Up man! I just ordered in for mine as a spare. $30 is cheap insurance!
 

billiebob

Well-known member
Dodged a big bullet. I'll post about it so hopefully others with a TJ/LJ can dodge the same bullet.

About 2 months ago, it felt to me like the ignition switch operation wasn't right - it felt a little "soft" and less "notchy" than normal. Two years ago the lock cylinder in the pickup failed (also a 2006 LJ), so thinking that might be the problem in this Jeep, I replaced the cylinder (an easy job BTW). It felt a little better, but still wasn't right. Everything was working ok other than the "feel", so I decided not to diagnose it any further at the time.

Since then I did the Colorado trip and lots of other miles in the LJ.

The other day the key release pushbutton stopped working right - I couldn't shut off the engine without pushing in the key release button, so I decided it was time to do some further diagnosis. I removed the cover from the steering column and looked at the mechanism of the key release button - it's connected to the ignition activator.

For those who haven't had their steering column apart, the lock cylinder connects to the ignition switch activator and the activator turns the electrical ignition switch. The activator also performs several other functions, such as the key release button and the steering column lock.

I decided the ignition switch activator was failing and if it failed completely, the Jeep would not start, so this was becoming urgent. Turns out Autozone carries the activator, so I went out and bought one.

This is what the activator looked like when it came out:

IgnitionSwitchActivator.jpg


The rod that turns the ignition switch is a pot metal casting and prone to breakage, mine was broken in the typical failure mode. Luckily it was still able to turn the ignition switch. The end of the rod goes in the recess in the center of the switch:

IgnitionSwitch.jpg


With the activator replaced, it's working fine and turning the key feels "notchy" like it's supposed to.

This has obviously been broken since it first felt soft to me a few months ago, and could have let us down 20 miles from the nearest road in Colorado.

The lead Jeep mechanic at the dealer tells me this is a common failure mode for the ignition assembly and the potmetal rod is the weak link. He says he's replaced quite a few over the years.

So forewarned being forearmed, if the feel of turning your key starts to feel a bit soft, your activator is likely heading for failure. Don't ignore it for too long.
Been there, done that.... 2012 lol

DSC_0005.jpeg

I took mine apart. Drove it for 2 months with a stubby screwdriver to turn the ignition thing. Why cant I copy paste your pic Jeff??

Jeep told me I needed a complete steering column $1100 to get a new ignition switch.... Dorman sold me the part for $60.
PS, this was 2012, 7 years ago, my TJR was 7 years old.

PS,

Take it apart, the round black piece on the left side, the part in Jeffs pic, can be turned with a straight screw driver.
You will need the key in the ignition on the right side to activate the computer code stupid thing.
Turn the screwdriver and everything will work. A stubby screwdriver is a perfect fit.
 
Last edited:

jscherb

Expedition Leader
I've been encouraging Overland Outfitters to do some TJ/LJ-specific products when they get some production time and this week they sent me a few preproduction samples to try out.

I posted about these in my JKU thread (https://expeditionportal.com/forum/...factory-hardtops.127687/page-327#post-2969933) so there's more info there, I've posted these photos here because they're installed in my LJ in these photos. These aren't specifically for the TJ (they work well in the JL/Gladiator/JK/TJ/YJ and more):

PocketBuddyLJ.jpg


TacticalBuddyLJOpen.jpg


TacticalBuddyLJClosed.jpg


TacticalBuddyMolleLJ.jpg
 

jscherb

Expedition Leader
Another product they sent me to test are these Zip & Go/MOLLE bands for TJ/LJ/YJ seats. The bands slip over the headrest part of the seat and have a PALS strip and a Zip & Go zipper on the back.

A Zip & Go bag in my LJ:

ZipAndGoTJLate.jpg


MOLLE pouches on the PALS strip:

TJSeatMolle.jpg


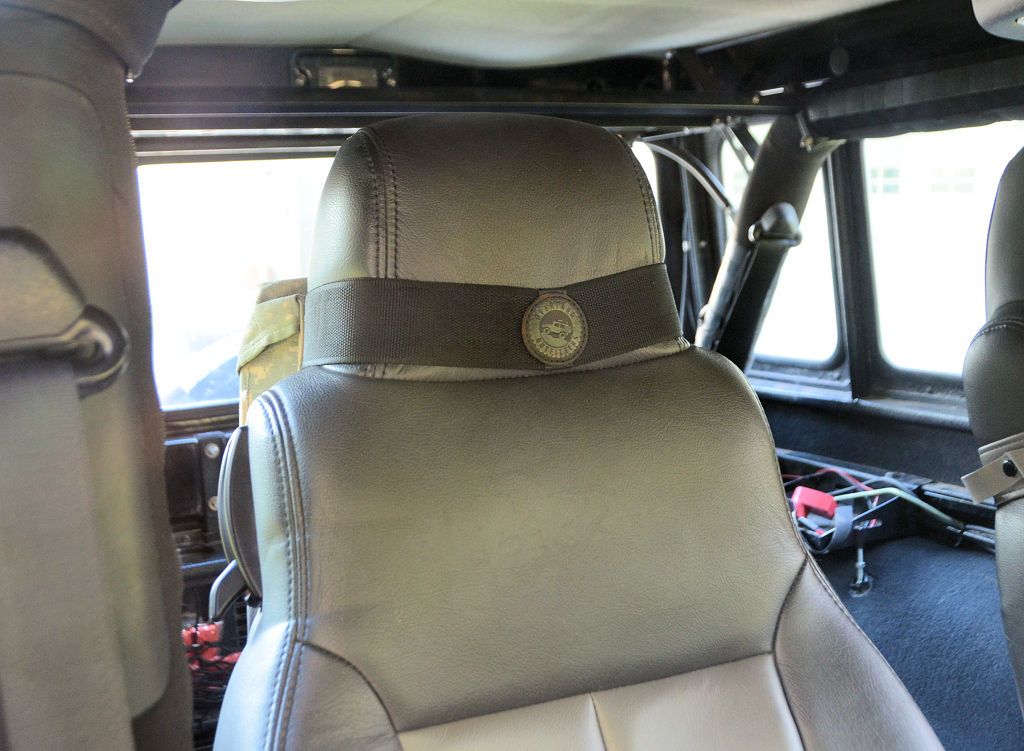
There are versions for early and late model seats; this is what it looks like from the front on an '03-'06 TJ seat:

TJSeatZipAndGoFront.jpg


And what it looks like from the back on a '97-'02 TJ or a YJ seat (this is a YJ):

YJSeatMolle3.jpg


I've been using a prototype version in my LJ for a while, in this photo from the summer I've got a Cool Pack picnic cooler hanging from the Zip & Go zipper on the passenger seat:

PicnicTest2a.jpg
 

jscherb

Expedition Leader
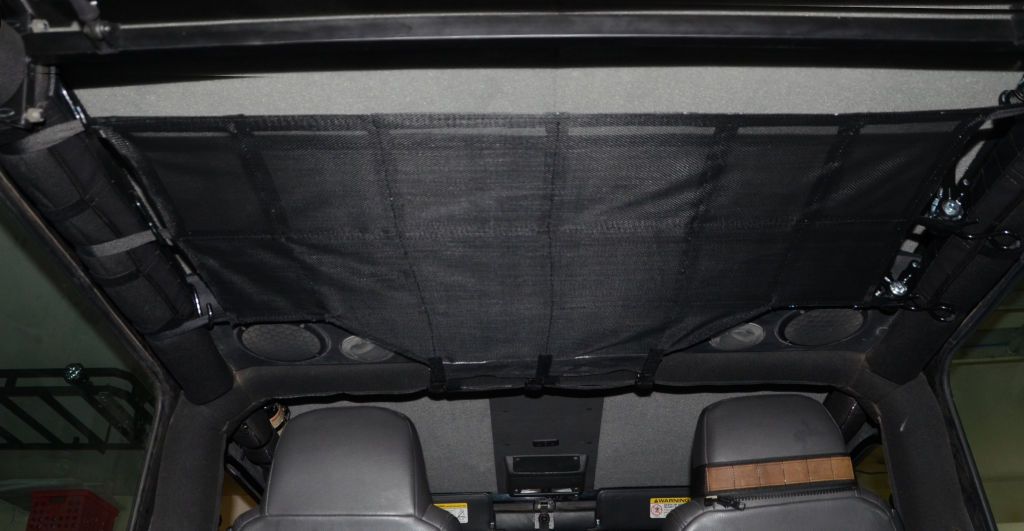
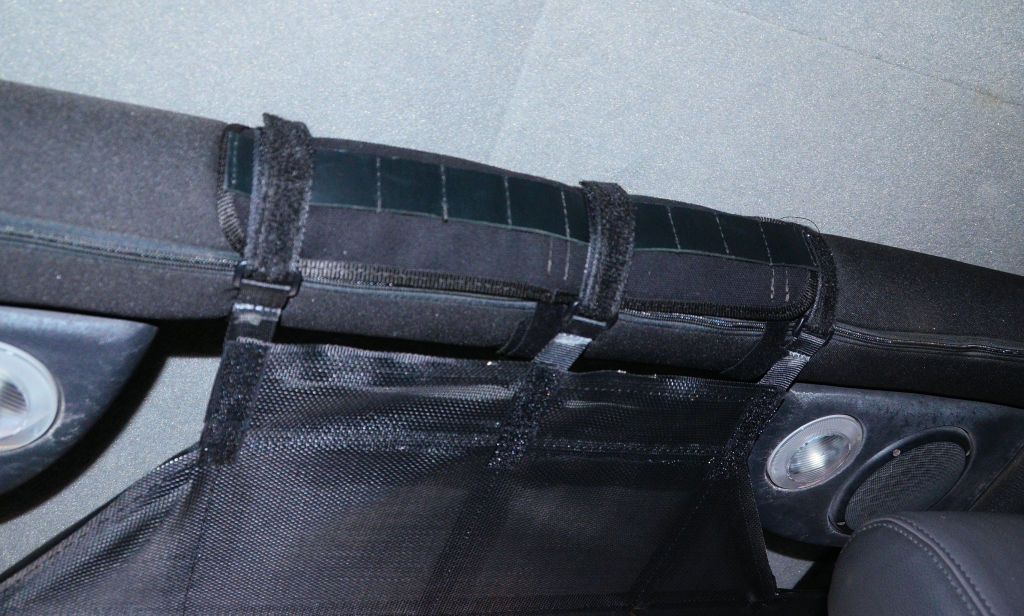
The "Home Depot" DIY Overhead Cargo Net

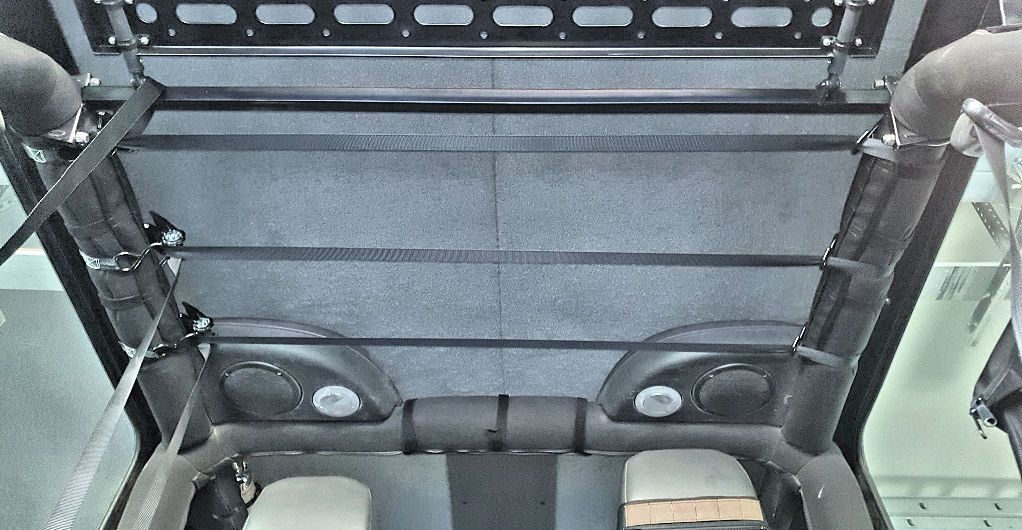
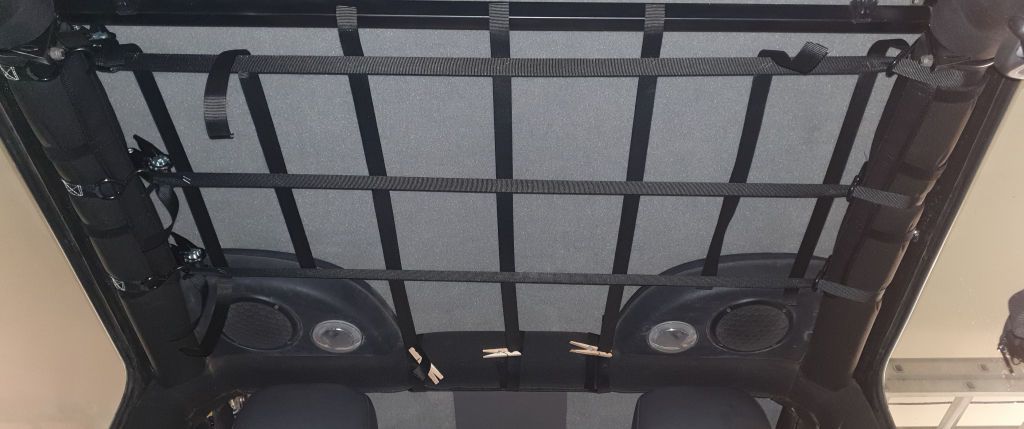
Here's an inexpensive way to DIY an overhead cargo net that I think is better than anything that's on the market. I'll call it the Home Depot Overhead Cargo Net because the main supplies necessary to make it can be found at Home Depot. All it takes is a few ratchet straps (Home Depot, $1.75 each: https://www.homedepot.com/p/Husky-15-ft-x-1-in-Ratchet-Tie-Down-Strap-with-S-Hook-FH0867/312994491), some heavy-duty "pet resistant" screen (Home Depot, $15.64 https://www.homedepot.com/p/Saint-G...Roll-for-Windows-and-Door-FCS8988-M/100397140) and a little bit of sewing.

InstalledEmpty.jpg


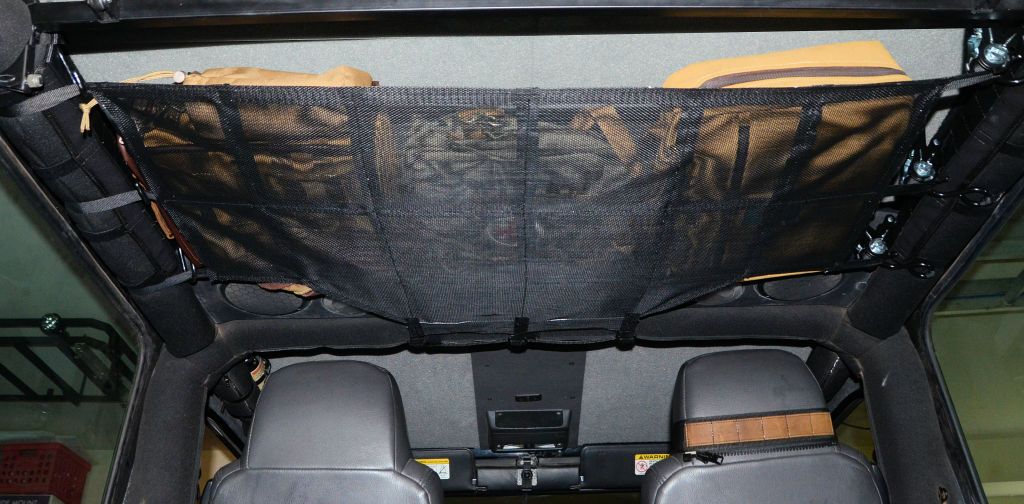
With some gear (3 bags):

InstalledBags.jpg


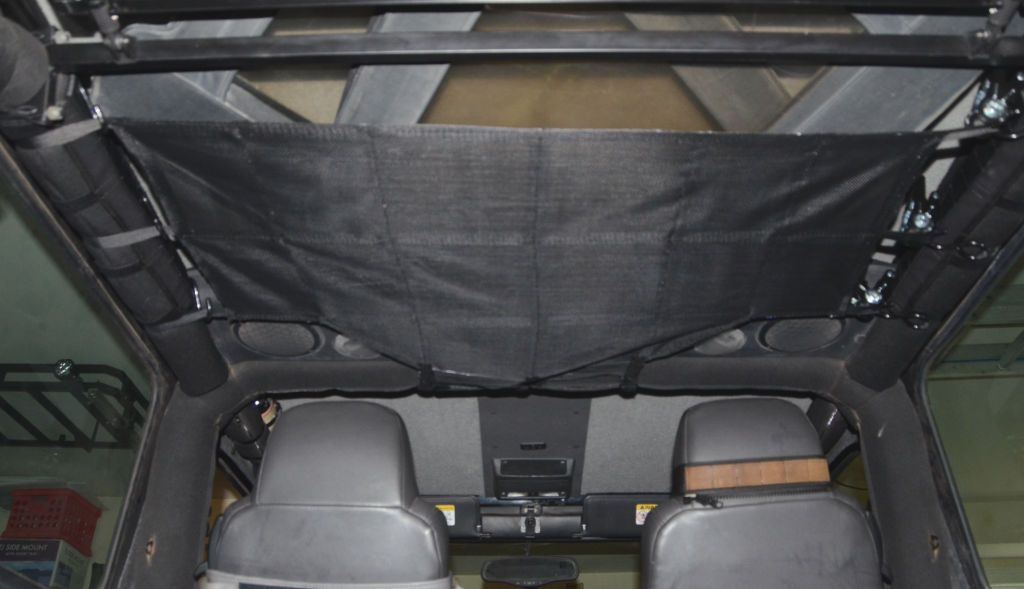
It's plenty strong enough to hold my half door uppers:

InstalledUppers.jpg


I think it's better than anything you can buy commercially because:
  1. It's more rigid than anything on the market because it uses ratchet straps to tension it; it won't sag down as much as other nets because it can be made tighter with the ratchet straps.
  2. The heavy-duty screen makes it easier to store random and smaller items up there without them slipping through the webbing.
  3. It costs about $20 to make.
I made one for my LJ but the steps would be the same for any Jeep so here are the details...

The first step is to make the cross-straps. These are the ones that will be tightened with the ratchets. In this photo, I've got three straps across, about 8" apart. I haven't cut the excess off yet so that's hanging down.

CrossStraps.jpg


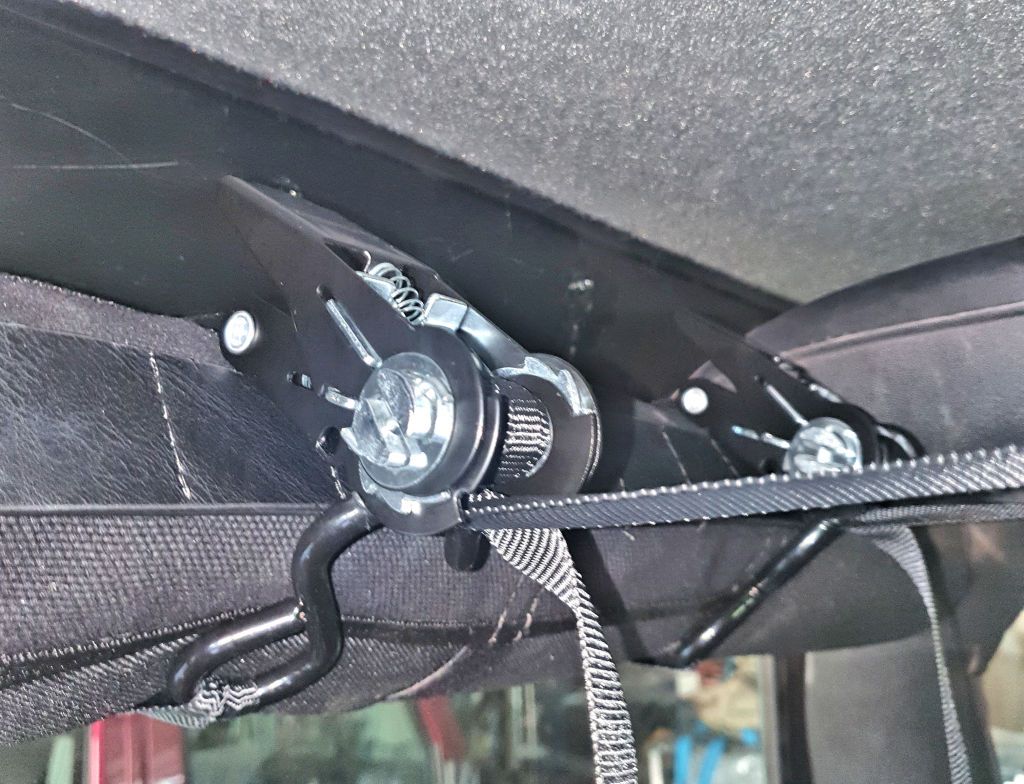
To keep the ratchets out of the way of cargo in the net, I installed them like this:

RollBarWrap.jpg


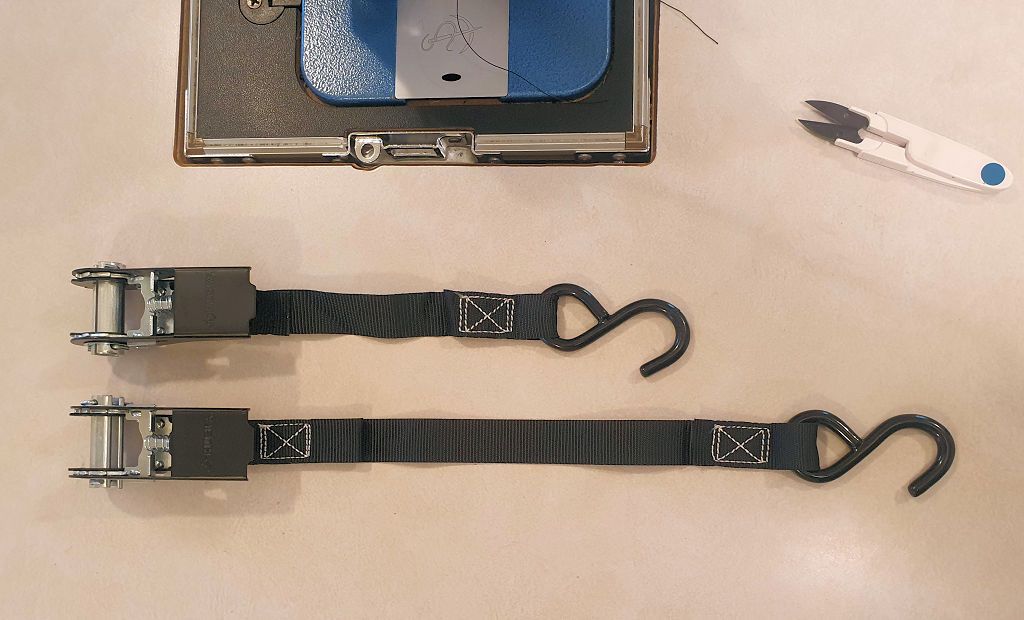
It was necessary to shorten the tail end of the ratchet end of the straps so they fit properly around the roll bar - in this next photo an unmodified strap and a shortened one are on my sewing machine table:

RollBarWrapShorten.jpg


Shortening them is simple - cut the sewed loop off the ratchet, loop the cut-off strap end around the pin on the end of the ratchet and resew. Depending on the diameter of the roll bars in your model Jeep, you might need a different length so check this before you sew.

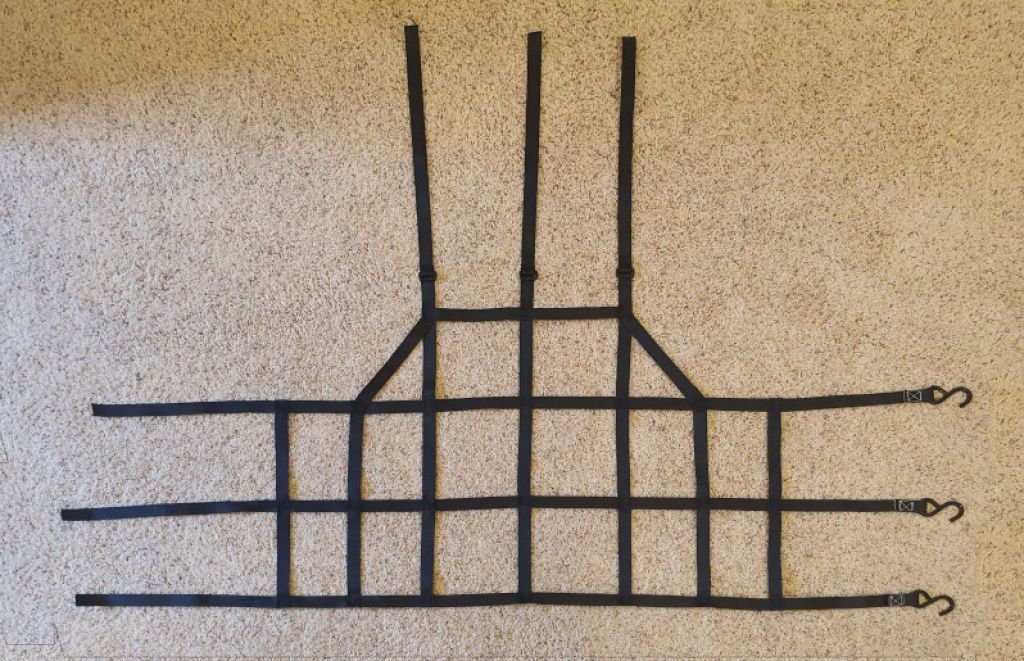
The next step is to add the longitudinal webbing. Cutting the excess off the cross-straps already installed provides plenty of webbing for this step. Leave the cross-straps in place after cutting off the excess; the longitudinal straps will be placed on them and temporarily stapled to the cross straps.

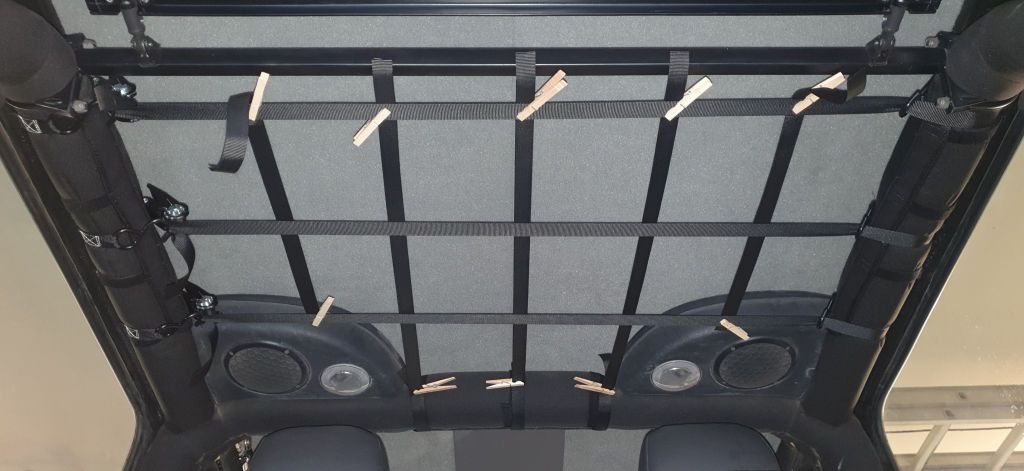
In this photo I've added 5 longitudinal straps. They're also spaced about 8" apart. Several are a bit longer in the front to go around the main hoop of the roll bar. I've left the ends of all the straps a bit long, I'll trim them after I sew them to the cross straps.

Clothespins can be used to position the straps for stapling, this is a work-in-progress photo:

Clothespins.jpg


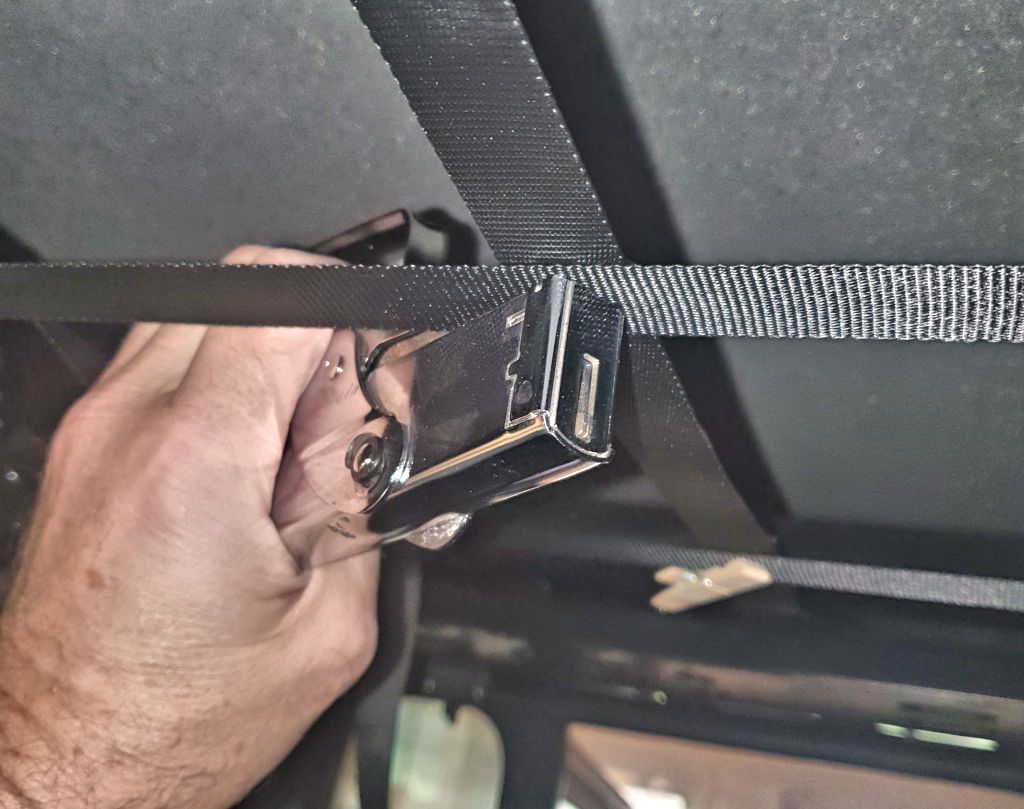
At every place where the straps cross, staple the straps together. Two staples at each location will hold them for sewing.

Stapling.jpg


All crosspoints stapled:

Stapled.jpg


Once all the straps are placed and stapled, remove the assembly from the roll bars, sew every place where the straps cross and pull out the staples. The ends of the straps can be trimmed if you left them long when you stapled them as I did. Sewn and trimmed:

SewnAndTrimmed.jpg


BTW the best way to shorten the straps is to cut them with a hotknife, this melts the end so it won't fray. since most people won't have a hotknife you can cut them with scissors and run a hot soldering iron across the cut end, or even a match can be used (carefully). Trimming the ends with a hot knife:

HotKnife(1).jpg


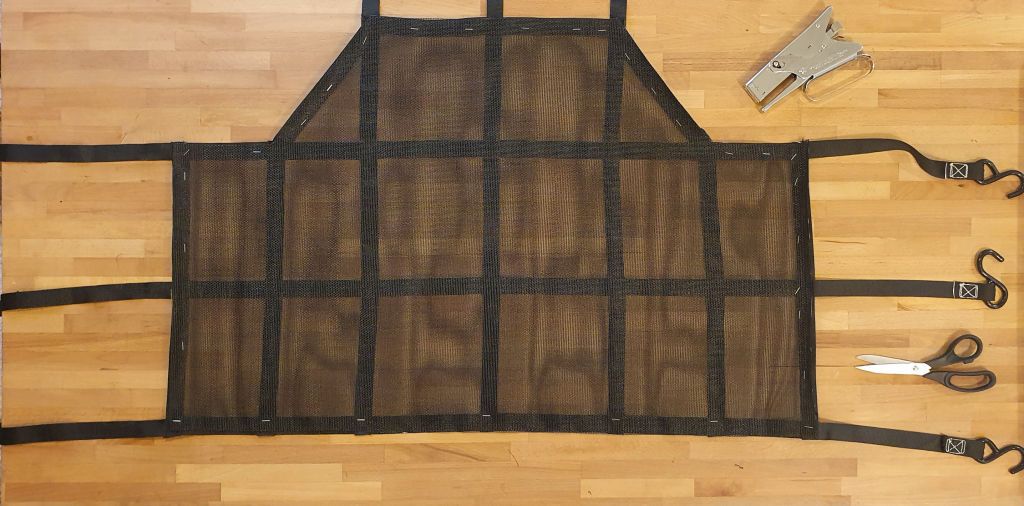
Next step: adding the screen. Lay the sewn net out on the floor and cut a piece of the screen to fit. Staple it around the edges to hold it in place for sewing.

ScreenStapled.jpg


Sew the perimeter of the screen to the webbing and then sew the screen to each cross-strap and longitudinal strap.

To secure the longitudinal webbing to the roll bar main hoop, I added a strap loop and some velcro.

MainHoopVelcro.jpg


Additional details could be added as desired or needed, for example straps on top of the net to hold cargo in place.

This net cost me $22.56 (which includes the sales tax); the velcro and strap loops for the main hoop attachment I had on hand but wouldn't cost more than a few dollars if they weren't in my sewing supplies drawer. So for just over $20 I now have an overhead cargo net that's better than anything I could buy. It's an easy sewing project, something that a beginner with a sewing machine could easily do.

BTW the same technique can be used to make a bikini top. Might use some fabric other than the netting to provide more shade, and you'd install it on top of the roll bars instead of the bottom, but mostly it would be the same.
 

jscherb

Expedition Leader
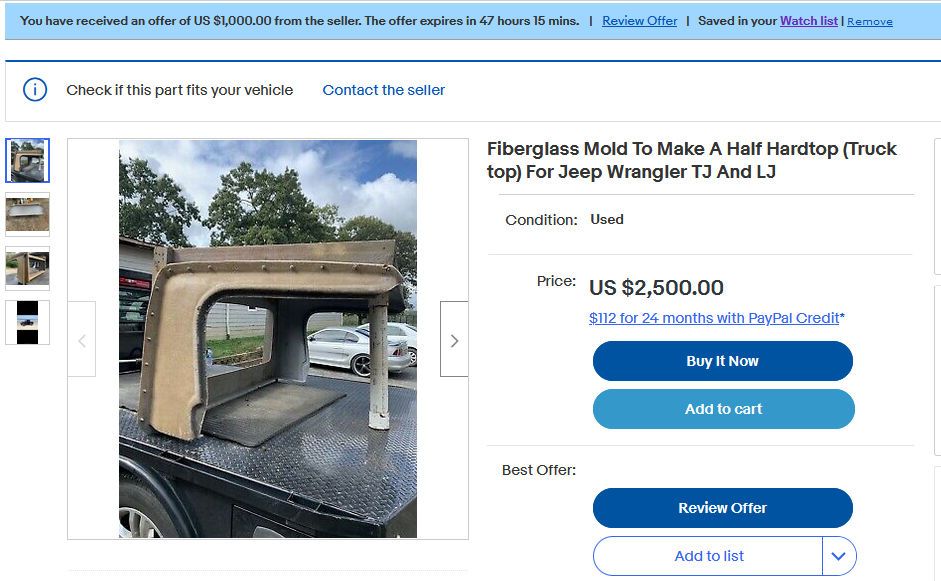
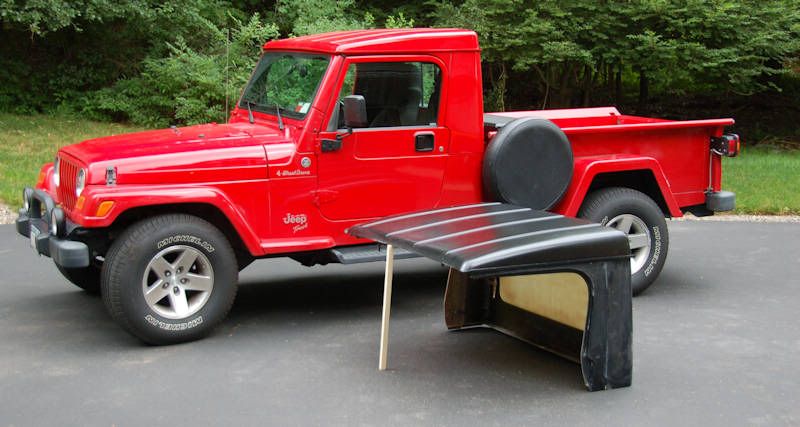
Anyone want to make their own half cab?

There's a half cab mold listed on eBay right now and this morning the seller sent me an offer to buy it for $1000:

eBayHalfCabMold.jpg


Fiberglass isn't hard to do, this mold could be bought probably for less than $1000, used to make a top for yourself, maybe mold one or two more and sell them for enough to pay for the whole project. ;).

The listing doesn't say if this comes with the mold for the windshield header - typically on a hardtop like this those are molded separately and bonded in to the main hardtop shell as the shell is being laid up. I messaged the seller to see if the header mold is included. I've got headers here I could use if I wanted to pick up this mold and made some but I don't have any need for another half cab, I've already got an extra one I don't use...

HalfCabProject3.jpg
Answer from the seller:

Yes sir, it is three pieces total. The main top, bulkhead, and windshield channel. The windshield channel is made to accommodate the factory hardtop clamps.

I then asked him if the tops out of the mold had ever been sold commercially and if so, by what company. He has yet to reply to that one.
 

jscherb

Expedition Leader
jscherb said:
...I then asked him if the tops out of the mold had ever been sold commercially and if so, by what company. He has yet to reply to that one.
His reply:

No, they could be though. They were made by a commercial fiberglass mold maker out of Tennessee. They are smooth sided molds so the inside and outside of the top are smooth not rough texture. That allows for the ability to paint match them to the body.
 

jscherb

Expedition Leader
Back when I built the Safari Cab hardtop and barn door for the LJ, I installed a lock actuator in the tailgate so I could lock/unlock it from the driver's seat. That actuator seems to have lost strength and sometimes can't unlock the tailgate so yesterday I replaced it with this one:

NewLockActuator.jpg


I picked up the door lock actuator on a trip to Florida last month at one of my favorite electronics surplus stores (Skycraft Surplus https://skycraftsurplus.com/).

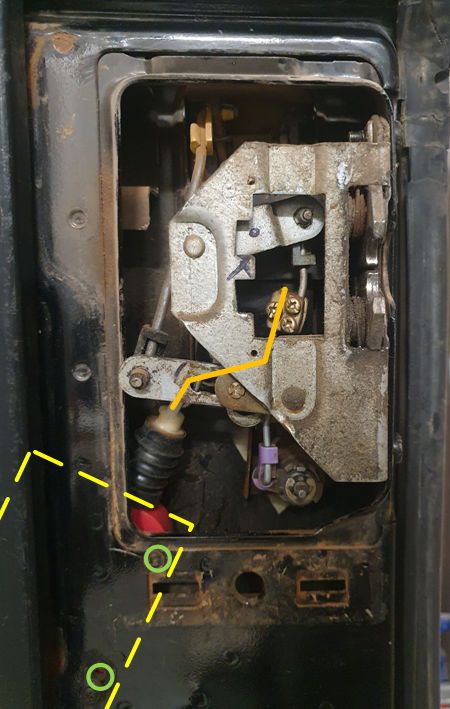
A few details in case anyone is interested in doing the same thing to their LJ/TJ/YJ tailgate...

The lock actuator is thin enough to slip inside the tailgate. The yellow dashed line shows where the body of the actuator is, some of it is out of the frame of this photo. The green circles show the screw heads that attach the actuator to the inside of the tailgate (I drilled holes years ago for the original actuator). The orange line shows the rod from the actuator to the lock rod (it's behind some of the latch mechanism so I drew it in for clarity).

LockActuator.jpg


I put the wiring for the power lock in back in 2010 when I built the barn door so all of the following images show work I did back then.

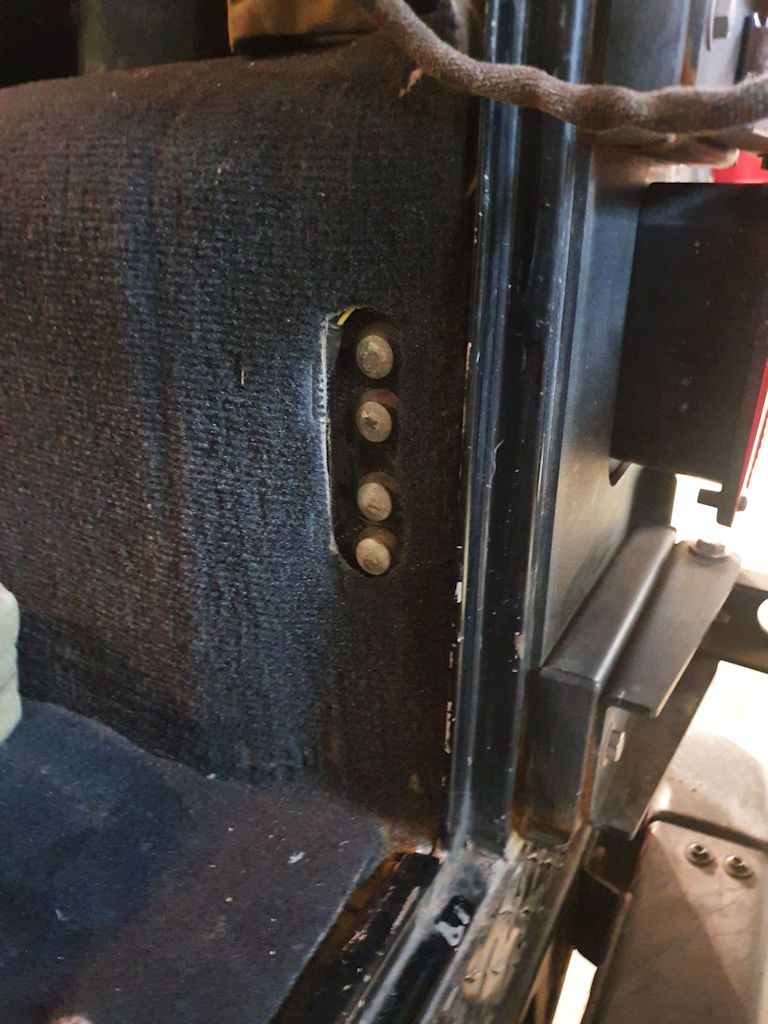
Rather than have wires to power the actuator draped from the body to the tailgate, I added a second pair of tailgate contacts:

LockActuatorPower.jpg


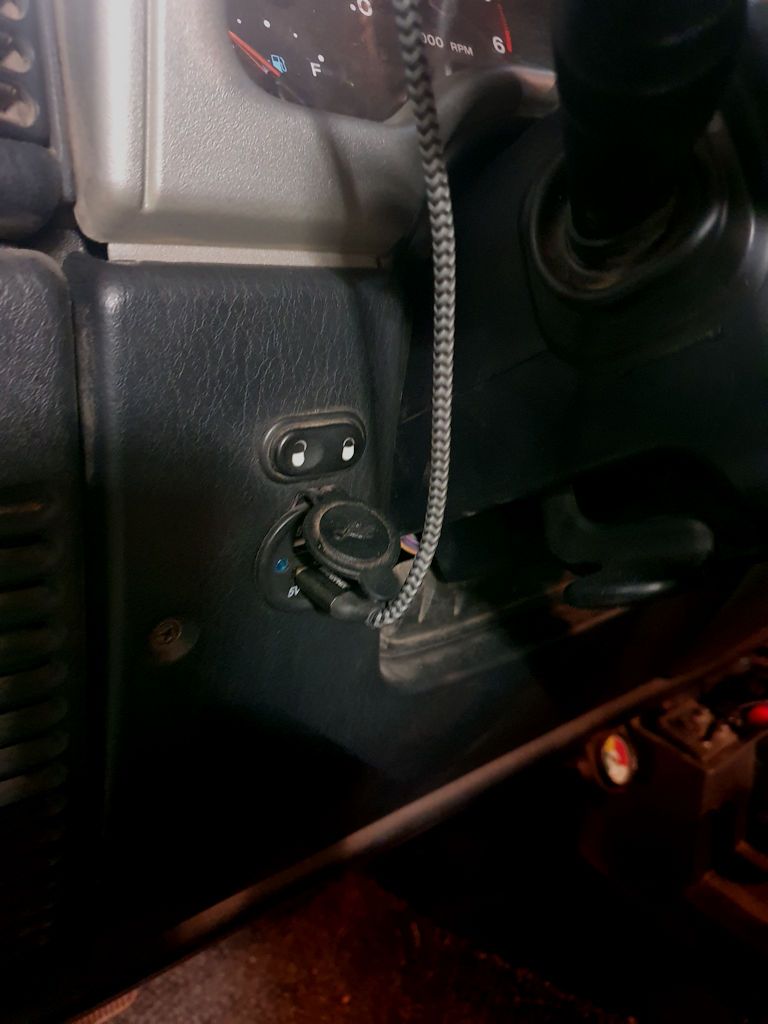
I pulled a lock switch from some Ford vehicle at the u-pull and mounted it on the panel below the steering wheel. Also added the USB outlet below the switch, although that was later - about 5 years ago. The outlet allows me to charge my phone in it's suction cup holder on the windshield with a very short wire - not a long wire draped all over the interior.

LockActuatorSwitch.jpg


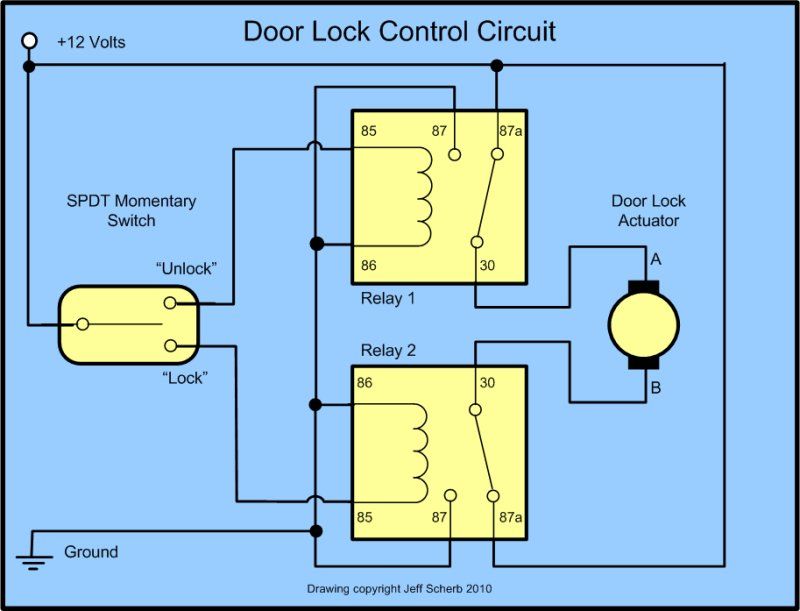
These lock actuators are two-wire devices and the power needs to be reversed to lock vs. unlock. The Ford switch provides momentary contact power to one of two relays which send the appropriate polarity voltage to the lock actuator. The circuit is pretty simple - 12v is always routed to both sides of the actuator through the normally closed contacts of both relays. When the lock or unlock switch is pressed, the appropriate relay switches that side of the actuator to ground, completing the circuit to operate the actuator. I mounted these relays under the dash.

PowerLockWiring.jpg


Over the years it's been very handy to be able to lock or unlock the tailgate from the driver's seat, and I've missed that capability since the original actuator failed. It's nice to have this feature back.
 
Last edited:

jscherb

Expedition Leader
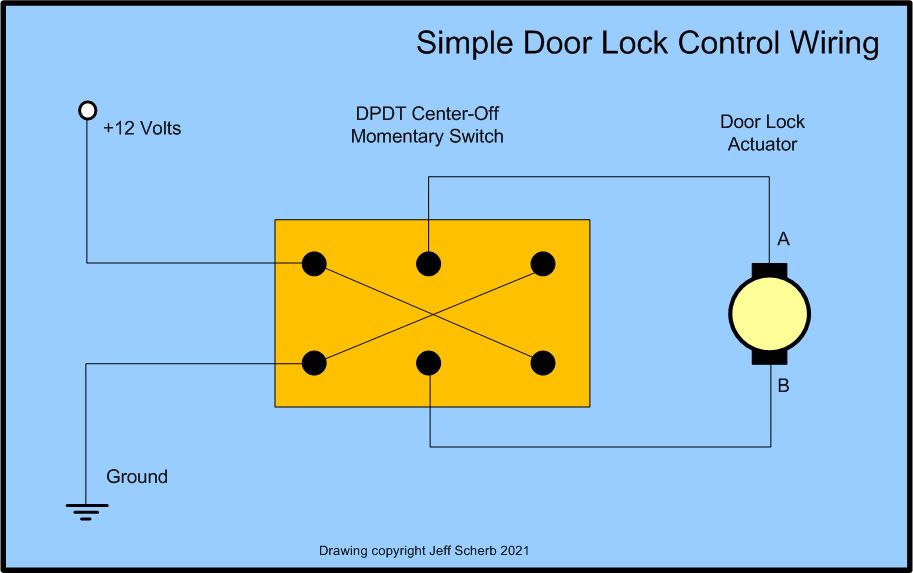
I was asked if the relays are necessary and the answer is if you can find a double-pole double-throw center-off momentary switch you like you can wire it like this:

PowerLockWiringSimple.jpg


I didn't do that because I wanted an OEM-looking switch that would install nicely somewhere in the LJ's dash and the best one I could find in the u-pull was the Ford one in the photo in my last posts. It's a single-pole double-throw momentary so it can't be wired to reverse polarity without the relays.
 

jscherb

Expedition Leader
Using the TJ Zip & Go seat attachments OO recently released in the LJ - the Cool Roll drink cooler I'm testing is on the passenger seat; the bag on the driver's seat is simple one I sewed a while back and it holds my recovery strap (27,000 lbs. load capacity x 20').

CoolRollAndRecoveryStrapInLJ.jpg
 

Forum statistics

Threads
188,211
Messages
2,903,840
Members
229,665
Latest member
SANelson
Top