How would you outfit this custom LJ?

jscherb

Expedition Leader
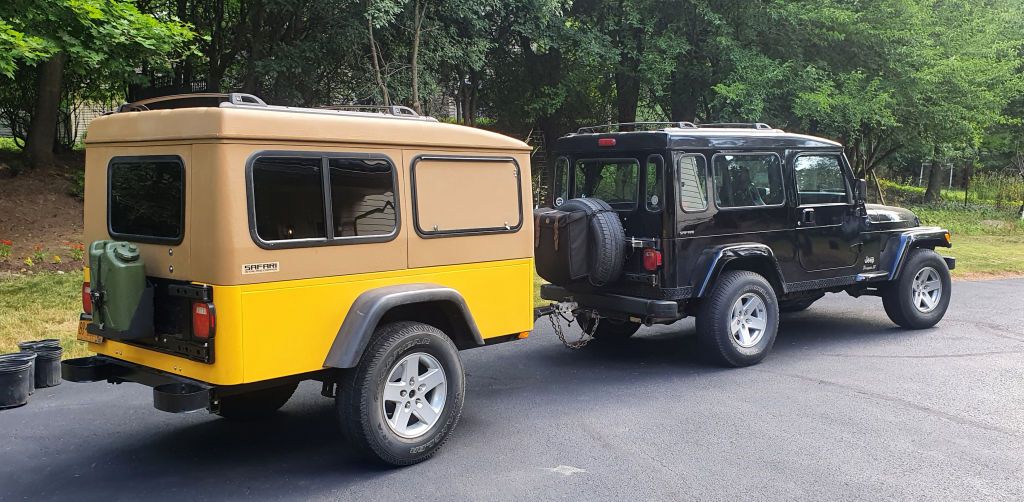
A few more trailer details.

I installed gas struts on the side hatches this morning.

FrontHatchStruts1.jpg


FrontHatchStruts2.jpg


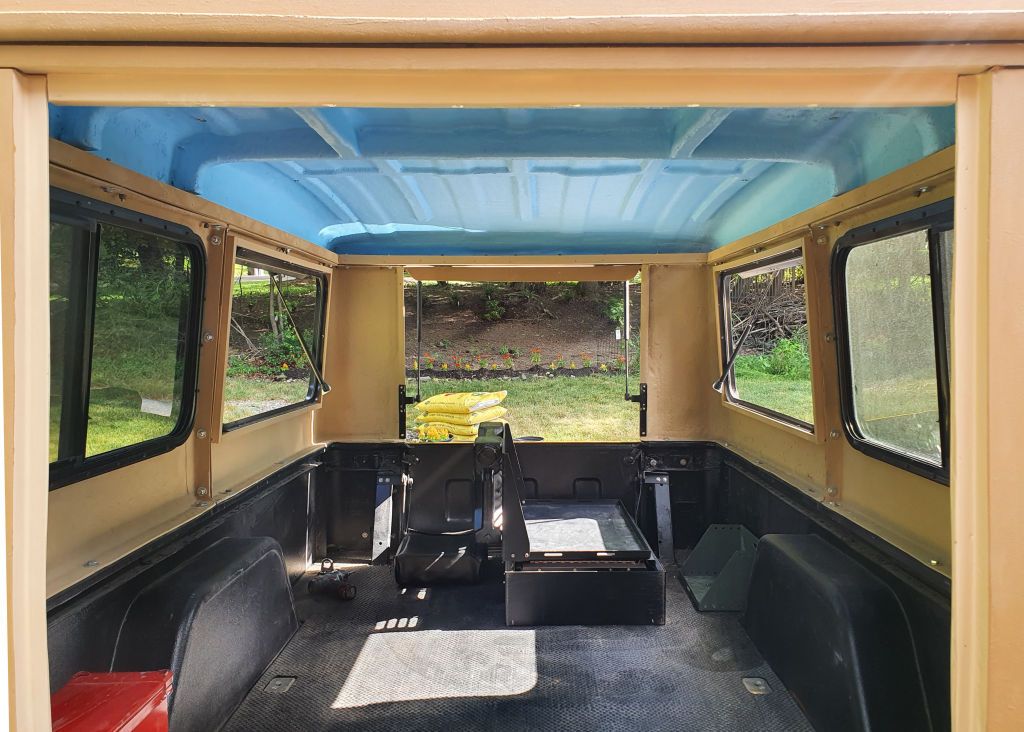
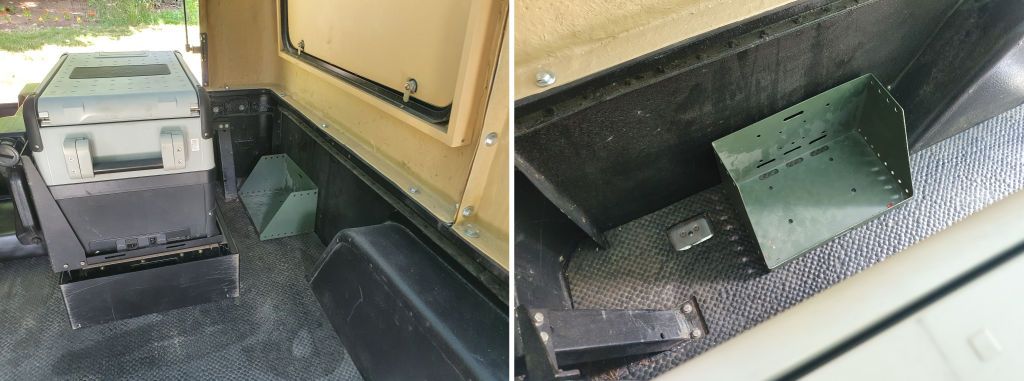
I decided that the best place for the kitchen battery is beside the kitchen. There's already a tie-down point in the floor I can use to secure the battery tray.

BatteryLocation.jpg


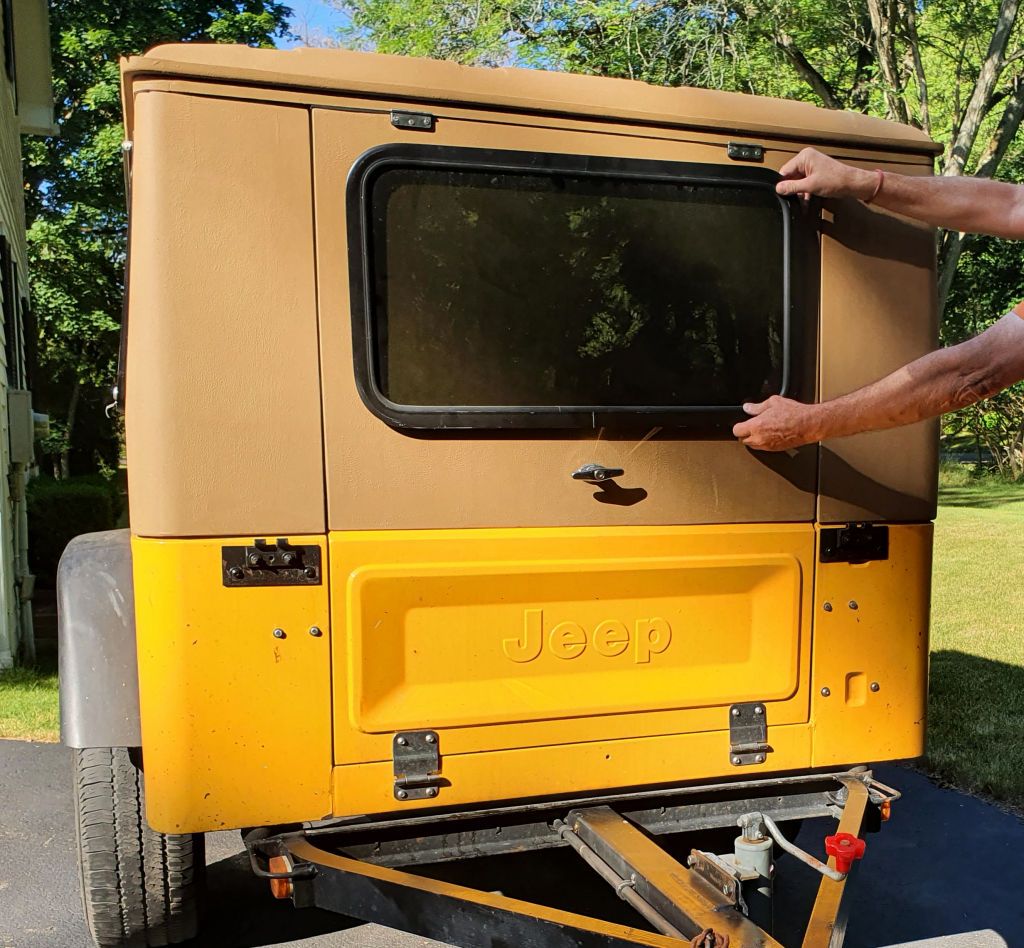
I have an extra window on hand for the front hatch, but I don't think I'll install it, I haven't made a final decision yet.

FrontWindow.jpg
 

TripLeader

Explorer
Very nice stuff as always!

The trailer is really coming along. You make it look easy, even though I know its not.

The window on the front would be nice. I would worry too much about a rock hitting it and breaking it.
 

jscherb

Expedition Leader
Very nice stuff as always!

The trailer is really coming along. You make it look easy, even though I know its not.

The window on the front would be nice. I would worry too much about a rock hitting it and breaking it.
Thank you. I also am worried about rocks, which is why I probably won't install that window.

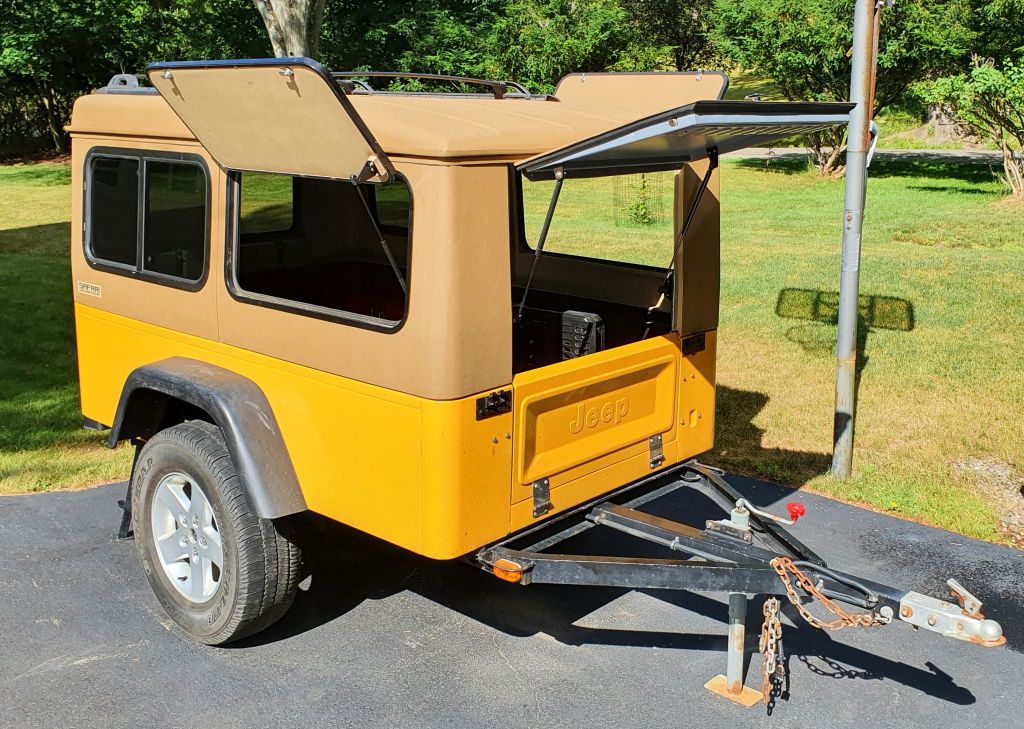
Actually most of the work so far has been pretty easy - the Safari Cab parts are a perfect fit on the Jeep tub trailer. Too bad these parts never became a kit, using them with a fiberglass Dinoot Jeep tub trailer kit would make building something like this a job most DIYers could do well.

Construction will get a little more interesting when I do the pop-top, here's a look at how that will work...

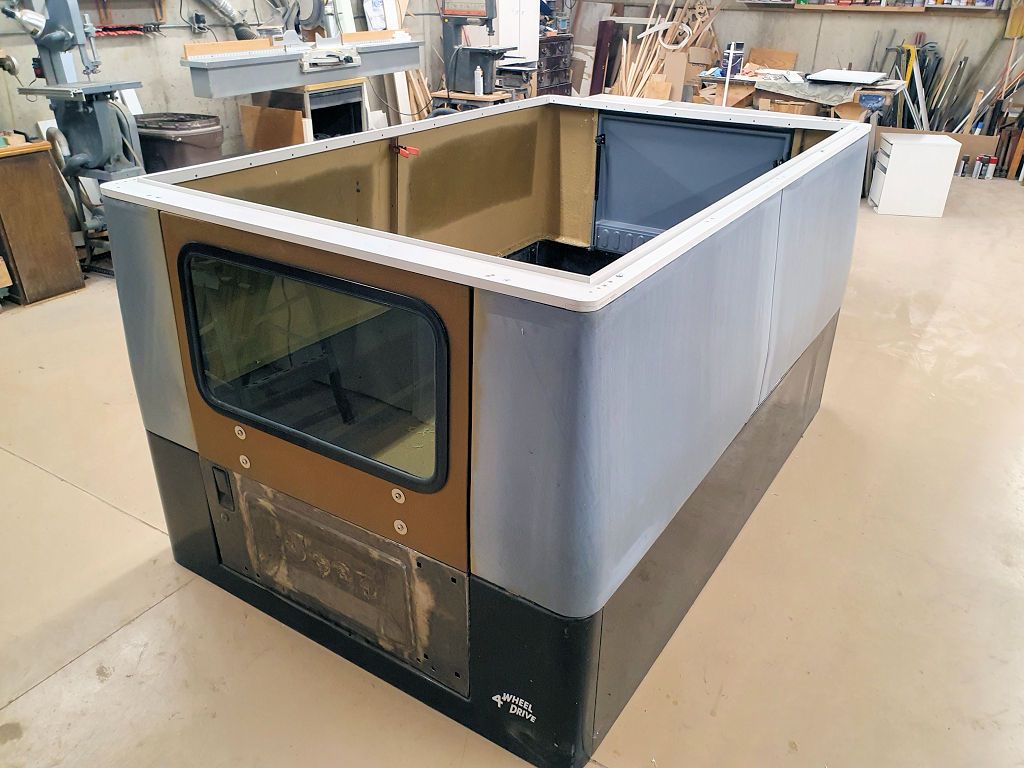
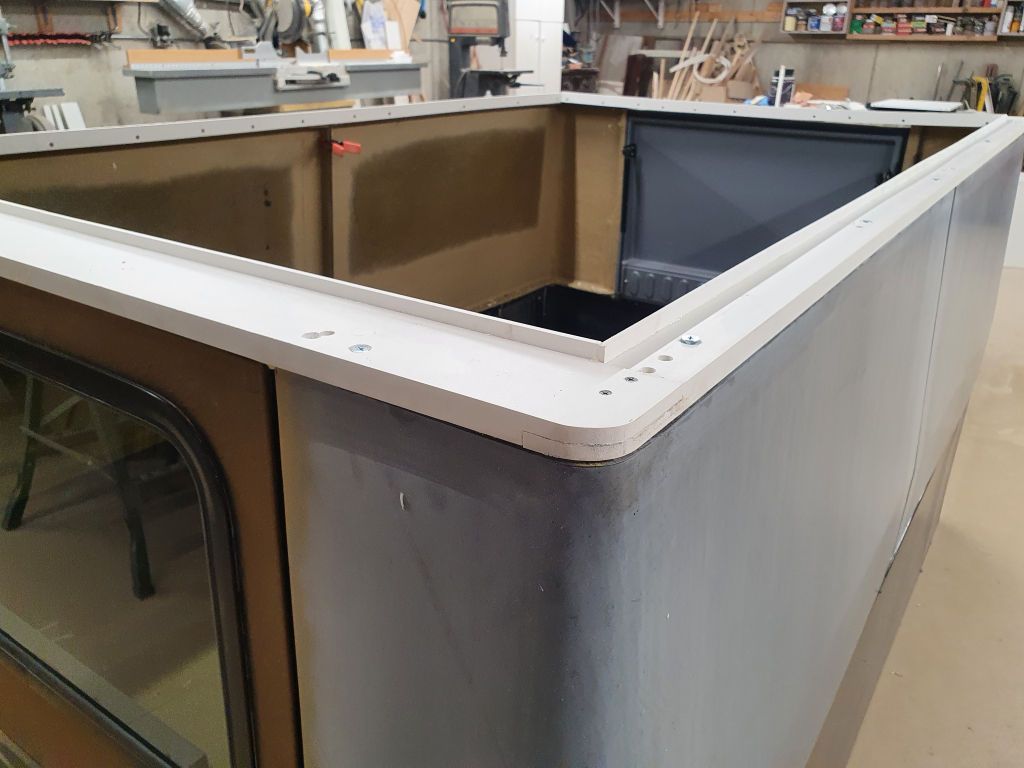
Bolted to the top of the camper sides is this frame. I will support the hinges for the roof and it has a lip inside to prevent water ingress in the event of an imperfect seal when the top is closed. These photos were taken before I applied the finish to the parts and the mocked up assembly was still in the workshop:

RoofFrame1.jpg


RoofFrame2.jpg


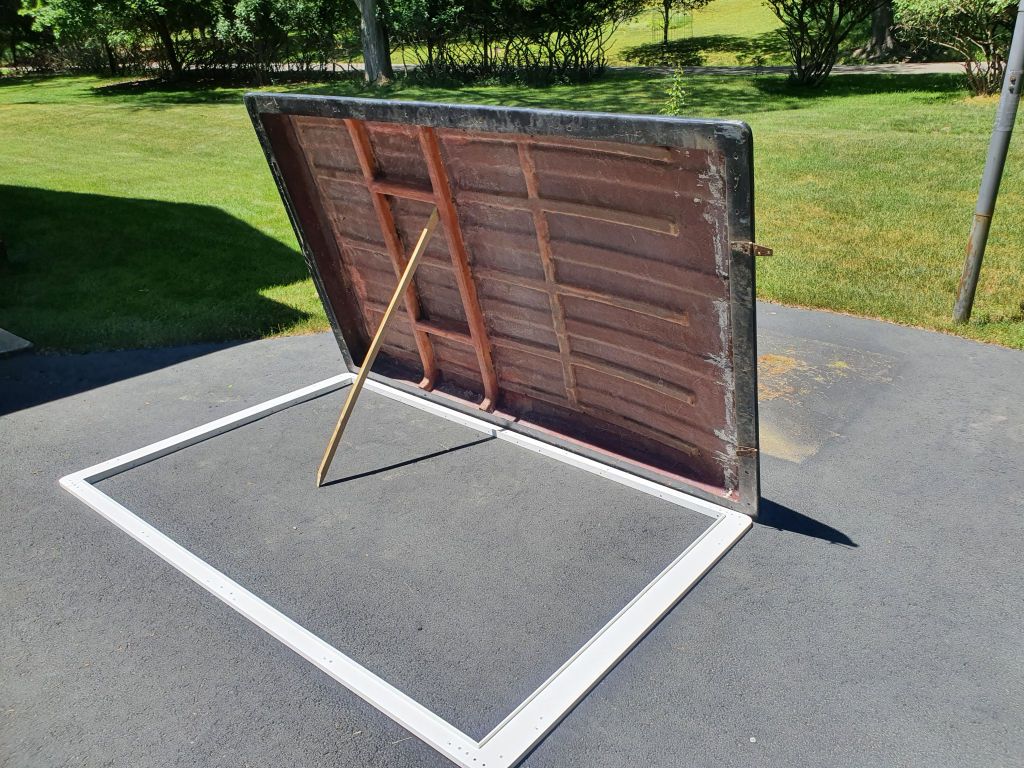
Out in the driveway, I'm checking the fit of the roof over the frame:

RoofFrame3.jpg


I'm hesitating to go ahead with hinging the roof because this roof is very heavy. I believe it was the first test part out of the Gr8Tops Safari Cab mold and they didn't know how thick to make it so the fiberglass is very thick. Much thicker than it needs to be, so this roof is very heavy. I probably should mold a new roof before proceeding with the pop-top part of the project; I still have all of my original Safari Cab molds and I can make a much lighter roof.

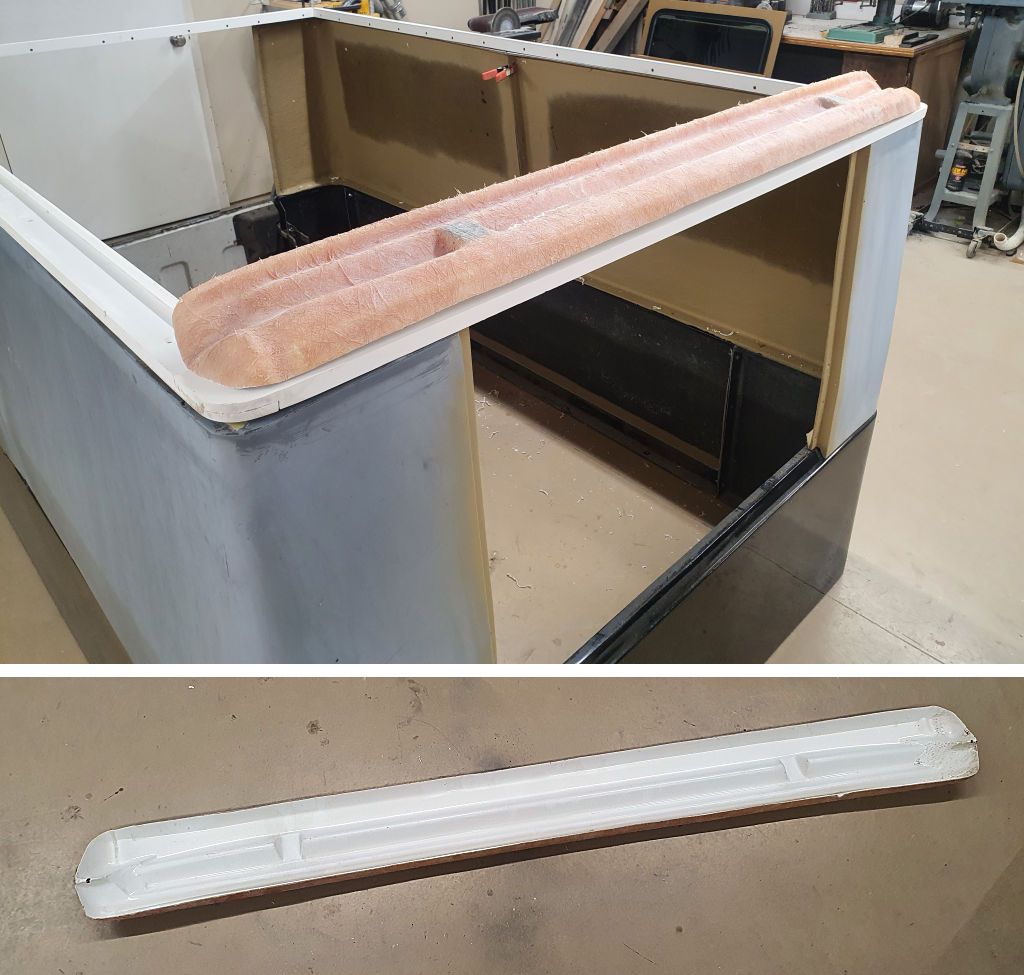
Another reason I designed the pop-top with the frame pictured above - by making a slightly different version of the frame with a Jeep windshield header at the front instead of a flat piece a frame can be made to mate to the Safari Cab sides on the LJ. That's pretty much all it would take to do a pop-top LJ Safari.

JeepHeader.jpg


For now I'm going to park the trailer in the storage unit until after a few cargo-hauling trips that I've got planned for it (no room in the garage - 3 bays and 3 Jeeps). After that I'll decide if I'm going to go to the trouble of molding a new roof for the pop-top.
 

ITTOG

Well-known member
What is the white frame made out of? Looks a little like painted wood but I figure fiberglass for you? If it is fiberglass, what is the inside lip made of?
 

jscherb

Expedition Leader
What is the white frame made out of? Looks a little like painted wood but I figure fiberglass for you? If it is fiberglass, what is the inside lip made of?
I'm experimenting with a new material for this - it's CPVC. It works like wood and is easily bonded with special CPVC cement. I assembled it with screws and cement. The inside lip is CPVC ripped to the necessary size from larger stock. Not sure if I really like this material for this application but it'll be well tested when I hinge the roof.
 

jscherb

Expedition Leader
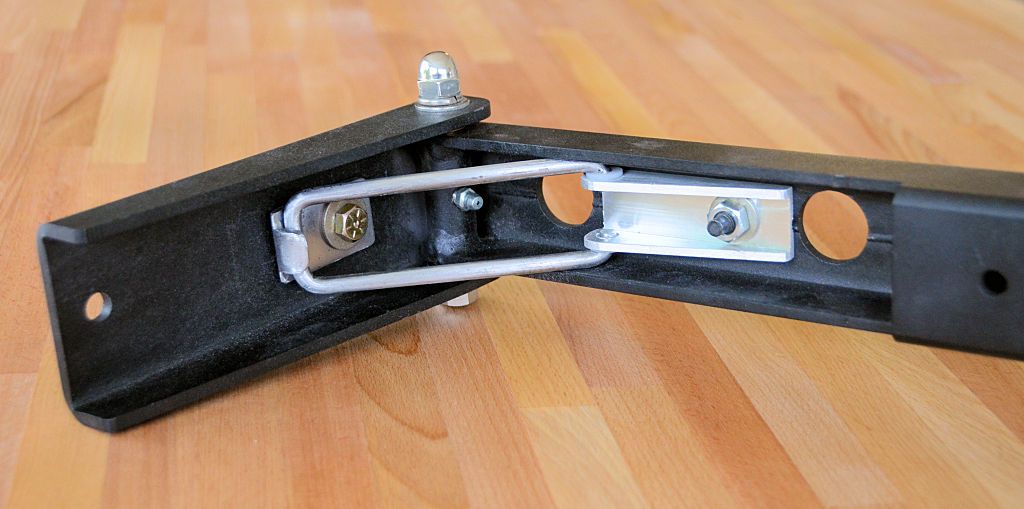
In 2020 I designed and built a prop for the MORryde TJ HD tailgate hinges to hold the tailgate open:

ExogatePropProto3Deployed_zpsir9cg9f4.jpg


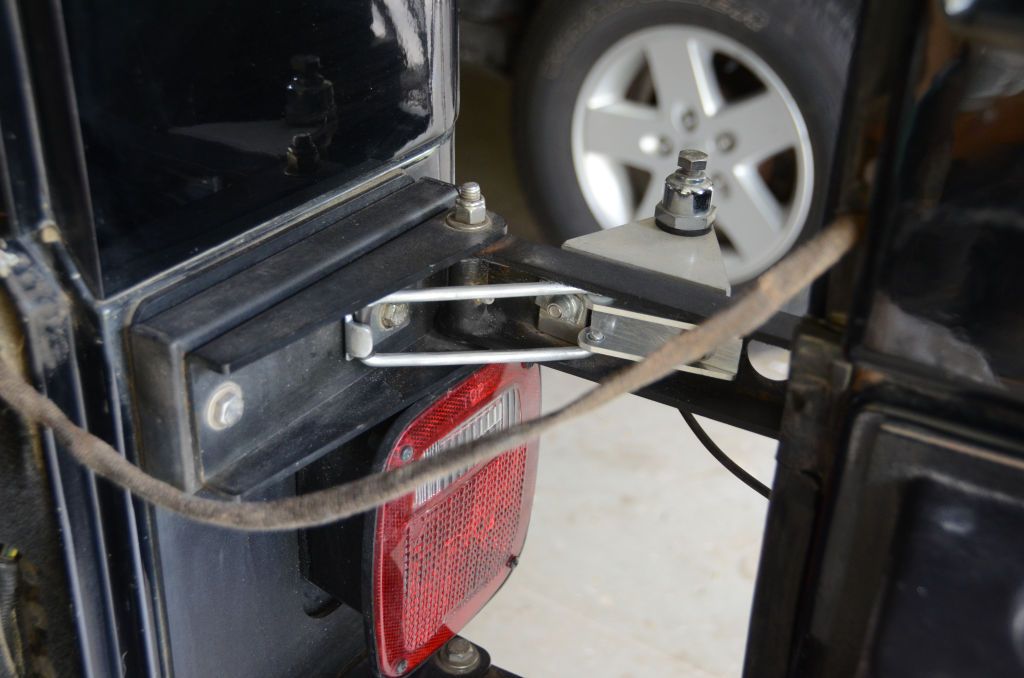
It's been in use on my LJ since then and works very well:

ExogatePropProto3Installed1_zpsmfvhixl1.jpg


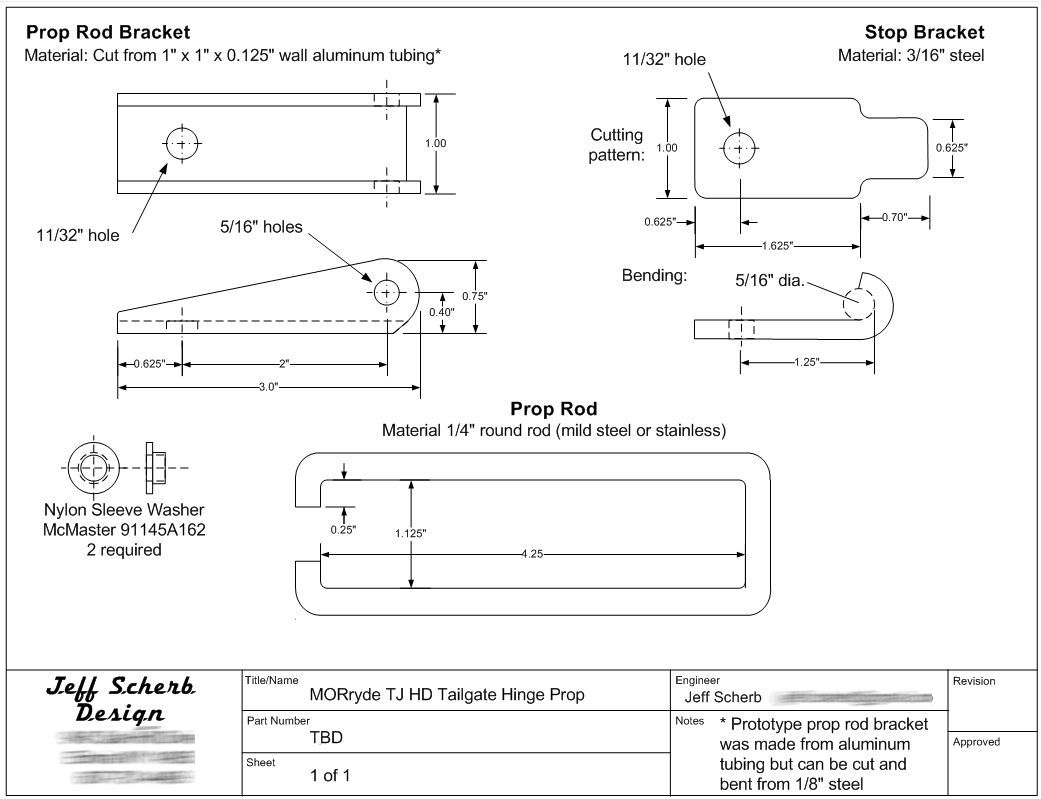
Since the trailer is a camper and the rear door will be used for access to the interior, it wouldn't do to have the door slam shut with someone inside so I made another tailgate prop. In this post I'll show most of how I made it; I didn't take photos of every detail but I hope there's enough info here that someone could follow along and make one.

The parts:

ExogateProp.jpg


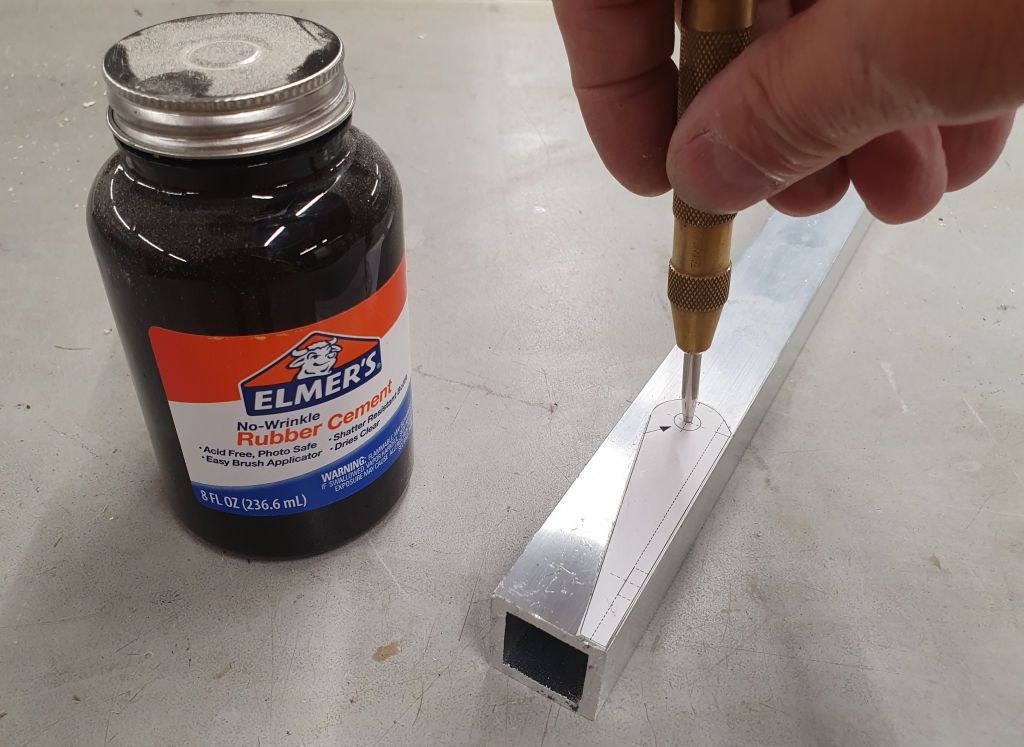
To make parts accurately, I typically cut the part image from the drawing and affix it to the metal stock with rubber cement. I've done that in this next photo; the stock is 1" square aluminum tubing:

PartLayout1.jpg


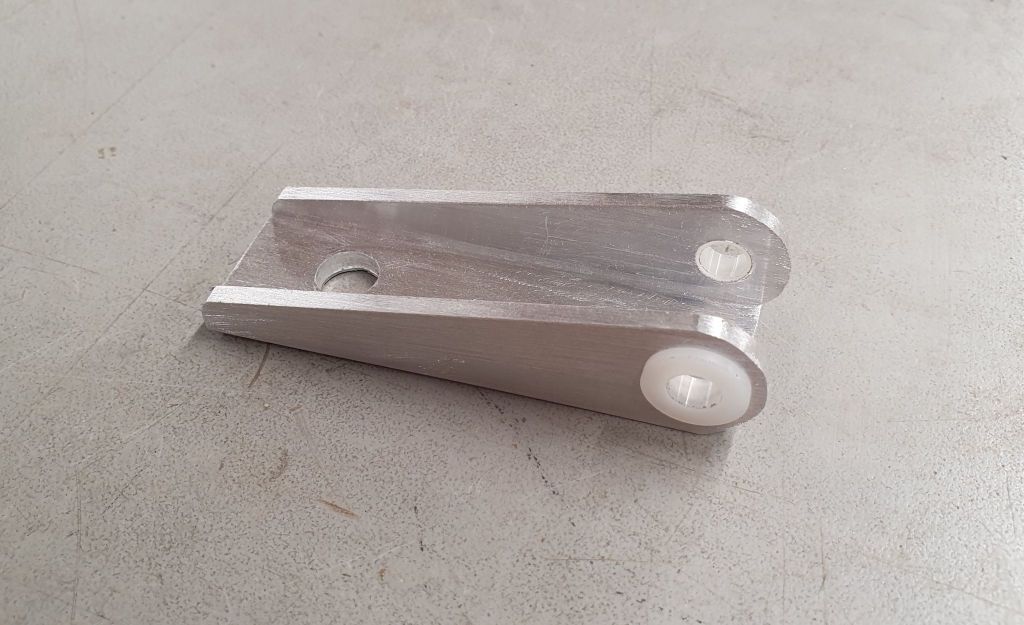
In the above photo I'm center punching the hole for the prop rod, I typically mark and drill the holes before cutting out the part because it's easier to drill a large piece of stock than a small part. This next photo shows the part above after drilling, cutting and a little filing and sanding to clean it up. The bushings for the prop rod are in place:

PropRodBracket.jpg


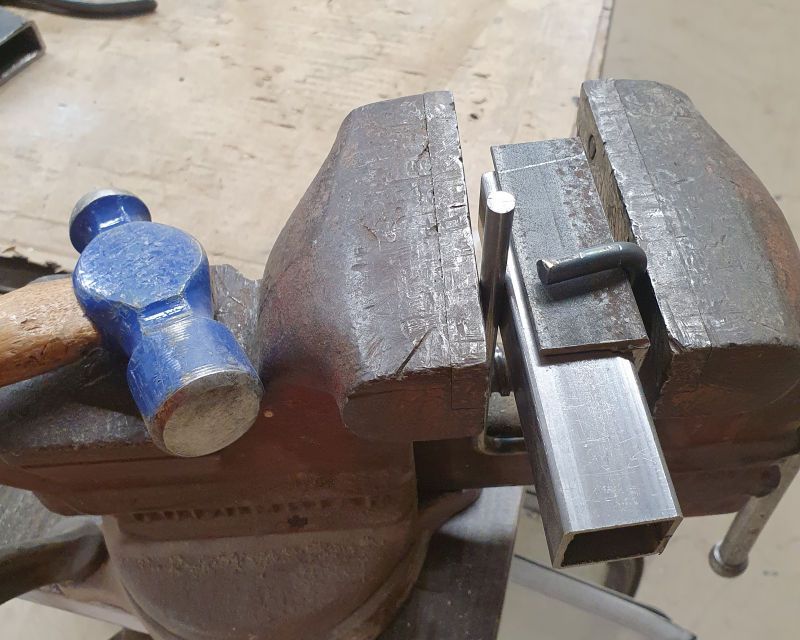
Next I'm making the Stop Bracket. Bending is accomplished in a vise, using the shank of a drill as an anvil to create a nice bend.

StopBracket.jpg


The prop rod is bent from 1/4" steel rod. For the one on the LJ, I used stainless rod but I didn't have any stainless on hand so this one is mild steel and I'll paint it to prevent rust. The bending is done in a vise with a hammer and I heated each bend with a propane torch before bending to make it easier to bend. I used various size scrap pieces of metal clamped in the vise along with the rod to create the bends accurately. Bending the rod accurately is the most difficult part of this project.

BendingPropRod.jpg


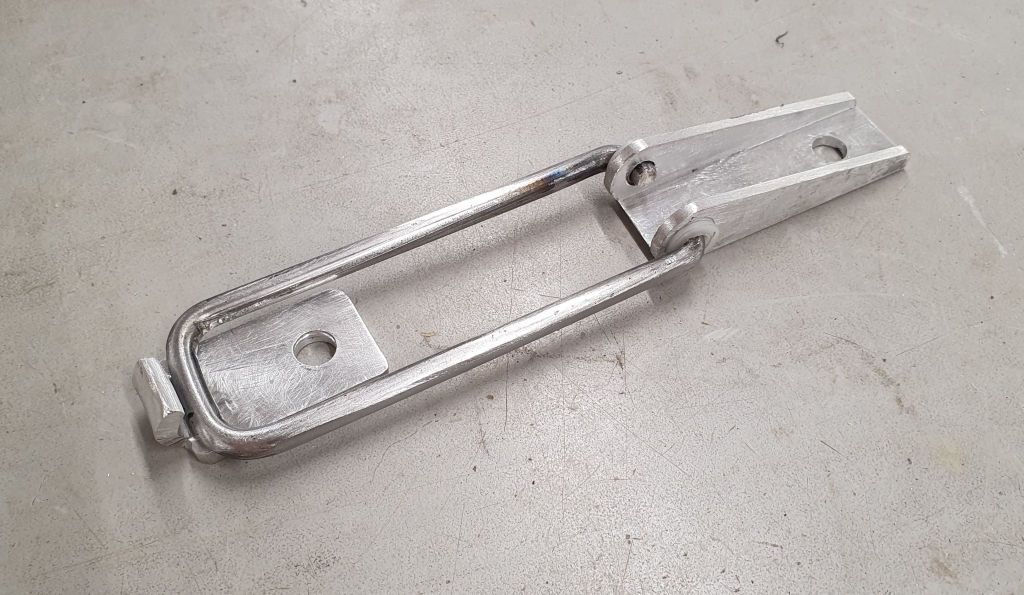
Once the rod is bent, it's test fit in the prop rod bracket and adjusted as necessary. I needed to file a little off the inside corners of the bends that go into the bushings in order for the prop rod to seat close enough to the prop rod bracket.

FabFinished.jpg


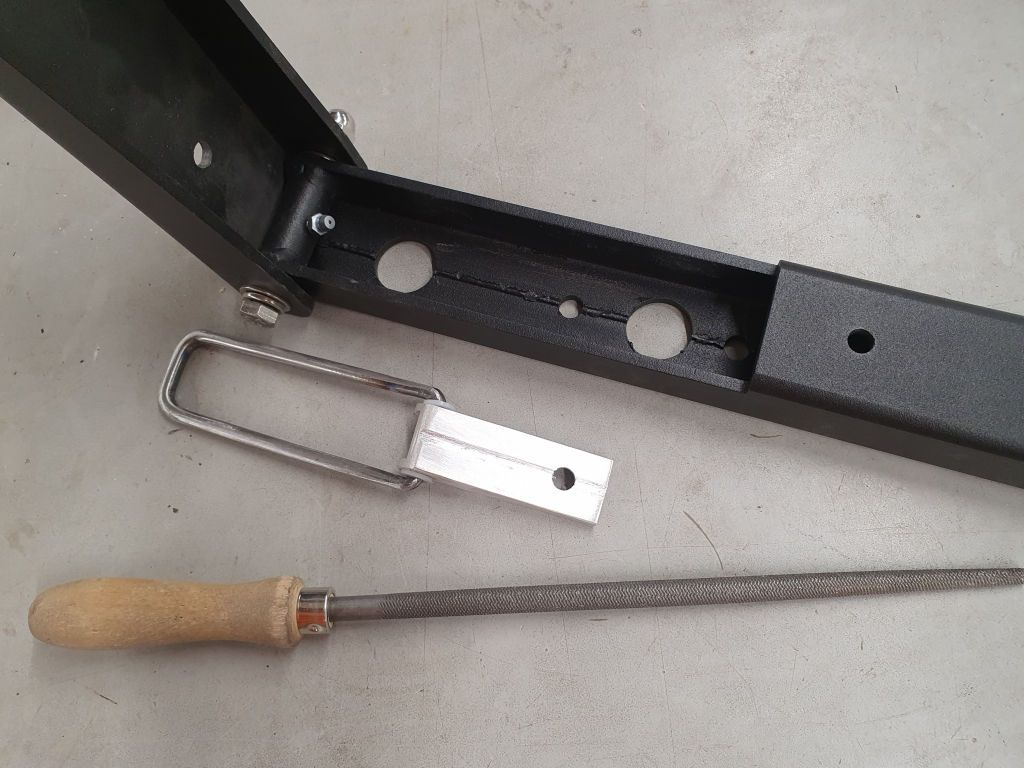
The MORryde hinges are laser cut from rectangular tubing and they've got a weld seam inside from the manufacturing process for the tubing. I used a rat tail file to make a groove in the back of the prop rod bracket so it sits nicely over the weld.

WeldSeamRelief.jpg


All of the parts test fit in a hinge:

TestFitInHinge.jpg


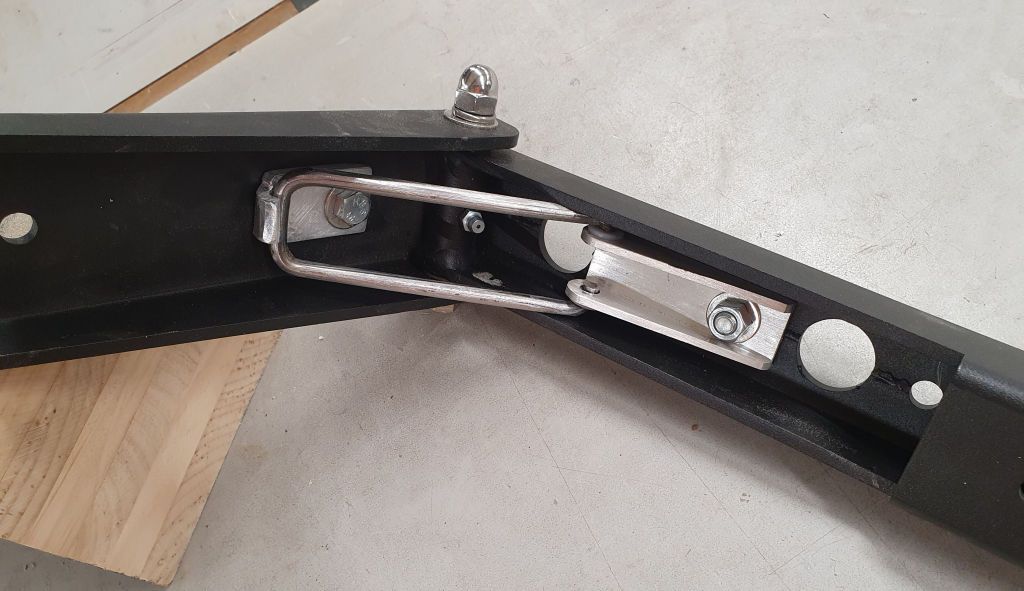
After painting the prop rod, one last detail - I slipped some heat shrink tubing over a couple of places on the prop rod where metal-on-metal contact could happen and possibly scratch the paint. Then I installed the assembly in the hinge on the trailer:

ExogatePropInstalled1(4).jpg


I mentioned that bending the prop rod is the most difficult part of the project - the 4 bends must be equal and parallel. There is a simpler way to make the prop rod with only two bends; it won't be quite as strong but it's easier to make:

ExogatePropV2(1).jpg


Next I need to make an inside release for the tailgate latch. After sleeping in the camper it would be good to be able to unlatch and open the rear door from the inside. I've done two designs for an inside release and I'll show both, stay tuned...
 

Zeep

Adventurer
Nicely done Jeff. Years ago, I installed wireless power locks on my LJR. I did this mainly because of the lack of manual lock
on the tailgate. That is, no other means, other than the key cylinder. A inside latch would make a nice addition!
 

jscherb

Expedition Leader
Nicely done Jeff. Years ago, I installed wireless power locks on my LJR. I did this mainly because of the lack of manual lock
on the tailgate. That is, no other means, other than the key cylinder. A inside latch would make a nice addition!
I also installed a power lock in my LJ tailgate, and considered installing one in the camper tailgate but haven't done that yet. When the trailer is configured as a camper there will be a battery in it so a power lock could be actuated so I might do it at some point. My LJ power lock: https://expeditionportal.com/forum/...fit-this-custom-lj.46300/page-62#post-2978752.

Inside latch writeup to come soon.
 

jscherb

Expedition Leader
It wouldn't be good to be sleeping inside the camper with the rear door closed and not be able to open it from the inside, so adding an inside latch release to the stock TJ tailgate is a must. Inside latch releases are easy to add to the TJ tailgate and I'll show two ways to do it.

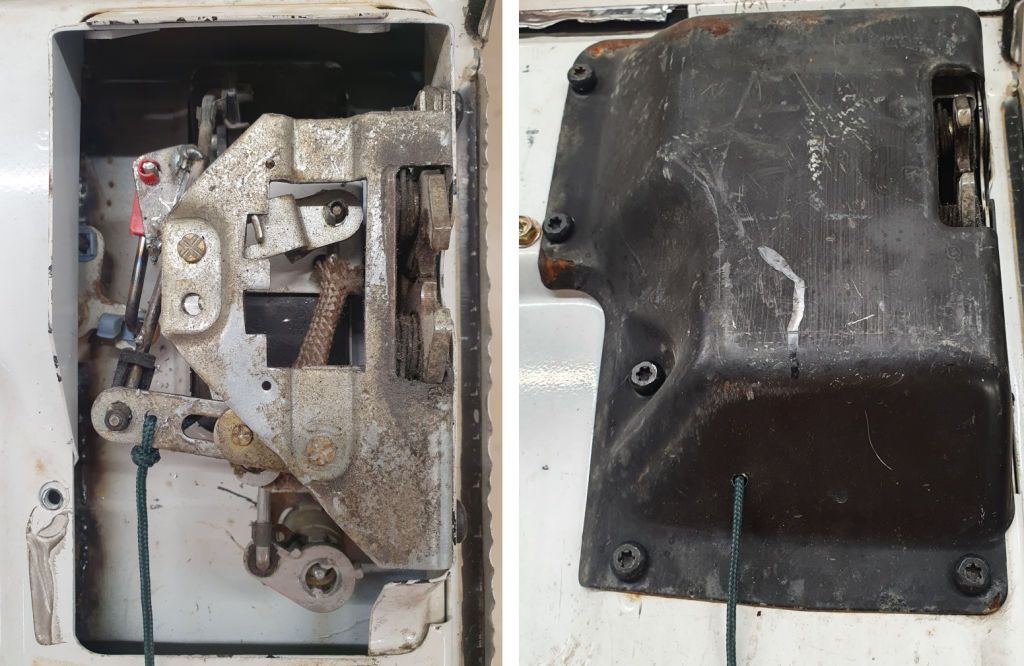
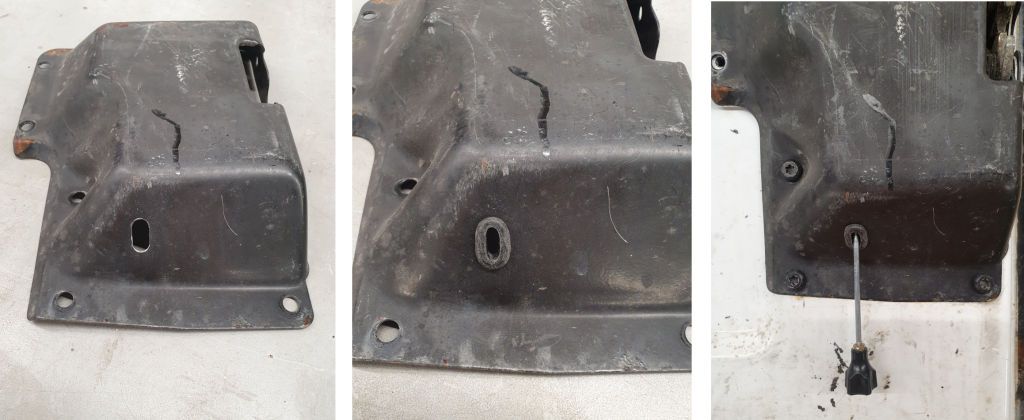
The simple way is to use a short length of paracord. A hole is drilled in the release lever and the paracord is tied to the hole. Then a hole is made in the latch cover for the paracord to exit:

ParacordLatchRelease.jpg


A downward pull on the cord will release that latch as long as the tailgate is unlocked. I takes a good amount of force to open the latch so some sort of handle tied to the end of the paracord would be good to make it easier, but I didn't put on one for these photos. An inside lock/unlock rod also wouldn't be difficult to add, but I don't think that's necessary for this camper so I'm only adding the latch release.

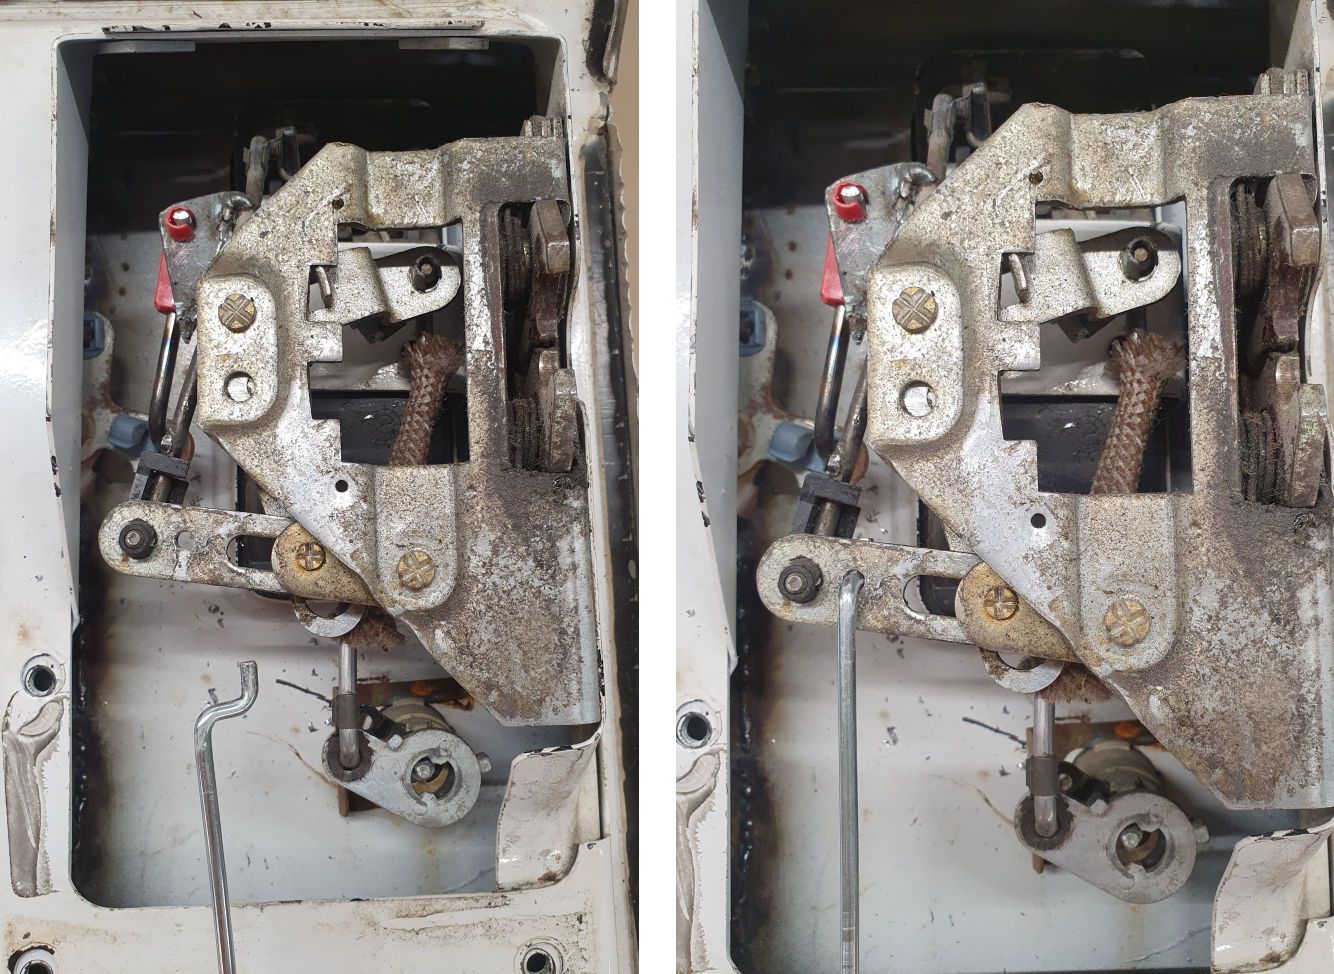
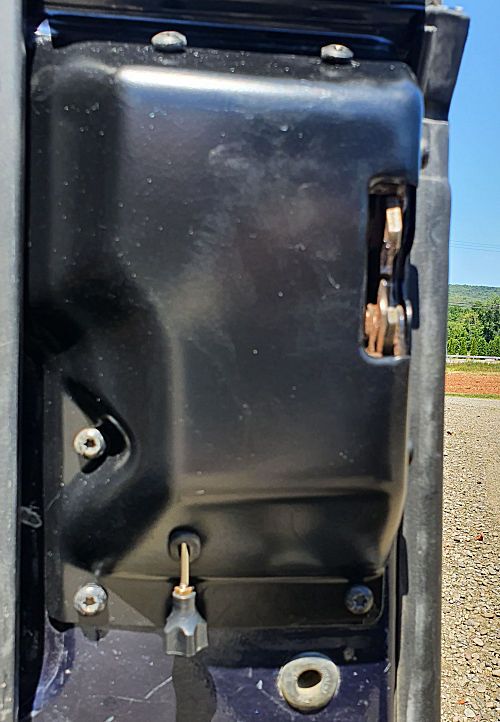
A piece of paracord sticking out of the bottom of the latch cover isn't appealing to me so I implemented a release with a little more finished look. Instead of a string, I used a piece of 1/8" steel rod. I put a z-bend in the end of the rod so it stays in the lever.

RodLatchRelease.jpg


To finish off the hole in the latch cover I enlarged the hole into an oval shape so a round grommet could be installed as an oval to provide a slot in the angled latch cover. For the bottom end of the rod I used a knob I found in my parts drawer. It had a hole all the way through it so I threaded the end of the rod with a 6-32 die so I could use nuts on both ends of the knob to hold it in place.

RodLatchRelease2.jpg


All of the above photos were done on a test tailgate on my workbench. The rod is a bit longer than I want it to be so I shortened it before installing it in the trailer. Installed:

LatchReleaseDone.jpg


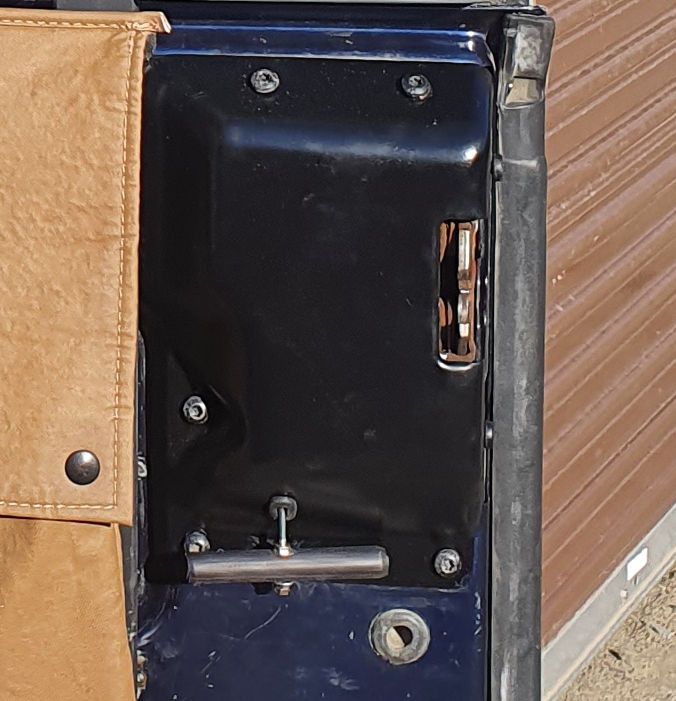
It turned out that the small knob pictured above isn't easy enough to grab to apply the right amount of force to open the latch, so I made a T-handle:

LatchReleaseTHandle.jpg


Done. Works just fine.
 

jscherb

Expedition Leader
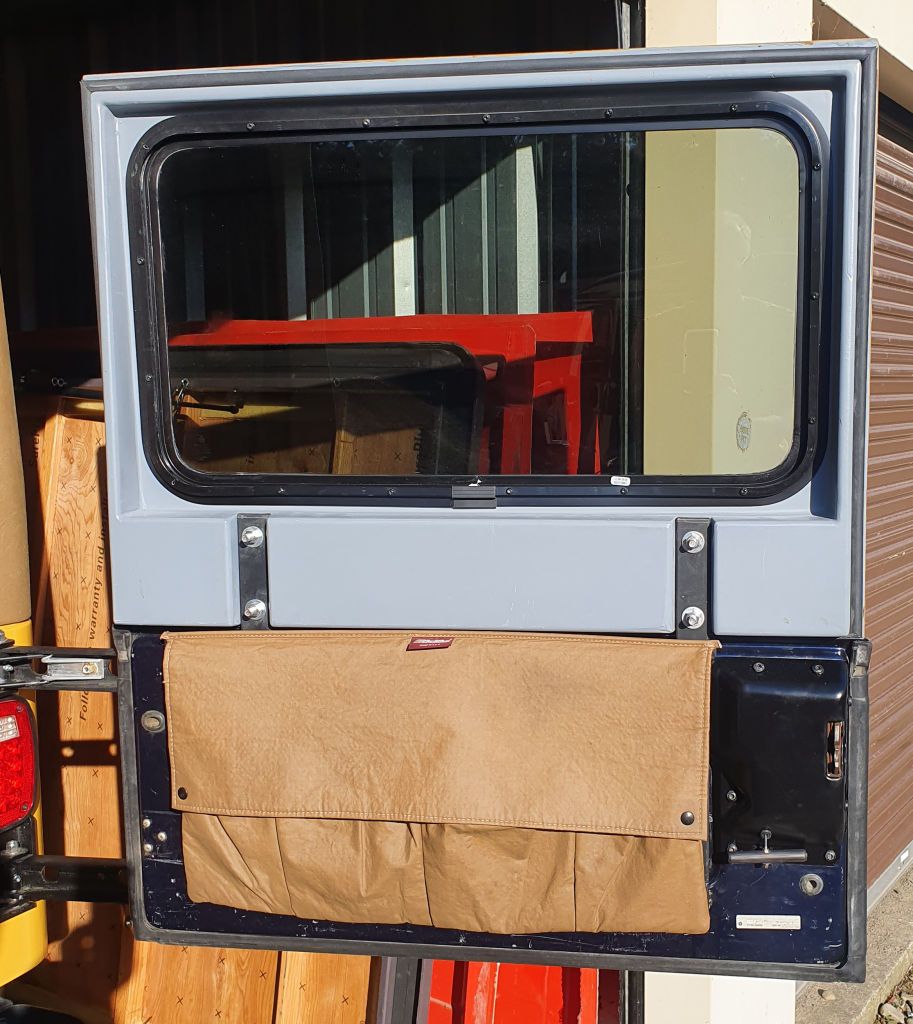
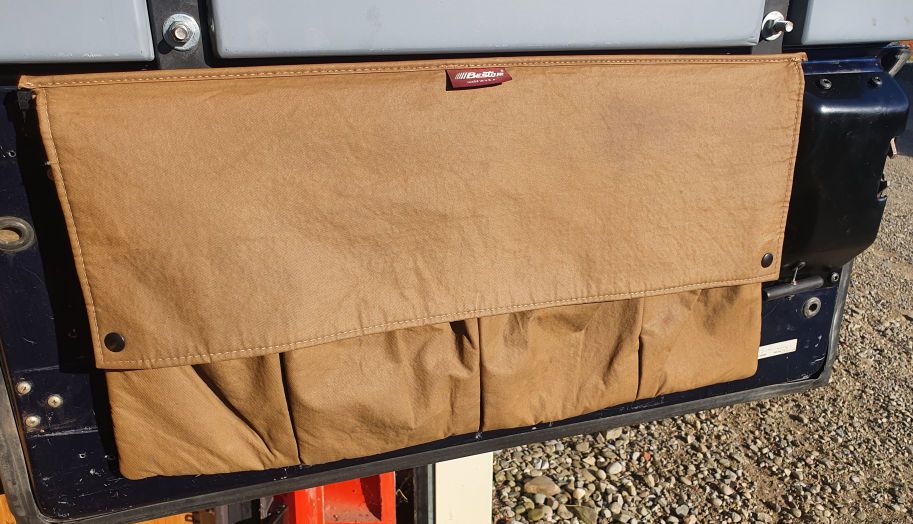
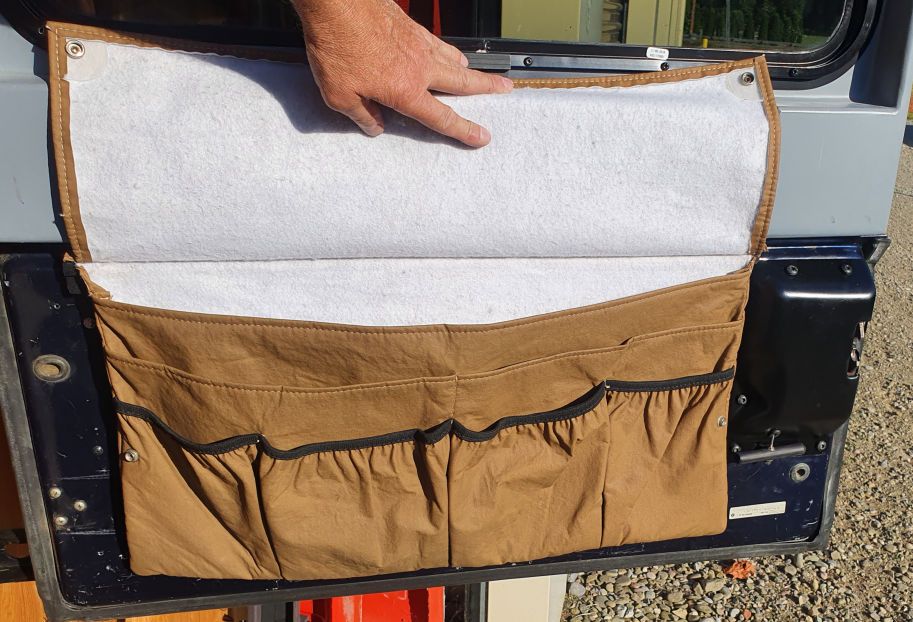
One more accessory to finish off the camper tailgate:

TailgatePockets1.jpg


TailgatePockets2.jpg


TailgatePockets3.jpg


The pockets slip into a channel across the top and have snaps on the bottom so they remove/reinstall in seconds if I don't want them on the tailgate for some trip.

TailgatePockets4(1).jpg
 

jscherb

Expedition Leader
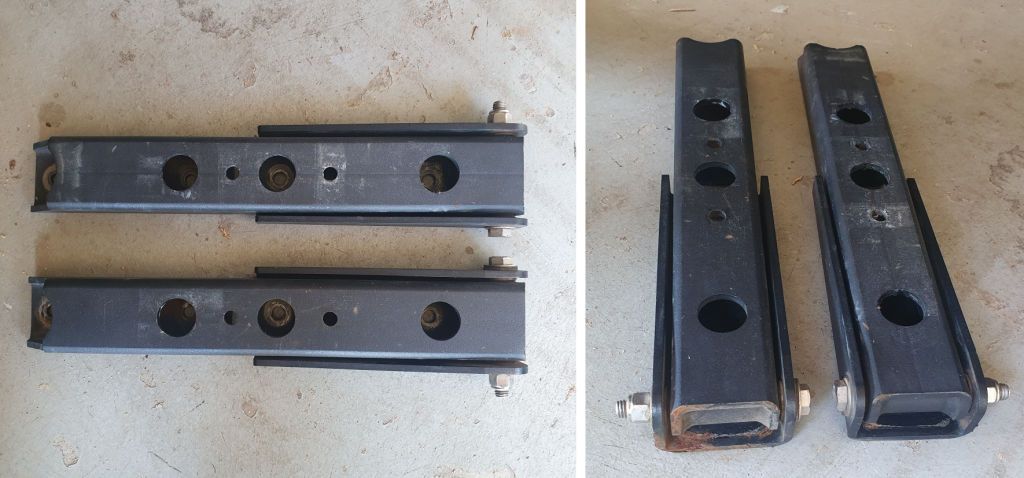
The MORryde HD hinges I've got on the LJ are preproduction samples from 2015. Preproduction samples sometimes don't go through the full production powder coat process, like zinc primer asa first layer under the powder coat so in 7 years of use they've started showing a few very small rust spots. I asked MORryde to send me a current production set to replace them and they arrived yesterday. I'll be installing them to replace the hinges on my ever-evolving tailgate reinforcement - it's part Gr8Tops v1 Exogate, part MORryde reinforcement, a few home fabricated parts plus some useful options that never made it into production like the cargo carrier receivers add-on.

NewHingesForLJ.jpg
 

jscherb

Expedition Leader
I installed the new MORryde hinges; the old ones were preproduction samples and still 100% functional but were showing some signs of 7 years of hard use and the wear and tear of lots of prototype accessories being bolted to them so it was time to upgrade to an actual production set. The old ones:

OldHinges.jpg


The new ones, installed:

NewMORrydeHinges.jpg


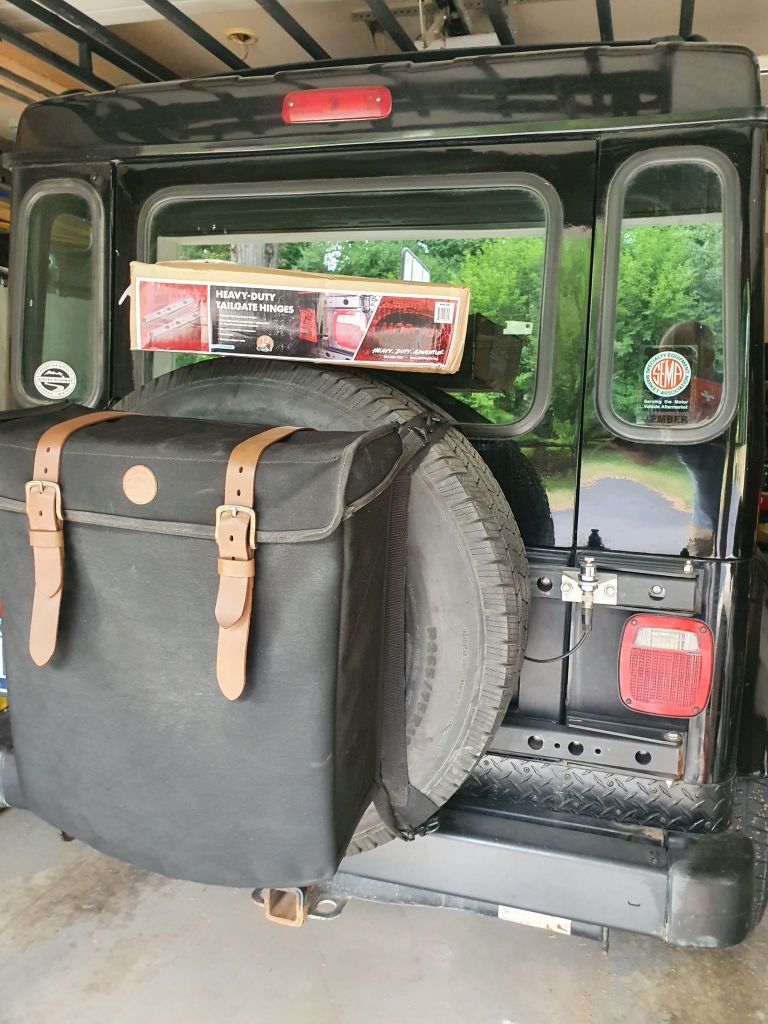
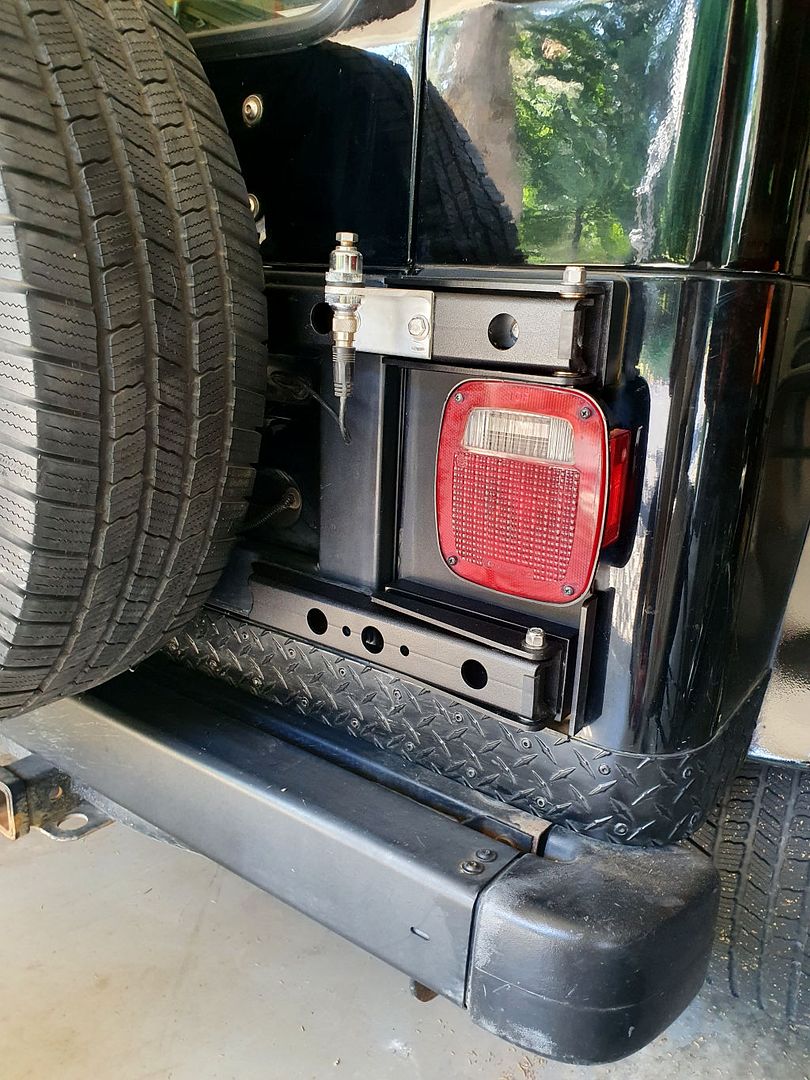
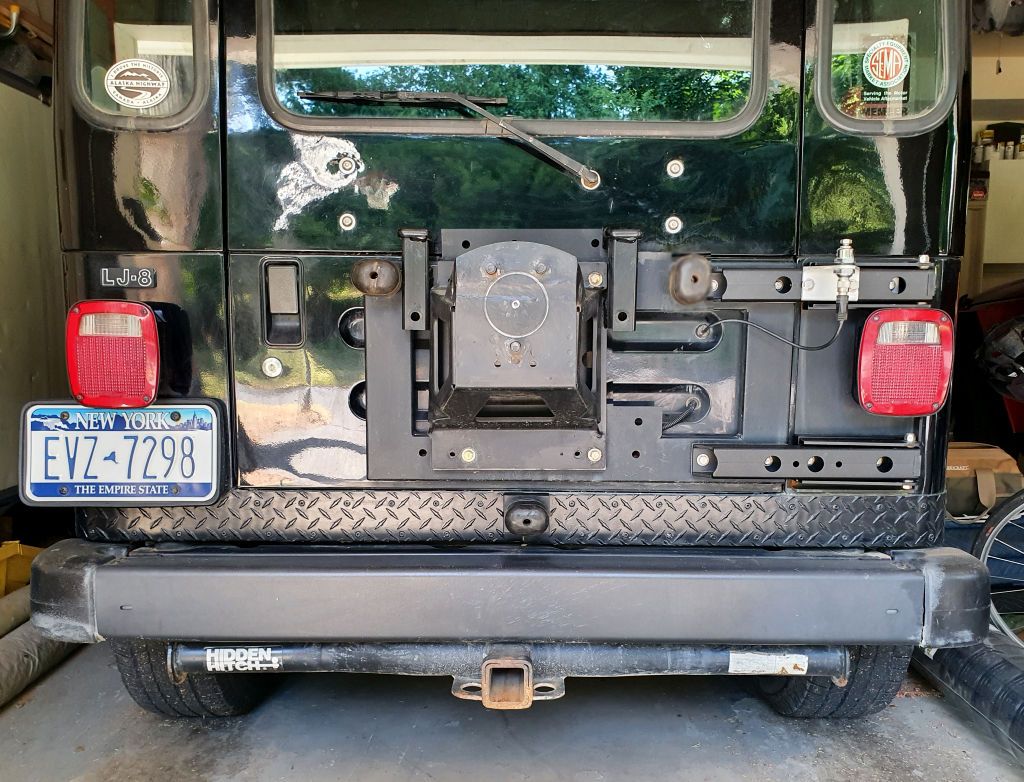
While I had the spare off I took this photo to show the entire assembly. The tailgate side is mostly a Gr8Tops V1 Exogate reinforcement; the tub side is the more recent MORryde/Exogate V2 reinforcement and HD wide-swing hinges. There are a few homemade bits to make the parts from the two versions work together and a few other changes and additions. The spare carrier has been redrilled so it can mount 1" towards the drivers side; this allows more space on the passenger side so larger things to be bolted to the hinges there.

HybridTailgateReinforcement.jpg


Also there are 1 1/4" receivers on either side of the spare carrier - these are for the the prototype tailgate cargo system.

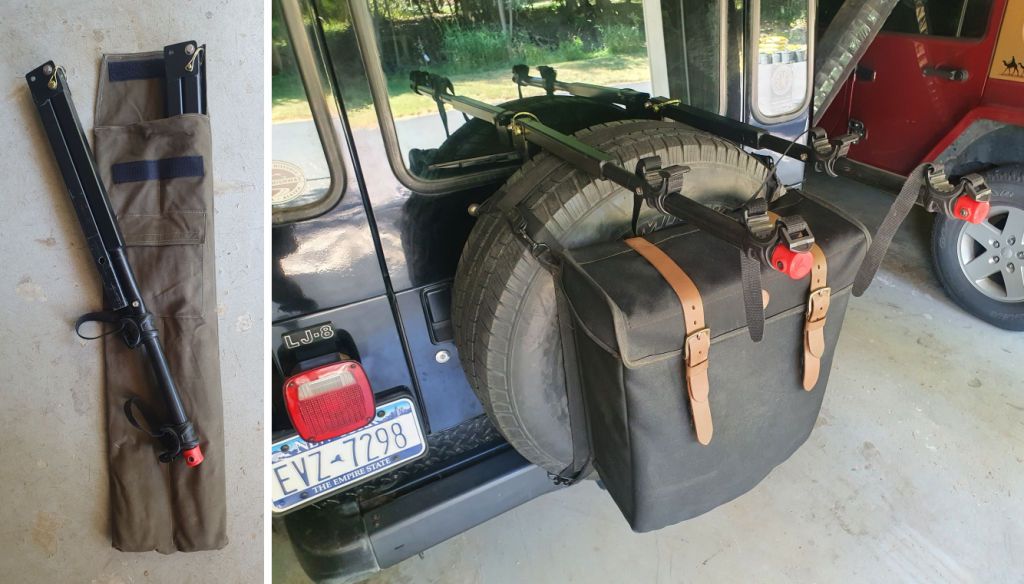
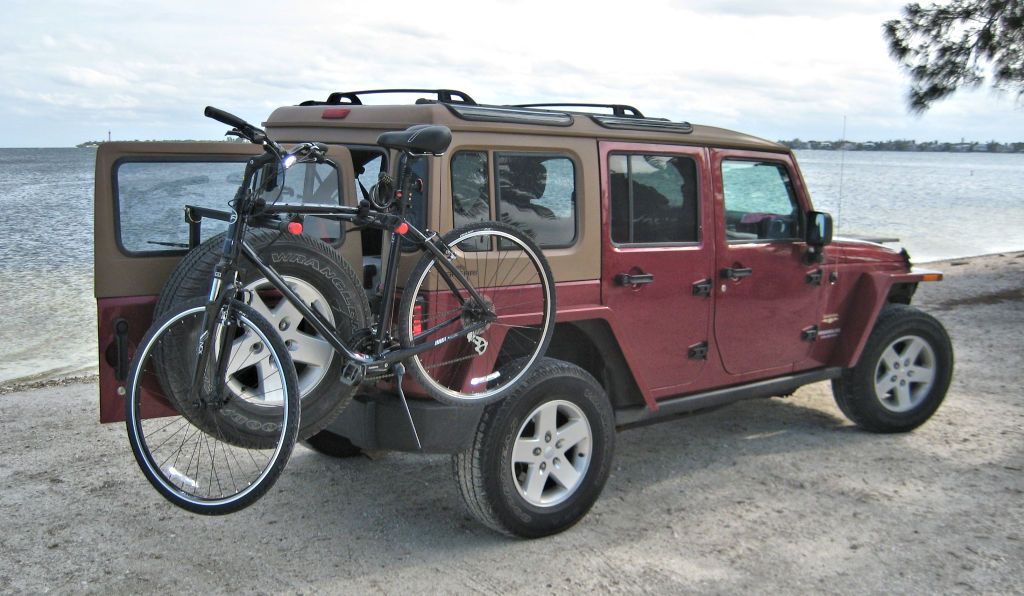
The most fully developed prototype accessory for the cargo system is the bicycle carrier. It folds up small enough to fit under the back seat and can carry two bicycles (the spare tire bag must be removed to fit two bikes; one bike will fit without removing the bag).

BikeRack.jpg


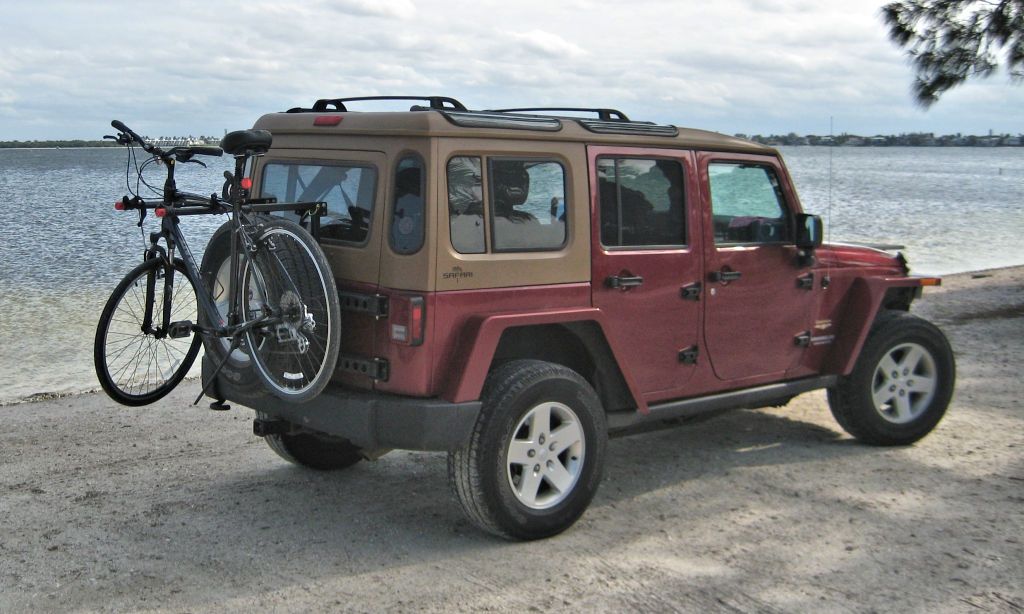
The system bolts up to either the TJ/LJ or the JK tailgate reinforcement; here are some photos of it in use on the JKU.

BikeRack6_zpse4gu9zat.jpg


Since it mounts to the tailgate reinforcement, it allows easy access to the cargo area of the Jeep:

BikeRack7_zpsu8fjrca9.jpg


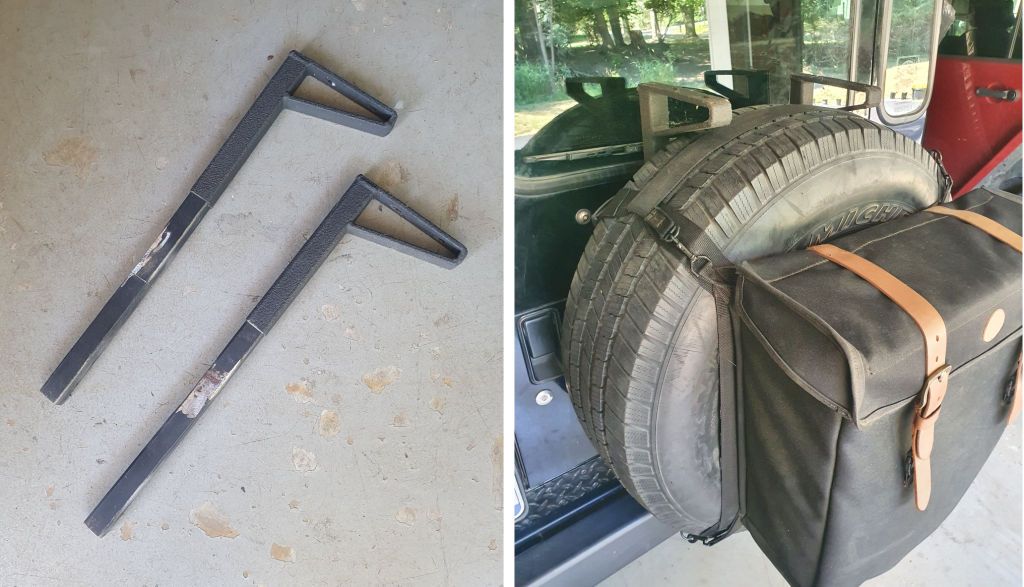
Another idea I'm working on are mounts for over-the-spare racks or other accessories that could be carried there. These are rough prototype mounts that a rack or something could be mounted to (HiLift plus sand ladders maybe?).

RackBrackets1.jpg


I've also built prototype Rotopax and jerry can carriers that slip into the receivers.

I don't know if any of the cargo system will ever make it into production, it's just something I've been developing for a while.
 

jgaz

Adventurer
I‘m very surprised the bike carrier (at least) hasn’t made it into production.

Anyone that has hauled a bicycle with a hitch carrier on a Wrangler knows the frustration of trying to get into the back when the bike rack is mounted.

I know there are solutions out there but this is simple, offer quick rear access, seems very solid, and keeps the load close to the gate.
 

jscherb

Expedition Leader
I‘m very surprised the bike carrier (at least) hasn’t made it into production.

Anyone that has hauled a bicycle with a hitch carrier on a Wrangler knows the frustration of trying to get into the back when the bike rack is mounted.

I know there are solutions out there but this is simple, offer quick rear access, seems very solid, and keeps the load close to the gate.
I've been a cyclist all my life and used dozens of different bike racks and this one is by far my favorite. The design is based on my likes and dislikes of the many racks I've used over the years. I especially like three things about this rack:

  • It stores very small and can fit under the back seat of most Wranglers.
  • It installs/removes so quickly
  • It allows easy access to the rear cargo area of the Wrangler because it swings with the tailgate.


In fact I'll be using it today - In a few minutes I'm leaving to ride to Watkins Glen (about 23 miles) and my wife will meet me there for a picnic on Seneca Lake. After the picnic, I'll install the rack and we'll drive home together.
 

Forum statistics

Threads
188,275
Messages
2,904,771
Members
229,805
Latest member
Chonker LMTV
Top