You are using an out of date browser. It may not display this or other websites correctly.
You should upgrade or use an alternative browser.
You should upgrade or use an alternative browser.
How would you outfit this custom LJ?
- Thread starter jscherb
- Start date
jscherb
Expedition Leader
I did the test one in brown leather because I've got lots of brown leather here. My 06's have gray door panels so I'll probably make pulls for those in black leather. I don't have any black leather on hand so I'll have to get some the next time I'm near a Tandy Leather store (https://tandyleather.com/). There's a store in Syracuse and I was in Syracuse Tuesday but I didn't make the brown one until yesterday so on Tuesday I didn't know I would want black leather.I'll take 2 in black!
These are very simple and quick to make, the only thing you really need is a sewing machine that can sew through two layers of leather plus a plastic stiffener that the leather is wrapped around. Unfortunately a typical home sewing machine won't have the power to drive the needle through those layers.
If there was a market for high end TJ things I'd turn the design over to OO for them to make and sell, but the market isn't there for that kind of thing for the TJ/LJ these days. If I thought they'd sell even a small quantity I'd suggest these to them. They can do very small production runs pretty efficiently and I've thought about organizing group buys with them for special items like this that there isn't general demand for.
Jim K in PA
Adventurer
I like the look. How are you reinforcing the ends to prevent tear out at the screws?
jscherb
Expedition Leader
The leather I used is quite thick (a little less than 1/8") and very tough. It's the same leather OO uses for their products (they supply me with it so I can sew prototypes of potential products for them). Tear-out should not be a problem.I like the look. How are you reinforcing the ends to prevent tear out at the screws?
jscherb
Expedition Leader
I was in a Hobby Lobby store today and discovered that they sell sheets of black leather: https://www.hobbylobby.com/Crafts-H...ather-Pieces/Black-Cowhide-Leather/p/81002437 (they also sell the same thing in brown). There's a 4-6 square foot piece of leather in the package, so I bought one. The leather is a little bit thinner than the brown leather I used to make the prototype door pull but it can be doubled up where the screws go in to strengthen it. And 4-6 square feet is plenty to make a bunch of door pulls.I'll take 2 in black!
I won't have time to get to this for at least a week but as soon as I get time I'll make a few black ones and I'll post step-by-step instructions and photos so people might be able to make their own.
jscherb
Expedition Leader
The prototype leather door pull I made a week ago was brown leather because that's what I had on hand. My LJ has a gray interior, I think Jeep calls it agate, so I made more in black leather I got from Hobby Lobby. In case anyone else wants to make their own leather pulls, here's a pattern and step-by-step instructions.
Materials - leather, preferably about 3/32" thick (typically called "6 oz." in the leather biz.). I found some black leather at Hobby Lobby https://www.hobbylobby.com/Crafts-H...ather-Pieces/Black-Cowhide-Leather/p/81002437 (they also sell the same thing in brown). There's plenty of leather in the package to make a dozen or so pulls. The leather is thinner than what I would prefer to make these out of so I'll double it up.
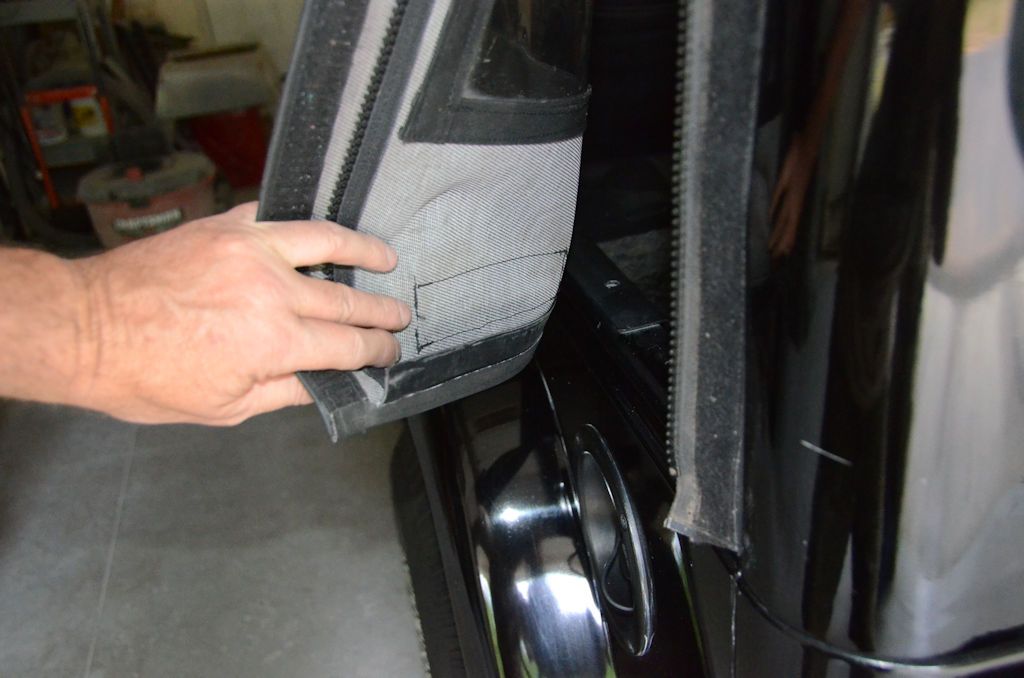
Also needed is plastic to form a stiffener. I cut that from lawn edging, the kind you stick into the ground around a flower bed - https://www.homedepot.com/p/Valley-...-W-Black-Plastic-Lawn-Edging-PRO-20/100013884, but any flat, semi flexible plastic that's maybe 1/16' thick or more will do. BTW I also use lawn edging as the bottom retainer for soft sides, this photo shows the retainer at the bottom of the roll-up soft side panel for my LJ Safari Cab that was made from lawn edging, it's fairly easy to sew through and strong enough to work well as a retainer strip:
If you can't find anything else to use you can cut three or four pieces from a gallon plastic milk jug and sew them together to make a thicker piece to serve as the stiffener for this project.
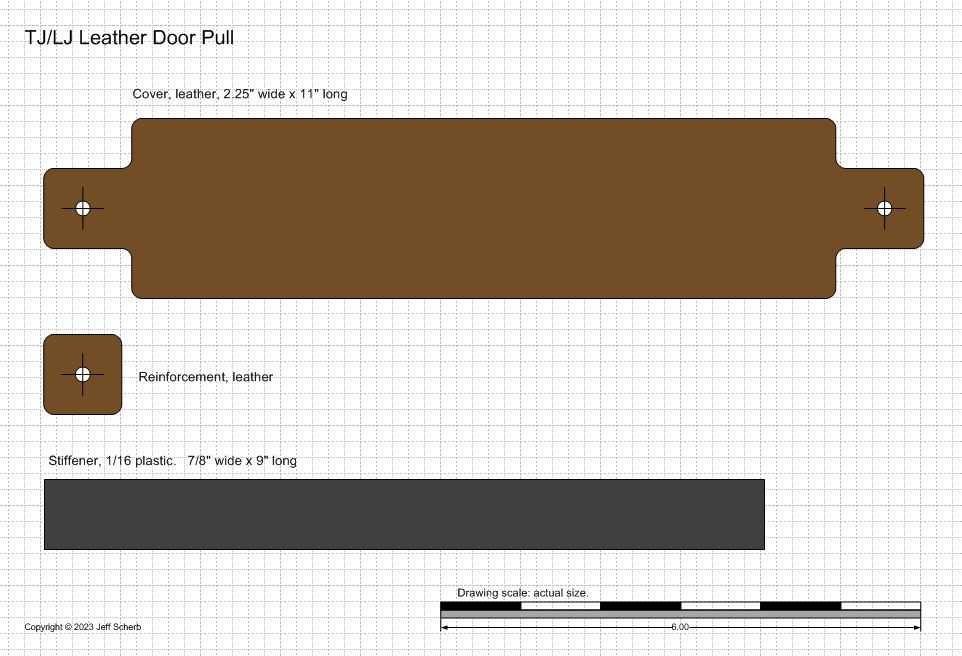
This is the pattern for the parts. There's a scale on the pattern so when you print the pattern you can verify that it's printed full size.
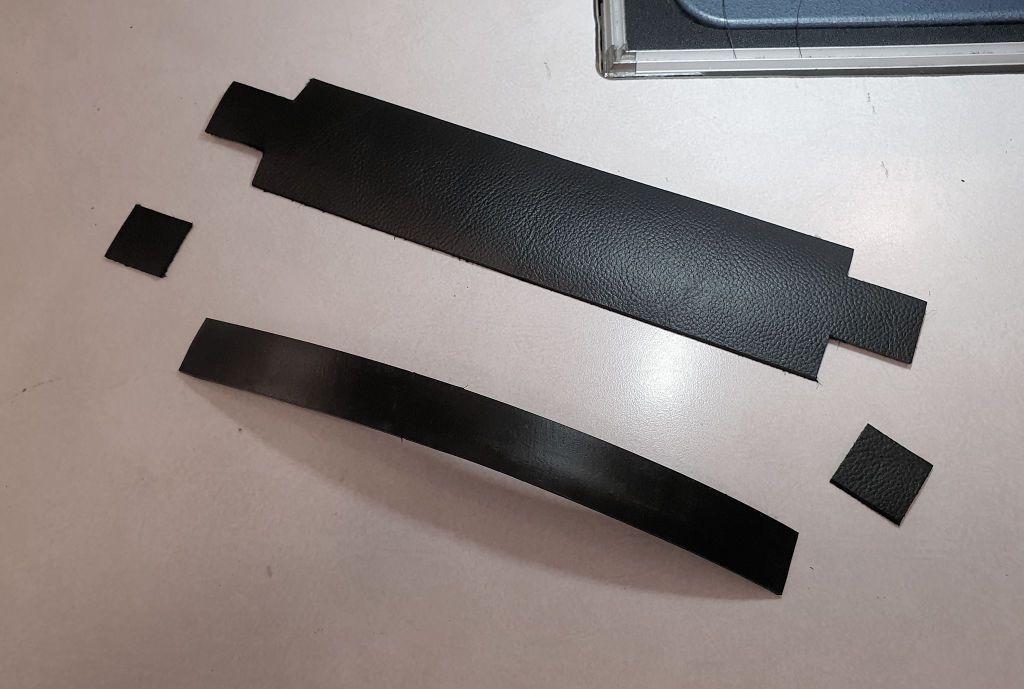
The parts:
As I said, the Hobby Lobby leather is thinner than I'd like, so I made two of the leather pieces and glued them back sides together with contact cement.
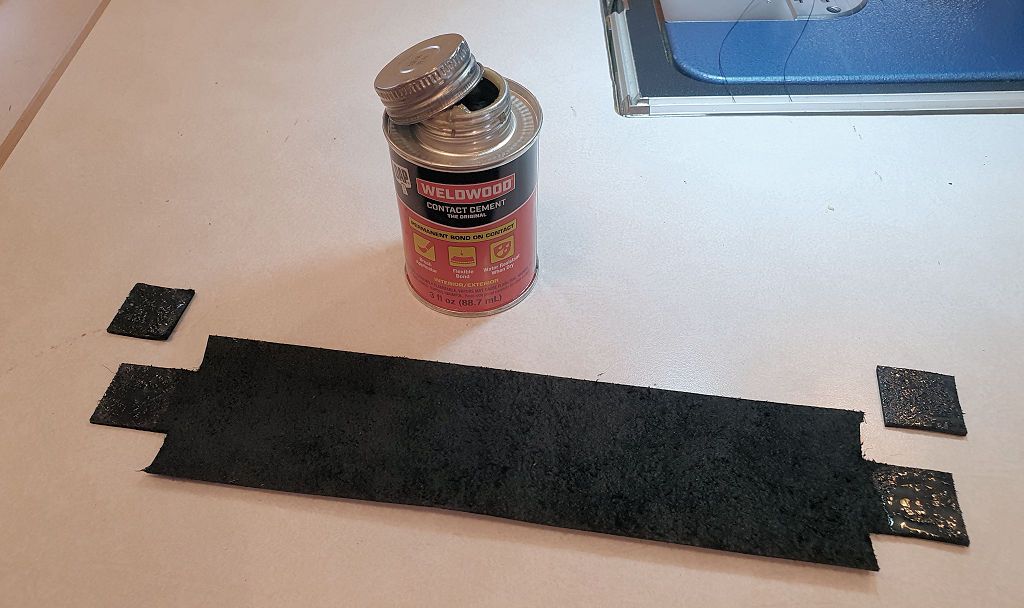
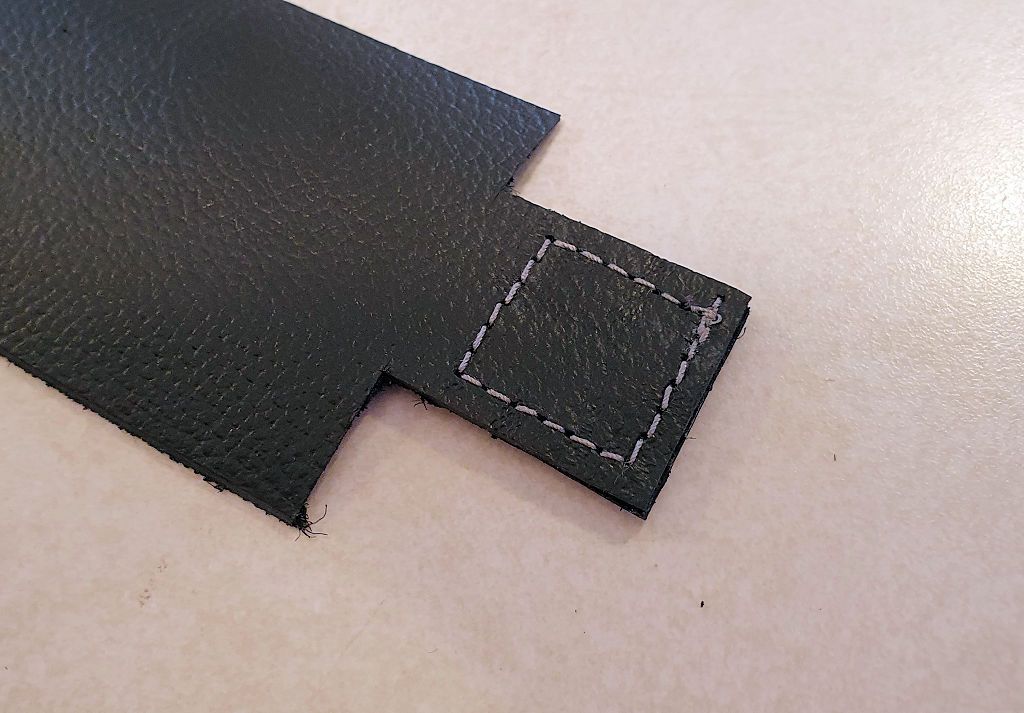
After gluingb the two pieces together, I sewed a box around each end to strengthen the tabs. This won't show once the pull is installed, so you don't get extra points for stitching a perfect box :
:
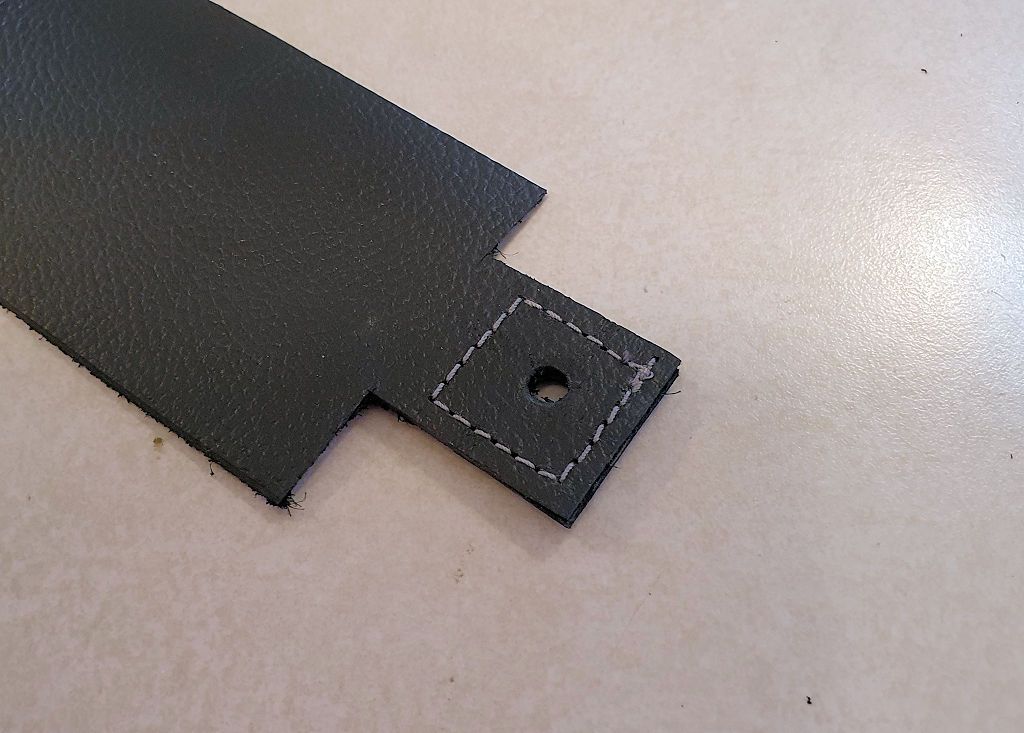
Punch the screw holes in the tab ends. I used a 3/16" punch to fit the screws but there is a boss on the inside of the door panel that's about 5/16" in diameter, so the holes could be punched larger for the boss to fit in. I like the smaller hole because the pull is clamped tighter between the door panel and the door frame.
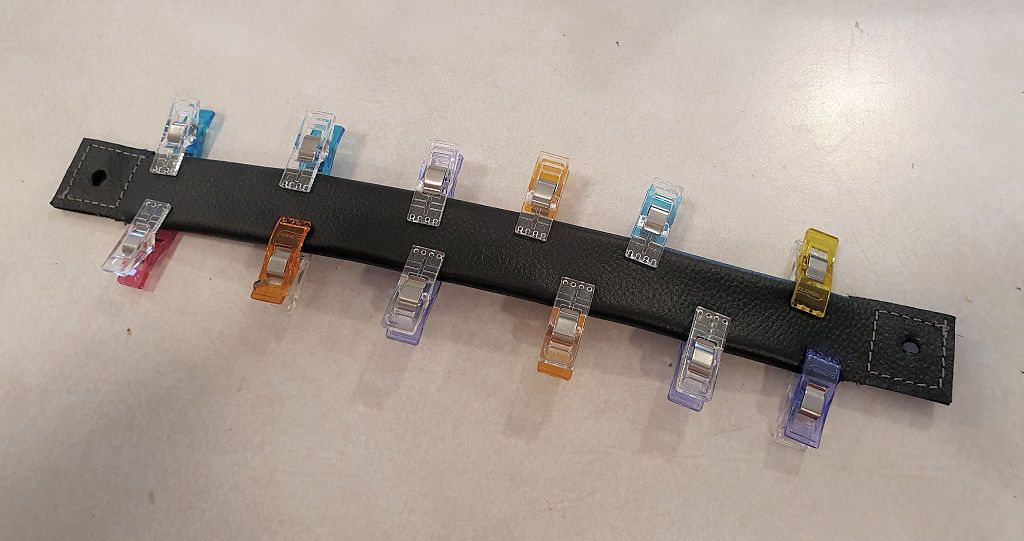
The leather is wrapped around the plastic stiffener and temporarily held in place with some sewing clips. Test the fit, and trim the leather as necessary if it overlaps in the back.
Two lines of stitching are sewn along the pull, going through the leather on both sides and the plastic stiffener in the middle. You can use whatever color thread you like for an accent color, I chose gray to match the door panel.
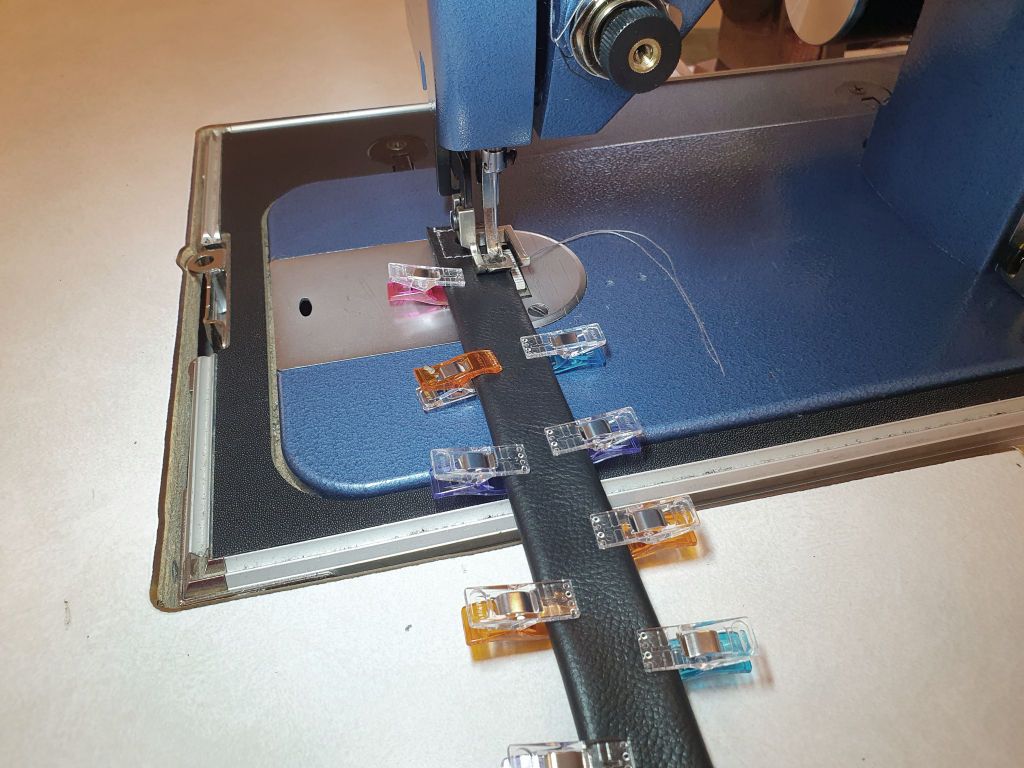
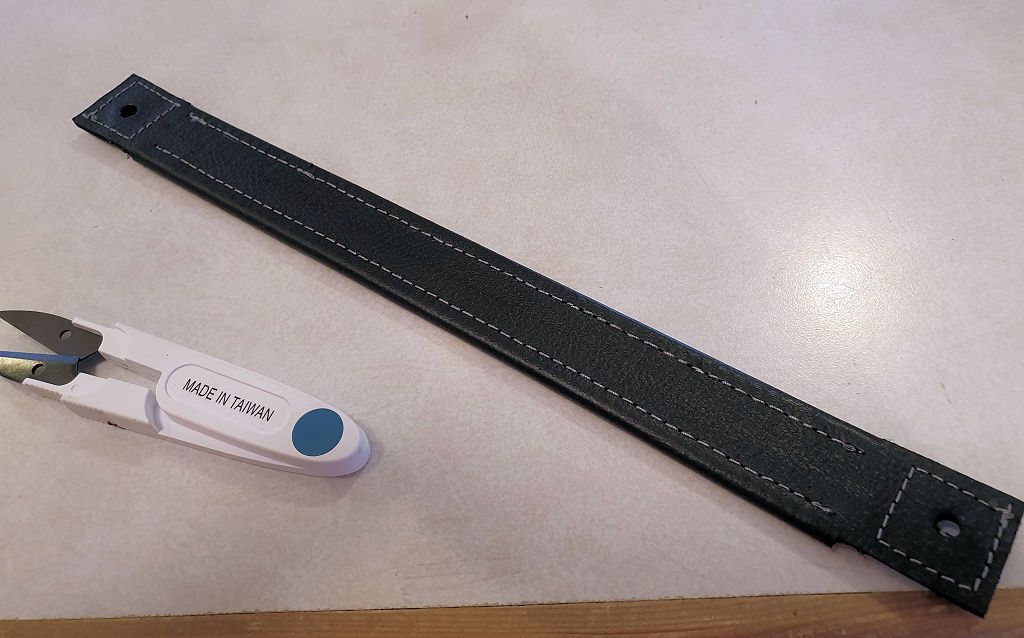
Some sewing machines, particularly the inexpensive ones that are mostly plastic these days, may not have the power to sew through the leather plus the plastic, so it's worth testing whatever machine you have with the leather and plastic before you get too far into this project.
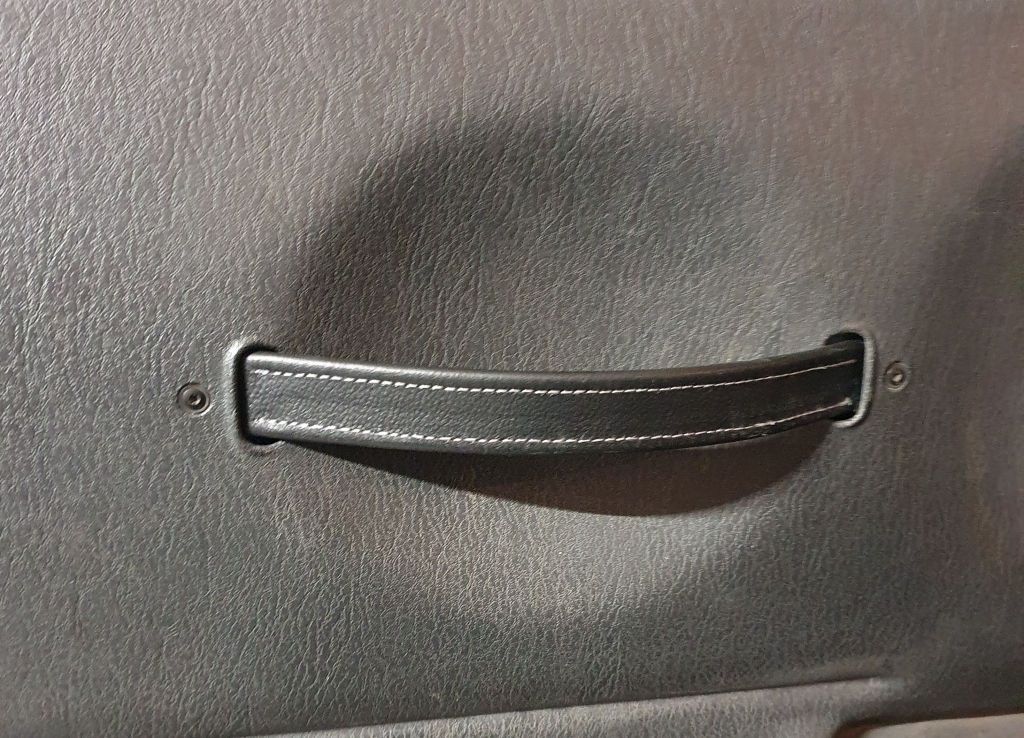
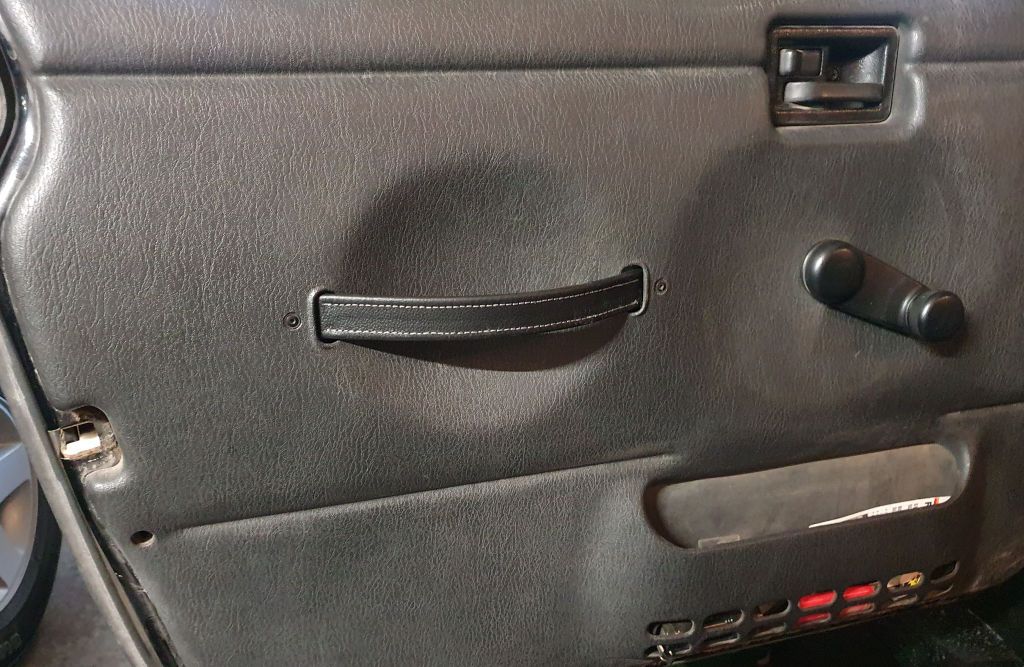
Installation is simple - remove the screws holding the factory pull in place (Torx T-15), slip the old pull out, slip the new pull into place and insert and tighten the screws.
It's a pretty simple project and I think they're a lot nicer than the factory pulls.
Materials - leather, preferably about 3/32" thick (typically called "6 oz." in the leather biz.). I found some black leather at Hobby Lobby https://www.hobbylobby.com/Crafts-H...ather-Pieces/Black-Cowhide-Leather/p/81002437 (they also sell the same thing in brown). There's plenty of leather in the package to make a dozen or so pulls. The leather is thinner than what I would prefer to make these out of so I'll double it up.
Also needed is plastic to form a stiffener. I cut that from lawn edging, the kind you stick into the ground around a flower bed - https://www.homedepot.com/p/Valley-...-W-Black-Plastic-Lawn-Edging-PRO-20/100013884, but any flat, semi flexible plastic that's maybe 1/16' thick or more will do. BTW I also use lawn edging as the bottom retainer for soft sides, this photo shows the retainer at the bottom of the roll-up soft side panel for my LJ Safari Cab that was made from lawn edging, it's fairly easy to sew through and strong enough to work well as a retainer strip:

If you can't find anything else to use you can cut three or four pieces from a gallon plastic milk jug and sew them together to make a thicker piece to serve as the stiffener for this project.
This is the pattern for the parts. There's a scale on the pattern so when you print the pattern you can verify that it's printed full size.

The parts:

As I said, the Hobby Lobby leather is thinner than I'd like, so I made two of the leather pieces and glued them back sides together with contact cement.

After gluingb the two pieces together, I sewed a box around each end to strengthen the tabs. This won't show once the pull is installed, so you don't get extra points for stitching a perfect box

Punch the screw holes in the tab ends. I used a 3/16" punch to fit the screws but there is a boss on the inside of the door panel that's about 5/16" in diameter, so the holes could be punched larger for the boss to fit in. I like the smaller hole because the pull is clamped tighter between the door panel and the door frame.

The leather is wrapped around the plastic stiffener and temporarily held in place with some sewing clips. Test the fit, and trim the leather as necessary if it overlaps in the back.

Two lines of stitching are sewn along the pull, going through the leather on both sides and the plastic stiffener in the middle. You can use whatever color thread you like for an accent color, I chose gray to match the door panel.


Some sewing machines, particularly the inexpensive ones that are mostly plastic these days, may not have the power to sew through the leather plus the plastic, so it's worth testing whatever machine you have with the leather and plastic before you get too far into this project.
Installation is simple - remove the screws holding the factory pull in place (Torx T-15), slip the old pull out, slip the new pull into place and insert and tighten the screws.
It's a pretty simple project and I think they're a lot nicer than the factory pulls.


jscherb
Expedition Leader
I wrote in my JK thread that Overland Outfitters sent me a box full of preproduction samples of their new spare tire storage products to test. I did a quick install of each of them on the LJ this morning. These are preproduction samples, so they don't have final production hardware and some of the details aren't final yet but they're close enough for testing and for me to provide them with feedback. Don't mind the salty LJ, it serves plow duty all winter and doesn't get washed until the plow comes off in the spring. The SpareHopper:
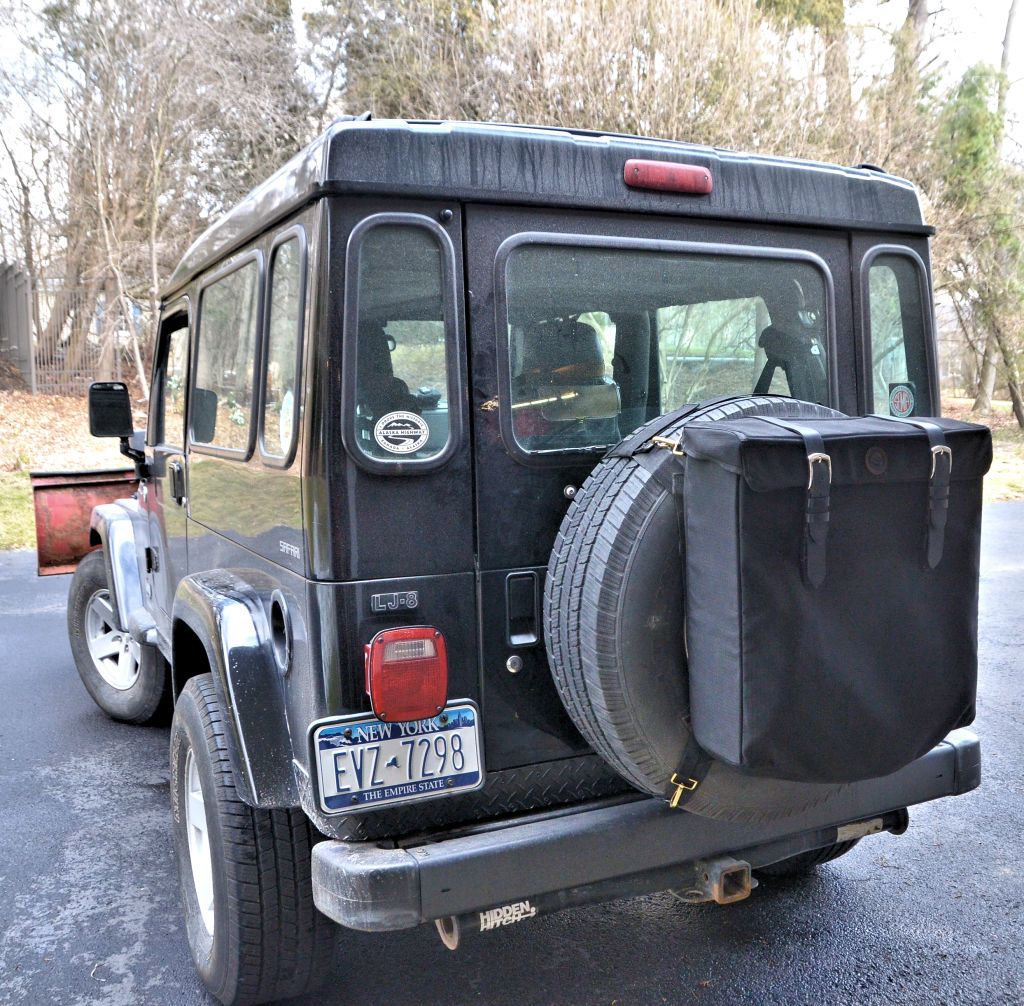
I've had a SpareHopper on both my JKU and my LJ for a long time - the first ones were prototypes I sewed and later I've been using preproduction samples from OO. I use them all the time - in NY State stores aren't allowed to put your purchases in bags anymore so I carry my reusable shipping bags in there because there's no good place to keep them in the Jeep. And when I'm on long trips or offroad expeditions I use it for a trash and recycling bag, it's just the right size for a standard kitchen trash bag to fit inside.
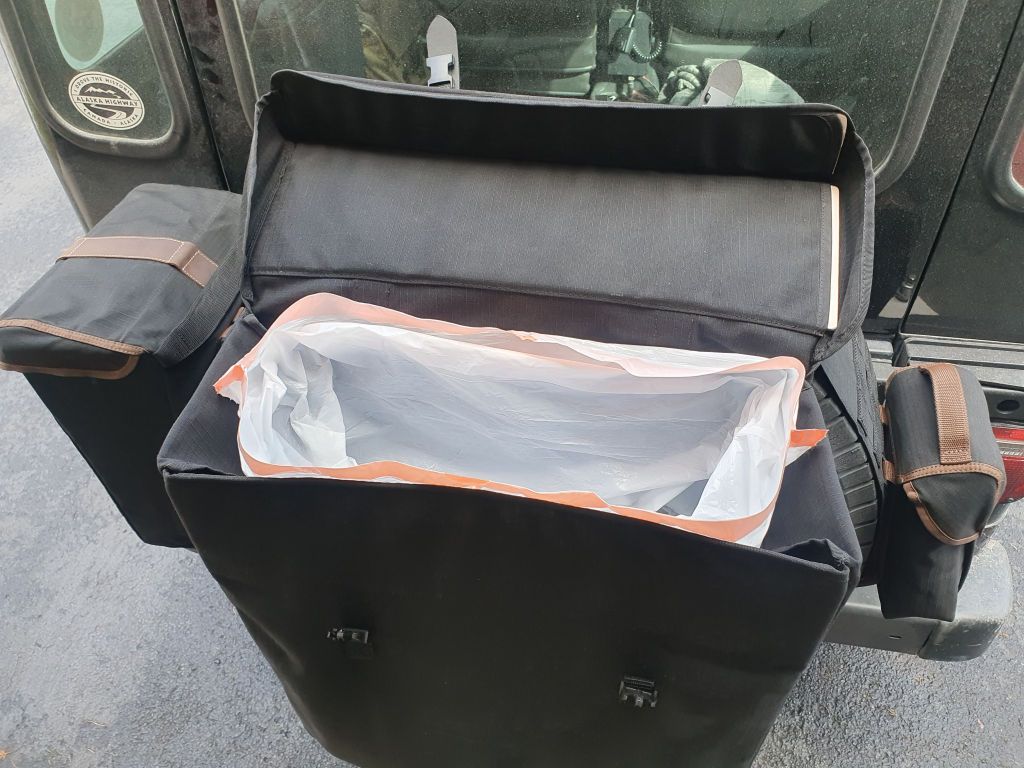
It's easy to move the SpareHopper between the two Jeeps because the mounting straps are separate and the bag attaches to the straps with clips. I've got mounting straps on the LJ and the JKU so I can use the bag on either one.
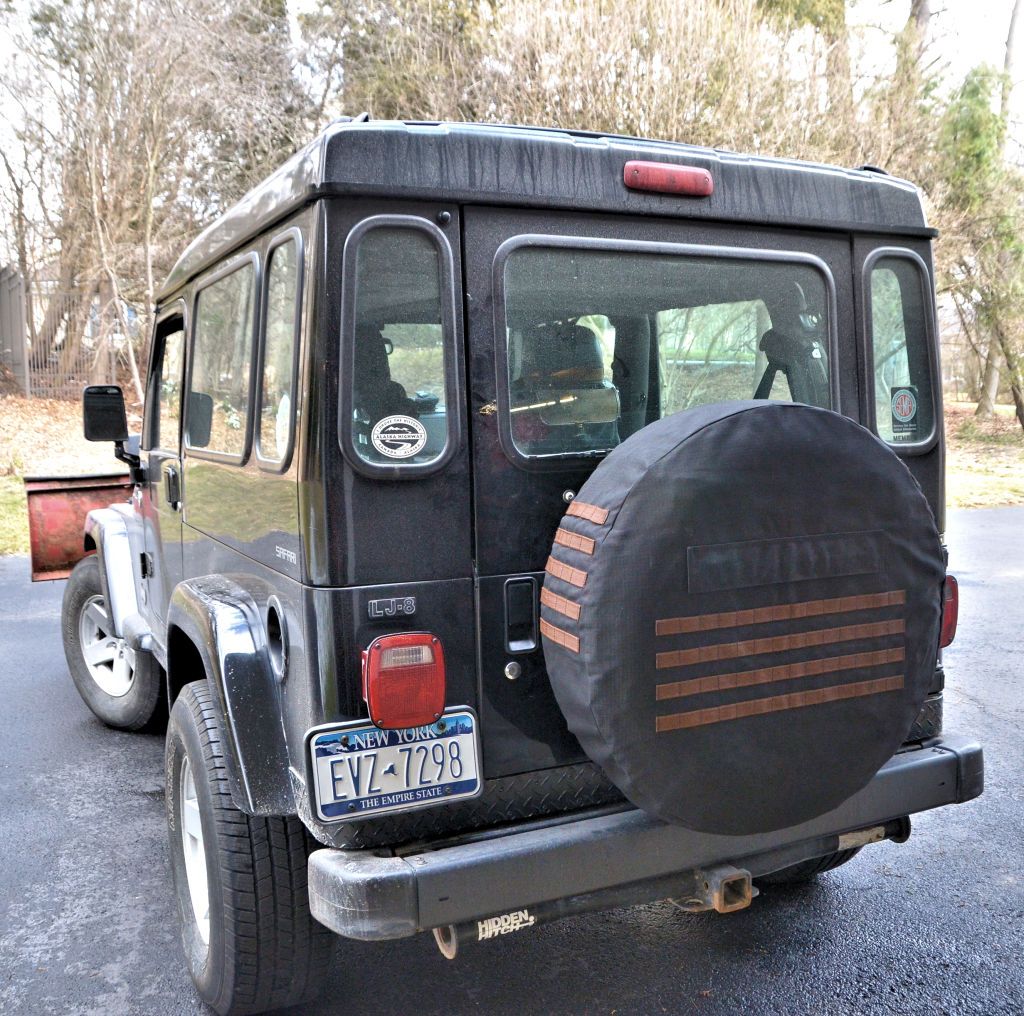
Next up is the Tactical Spare Cover. It's got MOLLE grids on both sides and on the face, and also a pocket inside the face.
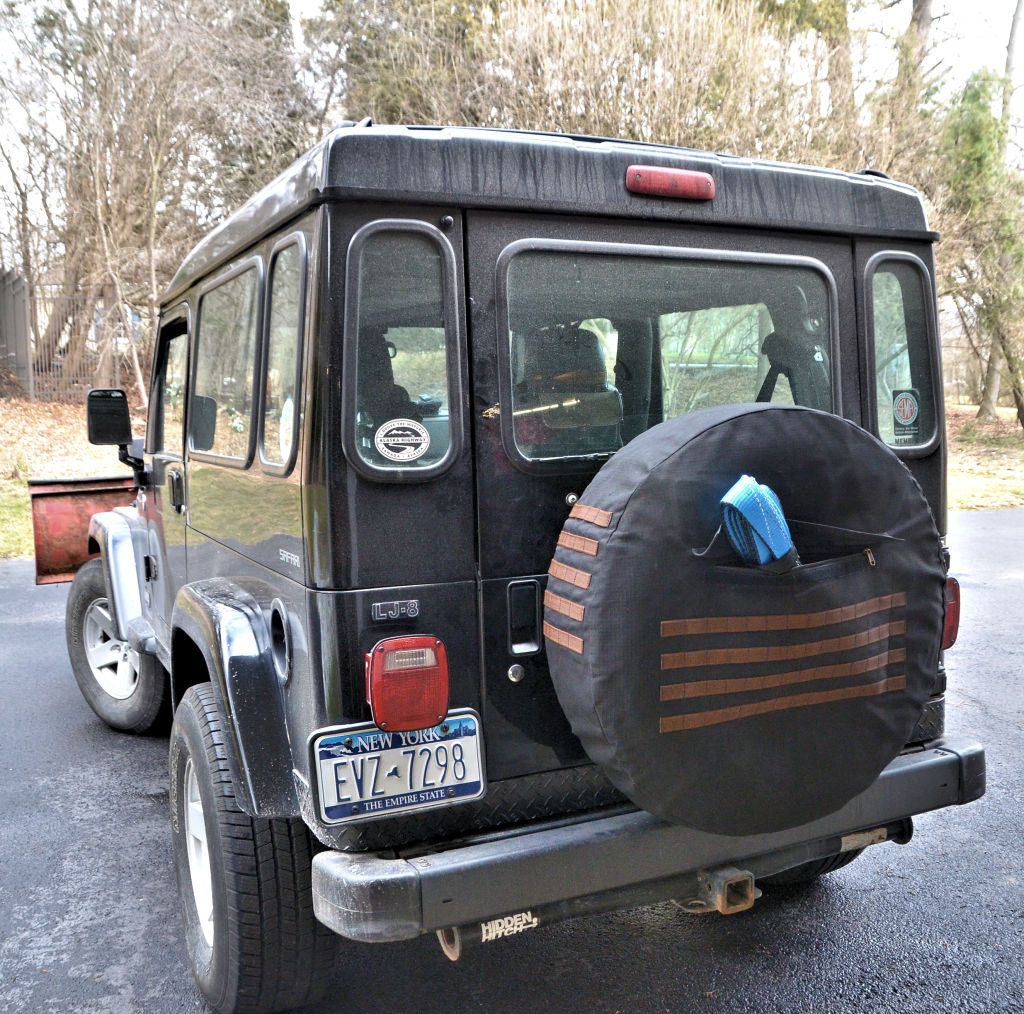
In this next photo my Tree Saver strap is sitting partially out of the pocket, it does fit all the way in.
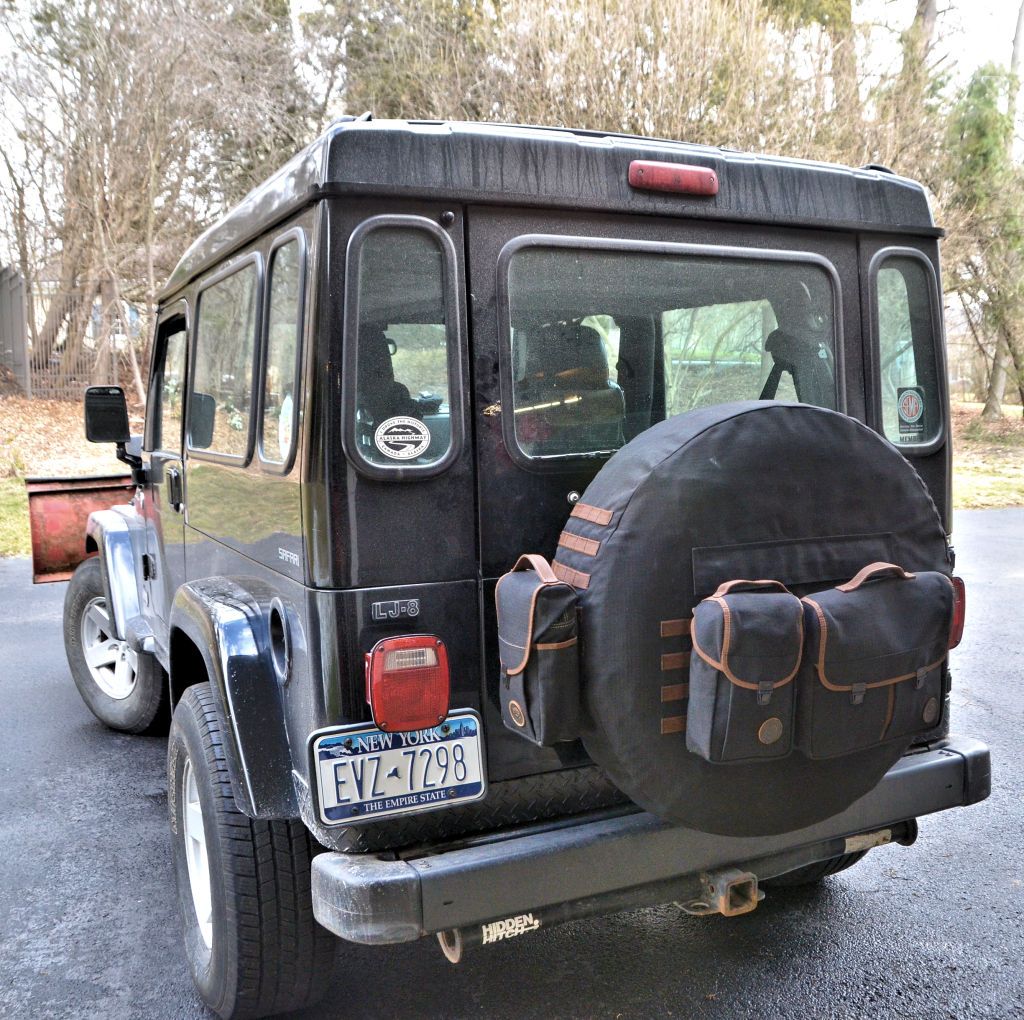
To go with the Tactical Spare Cover (or any other place where MOLLE is exposed to the weather, there are 6" and 12" weather resistant MOLLE bags. Here are a few on the spare cover:
And for more storage, similar to the SpareHopper but in a smaller size, are the SpareSide bags. They attach to the MOLLE on the side of the spare cover.
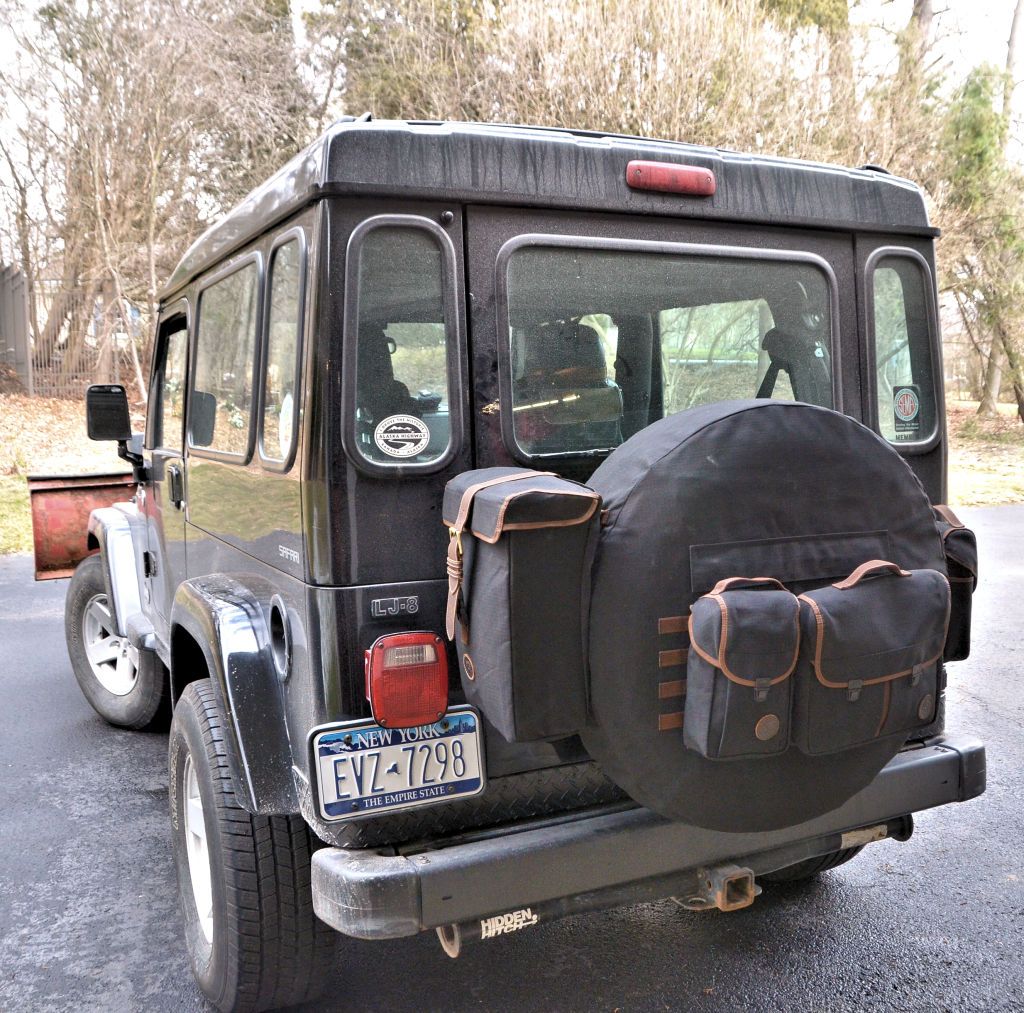
On the TJ/LJ the spare is a bit towards the passenger side of the Jeep so a SpareSide bag can interfere with the tail light on that side. The JK is wide enough for a SpareSide bag on either side, but on the TJ/LJ it's probably best to use a SpareSide bag only on the driver's side and put a weather-resistant MOLLE bag on the passenger side.
The SpareSide bags or the MOLLE bags can also be used without the spare tire cover - the MOLLEWrap is a band that wraps around the spare and has the same MOLLE grids on the side that the spare cover does. The MOLLEWrap is also compatible with the SpareHopper, in the next photo I've left the SpareHopper straps in place and installed the MOLLEWrap over them so both the SpareHopper and a pair of molle bags or SpareSide bags can be carried at the same time.
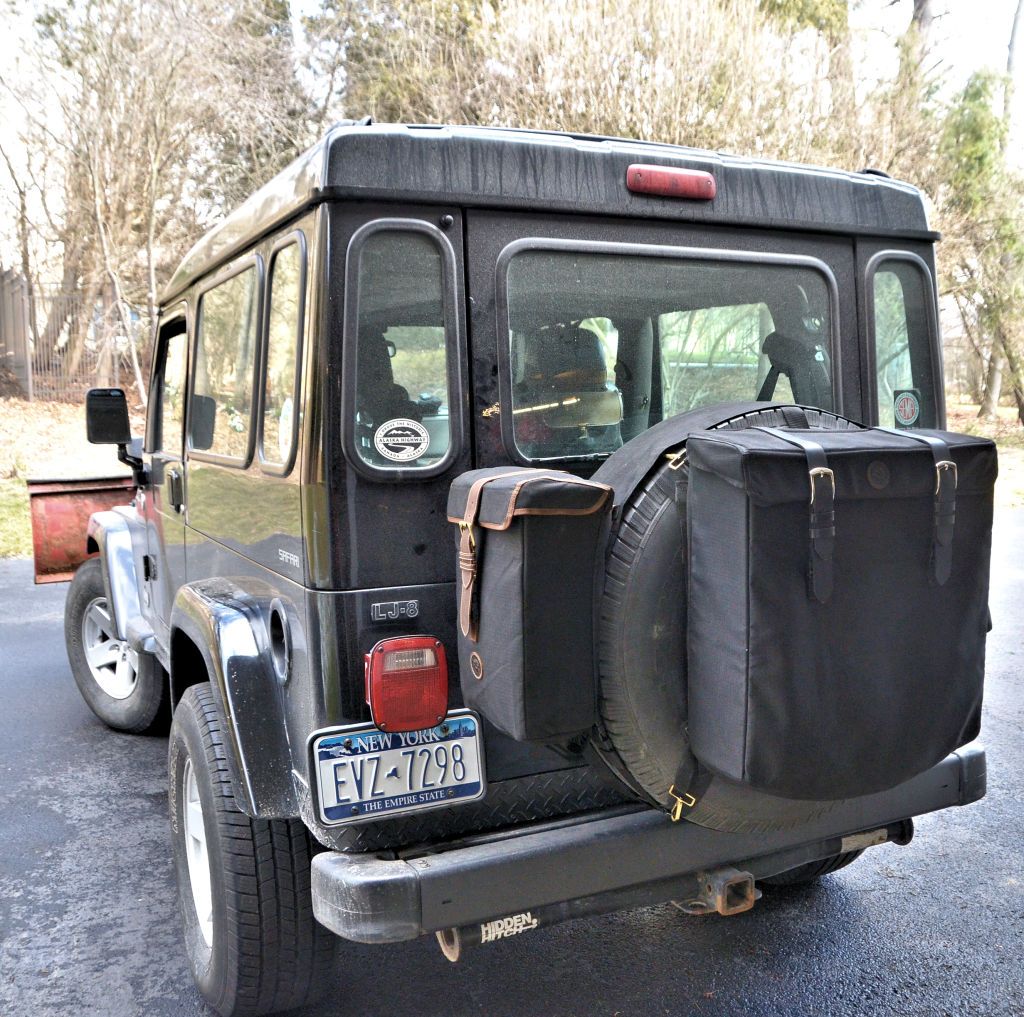
All of these products are made from DWR/UV-treated (durable water resistant) polyester so they'll stand up well to the weather and the sun.
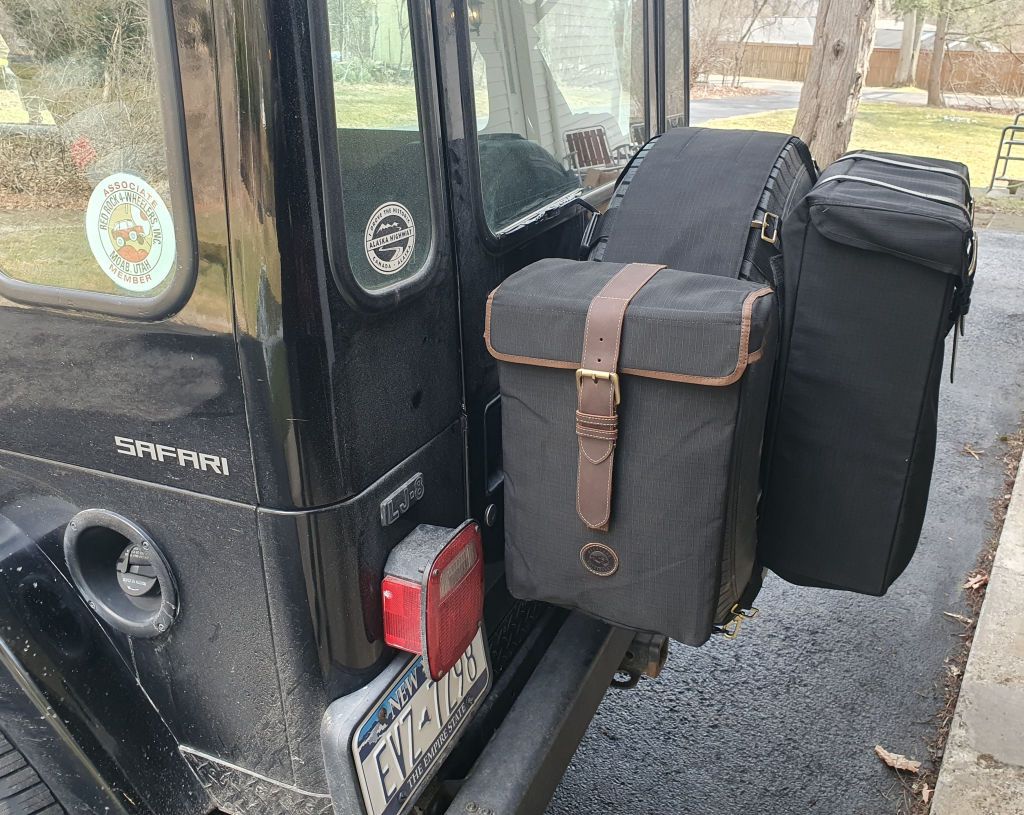
Since they're pretty quick to install, I'll use them on an as-needed basis. I'll keep a SpareHopper on each Jeep all the time for the uses I mentioned above and throw on one or more of the other bags as needed for whatever situation I'm about to go into.
I do have some suggestions for improvements in the details of the products which I'll pass along to them. They haven't given me exact release dates for any of these other than "soon".

I've had a SpareHopper on both my JKU and my LJ for a long time - the first ones were prototypes I sewed and later I've been using preproduction samples from OO. I use them all the time - in NY State stores aren't allowed to put your purchases in bags anymore so I carry my reusable shipping bags in there because there's no good place to keep them in the Jeep. And when I'm on long trips or offroad expeditions I use it for a trash and recycling bag, it's just the right size for a standard kitchen trash bag to fit inside.

It's easy to move the SpareHopper between the two Jeeps because the mounting straps are separate and the bag attaches to the straps with clips. I've got mounting straps on the LJ and the JKU so I can use the bag on either one.
Next up is the Tactical Spare Cover. It's got MOLLE grids on both sides and on the face, and also a pocket inside the face.

In this next photo my Tree Saver strap is sitting partially out of the pocket, it does fit all the way in.

To go with the Tactical Spare Cover (or any other place where MOLLE is exposed to the weather, there are 6" and 12" weather resistant MOLLE bags. Here are a few on the spare cover:

And for more storage, similar to the SpareHopper but in a smaller size, are the SpareSide bags. They attach to the MOLLE on the side of the spare cover.

On the TJ/LJ the spare is a bit towards the passenger side of the Jeep so a SpareSide bag can interfere with the tail light on that side. The JK is wide enough for a SpareSide bag on either side, but on the TJ/LJ it's probably best to use a SpareSide bag only on the driver's side and put a weather-resistant MOLLE bag on the passenger side.
The SpareSide bags or the MOLLE bags can also be used without the spare tire cover - the MOLLEWrap is a band that wraps around the spare and has the same MOLLE grids on the side that the spare cover does. The MOLLEWrap is also compatible with the SpareHopper, in the next photo I've left the SpareHopper straps in place and installed the MOLLEWrap over them so both the SpareHopper and a pair of molle bags or SpareSide bags can be carried at the same time.

All of these products are made from DWR/UV-treated (durable water resistant) polyester so they'll stand up well to the weather and the sun.

Since they're pretty quick to install, I'll use them on an as-needed basis. I'll keep a SpareHopper on each Jeep all the time for the uses I mentioned above and throw on one or more of the other bags as needed for whatever situation I'm about to go into.
I do have some suggestions for improvements in the details of the products which I'll pass along to them. They haven't given me exact release dates for any of these other than "soon".
jscherb
Expedition Leader
Accessories that suck (in a good way).
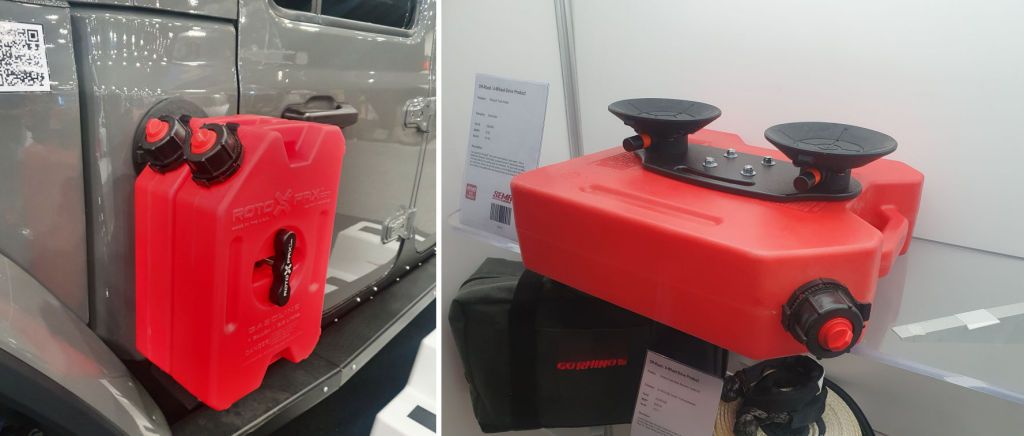
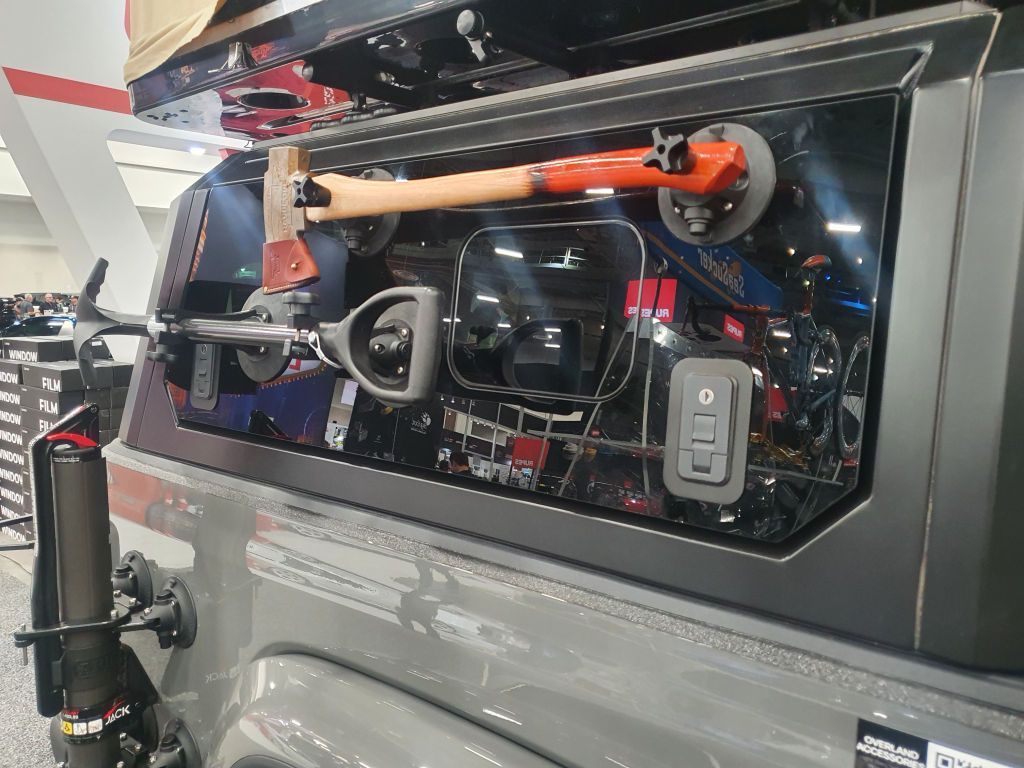
At SEMA in November I can across a company called SeaSucker - they make cargo accessories for boats and vehicles that attach with powerful suction cups. Here's one of the products they were showing, it's a Rotopax holder that can stick to the side window or body side of a vehicle (https://www.seasucker.com/collections/seasucker-camp-line/products/rotopax-tank-holder):
At SEMA they were also showing a range of things mounted to a Gladiator cap window:
At SEMA there was also a Chinese company offering similar suction mounts, but theirs have a vacuum motor and a battery and they detect loss of suction and automatically tighten the suction grip when that happens (https://www.onyxmount.com/product_detail/Electricity-type-of-vacuum-mount/GIIKO-EVM). They were demonstrating this rack with their automatic vacuum mounts:
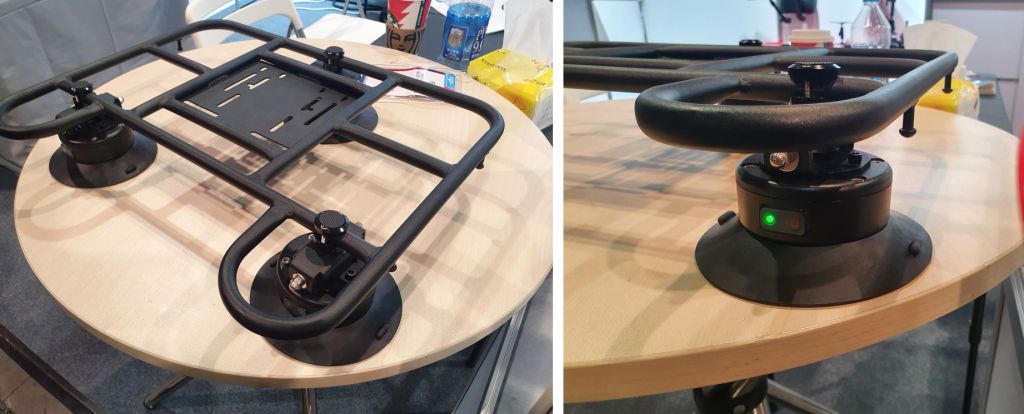
Both of these interested me enough that I decided I would experiment with vacuum mounting. I kept in touch with Chinese company and their automatic mounts are not on the market yet but just about ready for testing, so I may get a few samples from them but in the meantime I found a source for discounted SeaSucker mounts and picked up some samples to play with.
Since a Rotopax holder already exists, I had to try something else. How about a table that mounts to the side of the Jeep?
A while back I designed and built a tailgate table with features not found in any other table and I still have the prototype here so I decided to try that with suction. Here's the table on a TJ tailgate (using screws, before suction):
I designed that table so that with a minor change in mounting hardware the same table could be installed on TJ, JK or JL tailgates, and since it was designed to be adaptable it was easy to make a suction mount. Check it out:
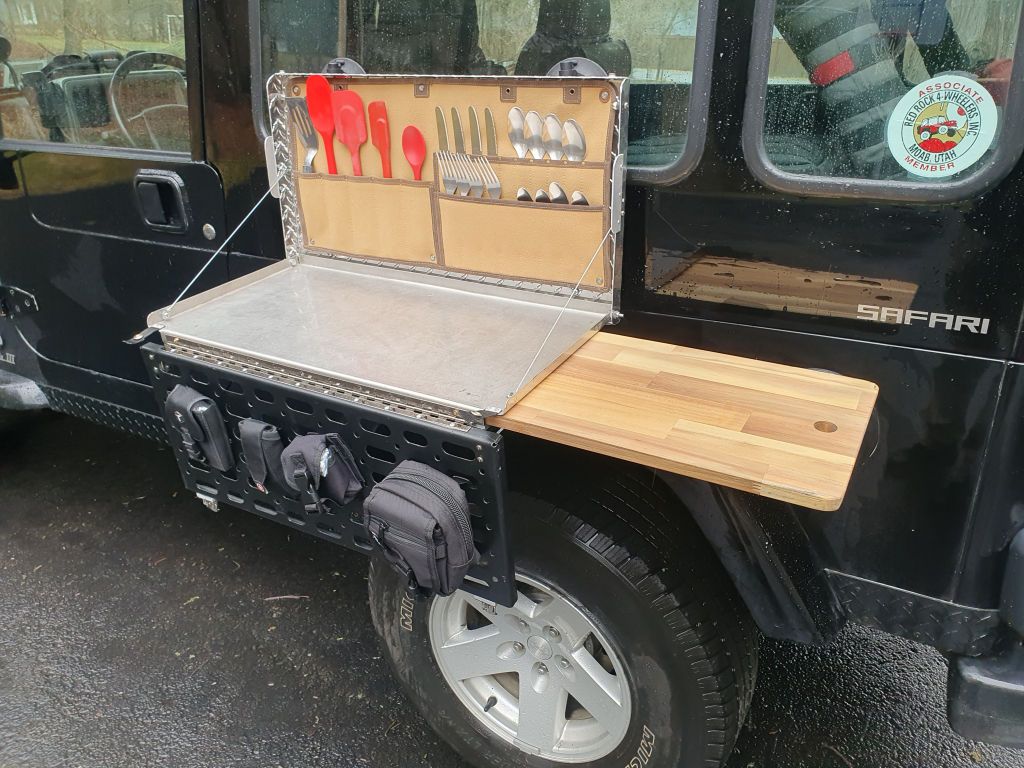
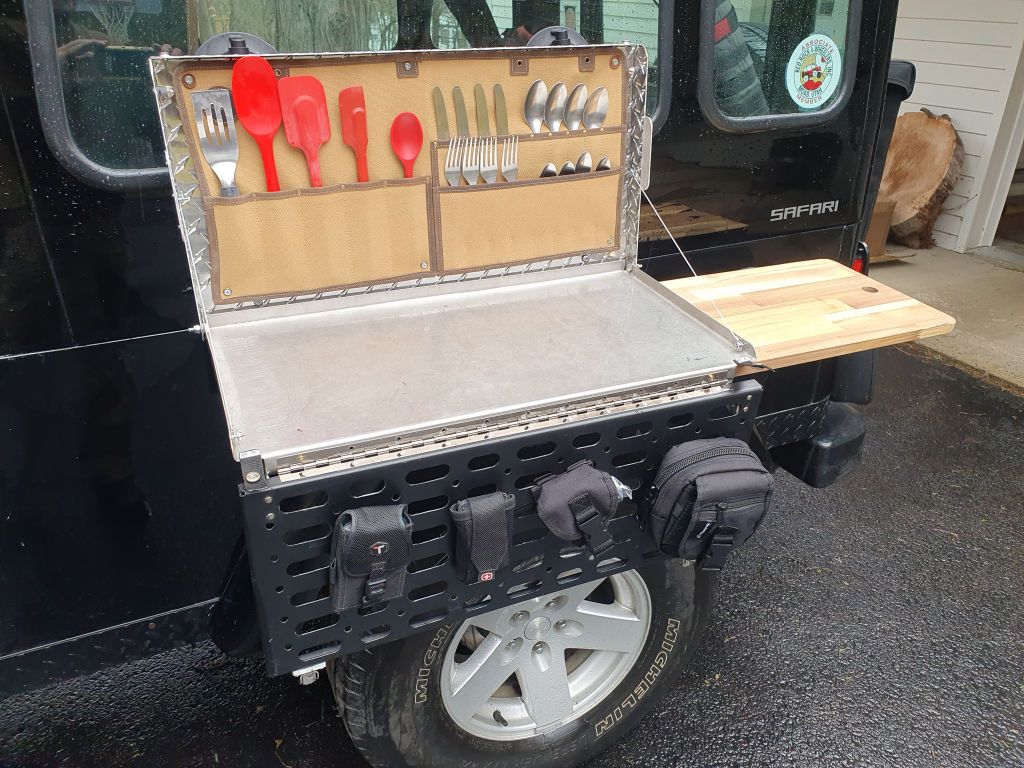
The MOLLE panel is optional and perhaps not necessary for the side mount version.
The way I designed the vacuum mount I don't intend the table to be installed while driving - I only used two suction mounts at the top and it has rubber feet that rest against the body at the bottom but with two vacuum mounts at the bottom it could remain installed while driving.
Another idea... a while back I designed a MOLLE panel intended to mount inside the hardtop and be accessible through a side window/hatch:
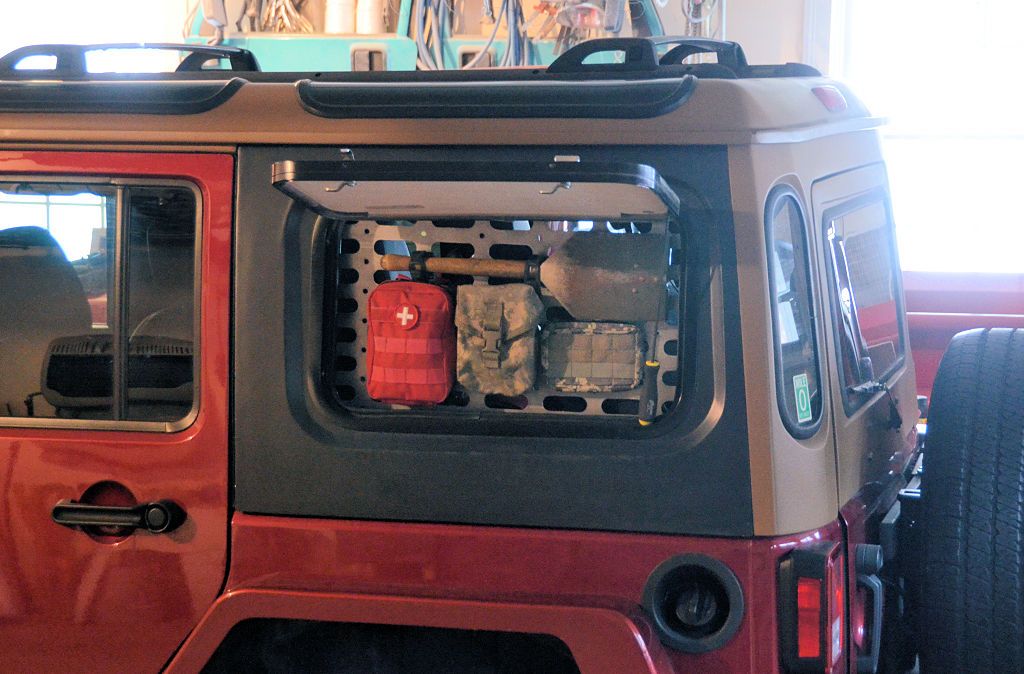
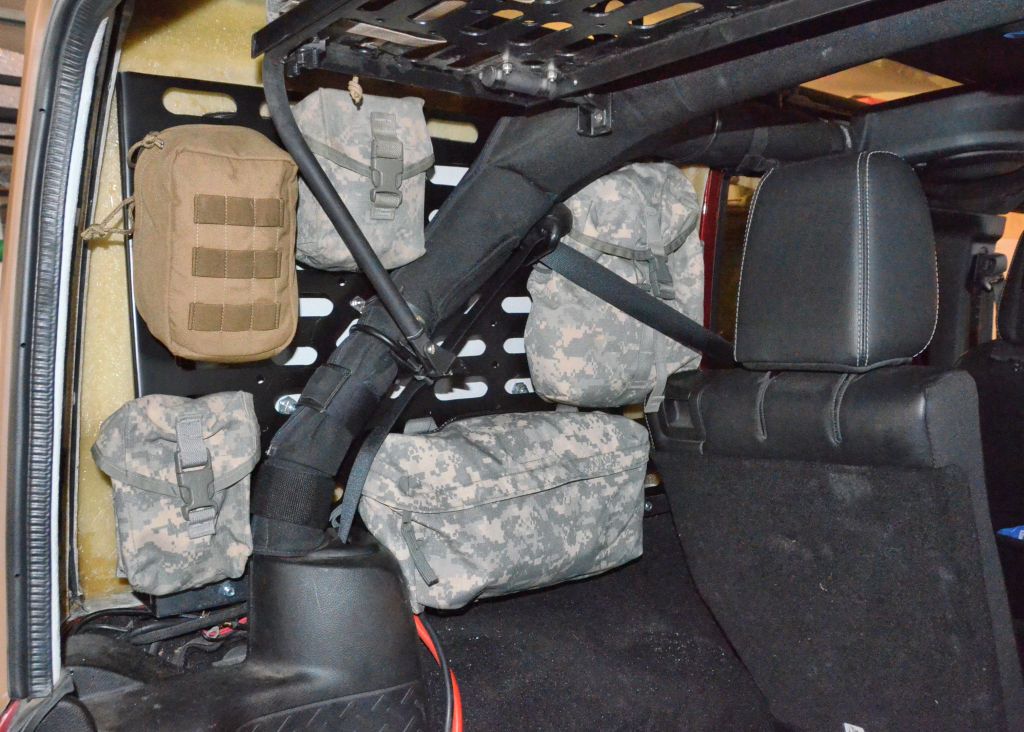
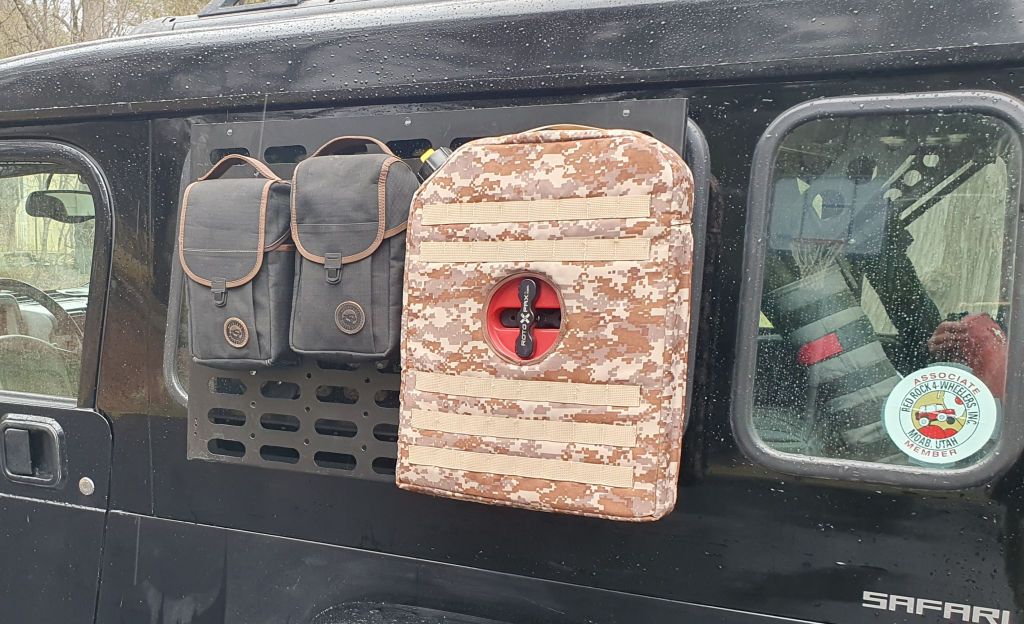
I've still got that prototype panel here so I decided to try it with vacuum mounts on the outside. For this test I used 4 vacuum mounts so the panel could be left in place while driving.
It's not going anywhere.
I think that accessories that suck have a future.
At SEMA in November I can across a company called SeaSucker - they make cargo accessories for boats and vehicles that attach with powerful suction cups. Here's one of the products they were showing, it's a Rotopax holder that can stick to the side window or body side of a vehicle (https://www.seasucker.com/collections/seasucker-camp-line/products/rotopax-tank-holder):

At SEMA they were also showing a range of things mounted to a Gladiator cap window:

At SEMA there was also a Chinese company offering similar suction mounts, but theirs have a vacuum motor and a battery and they detect loss of suction and automatically tighten the suction grip when that happens (https://www.onyxmount.com/product_detail/Electricity-type-of-vacuum-mount/GIIKO-EVM). They were demonstrating this rack with their automatic vacuum mounts:

Both of these interested me enough that I decided I would experiment with vacuum mounting. I kept in touch with Chinese company and their automatic mounts are not on the market yet but just about ready for testing, so I may get a few samples from them but in the meantime I found a source for discounted SeaSucker mounts and picked up some samples to play with.
Since a Rotopax holder already exists, I had to try something else. How about a table that mounts to the side of the Jeep?
A while back I designed and built a tailgate table with features not found in any other table and I still have the prototype here so I decided to try that with suction. Here's the table on a TJ tailgate (using screws, before suction):
I designed that table so that with a minor change in mounting hardware the same table could be installed on TJ, JK or JL tailgates, and since it was designed to be adaptable it was easy to make a suction mount. Check it out:


The MOLLE panel is optional and perhaps not necessary for the side mount version.
The way I designed the vacuum mount I don't intend the table to be installed while driving - I only used two suction mounts at the top and it has rubber feet that rest against the body at the bottom but with two vacuum mounts at the bottom it could remain installed while driving.
Another idea... a while back I designed a MOLLE panel intended to mount inside the hardtop and be accessible through a side window/hatch:


I've still got that prototype panel here so I decided to try it with vacuum mounts on the outside. For this test I used 4 vacuum mounts so the panel could be left in place while driving.
It's not going anywhere.

I think that accessories that suck have a future.
jscherb
Expedition Leader
It started to rain the other day when I was doing the videos and photos of the prototype vacuum-mount table so I didn't get to do any photos without the optional MOLLE panel. It's a beautiful day today, so here goes:
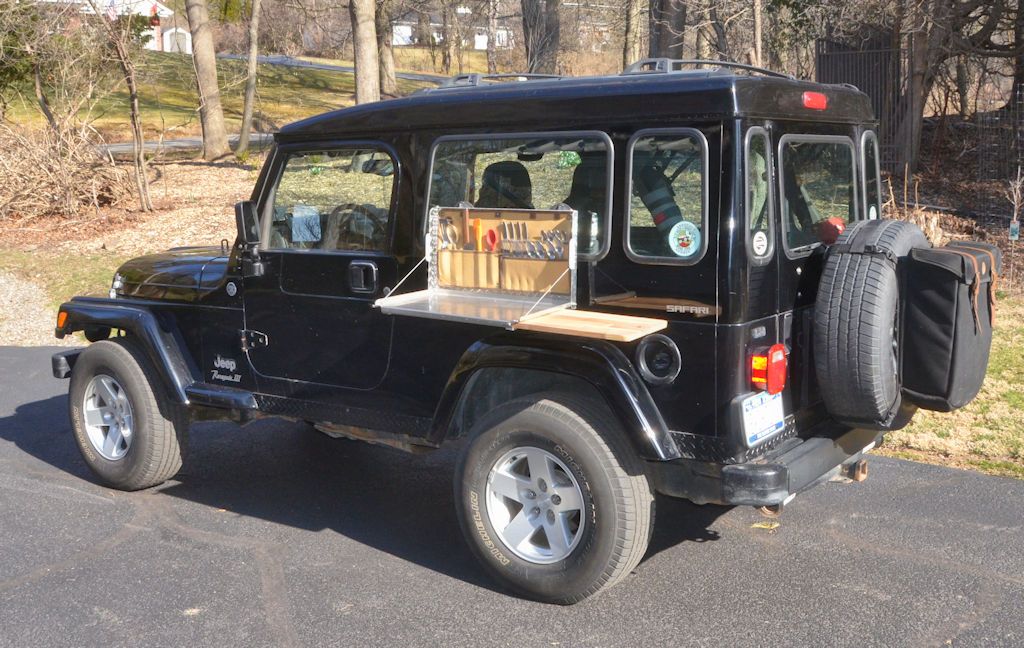
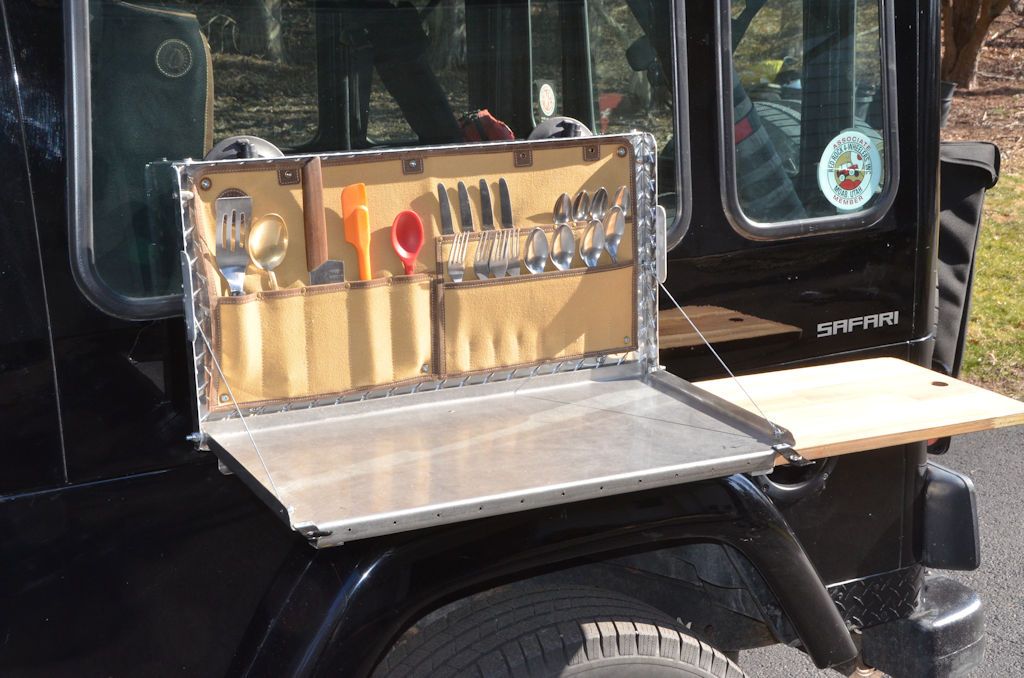
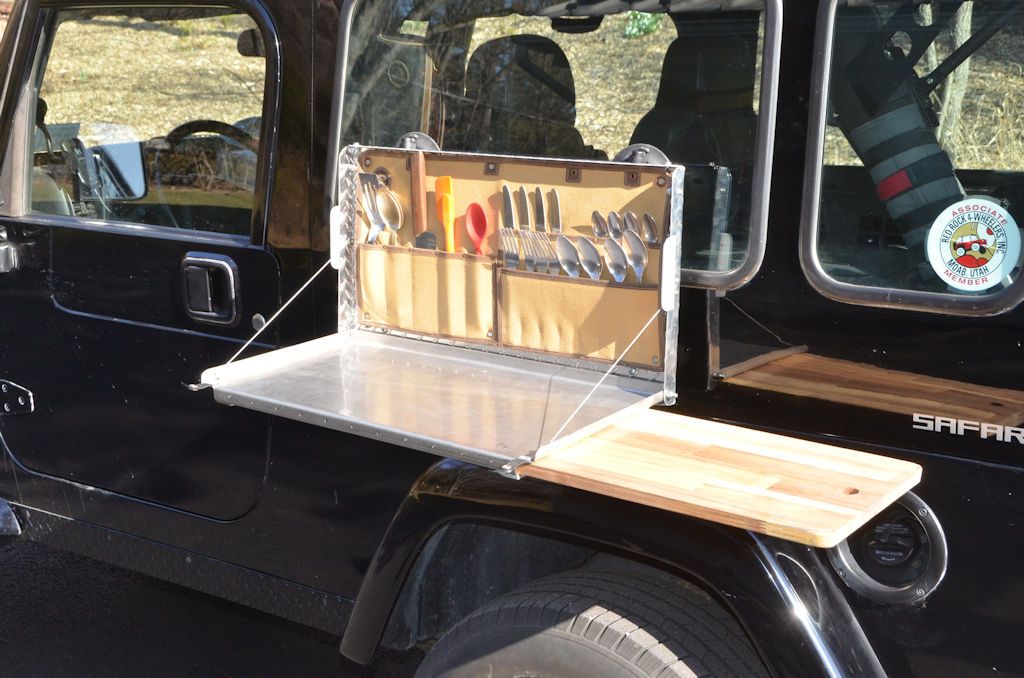
I'll use the table in this configuration on my LJ for the times when I don't have the full Trail Kitchen onboard. For some expeditions I just carry the fridge on a simple slide without a table and since I have a StoreGate on the tailgate I can't use a tailgate table in that Jeep.
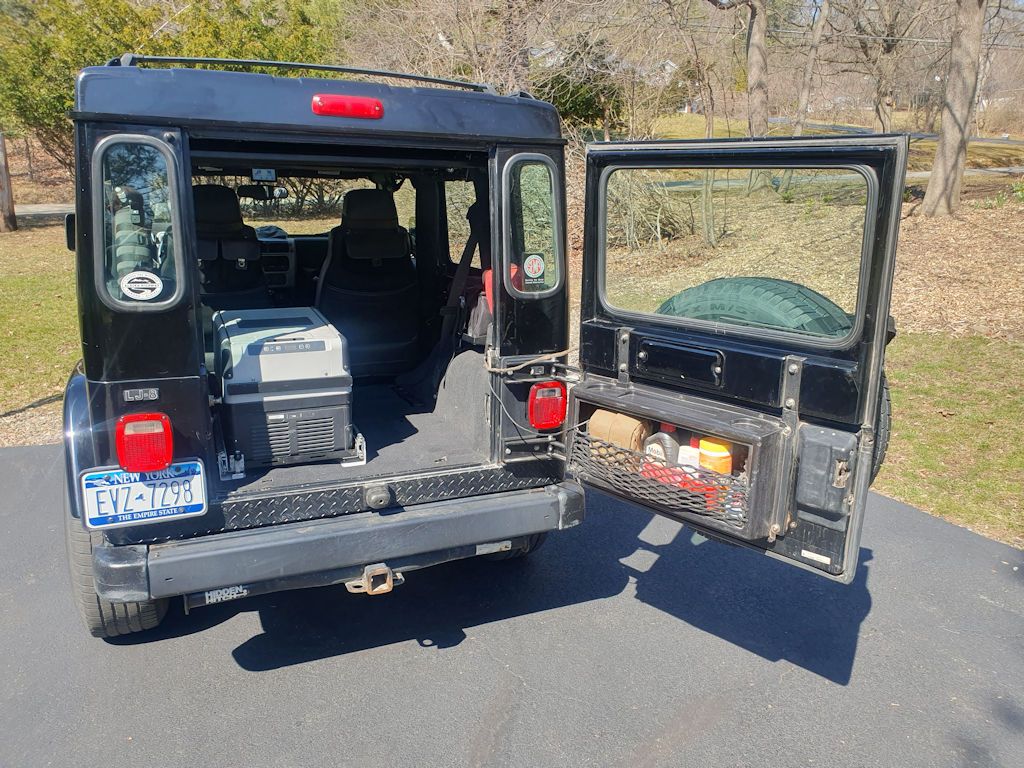


I'll use the table in this configuration on my LJ for the times when I don't have the full Trail Kitchen onboard. For some expeditions I just carry the fridge on a simple slide without a table and since I have a StoreGate on the tailgate I can't use a tailgate table in that Jeep.

CraftsmanCollaborative
Well-known member
Neat concept - seen some magnetic accessories out there but rarely the suction method.
Good fit for the wide rear glass on that top.
Good fit for the wide rear glass on that top.
jscherb
Expedition Leader
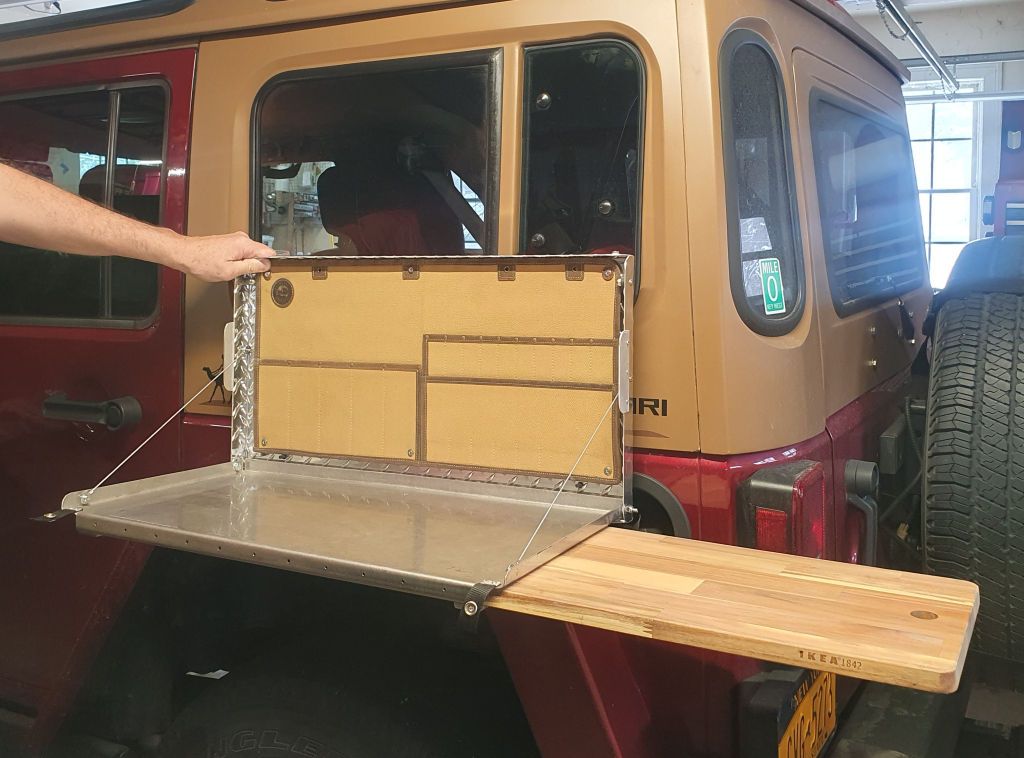
Yes it fits nicely on the Safari Cab window but it'll also fit on the factory TJ hardtop glass and the factory JKU hardtop glass, I measured before I located the vacuum mounts. the photo was taken before I installed the mounts, I was checking the width of the JKU side window (my two-piece window + vent is the same width as the factory window).Neat concept - seen some magnetic accessories out there but rarely the suction method.
Good fit for the wide rear glass on that top.
jscherb
Expedition Leader
Thank you very muchFor years I have been wondering when this thread would hit 1000 replies. Well I missed it but here we are.
Congratulations Jeff you do amazing work.
jscherb
Expedition Leader
For those people who want to run JK tires/wheels on their TJ/LJ, FYI the MORryde JK HD Spare Carrier is almost a direct fit on the TJ/LJ tailgate, four mounting holes in the carrier need to be enlarged less than 1/8" for a bolt-on fit.
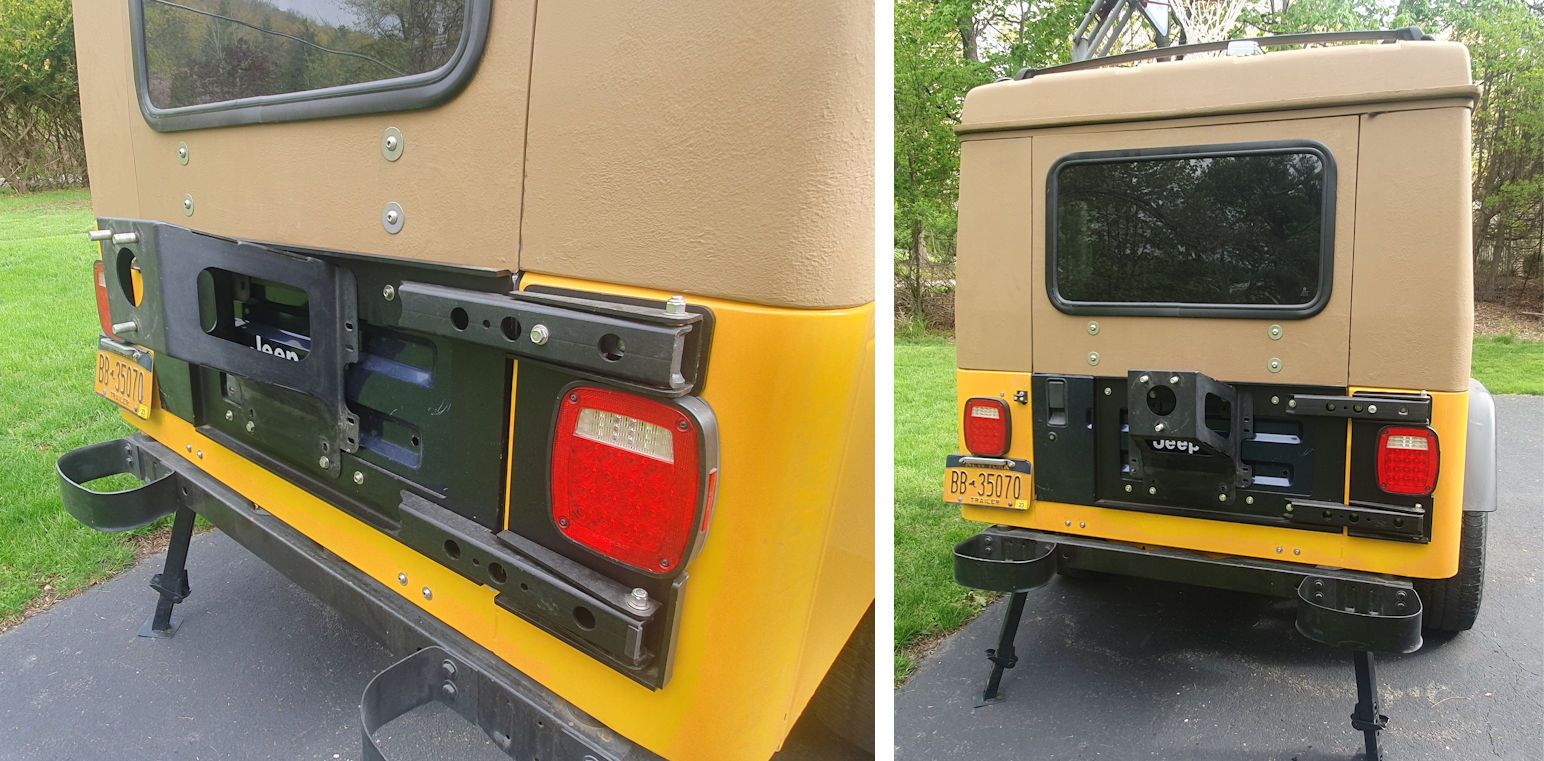
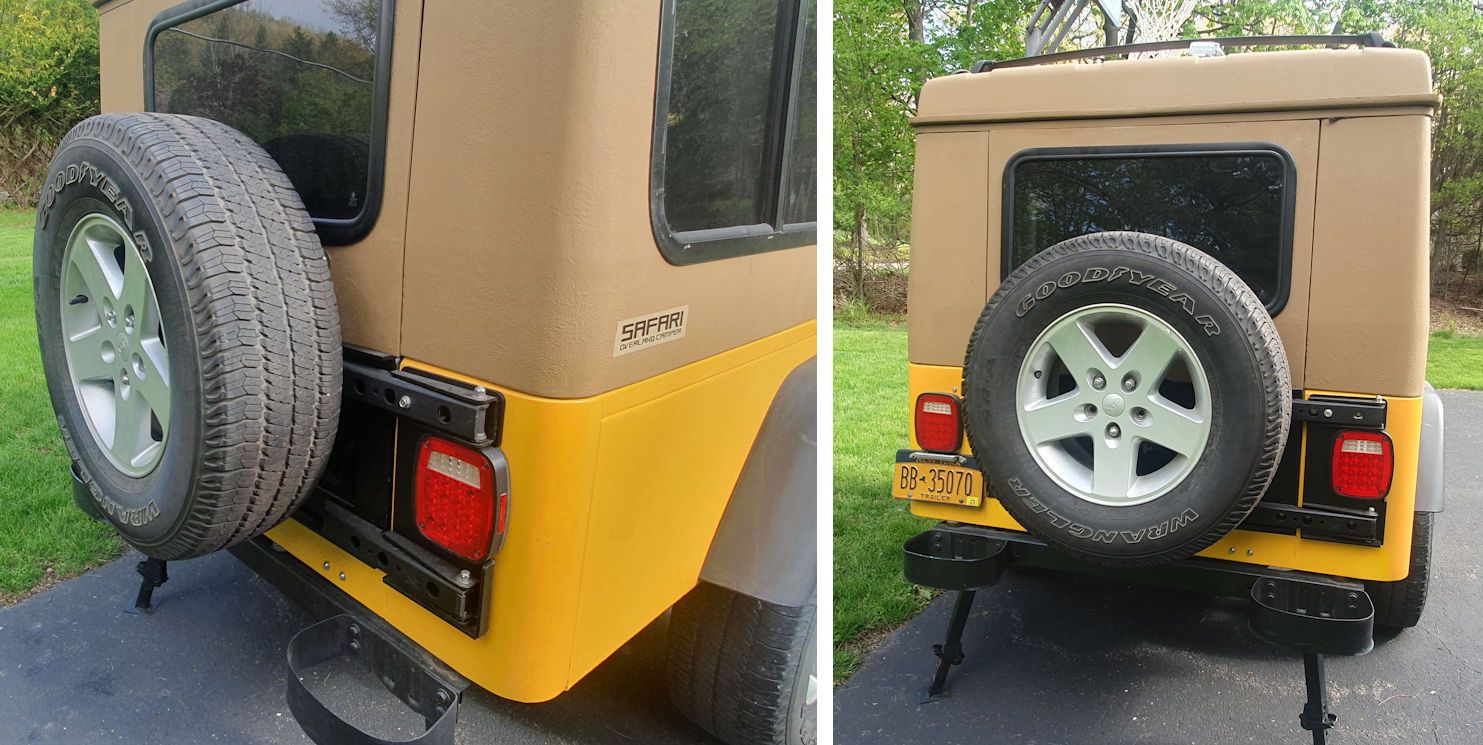
Since I'm running JK wheels/tires on my Jeep-tub trailer, I installed the MORryde spare carrier on the tailgate this morning. I already had the MORryde tailgate reinforcement. All it took was a few minutes with a file to move 4 mounting holes in the carrier slightly outward.
Just FYI in case anyone wants to run JK wheels on their TJ/LJ. Obviously adapters would be required to install each wheel on the Jeep, and the MORryde tire carrier is an easy way to carry the spare. It also raises the spare a few inches so you can fit larger spares above the bumper.
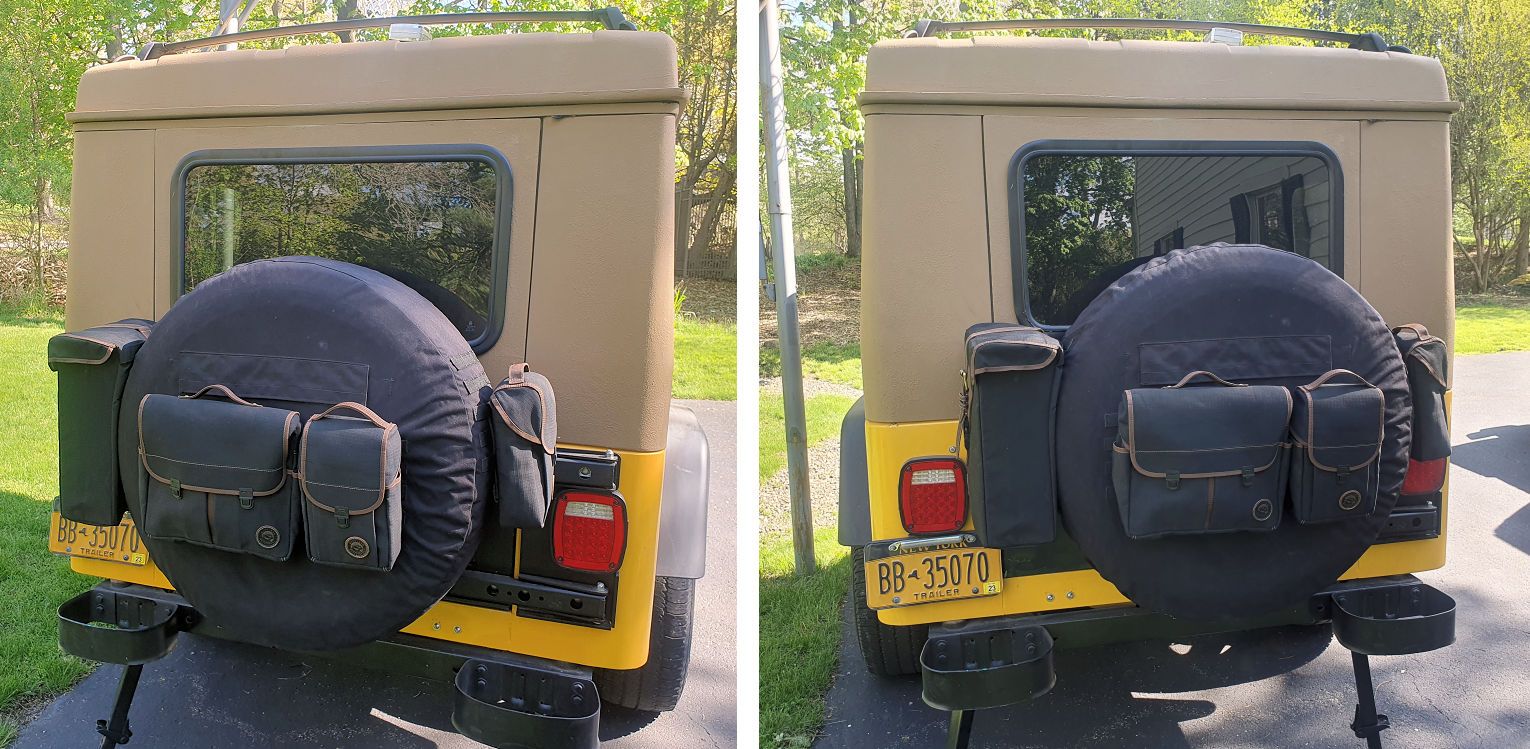
I was getting the trailer ready for a trip from upstate NY to Overland West in Flagstaff, leaving in about a week and Overland Outfitters will be using this trailer to bring products to the show and to show off their new Storage on the Spare products. I installed some preproduction samples this morning; they have announced availability of the products now but all I've got is preproduction samples.
Anyone here going to Overland West? Stop in at the OO or MORryde booths (they're next to each other) and say hi, I'll be there whenever I'm not out and about around the show.
Since I'm running JK wheels/tires on my Jeep-tub trailer, I installed the MORryde spare carrier on the tailgate this morning. I already had the MORryde tailgate reinforcement. All it took was a few minutes with a file to move 4 mounting holes in the carrier slightly outward.
Just FYI in case anyone wants to run JK wheels on their TJ/LJ. Obviously adapters would be required to install each wheel on the Jeep, and the MORryde tire carrier is an easy way to carry the spare. It also raises the spare a few inches so you can fit larger spares above the bumper.


I was getting the trailer ready for a trip from upstate NY to Overland West in Flagstaff, leaving in about a week and Overland Outfitters will be using this trailer to bring products to the show and to show off their new Storage on the Spare products. I installed some preproduction samples this morning; they have announced availability of the products now but all I've got is preproduction samples.

Anyone here going to Overland West? Stop in at the OO or MORryde booths (they're next to each other) and say hi, I'll be there whenever I'm not out and about around the show.
jscherb
Expedition Leader
One of the nice things about having the same base rack on my LJ, JKU and trailer is that all of the rack-mounted accessories are compatible with all three. The base rack on all 3 is an XJ Cherokee rack.
On the trailer's XJ rack is a smaller rack basket I made from Harbor Freight hitch racks before I found the Garvin on Craigslist.
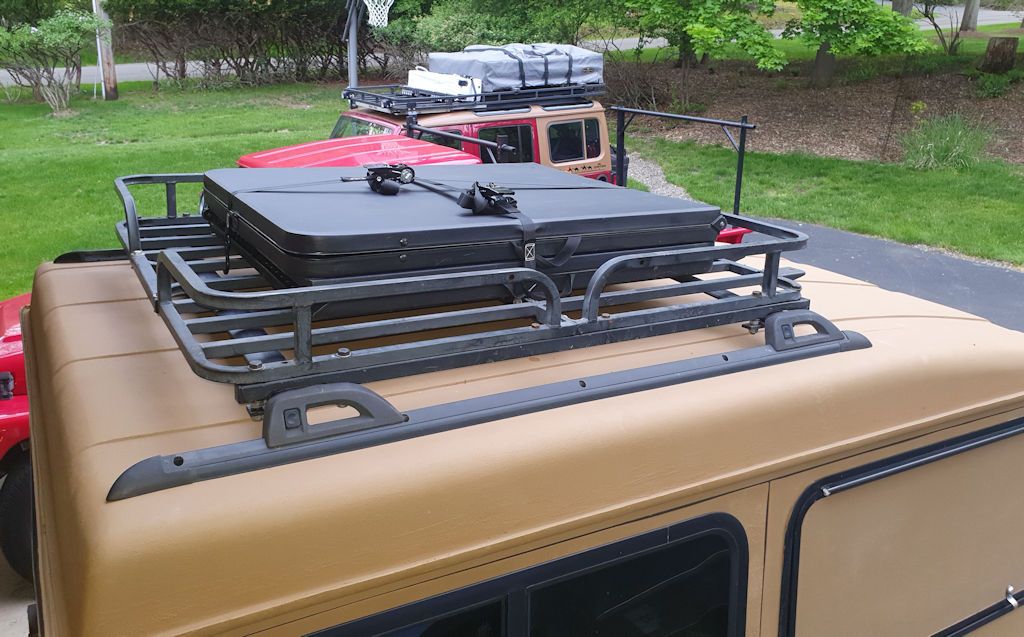
On the JKU right now is the Garvin rack basket plus my DIY front extension:
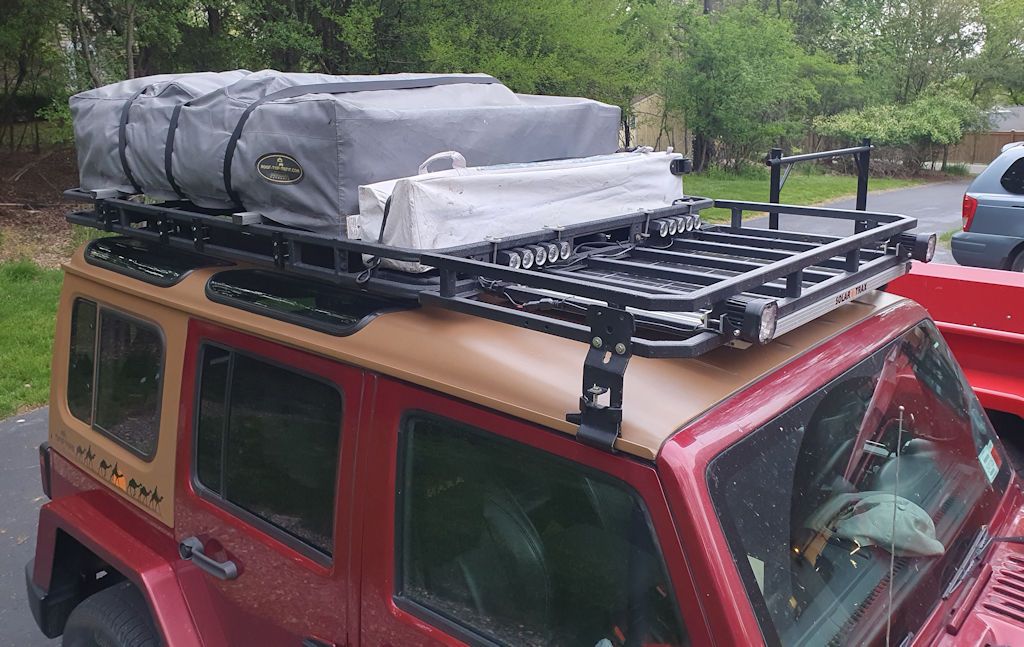
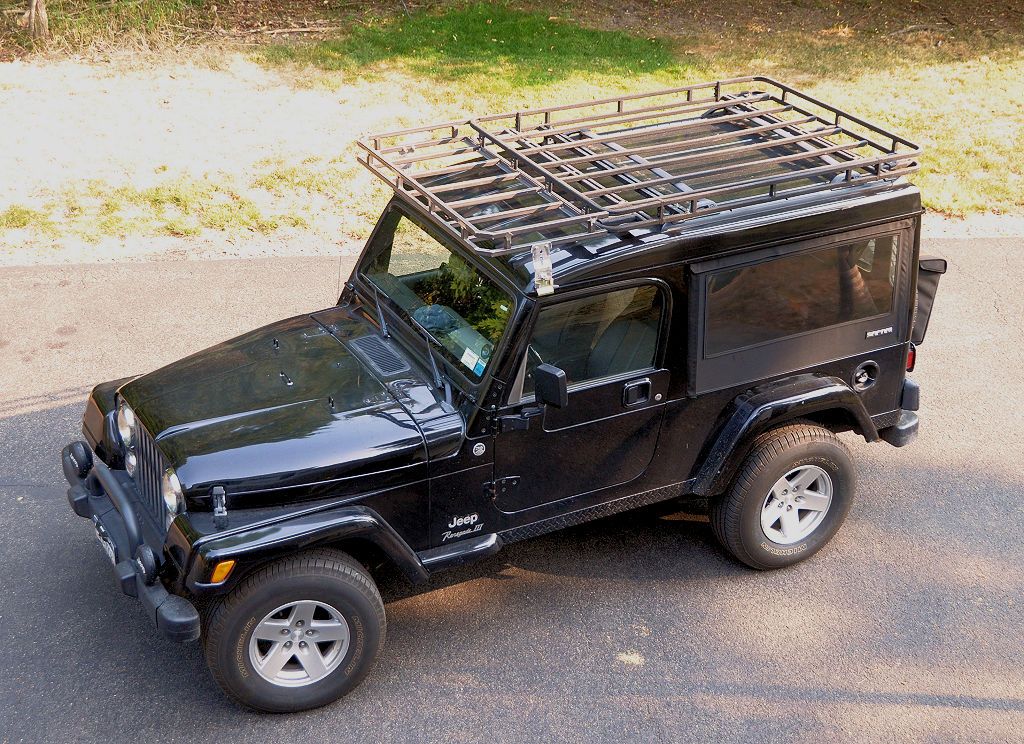
The LJ has nothing on it's XJ rack right now but the either the Garvin plus the front extension or the HF rack fit on it too.
Since any of the rack accessories can fit on either Jeep or the trailer, the roof top tent can easily go on any of them.
BTW I chose the XJ Cherokee racks for several reasons - first, they're inexpensive at the u-pull ($15). Second, since they're a Jeep factory part, they look right on my Jeeps and trailer. And third, because there's a lot of aftermarket support for them - adapters and mounts for various things.
BTW the LJ and the trailer have more in common than the XJ rack on top, both hardtops came out of the same molds, so anything I can think of to do to one of them can be done to the other...
.jpg)
On the trailer's XJ rack is a smaller rack basket I made from Harbor Freight hitch racks before I found the Garvin on Craigslist.

On the JKU right now is the Garvin rack basket plus my DIY front extension:

The LJ has nothing on it's XJ rack right now but the either the Garvin plus the front extension or the HF rack fit on it too.

Since any of the rack accessories can fit on either Jeep or the trailer, the roof top tent can easily go on any of them.
BTW I chose the XJ Cherokee racks for several reasons - first, they're inexpensive at the u-pull ($15). Second, since they're a Jeep factory part, they look right on my Jeeps and trailer. And third, because there's a lot of aftermarket support for them - adapters and mounts for various things.
BTW the LJ and the trailer have more in common than the XJ rack on top, both hardtops came out of the same molds, so anything I can think of to do to one of them can be done to the other...
.jpg)
jscherb
Expedition Leader
I'm planning my annual Colorado trail expedition in the LJ for just after Labor Day. Haven't made final plans yet but thinking of doing Salida to Silverton and Ouray with as little pavement as possible, something like this:
Marshall Pass Poncha Springs trail to Marshal Pass Railroad Grade trail to Sargents, then maybe Old Monarch Pass/Black Sage Pass/Waunita Pass to Gunnison. Next day, pavement to Lake City then Engineer Pass, North Fork Cutoff to Animas Forks ghost town. Then undecided, either California Gulch trail and Corkscrew Gulch trail or perhaps going through Silverton via the Lake Como to Silverton trail and perhaps a few other side trails and then on to Ouray. Spend some time in the Ouray Hot Springs and then the final day/night at the Glenwood Hot Springs Lodge.
I'd make the trip longer but I've been invited to attend the Tentrax Owners Weekend so I need to get to Uwharrie National Forest by the next weekend. No, I don't own a Tentrax trailer but recently I've done a number of designs for them and have a few more on the drawing board so they've asked if I would attend and talk to the attendees about new designs and options for their trailers.
Similar threads
- Replies
- 12
- Views
- 3K
- Replies
- 1
- Views
- 2K
- Replies
- 2
- Views
- 1K
- Replies
- 2
- Views
- 893
- Replies
- 8
- Views
- 3K
