Martinjmpr
Wiffleball Batter
Posting this for anyone who might be interested in doing something similar.
Background: The idea behind this came from my previous vehicle, a 2004 Suburban. When we camp we use an Indel-B TB 41 refrigerator and in the past we've had "issues" with it discharging the battery enough to cause the vehicle to need a jump start (not to mention the possibility of spoiled food.) On the Suburban, the solution was easy: A 2nd battery installed with an isolator to keep the starter battery from discharging. On the 'Burb it was a fairly straightforward process both because of the "old tech" alternator and electrical system, and more importantly because GM trucks of this era already have a space under the hood for a 2nd battery (IMO the most vexing part of a dual battery install is where to physically locate the 2nd battery.)
That setup worked great (using a 68ah AGM battery as the "house battery" for 3 years, but in August of 2019 I bought a new truck, a 2018 F-150.
At first I considered a dual battery setup there as well. Unfortunately there were two factors that worked against that: The first was that there was not a physical space under the hood for the battery. The second and more difficult was that the modern engine has a much more complicated electrical system and my concern is that the battery monitoring system (which is needed for the stop/start technology on the engine) would go wonky if I introduced another variable into it like a 2nd battery running off the alternator and cause other problems with the system.
So instead, I decided to just make a separate (portable) battery box to run the fridge. But before I made one myself, I looked at the market to see if maybe something like what I wanted already existed, and it turns out, it does:
https://www.amazon.com/MinnKota-Tro...lling+motor+battery+box&qid=1586636280&sr=8-2
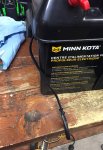
There are several varieties of these and they are all basically glorified battery boxes, but they have nice features like connecting studs on the outside of the box and 12v aux outlets, as well as a primitive volt meter (red/green/amber) to monitor battery life.
I modified mine right off the bat by adding a USB socket with a digital volt meter (which I had been planning on putting in the Suburban but never did) and a Battery Tender SAE harness:


The SAE harness is so I can keep it plugged into a battery tender when it is at home. The battery tender keeps it "topped off" without overcharging it. I can also plug my solar panels into the SAE socket if I want to charge the box with my solar panel (100w.)
The battery box is made for trolling motors and can accommodate a wide range of battery types and sizes. Currently I am just running an inexpensive FLA 90 ah deep cycle marine/RV battery.
The battery works to keep the fridge running (though it's crazy heavy!) but I also need a way to keep it charged. Initially, I thought that maybe a 120v AC charger plugged into the 400W inverter (which is switched so it's only on with the ignition) would be a simple and easy way to keep the battery charged up. However, a bit of research revealed that this was not feasible because of the cheap nature of the factory inverter. With no factory inverter option, I was back to figuring out how to keep the 12v battery charged another way.
I decided that I'd try one of the new generation of DC-DC chargers that seems to be popping up all over the market. The DC-DC charger seems to promise a way to keep a good charge going to the aux battery without adding another variable to the truck's electrical system. Although I considered the Redarc 50a unit, I ultimately decided on the Renogy 20a charger both because it was less expensive, but also because at "only" 20a I would not have to run such massive wires that a 50a would likely need to operate safely. This was especially important because I plan to keep the charger in the cab of the truck.
So, now that I had a general idea of what I wanted to do, I now had to come up with a plan:
Background: The idea behind this came from my previous vehicle, a 2004 Suburban. When we camp we use an Indel-B TB 41 refrigerator and in the past we've had "issues" with it discharging the battery enough to cause the vehicle to need a jump start (not to mention the possibility of spoiled food.) On the Suburban, the solution was easy: A 2nd battery installed with an isolator to keep the starter battery from discharging. On the 'Burb it was a fairly straightforward process both because of the "old tech" alternator and electrical system, and more importantly because GM trucks of this era already have a space under the hood for a 2nd battery (IMO the most vexing part of a dual battery install is where to physically locate the 2nd battery.)
That setup worked great (using a 68ah AGM battery as the "house battery" for 3 years, but in August of 2019 I bought a new truck, a 2018 F-150.
At first I considered a dual battery setup there as well. Unfortunately there were two factors that worked against that: The first was that there was not a physical space under the hood for the battery. The second and more difficult was that the modern engine has a much more complicated electrical system and my concern is that the battery monitoring system (which is needed for the stop/start technology on the engine) would go wonky if I introduced another variable into it like a 2nd battery running off the alternator and cause other problems with the system.
So instead, I decided to just make a separate (portable) battery box to run the fridge. But before I made one myself, I looked at the market to see if maybe something like what I wanted already existed, and it turns out, it does:
https://www.amazon.com/MinnKota-Tro...lling+motor+battery+box&qid=1586636280&sr=8-2
There are several varieties of these and they are all basically glorified battery boxes, but they have nice features like connecting studs on the outside of the box and 12v aux outlets, as well as a primitive volt meter (red/green/amber) to monitor battery life.
I modified mine right off the bat by adding a USB socket with a digital volt meter (which I had been planning on putting in the Suburban but never did) and a Battery Tender SAE harness:


The SAE harness is so I can keep it plugged into a battery tender when it is at home. The battery tender keeps it "topped off" without overcharging it. I can also plug my solar panels into the SAE socket if I want to charge the box with my solar panel (100w.)
The battery box is made for trolling motors and can accommodate a wide range of battery types and sizes. Currently I am just running an inexpensive FLA 90 ah deep cycle marine/RV battery.
The battery works to keep the fridge running (though it's crazy heavy!) but I also need a way to keep it charged. Initially, I thought that maybe a 120v AC charger plugged into the 400W inverter (which is switched so it's only on with the ignition) would be a simple and easy way to keep the battery charged up. However, a bit of research revealed that this was not feasible because of the cheap nature of the factory inverter. With no factory inverter option, I was back to figuring out how to keep the 12v battery charged another way.
I decided that I'd try one of the new generation of DC-DC chargers that seems to be popping up all over the market. The DC-DC charger seems to promise a way to keep a good charge going to the aux battery without adding another variable to the truck's electrical system. Although I considered the Redarc 50a unit, I ultimately decided on the Renogy 20a charger both because it was less expensive, but also because at "only" 20a I would not have to run such massive wires that a 50a would likely need to operate safely. This was especially important because I plan to keep the charger in the cab of the truck.
So, now that I had a general idea of what I wanted to do, I now had to come up with a plan:


