Introducing the Van-That-Can- 2000 E350 V10 EB Passenger Van

AUTO360

Adventurer
Umm, the bolt pattern on the p/u truck axles are different than whats on the E series vans. If your new wheels are for the Van hubs then I'm not sure how it will work when you swap axles unless someone makes an adapter.
Otherwise looking good so far. I like that new center console. A little less storage but looks way better. I wouldn't mind replacing mine. How much was it?
Matt
 

desertspeed

Adventurer
I don't know about the newer axles, but up through the '90s Ford truck axles didn't have an oil drain plug, just a fill plug. This means you have to remove the cover to change diff oil. The fact that it has been opened may actually be a good thing.

Good point

Umm, the bolt pattern on the p/u truck axles are different than whats on the E series vans. If your new wheels are for the Van hubs then I'm not sure how it will work when you swap axles unless someone makes an adapter.
Otherwise looking good so far. I like that new center console. A little less storage but looks way better. I wouldn't mind replacing mine. How much was it?
Matt

You should read this- :) http://www.ujointoffroad.com/4x4vanfaqs.html

Q. What is done about the bolt pattern difference?
A. The donor axle will have the 8 on 170mm bolt pattern, and the vans are 8 on 6.5". There are a few options to make the change. Option 1: Install rear wheel spacers that change the bolt pattern as well as increase the trac width to match the front. Option 2: Swap the rear axle assembly to a Sterling 10.5" (disc brake). Option 3: Upgrade the axle with the RSC kit. (more info on the axle page)

I have the spacers coming, but at some point in the future I will throw a Sterling 10.5" in the rear.

The console was $40 on eBay, but shipping was about $30. My old one was was pretty scratched up and dirty, so it was definitely worth it. A little less storage, but it is more functional than the older design.
 

bknudtsen

Expedition Leader
Umm, the bolt pattern on the p/u truck axles are different than whats on the E series vans. If your new wheels are for the Van hubs then I'm not sure how it will work when you swap axles unless someone makes an adapter.

I am pretty sure that he bought wheels with an 8x170 bolt pattern and not the van 8x6.5 pattern. Just needs the adapter included in the UJOR kit to run the rear wheels on the van D60.
 

desertspeed

Adventurer
I don't have any exciting pictures to post, but I have been busy pulling apart my donor axle and cleaning it up. bknudtsen has a great writeup in his build thread so I didn't see any point in duplicating it. I have also found these great step by step instructions for ball joint replacement, although it doesn't go into changing out the ujoints themselves:

http://www.superdutypsd.com/ball_joint_article.php

Never having dealt with a straight front axle before (I am a desert guy, we like IFS :sombrero:) it has been a very interesting process, but something I'm glad I am tackling myself.

One thing I did find out is that sometimes I am an idiot..... For some reason I was convinced my rear axle was a 3.73, so that is the ratio front axle I got. Last night I was checking something on my rear axle and the ID tag caught my eye..... 4.10 :mad:

Not that I am upset I have 4.10 in the rear, but that I didn't double check before I bought the front. Now I will need to get my front re-geared- I hate paying $$$ for my mistakes.

On a more happy note, UPS is dropping off my final UJoint shipment today :wings:
 

McZippie

Walmart Adventure Camper
Not sure about the part number, but there are a bunch on ebay- just search for "econoline console"- http://www.ebay.com/itm/99-FORD-ECO...pt=Motors_Car_Truck_Parts_Accessories&vxp=mtr

...and FWIW is my DIY cup holder Netbook GPS mapping set-up in the console. Still has two usable cup holders. Third year now on the little HP solid state drive netbook, never take it out of the Rig. Runs via air card wireless router Sling Box, Netflixs, internet and mapping software without a hitch.

Made from a plastic cutting board, velcro and gray PVC pipe fittings.

!Bu(!zpQBGk~$(KGrHqMOKjcEveeZ11LiBL++hb)nJQ~~_35.JPG

.
4274_1159000899761_4508243_n.jpg

.
4274_1159000859760_488760_n.jpg

.
4274_1159000819759_624524_n.jpg
 

desertspeed

Adventurer
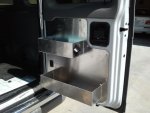
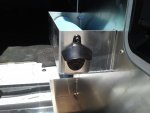
Just a couple of pics, but I have been busy..... Last weekend I drilled out the holes for the front spring hangers and got them powdercoated this week. I have completely rebuilt my front axle with new ball joints, ujoints, seals, unit bearings, calipers, pads, rotors, and Yukon locking hubs, as well as painted everything to keep it pretty. I got my new BFG A/T 285/70R17 tires mounted and ready to go, and I added 12V outlets for the 1st and 2nd row of bench seats for my kids. Finally, I replaced my cracked rear passenger door panel with this aluminum one with storage bins, and added the obligatory bottle opener so I don't die of dehydration while in Baja.

This weekend I will be tackling the majority of the UJoint conversion- I will try to take as many pics as possible. Really looking forward to the 100+ temps forecast here :)
 

Attachments

  • 2012-09-13 12.48.38.jpg
    2012-09-13 12.48.38.jpg
    39.1 KB · Views: 60
  • 2012-09-13 12.48.48.jpg
    2012-09-13 12.48.48.jpg
    33.2 KB · Views: 52
Last edited:

bknudtsen

Expedition Leader
More pics please! Wheels and tires, axle, big pile 'o parts..... etc!!!! That door panel looks nice. Is it from the plumbing van website?
 

desertspeed

Adventurer
One other thing- when I picked up the van the rear A/C fan was blowing, but only warm air would come out of the side vents. No air was coming out of the roof vents. I did some searching online and found out it was most likely one of two issues, both related to the blend door, which diverts air either past the rear heater core to the lower vents along the drivers side panel, or to the roof vents for A/C.

The blend door is actuated by a vacuum line, so one possibility is that there was an issue with that, but when I tested it at the actuator I was getting plenty of vacuum. So I pulled out the blower motor from the rear A/C unit (4 screws) to access the blend door, and the linkage between the vacuum actuator and the blend door was broken. I ended up securing the blend door in the "A/C" position since I don't anticipate needing rear heat for several months, and I haven't looked into whether or not I can get a new blend door for a reasonable price.

After pulling it apart and looking at it, the linkage ssems to be very weak and prone to breaking, so if anyone else is having this problem it is a reletively easy fix.
 
Last edited:

desertspeed

Adventurer
More pics please! Wheels and tires, axle, big pile 'o parts..... etc!!!! That door panel looks nice. Is it the from the plumbing van website?

I will take as many pics as I can this weekend as I do the conversion. I figure everything will look better when it is actually on the van.

Yes, i got the panel from here: http://plumbingvans.com/cargo_vans/door_panels.php

My rear passenger panel was cracked anyways, so rather than replace it with a stock panel I got the aluminum one. I like having the storage bins as well, and the price was very reasonable. They come with rivnuts, so they are easy to remove if needed, and it showed up the day after I ordered it. Highly recommended.
 

Forum statistics

Threads
188,462
Messages
2,905,325
Members
230,428
Latest member
jacob_lashell
Top