Introducing the Van-That-Can- 2000 E350 V10 EB Passenger Van

desertspeed

Adventurer
So I got a LOT done today. Most of it went pretty well, with a couple of issues. The first, and biggest, was Atlas spring put the wrong size sleeve in the front of the rear springs, so I couldn't finish up the rear. I called Chris and he is going to get in touch with them on Mon and have them send out new springs. Not the end of the world, but I was hoping to have it back on its wheels this weekend.

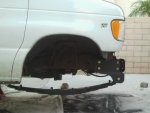
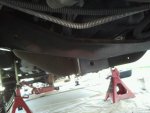
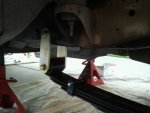
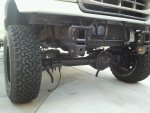
The other issue is drilling out the the rear spring hanger sleeve for the front springs SUCKS without a plasma cutter. The frame is too close to the body to fit a regular drill, so I am having to use my air powered angle drill. The problem is my compressor works pretty good for what I normally need it for, but it is not made for continuous duty air tools. The result is it took me about 2-3 hours to get one side done, since I can only drill for a minute or so and then need to wait on the compressor. There is NO room on the inside, so I had to drill completely through the frame from the outside.

The only other thing that has sucked so far is taking off the top nut on the stock shocks. They are the original shocks and somewhat corroded, and they must put them on the frame before they put on the body from the factory. There is only room to turn the nut 1/8 of a turn at a time, and there are a LOT of threads......

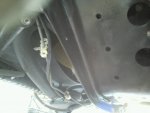
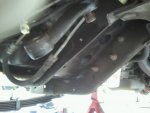
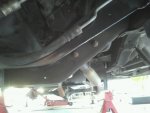
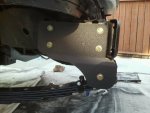
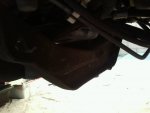
For the engine crossmember trimming, I ended up removing the beam mount completely. One side had 2 bolts and one rivet, and the other side had three rivets. Since I was using an angle grinder, it was much easier to cut the crossmember from the backside once I removed the beam mount, since that side doesn't have a lip to interfere with the grinder. I just used a cutoff wheel to cut the heads off the rivets, and it came right off.

My list for today:

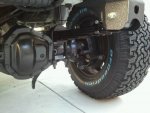
Removed stock suspension, removed all shocks, removed rear springs, installed new rear brakelines, installed both front spring hangers, trimmed crossmember, drilled out pass side rear sleeve, installed pass side spring.

The pics are not in order since I am too lazy to edit, so if anyone has any questions let me know.
 

Attachments

  • uploadfromtaptalk1347759277228.jpg
    uploadfromtaptalk1347759277228.jpg
    27.2 KB · Views: 45
  • uploadfromtaptalk1347759298243.jpg
    uploadfromtaptalk1347759298243.jpg
    22.8 KB · Views: 46
  • uploadfromtaptalk1347759314839.jpg
    uploadfromtaptalk1347759314839.jpg
    27.4 KB · Views: 45
  • uploadfromtaptalk1347759328948.jpg
    uploadfromtaptalk1347759328948.jpg
    27.2 KB · Views: 42
  • uploadfromtaptalk1347759346767.jpg
    uploadfromtaptalk1347759346767.jpg
    30.2 KB · Views: 45
  • uploadfromtaptalk1347759362595.jpg
    uploadfromtaptalk1347759362595.jpg
    29.1 KB · Views: 43
  • uploadfromtaptalk1347759375582.jpg
    uploadfromtaptalk1347759375582.jpg
    29.9 KB · Views: 41
  • uploadfromtaptalk1347759415105.jpg
    uploadfromtaptalk1347759415105.jpg
    39.4 KB · Views: 39
  • uploadfromtaptalk1347759446034.jpg
    uploadfromtaptalk1347759446034.jpg
    19.6 KB · Views: 39
Last edited:

desertspeed

Adventurer
The marks to trim the front crossmember

uploadfromtaptalk1347759630588.jpg
uploadfromtaptalk1347759648058.jpg

The drivers side beam mount. I removed the two bolts and then cutoff the rivet heads to remove the mount completely. Then I could trim the crossmember from the back so the lip you can see didn't interfere with the grinder.

uploadfromtaptalk1347759547837.jpg
uploadfromtaptalk1347759566613.jpg
 
Last edited:

ujoint

Supporting Sponsor
Good eye......my dd. IMHO one of the best cars ever built. Thanks for the help today.

I agree! On my list for sure. I have my eye on one, I'm supposed to be 1st on his list.

On those stock shocks, I cut them off. Quick and easy, I've fought too many of them. Great job on the x-member cutting.
 

desertspeed

Adventurer
I agree! On my list for sure. I have my eye on one, I'm supposed to be 1st on his list.

On those stock shocks, I cut them off. Quick and easy, I've fought too many of them. Great job on the x-member cutting.

Sweet! I spent almost a year looking for mine before I found it. I really wanted the Alpine White, and they are pretty rare.

I did cut off the driver's front, finally. I should have done that for all of them.

BTW, this is not the biggest vehicle project I have going on right now. Not really an expo vehicle, but it has done thousands of miles down in Baja in its lifetime. If anyone is bored and wants a long build thread, it is here: http://www.race-dezert.com/forum/sh...amp-M-4WD-Supercrew-Build?highlight=supercrew

Ocotillo 1-11 027 small.jpg
 

bknudtsen

Expedition Leader
Good info on the shackle mounts, crossmember and shocks! Looks like I need to add a plasma cutter to my list of tools.
 

desertspeed

Adventurer
Completed today: drilled out driver's side spring hanger, mounted spring, attached axle, assembled axle (knuckles, axles, unit bearings, hubs, rotors, calipers, etc), and set it on its wheels, since that was the goal for today :victory:

Issues/Notes- drilling out the rear spring hanger on the drivers side was MUCH easier. I was able to remove a heat shield and could fit a regular drill on the inside of the frame. Plus, I figured out how to move the interal frame bracing out of the way. On the pasenger side I thought that it was welded in place, so I ended up drilling almost all the way though it before it shifted, and then I realized it was not welded to the frame. It just needs to be pushed/rotated up and back with a long prybar.

Pitman Arm- I couldn't get my pitman arm off. An impact gun didn't even come close to budging it. I ended up trying to use a long cheater bar ratchet to try, and it just bent my puller.

Sway Bar- My sway bar didn't come attached to my axle, so I am not sure which way it is supposed to go. I thought that it was symetrical, but in starting to attach it to the exle I realized there is a slight bend in the middle section. Does anyone know whether the center section should bend up, or bend down?

Still do do tomorrow- figure out how to remove pitman arm, attach steering, sway bar, front shocks, brakelines, ABS wires, and do a final checkover/torque bolts etc.
 

Attachments

  • uploadfromtaptalk1347845054787.jpg
    uploadfromtaptalk1347845054787.jpg
    41.2 KB · Views: 40
  • uploadfromtaptalk1347845071926.jpg
    uploadfromtaptalk1347845071926.jpg
    43.7 KB · Views: 42
  • uploadfromtaptalk1347845086447.jpg
    uploadfromtaptalk1347845086447.jpg
    33.2 KB · Views: 41
  • uploadfromtaptalk1347845104852.jpg
    uploadfromtaptalk1347845104852.jpg
    37.6 KB · Views: 43
  • uploadfromtaptalk1347845121575.jpg
    uploadfromtaptalk1347845121575.jpg
    39 KB · Views: 43
  • uploadfromtaptalk1347845139110.jpg
    uploadfromtaptalk1347845139110.jpg
    29.4 KB · Views: 42
Last edited:

bknudtsen

Expedition Leader
.
BTW, this is not the biggest vehicle project I have going on right now. Not really an expo vehicle, but it has done thousands of miles down in Baja in its lifetime. If anyone is bored and wants a long build thread, it is here: http://www.race-dezert.com/forum/sh...amp-M-4WD-Supercrew-Build?highlight=supercrew

View attachment 121239

Holy Cow! Just finished reading through your F-150 build. You have some serious fab skills!!! I wish you were my neighbor...
 

CodyY

Explorer
My plan is to just get another steering box since they wear out consistently and mines already sloppy
 

blakeape

Adventurer
I don't know if you got your pitman arm off yet or not, but make sure you whack it with a hammer. Tighten up the puller then ********** the pitman arm, tighten a little more, ********** again. Eventually it should pop off the sector shaft. That's what has always worked for me anyway.
 

desertspeed

Adventurer
My plan is to just get another steering box since they wear out consistently and mines already sloppy

I don't know if you got your pitman arm off yet or not, but make sure you whack it with a hammer. Tighten up the puller then ********** the pitman arm, tighten a little more, ********** again. Eventually it should pop off the sector shaft. That's what has always worked for me anyway.

The puller that I had (admittedly a pretty cheap one) started bending when I was trying a long breaker bar, and I was afraid to put any more pressure on it. I am heading over to OReilley's today at lunch to "borrow" a bigger puller to try. I would rather not buy a whole new steering box unless I have to, since this one still felt tight.

I did hammer on it some, but I will definitely continue to try it when I get the bigger puller.
 

desertspeed

Adventurer
Holy Cow! Just finished reading through your F-150 build. You have some serious fab skills!!! I wish you were my neighbor...


Thanks! It has been a long build (going on 4 years now) and I still have a while to go. I am really enjoying the van conversion since it is somewhat challenging, but not nearly as involved and will have a much quicker payoff.
 

New River KTM

Observer
I don't know if you got your pitman arm off yet or not, but make sure you whack it with a hammer. Tighten up the puller then ********** the pitman arm, tighten a little more, ********** again. Eventually it should pop off the sector shaft. That's what has always worked for me anyway.

You may have to hit it pretty hard. I used the 3 lb mini sledge on mine before it popped.
 

Forum statistics

Threads
188,695
Messages
2,909,191
Members
230,892
Latest member
jesus m anderson
Top