Isuzu NPR HD Truck Camper Build

VicHanson

Adventurer
I found the source of the water leak in the bathroom area, the black water tank under the toilet. The supports holding it up were not holding it up properly, so all that was supporting it was the drain pipe. The tank is cracked in a couple of places around the flange. Not sure if it can be fixed or not, but will try. If it doesn't work, will probably just take out the toilet and put in a portable one.
 

VicHanson

Adventurer
I decided if I was going to fix the holding tank I should take it out and do it right. It took a bit of doing - there were 12 screws in the floor of the shower pan holding it down. Something doesn't seem right with that, you think they might leak?!?!?

Got started on rebuilding the back end, then had second thoughts about my method so didn't get much done. I'll see if the new ideas in my head work out in wood tomorrow.

IMGP0206_resize.JPG
This doesn't look good!

IMGP0210_resize.JPG
Got the shower/holding tank out

IMGP0212_resize.JPG

The leak is around the flange where the screwdriver is inserted

IMGP0213_resize.JPG

Looks more like a sieve than a floor pan for a shower
 

VicHanson

Adventurer
No fooling, made some progress today, got the rear of the camper mostly rebuilt today! Took a lot of mental energy to work it all out, especially after either cutting some pieces too short (or maybe forgetting how I planned to do it), anyway it all worked out with a few minor modifications. Still need to cut a hole in the plywood for the black water drain, and put in a few vertical pieces.

I also need to get the camper off of the truck again so that I can go get my batteries and some other materials. Also my 30 day temporary registration expires tomorrow I think, so need to renew that. I want to get the camper mounted so I can send a photo of it to the Minnesota DMV if they give me any hassle registering it as a RV.

Vic

IMGP0217_resize.JPG
New supports underneath and new plywood

IMGP0218_resize.JPG
Side view of the shower area

IMGP0220_resize.JPG

There was only one 1x2 here, I put a 2x4 to tie everything together better and act as sort of a bumper, and will put a 1x4 above it where the 1x2 was
 

Ned B

New member
Vic,
far too late at this point, but I'd have just grafted the nose cap onto the utility box once I saw all that rot. However, onward and upward!

Going to be an interesting build, can't wait to see it finished. Oh and I found I had a picture of a 5er, not mine, but I had the same model. It was a good starter trailer though. I bet mine had more miles on it at the time than just about any other SC product. I literally crisscrossed the USA with it for three years.
I miss the lifestyle, but not the gas bills.
 

VicHanson

Adventurer
This afternoon we got the camper off of the truck again and back on the stand. We hoisted up the back end of the camper, jacked up the front end and drove the truck out - very easy compared to putting it on there. Then we put the stand back underneath. Now I can go get some needed materials, the batteries, and hopefully soon get the auxillary fuel tank installed.
 

VicHanson

Adventurer
After getting the camper under a roof, we have had over a week of nice weather with no rain! Ah, well, the days are beautiful so I'm not complaining. However I don't seem to be making much progress, too much time trying to find stuff, both on the internet and running around town.

I got the batteries on Monday, six T-105 6 volt Trojan golf cart batteries. I was planning on getting the 105RE (for renewable energy) but the distributor here doesn't even stock them so ended up getting the regular ones, as I got a good price on them - $87 each. Of course because I wasn't replacing any old ones, I didn't have cores to turn in, so had to pay $16 extra for each one for that, plus $1.50 each for hazard waste fee. Thankfully I didn't have to pay sales tax because they will be used with solar panels. I needed a battery charger and couldn't find one like the Vector one (2/4/10 amp) I left in Peru, so wasted a bunch of time looking and finally ended up getting the first one I looked at (2/4/6 amp) because it was the only one that had smart charging on 6v. There were also 2/4/10 and 2/4/12 models but they didn't even have a 6v range.

I've got the battery box almost finished, just need to seal the wood so the acid doesn't affect it, and put in a vent. The batteries are now all charged so I will test out the refrigerator with the inverter tomorrow. If all looks good, I will then take out the old 12/120 volt fridge and put in the new one. I also need to hook up the oven and water heater to the gas line and make sure they work. I think I will redo the water lines too, they are a flexible gray plastic and I've heard that it gets brittle and easily breaks after 10-15 years, and the camper is 20 years old. Still haven't found any ABS cement to repair the holding tank.

I needed to find a place to put the inverter, which is quite large, and there wasn't really a good place to put it in the camper. I finally realized that if I took the converter/charger/power panel out of where it was below the front bench, I could put it under the sink. All the wires came through this area so it worked out well, didn't need to lengthen any wires. Then I put a removable shelf over the water pump (which was where the power panel was) and there was room to put the inverter in there if I turned it sideways. There will be a separate remote meter/display panel for the inverter and charger, and I think that will fit above where the power panel is now.

Today I got the auxiliary fuel tank mounted, but it isn't hooked up yet, so need to figure out the details of that. Also my cousin gave me a good idea to put a dropped channel for the bike tires below the level of the garage floor, rather than raising up the whole camper to give the needed height in the garage. Dana couldn't do it today when he put the tank on because he didn't have the 5" channel needed for the tire width. He is going to bend a piece of aluminum stock to make it, hope to have that by Friday. Now I can put the plywood on the flatbed as well, so should see some progress soon.

Vic

IMGP0227_resize.JPG
Having the hoists made it real easy

IMGP0244_resize.JPG
Making sure the batteries all fit

IMGP0250_resize.JPG
Completed battery box

IMGP0233_resize.JPG
Power panel is in the top opening, the inverter is right below that

IMGP0252_resize.JPG
The new fuel tank
 
Last edited:

dhackney

Expedition Leader
Bike ramp

PM from Vic:

Hi Doug,

I'm busy here in Florida working on my camper. Not sure if you've seen my build page, but there was lots of wood rot so it needed a major rebuild.

I'm about to start building the bike garage and would appreciate your advice on a couple of things. I'm hoping to get a Honda CRF230L dual sport if I can find a used one for a decent price, but haven't seen many available. There are quite a few of the off road version available but not the dual sport. Did you do the conversion on your 150s to make them street legal, or did you buy them that way someplace? I've seen kits for $500 or $600, but not sure how much trouble it is to get them registered.

I was using my bicycle today as a model for the motorcycle, to visualize the layout. My plan was to use the door as the ramp, but the door is only 4 feet high, so will need some kind of an extension to keep the angle gentle enough. It looks like a 6-7 foot ramp would be OK but I'm not sure. The 230 weighs 267 lbs so I'm sure it could be a bit of a challenge to balance the bike and get it up the ramp. I'm guessing that it's possible to "walk" it up, but using the bike in 1st gear so you don't have to push it?

Any advice or ideas from your experience would be greatly appreciated, either here, or if you want to post it on my build thread on the Mitsubishi truck for the benefit of all.

Thanks much,
Vic


I'm responding here in Vic's build thread so others can share in this.

First, apologies for not being around ExPo much lately. I've been consumed by other things and have just not had the bandwidth to contribute.

As to the bike ramps:

The 230 is a great choice. It's basically the same bike as our 150s with a bigger bore/stroke (not sure which or if both) and bigger wheels.

You can buy the lighting kits from Baja Designs. Highly recommended and it's not just because we know the owners. They really do make the top quality gear for that purpose. I've used their kits on every dirt bike I've ever kitted for the street and have never had a single issue.

Our stock armatures on the 150s are not really up to pulling the lighting kit. I recommend you have your stator rewound to generate more amperage. It's inexpensive and quick. Baja Designs can do this for you.

As to the ramp, We used a door that opened up (top edge hinge) and a folding aluminum bike ramp. We stowed the bike ramp on the rear wall of the garage.

One advantage of a top hinged door was that it formed a wonderful rain and shade shelter for working around the garage and for loading / unloading.

I'm sure a creative fabricator could create a downward opening door that could craftily integrate a folding extension to make a long enough ramp to load/unload the bike.

I don't have it handy to measure, but I think our ramp was about six feet / 1.8 meters. It was the shortest we could use and deal with our load height.

I used first gear and walked the bikes up into the truck. I stepped up onto a motorcross milk crate as I walked the bike in.

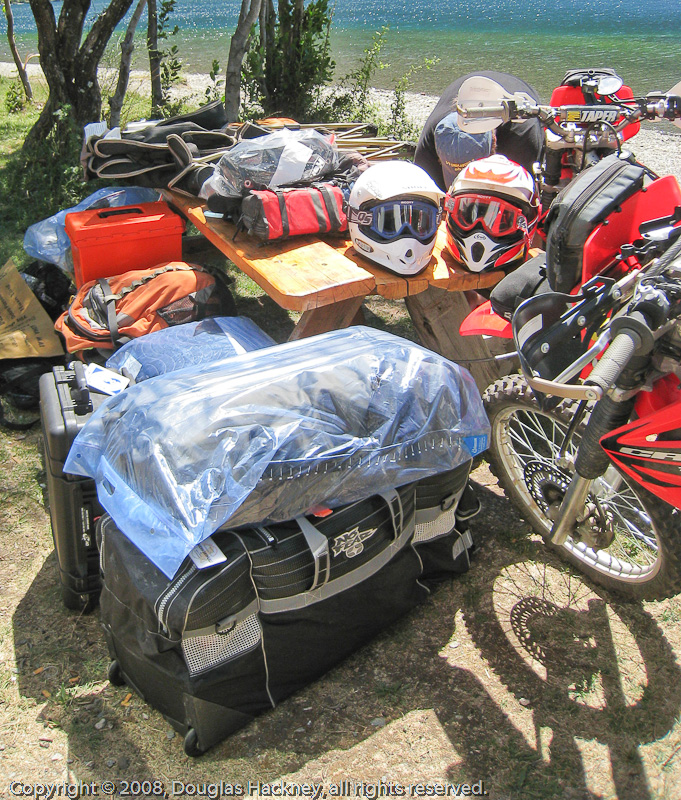
The embarassing part is that until we deleted a bunch of the stuff we had in the garage, it took me longer to remove and stow all the stuff we had shoved into the garage than it took to unload or load the bikes. The bikes really went in and out very easily and quickly.

2008-02-01-SD870%20IS-IMG_1447-800.jpg


There are extensive collections of photos of our buildup that show the details on the garage construction, the bike clamps, etc. here: http://www.hackneys.com/mitsu/index-buildup-photos.htm

There are garage shots throughout, but I did the finish work on it as one of the last steps in the build. You'll start to see quite a bit of garage stuff in these late albums:
http://www.hackneys.com/mitsu/photos/buildup_album_23/index.htm
http://www.hackneys.com/mitsu/photos/buildup_album_24/index.htm

This album has the detail on the system I used to clamp the shovels, pick, ax, bike ramp, etc. in the garage:
http://www.hackneys.com/mitsu/photos/buildup_album_25/index.htm

This album has the detail on how I sealed the garage door top hinge from rain:
http://www.hackneys.com/mitsu/photos/buildup_album_26/index.htm


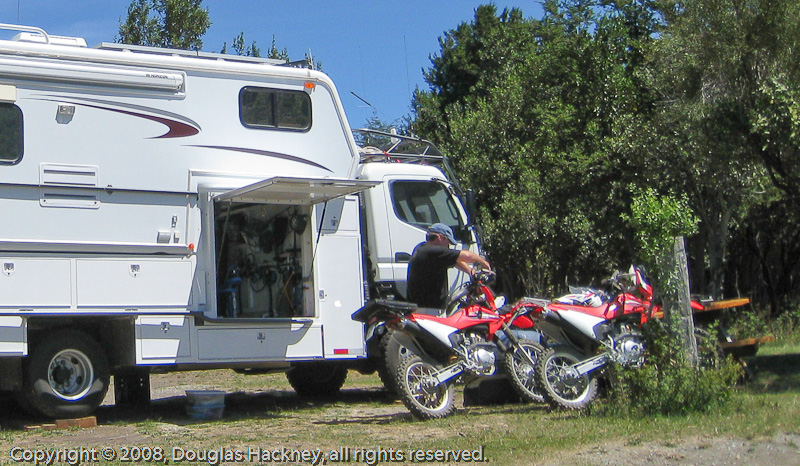
Garage and top hinge door:

2008-02-01-SD870%20IS-IMG_1446-800.jpg


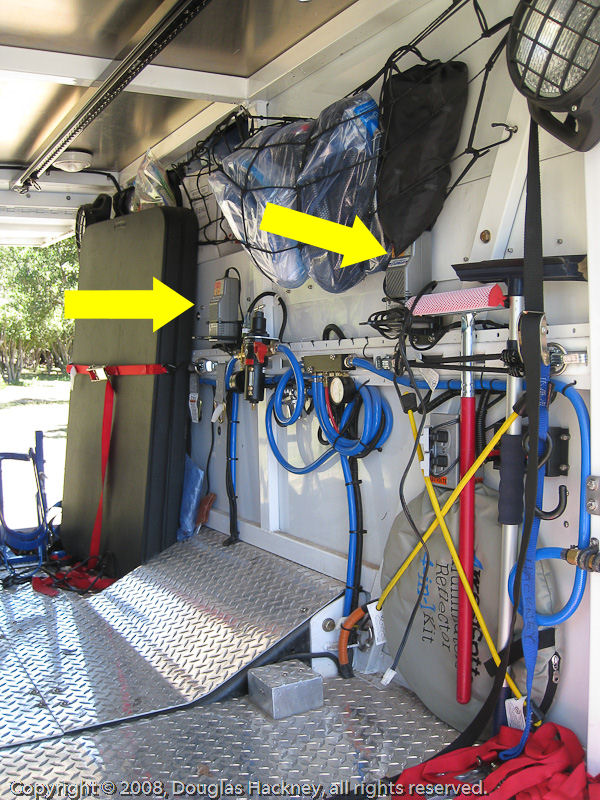
Air regulator, lines and forward garage wall stowage. Note the two battery chargers for the electric start 150s. The 150 motors are made in Brazil, so I was hopeful I could find a kick-start 150 down there and put kick start kits onto our bikes. I never pursued this idea once we were in South America.

2008-02-01-SD870%20IS-IMG_1442-800-arrows.jpg


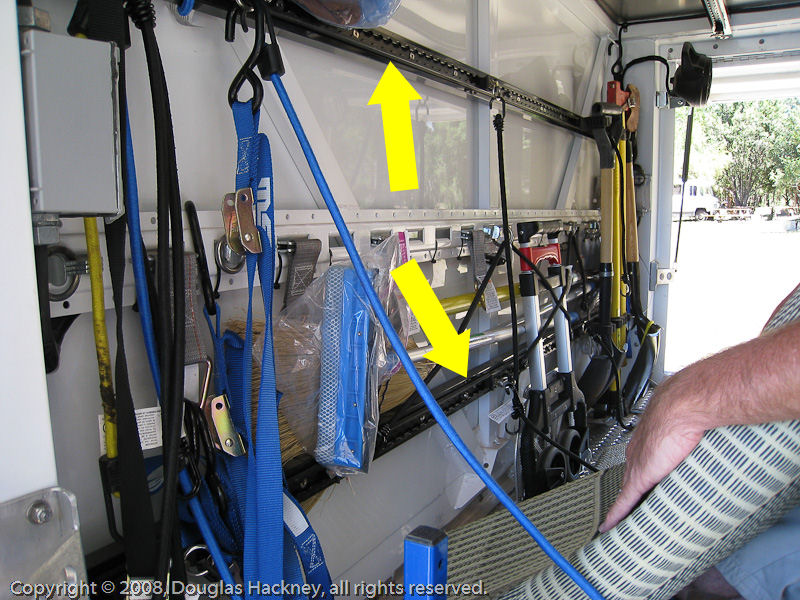
Aft garage wall stowage. The aluminum rails with adjustable anchor points were extremely useful and highly recommended.

2008-02-01-SD870%20IS-IMG_1438-800-arrows.jpg


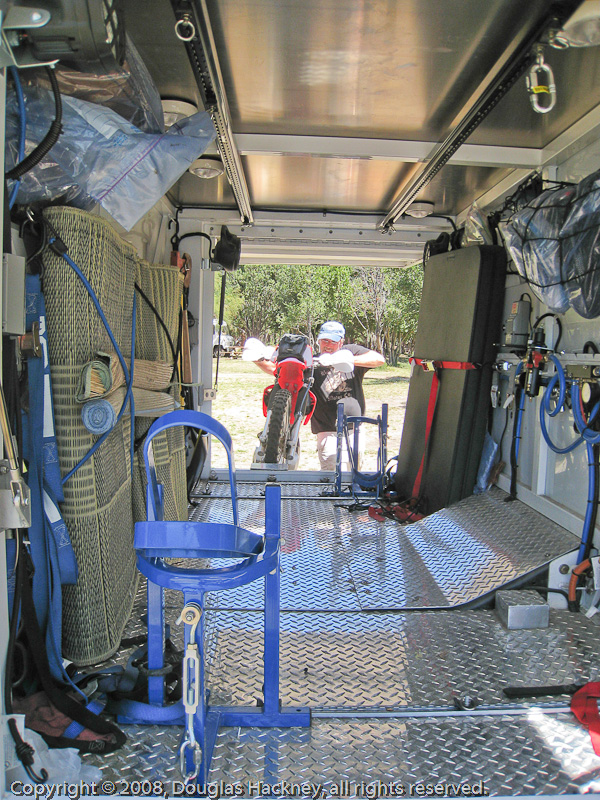
Loading Steph's bike. I'm just ready to step up on the motocross milk crate and power the bike on into the garage. The load was very easy and quick once I worked out the order and arrangement of things. Your 230 may be an inch or two taller than our 150s.

2008-02-01-SD870%20IS-IMG_1449-800.jpg


2008-02-01-SD870%20IS-IMG_1450-800.jpg


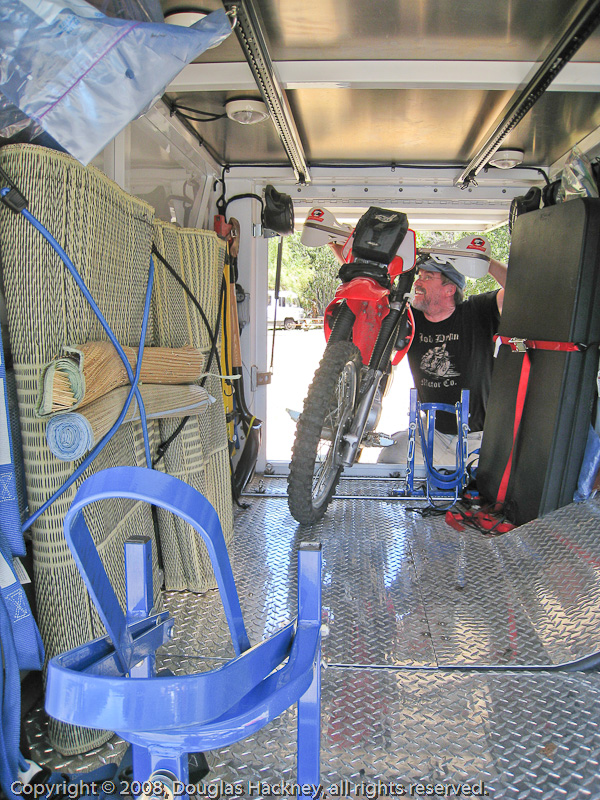
Loading my bike. Note that we loaded from each side of the truck. The bikes always went in nose first and unloaded tail first.

2008-02-01-SD870%20IS-IMG_1455-800.jpg


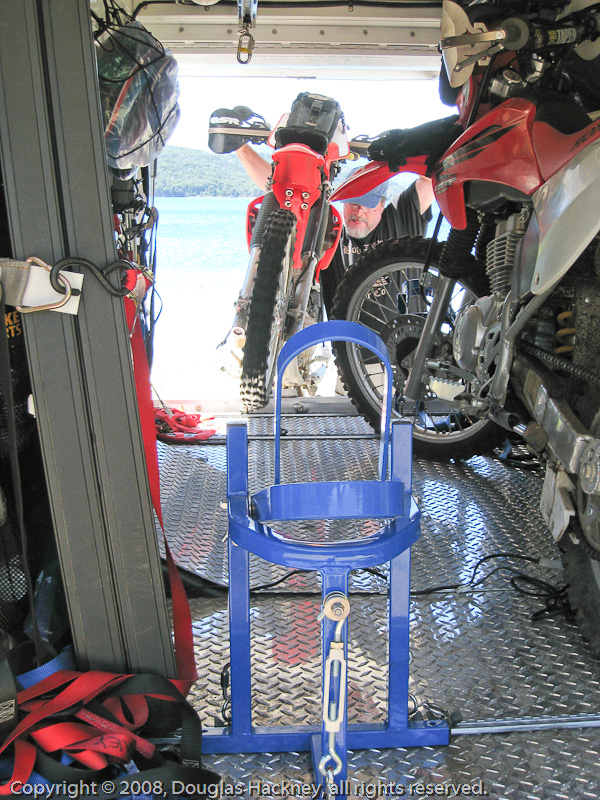
My 150 nosed up into the clamp. The bike clamps worked very well. They are vastly superior to a simple stop and using tie downs on the bars. Plus, they prevent the fork springs from being compressed while the bike is stored.

I built the clamps to mount onto adjustable aluminum rails so we could reconfigure the entire garage at will. We never moved them the entire two years.

2008-02-01-SD870%20IS-IMG_1456-800-plate.jpg


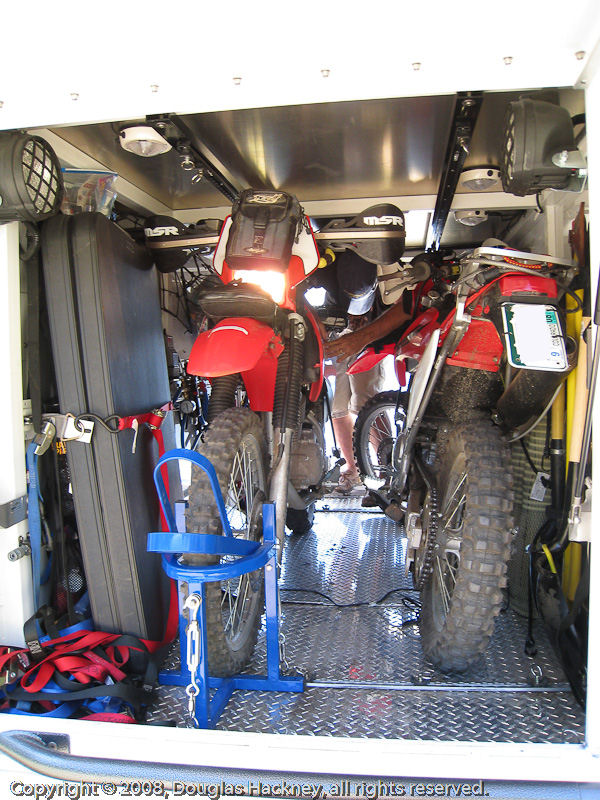
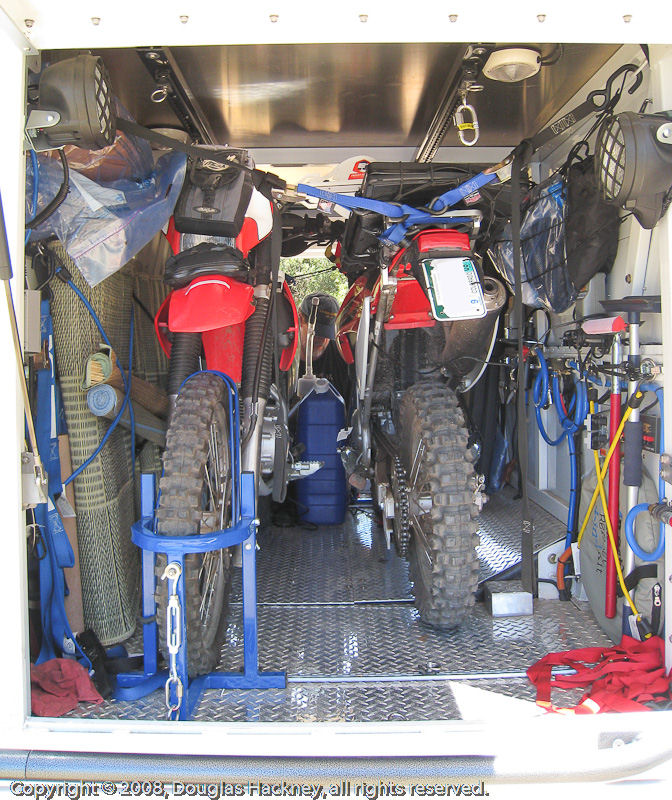
Shot from passenger side of the truck, both bikes clamped down and tied off. Note that the rear of the bike is held in place with no downward compression of the spring/shock. BTW, the rear racks on our bikes were made for the 230s but bolted right onto the 150s since they are the same frame, motor, etc.

2008-02-01-SD870%20IS-IMG_1467-800-plate.jpg


Shot from the driver's side of the truck showing where we stowed the folding ramp. Note that I'm in the shade and I'd also be dry if it was raining. The top hinge doors do have some advantages.

2008-02-01-SD870%20IS-IMG_1468-800-arrow.jpg
 
Last edited:

VicHanson

Adventurer
Thanks Doug, The information was great and the photos really helped to visualize it. I was looking for a photo of the CRF230 head on to see how much room it takes up, and couldn't find one anyplace. I've found a couple for sale on line, waiting to hear from the sellers. I will be registering the bike in Minnesota, so need to check and see if they allow conversions from dirt bike to dual sport bike.

Vic
 

VicHanson

Adventurer
I'm trying to hook up the auxiliary fuel tank but need to know the size of the drain plug on the original tank. Does anyone know what size it is? John?
Thanks.

Got my battery cables yesterday. Also last week tried out the inverter and found out there was a problem with the load sensor switch, it doesn't shut the inverter off when there is no load. Called Tripp Lite and they said it was defective, would send me a new one, which should be here any day now. I also ordered a Tri-Metric 2025RV meter which monitors battery charge, current usage, etc.

Vic
 

whatcharterboat

Supporting Sponsor, Overland Certified OC0018
'm trying to hook up the auxiliary fuel tank but need to know the size of the drain plug on the original tank. Does anyone know what size it is? John?
Thanks.

Sorry Vic . Just saw this. Will check for you today.
 

john101477

Photographer in the Wild
If I get a chance to get out and check I'll let ya know. been stuck indoors the last few days sick. hopefully Mark will have it before I do.
 

whatcharterboat

Supporting Sponsor, Overland Certified OC0018
I'm trying to hook up the auxiliary fuel tank but need to know the size of the drain plug on the original tank. Does anyone know what size it is? John?

Vic. It looks like it's 20mm x 1.25mm on one I've got here. Hopefullly your's will be the same but can't gaurantee this.

Vic, if you can't get a fitting to suit, then just tap a common BSP thread into the drain plug and go from there with standard BSP-T brass fittings.
 
Last edited:

VicHanson

Adventurer
Thanks, John, really appreciate the information, as well as the great idea about tapping the plug, never thought of that!

Yesterday I took the vents off the roof, the covers need replacing and they need to be recaulked, also need to plug up the hole where the air conditioner was, as well as took the old fridge out. Today I got the opening cut out to put the door on the side and rewired for the fridge (after accidently cutting the original wire I moved it too the other side so it didn't have to go across the doorway). Also lots of mental energy expended on how to mount it on the truck, think I got it about figured out.

I also got a roll of self adhesive roofing material (used to be called tar paper). This is polyglass or something like that, going to put it under the plywood of the truck bed to protect it from water, as well as protect the aluminum frame from the pressure treated wood. Probably wasn't needed because it already had 3 coats of polyurethane on it, but the roofers were here putting a new roof on the house so decided to get a roll from them.

Tomorrow hope to get the materials to put in new water lines, and the replacement inverter should be here.

Vic
 

VicHanson

Adventurer
My cousin Jim is an accountant, and with tax season over he was going to his hunting camp for a long weekend, and invited me to go with him. I had already missed the deadline to go to the wedding I wanted to attend so I took the weekend off as well. Now he is taking some time off work and helping me with the camper, which is a real blessing. He has given me lots of good advice and has lots of practical experience to be a great help.

I had kind of reached a point where the camper needed to be on the truck again to fit things, but first we had to put the plywood deck on the truck. We got that done on Monday, and also put the roofing underlayment on the bottom of the plywood. We will also put a layer on the top before we permanently attach the camper. One of the things I wanted to check was to make sure the fiberglass front cap would clear the cab, and to make sure there was room to tilt the cab - all is OK! We had to raise the camper 1 1/2" to give sufficient height in the bike garage, which also gave enough clearance for the cab. We will be putting 2x4s flat under all supporting parts of the camper to do this. I had planned on using 4x4s, but don't need to go that high. One of Jim's ideas was to use a dropped channel for the bike tires, which gave 3 1/2 inches of extra space for the bike. As the wheel goes in first over the side of the frame, it drops down into the channel before the handlebars go in, so it should work OK. If I remember right, this will give an overall camper height of about 11 1/2 feet, to the top of the solar panels.

Yesterday and today I worked on storage compartments, got the passenger side storage done. I enclosed the area from the new side door to the start of the bike garage, and cut out hatches under the dining area bench seat. It will only be accessed from the inside so it was quite easy, no need for outside doors. The storage area is about 6 1/2 feet long, 19 inches wide and 22 inches deep. After mounting the camper on the truck, I will insulate the bottom and side. I also have the front side of the door area framed in and took out the old closet that was in that back corner. It used to open towards the center aisle, I need to change it to open towards the front, where the new entrance will be, because the refrigerator will be just inside of the old door opening. I am also putting in shelves instead of a closet for hanging clothes, as I don't have any clothes that go on a hanger!

This afternoon we patched up the black water tank, the leak from which was one of the reason the whole back end of the camper was rotted away. We used 3M 5200 marine adhesive and a piece of 3/4" treated plywood. That takes 7 days to dry so decided that we better get it done so we can put it back into the bathroom. Still need to patch the bottom of the shower pan.

Over the weekend a friend redid most of the fresh water lines using PEX flexible tubing, still need to get a bypass valve before he can put in the water heater.


IMGP0289_resize.JPG
I guess this might qualify as an expedition vehicle, a Florida swamp buggy.

IMGP0296_resize.JPG IMGP0298_resize.JPG IMGP0299_resize.JPG
The finished flatbed with the bike tire channel; the roofing underlayment from the bottom; and the box it came in.

IMGP0310_resize.JPG IMGP0312_resize.JPG IMGP0328_resize.JPG
Getting the hoists and chains ready; backing the truck under; camper on the truck, also working on the storage area.

IMGP0337_resize.JPG IMGP0331_resize.JPG IMGP0339_resize.JPG
Hatches cut out; storage area enclosed; all finished!
 

Forum statistics

Threads
188,480
Messages
2,905,469
Members
230,494
Latest member
Sophia Lopez
Top