You are using an out of date browser. It may not display this or other websites correctly.
You should upgrade or use an alternative browser.
You should upgrade or use an alternative browser.
Just purchased a Military trailer to build a family hauler
- Thread starter Mark Harley
- Start date
Mark Harley
Expedition Leader
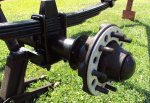
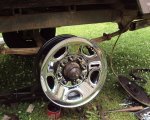
Drum and break service.
The M101A2 I purchased came with 8 bolt hubs it is a matching patern for my 2002 GMC 2500HD.
Remove the two phillips head counter sunk drum retainer screws, the drums will pull off, pry off the dust caps,
remove the cotter pin, castle lock cover and hub nut. Pull the hub off carefully as to not damage the inner and outer bearings and seals.
With the hub off I removed the five backer plate bolts and removed the backer plates, brake shoe assemblies "careful asbestos may be present"
Then remove the fluid lines from the brake piston block.
The parking brake cables are removed with the backing plate assemblies.
Inspect the bearings clean and repack. replace the hub, smear more grease in the face and put the retaining washer, nut, tighten the assembly while you rotate the hub to seat the bearings, then when they are seated back the nut off slightly to add the castle retainer and cotter pin.
Clean the dust cover, straighten any dents or bends in it and tap it on.
If you don't need the brakes or they don't work "Like in my case"
This is a big reduction in weight.
Attachments
Scrapdaddy
Adventurer
Hey Mark, nice write up on the brakes. I know you have a full size pickup, so you really aren't going to need the trailer brakes much, but you aren't going to feel the extra few hundred pounds either. I would think a smaller type truck might need the brakes on the trailer, when it's loaded up. Your brakes were used up, but most of them seem to be in good shape, it just seems a shame to take all that neat stuff off, just to save a few hundred pounds. I really can't say either, because I tow mine with a 5500 dodge. My son has a mid size suv and is planning to build a camping trailer out of his, so we'll see how his truck will handle the weight. I know him, it will be loaded down. I really like what you've done to yours, clean job!
Mark Harley
Expedition Leader
Making bows and lashing it down.
I have been kicking around some ideas for bows for the trailer and made some prototypes from pine. I cut a 3/4 x 1 7/8" x 69" piece that fits in the pocket recess well.
It required a curf on the underside to drop flush with the trailer lip.
I made 5 of these flat pine bows as a tempory for keeping water from pooling on top of the cover. I have ordered 5 pieces of 1" x 2" x 96" aluminum hollow stock from a distributor at work.
At work we have a rolling machine that will curve the aluminum and make a slight bow.
I will run the material through the rolling machine and make 5 matching bows
with the correct length and add the curf underneith to drop into the pocket.
I was at Target and spotted a spool of nylon camping rope that has a cool red, black, white pattern. Perfect match for the trailer.
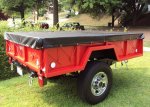
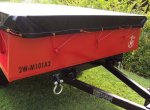
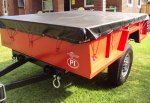
Added the tempory bows and threaded the rop through the grommets and cinched the cover down using the original tie down hooks. Simple on and off and it keeps the cargo dry.
Next on the list is side mounted receiver tubes for the cook table, a propane tank mount, custom diamond plate tongue box and a rack for a RTT.
I am looking for a great deal on a RTT to fit 2 adults and 2 children.
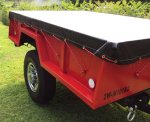
Here is the tarp progress:
The last picture is of the 1 1/4" x 6" receiver tube that will be mounted to the side of the tub and be used to mount a counter for cooking.
Attachments
Last edited:
Titanpat57
Expedition Leader
looks good!
no bows?....seems it would fill and sag on a span like that.
no bows?....seems it would fill and sag on a span like that.
Mark Harley
Expedition Leader
temp bows until the aluminum comes in.
There are bows under the cover, 5 total dropped in the stake pockets.
These are temporary wood mock ups.
I have ordered aluminum and will have it arched at work.
Mark
looks good!
no bows?....seems it would fill and sag on a span like that.
There are bows under the cover, 5 total dropped in the stake pockets.
These are temporary wood mock ups.
I have ordered aluminum and will have it arched at work.
Mark
Mark Harley
Expedition Leader
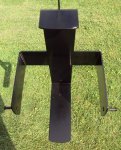
Home made tank hanger
In a previous post, I stated I bought a five pound manchester propane tank.
I searched for a mount to hang it on the front of my M101A2. it seemed everything I wanted except one required extra items to satisfy my need.
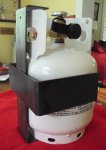
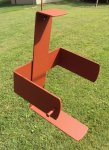
I measured that tank dementions and came out with this design.
it is bent from 2 3/4" wide steel 1/8" thick. The main support will bolt on the trailer
tub with two 5/16" bolts, the top bolt will be left longer and insert through a hole in the tank and be used a s a hold down. the U strap wraps around the tank and will have a rubber bungy to hold it secure.
A little welding tomorrow and some paint and it will be ready to hold the tank.
Attachments
Dirtytires
Explorer
Looks good Mark! Your progressing very well.I like the propane holder. Are you mounting it on the tongue of the trailer?
Mark Harley
Expedition Leader
I've Got Gas!
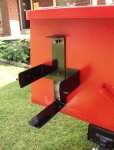
I finished the propane tank holder and I feel it turned out well.
I went to the hardware store and spied some 1/4" clevis pins.
that would suite my needs as a holder for the tank strap.
I wanted a mushroom style head that the bungy would slip over and not slide off,
I marked everything and drilled for the mounting bolts and bungy pins.
The welding of the frame and pins was finished at work and I bead blasted the whole assembly for good paint adhesion.
a coat of red oxide primer and several coats of glossy black and the rack was looking better. I marked and drilled the mounting location on the right side of the trailer
"This will be the side my kitchen box and tables will be mounted on"
The mount is bolted on with two 1/4" bolts and the top is longer and passes through a hole in the top rim of the propane tank locking it on with a nyloc wing nut and spacer. A 14" bungy has the correct amount of tension on the mounting pins to hold the tank firmly.
I like the K.I.S.S method and I think this simple design is a keeper.
Attachments
Last edited:
Dirtytires
Explorer
Sweet. What would you charge to make me two of them..
koolex11
Observer
See Mark, you need to start making these parts in bulk! Could have sold 20 coupler mods by now!
Some guys came over today to look at my A1. When they saw the channel with the 2" ball on the A2, they completely ignored the A1 and tried to get me to sell the one with the tongue mod!
Some guys came over today to look at my A1. When they saw the channel with the 2" ball on the A2, they completely ignored the A1 and tried to get me to sell the one with the tongue mod!
Mark Harley
Expedition Leader
I would have to talk to my co workers about making more.
It is tough to squeeze jobs in at the press. I have worked here 11 years and
pay with lunches.
I won a 9' side mount RED umbrella on ebay
It arrived yesterday and will be an addition to the trailer.
I plan on using a receiver mount to hold it.
Keep checking for progress, I need to mount the receiver mounts under the tub for the table mounts.
Similar threads
- Replies
- 2
- Views
- 841
- Replies
- 1
- Views
- 704
- Replies
- 31
- Views
- 5K
- Replies
- 3
- Views
- 712

