You are using an out of date browser. It may not display this or other websites correctly.
You should upgrade or use an alternative browser.
You should upgrade or use an alternative browser.
M416 Build
- Thread starter dieselcruiserhead
- Start date

dieselcruiserhead
16 Years on ExPo. Whoa!!
dieselcruiserhead
16 Years on ExPo. Whoa!!

dieselcruiserhead
16 Years on ExPo. Whoa!!
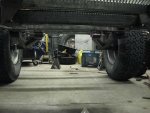
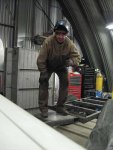
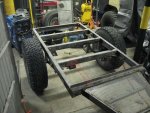
Ha, it supports my weight! Time to turn it back into a trailer...
As you can tell it gets a little cold in the shop, metal building without insulation. Recently we got the heat working again which takes the tip off but it is still a little cool...
As you can tell it gets a little cold in the shop, metal building without insulation. Recently we got the heat working again which takes the tip off but it is still a little cool...
Attachments

dieselcruiserhead
16 Years on ExPo. Whoa!!
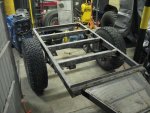
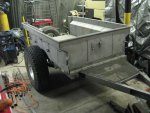
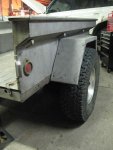
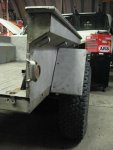
With the fenders on.
The 33's fit nicely and I'm psyched that they are a little narrower but still have the size to get over things. I spaced the wheels wide enough enough (via axle positioning) that I could run any one of the tire sizes in our arsenal, the wider 35s on my FJ55, the wider 16" 33s on everyone else's rigs, and didn't want any potential rubbing and mud clearance. But truth be told I think the 33's will probably stick/be the ticket for drag resistance (really there's no reason to go to a wider tire) and looking back at it I should have just committed to the size.
I spaced the tire on these rims at 2" from the inside wall to the frame, but looking back at it I should have sized 1" or 1.25" narrower and I wouldn't now have to widen the fenders. Maybe it will be worth it to have the flexibility of different tires sizes later.
I'm also considering even going down to 32" (or even just temporarily) as these tires may end up on my truck and I have two good and two increasingly worn 32's on truck currently... Not sure if this will be temporary or not. I'm telling myself that I would really like to be able to wheel the trailer fairly hard so the larger size will be nice...
Attachments

IH8RDS
Explorer
Wow! Really nice work. I am going to do the same thing with the toung on mine. I like how it still uses the stock pintle receiver.
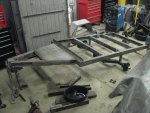
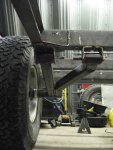
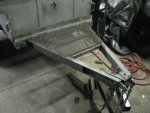
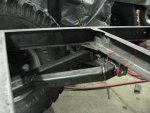
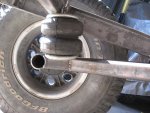
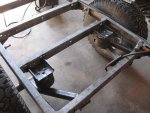
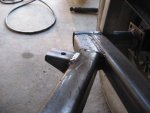
Looks like you got good and straight. One concern I have is with the picture below. The inside arm mount location worries me. I have stripped down my M416 frame and I don’t know if that crossbar will be strong enough over time. My upper portion was slightly bent from loads carried in the tub before I got it, and the other crossbars seem a little flimsy. I maybe wrong, but I don’t think it is strong enough. Maybe if you box in that section it will make it more rigid.
You build is defiantly an inspiration. Keep it up!!
dieselcruiserhead
16 Years on ExPo. Whoa!!
Thanks Scott...
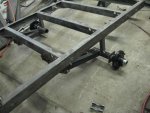
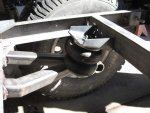
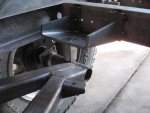
To tell you the truth that has crossed my mind as well. I figured it was probably OK and though the frame is a little thin it is still pretty strong. I didn't burn through it once for example welding both the 1/4" steel and even 3/8" though I did mostly use a thicker to thinner technique.
I've thought about beefing it up and at one point I was going to weld some 2" wide 1/4" strap to the bottom of the frame at this point to beef it up. But I made the decision it wasn't necessary for a couple reasons... My thoughts were along the lines of the AT arm kit (again with all the time I have into this it is more and more attractive to me) and I don't think it calls for any frame beefing up.
This said I made some provisions to possibly revisit this when I add the airbags. Most notably (it's hard to tell from the pics except for the first) is I made the inner hanger about a 1/4" too long to add some scab plating... If I did add extra steel my thoughts were along the lines of these photos below/crude MS paint illustrations. It also turned into a slight hassle to *not* add the extra steel as the spring hangers needed to be 1/4" longer to compensate for the extra steel on the side of the frame so the arms would flex consistently through their motion. I guess I felt comfortable enough with it to leave as is..
Attachments
Last edited:
Willman
Active member
dieselcruiserhead said:With the fenders on.....
I spaced the tire on these rims at 2" from the inside wall to the frame, but looking back at it I should have sized 1" or 1.25" narrower and I wouldn't now have to widen the fenders. Maybe it will be worth it to have the flexibility of different tires sizes later.
Andre...
First.....great build!.....I need to come see this sweet build!
I too went with 2" spacing.....Had the same thoughts after as you did!
Brakes.....Are you going to do it?....or is it too late?.....worth every penny when the tow rig and the trailer are all weighted down with gear and your at Moab doing some crazy hills...
Keep up the great work!
")
dieselcruiserhead
16 Years on ExPo. Whoa!!
For now, no unfortunately... Couldn't justify the $200 price difference (plus the controller, etc) but that said you have me serioously reconsidering. Bummer too as I just assembled the hubs as you saw...
Anyway, too funny regardless.. Not sure when the next time I'll be there is but I'll keep you posted! Possibly Sunday with luck. I snoozed on the ebay airbag kit and/or skimped when they went for only $150 which looking back I should have grabbed. That said the braketry and spring size was right but it was a rare bladder if one blew. There is a Ford kit that works for a dozen other apps (part number 2071) that should work well and the brackettry is correct for that, and uses one of the most universal bladders out there that is also the correct size. We'll see but that is the next step along with the actual tub mods..
Really this trailer is taking a lot of time but again I am enjoying it...
Last edited:
dieselcruiserhead
16 Years on ExPo. Whoa!!
Sorry for the delay in updates. Here is a little more work on the trailer...
First I wanted to say **BIG PROPS** again to Adventure Trailer... I was going to say the same thing as Jereme here, but he beat me to it!
http://www.expeditionportal.com/forum/showthread.php?t=23965
I ordered the air bags, mounting plates, plumbing etc from Mario at AT. I've also talked to Martyn God knows how many times lately. I cannot say enough about these guys, they are absolutely as good as they come...
So anyway, these things showed up late last week, here is the approximate mockup that I figured I'd do after maybe 20-30 minutes of mettling around...


The one on the right I modified with a little heat and the hammer and some trimming with the cutoff wheel...

First I wanted to say **BIG PROPS** again to Adventure Trailer... I was going to say the same thing as Jereme here, but he beat me to it!
http://www.expeditionportal.com/forum/showthread.php?t=23965
I ordered the air bags, mounting plates, plumbing etc from Mario at AT. I've also talked to Martyn God knows how many times lately. I cannot say enough about these guys, they are absolutely as good as they come...
So anyway, these things showed up late last week, here is the approximate mockup that I figured I'd do after maybe 20-30 minutes of mettling around...
The one on the right I modified with a little heat and the hammer and some trimming with the cutoff wheel...
Attachments


Last edited:
dieselcruiserhead
16 Years on ExPo. Whoa!!
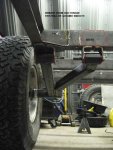
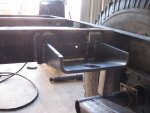
The pic above shows the AT mountain plates. At first I was going to fab these up from scratch but they are very heavy duty and worth it and in my opinion the best possible solution for mounting of the bags. I also got all of this done in 1 day at my usual slow/double check everything pace so it saved a lot of time by having them. Again, big props to AT and how awesome these guys (and their products) are...
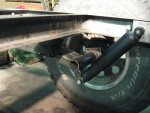
Here is it bent/mocked up. The photo shows my friend Ray who is a professional welder for a big structural fabricator who happened to show up yesterday afternoon (and is a hell of a guy). He suggested using spreading the weight to reduce flexing. That is the only issue with this mounting is the M416 frame is about 1/8" (so quite thin so it flexes).
You can see the strap that spaces out the mountain point of the upper bracket (which is going to take the brunt of upward motion). So it is crucial that it gets spread out and is strong as nails. Second, you can see the lower mountain point which is just more 2x2 box tube cut in half. Works excellently and is also strong and nice and easy to mount/apply as well...

Ray from Arches welding:

Fully mocked up:

You can see it all tacked up:

Here is it bent/mocked up. The photo shows my friend Ray who is a professional welder for a big structural fabricator who happened to show up yesterday afternoon (and is a hell of a guy). He suggested using spreading the weight to reduce flexing. That is the only issue with this mounting is the M416 frame is about 1/8" (so quite thin so it flexes).
You can see the strap that spaces out the mountain point of the upper bracket (which is going to take the brunt of upward motion). So it is crucial that it gets spread out and is strong as nails. Second, you can see the lower mountain point which is just more 2x2 box tube cut in half. Works excellently and is also strong and nice and easy to mount/apply as well...
Ray from Arches welding:
Fully mocked up:
You can see it all tacked up:
Attachments
Last edited:
dieselcruiserhead
16 Years on ExPo. Whoa!!
dieselcruiserhead
16 Years on ExPo. Whoa!!
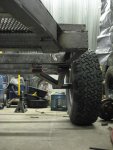
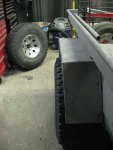
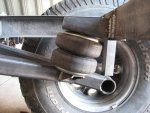
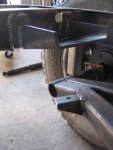
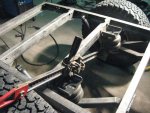
Shock mounting, including shock tabs...

16" of straight steel with two 2.5" holes equals 4 tabs with 2" of distance between tube and stock mount, 2.75" overall length from tube to end of tab:

And mounted up. I lucked out and found these old shocks I'd been saving for a couple years now specifically for a future trailer project, off the rear of a stock 4 cyl leaf spring Wrangler I installed a lift on. They are nitrogen charged and should work pretty well and are basically brand new. So far they seem to be great and the restriction in both directions seems awesome (if I lift the frame too quickly it lifts the arms/wheel off the ground as well -- perfect for cornering and quick movement. About 3" of uptravel and maybe 4-5" of droop. So they err on the side of being too long still but with the mounting setup there is no way I'll ever touch 3" of uptravel. You'll see the final picture when I get it painted and all assembled. Because of this mounting style it also places the shocks nice and vertically which is much preferred. Because of the shock angles for that occasional low rock the trailer should slider over it just fine. It also mimics the style of FZJ80 Land Cruiser axles which is what will be towing it most of the time when I finally get that truck done... Interesting this trailer is more "jeep" than anything I've owned with the shocks and leaf spring bushings (Jeep CJ).


16" of straight steel with two 2.5" holes equals 4 tabs with 2" of distance between tube and stock mount, 2.75" overall length from tube to end of tab:
And mounted up. I lucked out and found these old shocks I'd been saving for a couple years now specifically for a future trailer project, off the rear of a stock 4 cyl leaf spring Wrangler I installed a lift on. They are nitrogen charged and should work pretty well and are basically brand new. So far they seem to be great and the restriction in both directions seems awesome (if I lift the frame too quickly it lifts the arms/wheel off the ground as well -- perfect for cornering and quick movement. About 3" of uptravel and maybe 4-5" of droop. So they err on the side of being too long still but with the mounting setup there is no way I'll ever touch 3" of uptravel. You'll see the final picture when I get it painted and all assembled. Because of this mounting style it also places the shocks nice and vertically which is much preferred. Because of the shock angles for that occasional low rock the trailer should slider over it just fine. It also mimics the style of FZJ80 Land Cruiser axles which is what will be towing it most of the time when I finally get that truck done...
Interesting this trailer is more "jeep" than anything I've owned with the shocks and leaf spring bushings (Jeep CJ). Attachments

Last edited:
dieselcruiserhead
16 Years on ExPo. Whoa!!
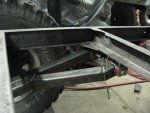
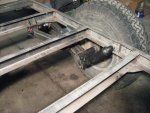
From here all the welding and the final product was actually a hair off as far as alignment. Both arms tweaked in a little so the it was minimal and probably fine, and there is enough light play in the whole setup (which is actually good) that it would probably track just fine. it measured a hair to the side of this:
||
\ /
But to be safe, I "aligned it" which basically involved some minor metal "tweaking" before I welded up the last of the frame... My "alignment" technique, lol... Use the highlift to spread them out and the push down on the frame to tweak to correct measurement... I was laughing hard enough that I set the camera to self timer to take a photo of it. It worked perfectly...

Hard to tell but the side I'm on was tweaked up and I'm pushing it down.

||
\ /
But to be safe, I "aligned it" which basically involved some minor metal "tweaking" before I welded up the last of the frame... My "alignment" technique, lol... Use the highlift to spread them out and the push down on the frame to tweak to correct measurement... I was laughing hard enough that I set the camera to self timer to take a photo of it. It worked perfectly...
Hard to tell but the side I'm on was tweaked up and I'm pushing it down.
Attachments

Similar threads
- Replies
- 0
- Views
- 380
- Replies
- 20
- Views
- 3K
- Replies
- 16
- Views
- 855
- Replies
- 0
- Views
- 328
- Replies
- 5
- Views
- 277