You are using an out of date browser. It may not display this or other websites correctly.
You should upgrade or use an alternative browser.
You should upgrade or use an alternative browser.
Making a ifting roof on a 110
- Thread starter wuntenn
- Start date
Yes the injector pump. Luckily I was able to get the old one back (which had been adjusted to suit my vehicle) so I can use it to establish some indicators for setting up the overhauled one which runs beautifully but lacks bottom end and top end ooomph. They are expensive in this country too - it is £700 for a Bearmach one and (sit down) £4100 for an original parts Land Rover one.
piratexpress1369a
Explorer
Is the original a Bosch pump
tacr2man
Adventurer
Hi Renier - glad you're enjoying it! Progress - yes.
Fitted various electrical stuff - a Smartgauge to monitor the batteries, which seems to work really well (seems like there's some 'controversy' around them); wired in a decent (pure sine) inverter; a mains hookup with RCD; new hifi & speakers; and am currently installing EGT and boost gauges, and a tacho.
The head gasket went so I've had the head off and replaced with a fully overhauled Turner head, new exhaust, and various gaskets and seals, and have a set of new silicone pipes and alloy hoses to fit on the air intake/intercooler, as the current ones are the old & worn tatty things which I've had for over 15 years and are well past their sell-by date.
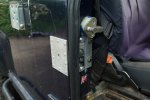
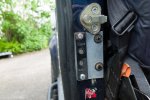
My back door skin was dissolving so I stuck a new one on last week. Thats the third one, they last 12 years! Needed decent security locks for the front doorsso found neat deadbolts with a mechanism that will fit well back inside the van side/door, away from water, salt and mank - I've had another type on for the last 15 years and had to replace them three times as they wear out, so hopeful these ones will be more weather-resistent.
My fuel pump was leaking badly so I bought a s/h one and had it fully overhauled by the local Bosch agent. When fitted it ran like a dog and the shop owner was perplexed but turned the fuel up which helped a bit, still not brilliant so I got a hold of the Bosch service manual and genned up on pumps and took the top off and found that the boost pin was jammed solid, held in by the fuel pin that runs up against it (the pin responding to throttle action). Pump guys got it back and had to weld a rod onto it to get it out. This was a first for them in over 30 years of pump servicing. Anyway they put new parts in it and when I picked it up they were still not happy with it, and as I drove it home the idle speed whacked itself up a good bit all by itself while I sat at the lights. It runs a bit better after this little hiccup but I still need the pump tweaked a bit to increase boost and fueling.
The hard sides are on hold while all the rest of this is going on, and the workshop where I've been allowed to work on the sides has been fully used for a van build anyway so it was a no-go there for a few months.
My rear awning got overtaken - I realized that a commercially available tent porch off ebay would be a possible fit and more elegant than the home-made one I was aiming for constructing, as well as being cheaper. It'll be here in a few days so I'll report on that when I've tried it.
Minor annoyances revealing themselves - the combination of etch primer and cellulose paint I used is proving a bugger to stick sealant to. I've sealed various bits using Sikaflex and it just hates the paint, eats through it and falls off leaving bare alloy! So I've had to scrape some of it off and redo it, that was started but is on hold for now as the weather has been rubbish with too much damp.
So yes progress, slow but sure!
What locks were they as looked everywhere for something that even looks like it might fit ?
Is the original a Bosch pump
Yes pirate, Bosch ERR1333 (I think) and the replacement is the same with same ID number on the case.
What locks were they as looked everywhere for something that even looks like it might fit ?
Its a twin bolt mortice lock, with a long thin 'star' key that only requires a small hole for insertion, the lock mechanism being 2 inches or so set back from the panel surface inside. Got them here and not expensive either: http://www.sentrylocksupplies.co.uk/shop/shop.php?action=full&id=98
I'll get some pics of them installed later and post them up. Works fine and fits neatly.
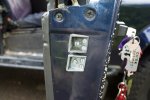
Here you go. I'd to put an alloy plate over the outside as the holes didn't align with my old locks.

The actual lock is set back a good bit. I put a sort-of anti-twist plate on the face to strengthen the securing bolts.

The keepers you can see here on the door itself are NOT part of the kit but the remains of the old locks I'd previously had on. You'll need to bolt on a small L plate to replicate them. It's all to do with the bolt throw and distance across the gap. It'll make sense when you start messing about to fit them.

They seem very robust and will certainly be inaccessible to most picking tools as the actual tumbler mechanism is almost two inches inside the van body.

The actual lock is set back a good bit. I put a sort-of anti-twist plate on the face to strengthen the securing bolts.

The keepers you can see here on the door itself are NOT part of the kit but the remains of the old locks I'd previously had on. You'll need to bolt on a small L plate to replicate them. It's all to do with the bolt throw and distance across the gap. It'll make sense when you start messing about to fit them.

They seem very robust and will certainly be inaccessible to most picking tools as the actual tumbler mechanism is almost two inches inside the van body.
This is one of the coolest threads I've stumbled upon here yet! Amazing work!
Seriously though, thanks for reading and commenting, really appreciate your interest and be nice to think my tinkering is helping other folks too.
I'll keep an eye open for you, I'm off up to Mull later in the year.
I'm hard to miss! Have you been to Mull before?
No, I'm really looking forward to it, we are up for the rally, though making a longer holiday of it.
Congrats on the truck, top job and fab write up.
Thanks! Van is slowly taking shape. Got a few bis and bobs to bolt on, and some interior trim to stick in, but its eminently usable.
Mull is well...wonderful It's big too, don't underestimate the distance from top end to bottom. Are you roof tenting? There's a few good campsites and loads of spots to pull up by the coast.
Spots to not miss: Calgary beach and the walk around the coast from there (sea eagle territory). Also all along Loch na Keal you may see otters, and there are golden eagles on the south side if you keep an eye on the ridges.
If you have a chance take the Turus Mara boat from Ulva Ferry out to see Fingal's Cave on Staffa. Worth getting high up too, the cliffs along at the mouth of Loch na Keal above Inchkenneth island afford fantastic views across the island, to more islands, and more islands!
GREENI
Adventurer
I have to say, I'd retire to the Highlands tomorrow. When I was up there with the tab caravan I fell in love with the place.
We have cottage booked, though going up in the 110, with the kayak.
Thanks for the tips on the spots, I'll be sure to give them a look.. Will be doing the highlands again and again. I've got a big list of places to tick off, though tenting it.
We have cottage booked, though going up in the 110, with the kayak.
Thanks for the tips on the spots, I'll be sure to give them a look.. Will be doing the highlands again and again. I've got a big list of places to tick off, though tenting it.
Well with a kayak you definitely need to pop over to Inchkenneth and have a look at the old church and burial ground, some fantastic grave stones. There's a story there too: http://www.duckrabbit.info/2012/05/hitler-islands-and-a-story/
Similar threads
- Replies
- 0
- Views
- 421
- Replies
- 1
- Views
- 360
- Replies
- 2
- Views
- 589
