Mercedes 1222A.. The beginning!

joeblack5

Active member
Maybe you can run some appropriate wires thru the hollow profiles. Straight sections, one corner max....that is if the corner is opened. I used to make UT aircraft test equipment. The frames were made if 3" square polished stainless. To reduce the work of re-polishing the corners we cut and welded on 45 degrees, so the corners would always be open.
Not the easiest to install but very clean looking
Johan
 

Sitec

Adventurer
Hi Johan. I've done exactly this on some of what I fitted last week. No matter what I do, it'll be difficult to get back out in the event of a problem. The joys of having wiring in a hab box! :)
 

Sitec

Adventurer
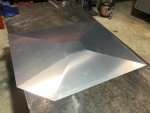
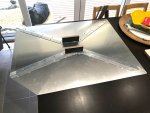
With the exterior work all but completed, I have started focusing on the interior. The time has come to fabricate the toilet room and shower room. Here is where I learn that one of my 'good idea's' is not such a good idea... I have designed our shower size aroud being usable but also to suit the area it's going in. Both the shower and toilet rooms have one wall at 45 deg as it mkes for a nice layout in the kitchen. However, this presents as a problem when you want to fit a shower tray to it! I planned to have a stainles tray with integral plug made by a stainless expert, but with quotes coming back north of $1000 I have decided I'll do it myself! With the shape of the rooms fabricated, I could then build in the angle supports for the shower tray and toilet floor. Here's the shower tray taking shape. Some accurate measuring took place to get this right!

Body mods 117.jpg

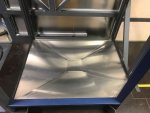
Here's the basic tray dropped in place... It fits!

Body mods 119.jpg

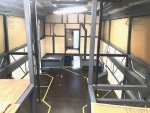
Here's a view of both rooms taking shape. The two 45deg walls give me good kitchen space for towel rails, and mounting switches etc. Both these panels will be removable to access the shower taps and outlet, as well as wiring to and from the roof. I plan to have most of the switches here, as well as heater controlls and hot water etc. There will also be two eyelets for securing the dog bed and dog harness when hes traveling with us. So much to think about in this little space! I'll be finishing the shower tray and cutting the second floor for the toilet/lobby area this weekend so will post a pic when done. The cutout in the floor forms the house battery locker, and once the second floor is in, I'll have plenty of depth for batteries, and acces to all areas for wiring!

Body mods 118.jpg
 

Joe917

Explorer
Assuming your heater control is a thermostat be sure it is well placed not just for convenience. A t-stat over a radiator or too close to a door or window can cause issues.
 

Alloy

Well-known member
Surprise Stainless is so much all it needed was a cross break and the premier flange formed. No welding except for the drain

Not sure if you know but the aluminum pan needs to be welded one side then backcut ( a saw is best but if a grinding wheel is used it needs to be wire wheeled with STAINLESS STEEL brush) on the other side to make a watertight weld.

Walking on it will stretch / oil can the aluminum over time. The easiest way to prevent this is with 2 part pour foam under the pan

If a vertical edge is going on the perimeter best to tack it on before welding.
 

Sitec

Adventurer
Hi Joe917. Good info re the switch. I'd not thought about it being the thermostat too. With that in mind, the location is good, as its pretty central in the body, so we should be good. Thanks for picking up on that! :)

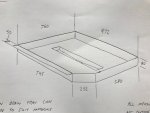
Hi Alloy. So the tray will have strips bonded underneath and further fixed with countersunk rivets. It's 2mm thick, and will be suported in the middle around the plug and also with an upstand off each taper. It'll then hve a stretched grip lino bonded to it (our neighbour owns a flooring company and says he 'has just the stuff'). the original stainless tray was a bit more detailed, but I think over engineered for the job. Pic attached of the original plan!

Tray.jpg
 

Alloy

Well-known member
Hi Joe917. Good info re the switch. I'd not thought about it being the thermostat too. With that in mind, the location is good, as its pretty central in the body, so we should be good. Thanks for picking up on that! :)

Hi Alloy. So the tray will have strips bonded underneath and further fixed with countersunk rivets. It's 2mm thick, and will be suported in the middle around the plug and also with an upstand off each taper. It'll then hve a stretched grip lino bonded to it (our neighbour owns a flooring company and says he 'has just the stuff'). the original stainless tray was a bit more detailed, but I think over engineered for the job. Pic attached of the original plan!

View attachment 666860

2mm Aluminum is really really thin for a floor. It might not oil can if the bracing is 5"- 6" OC or it is fully supported with foam.

Yeah I can see $1000 now..... that center drain trough is as much work as the SS pan. It has to be welded vs. the pan can be formed
 

Sitec

Adventurer
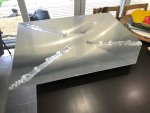
So after discussion's (above) re the shower floor thickness, I pondered this for a while, and then thought that as I have an offcut of 3mm alli that happens to be a similar size, I'd cut a new shower floor and see what it feels like. Result, one 3mm shaped floor, with the joins glued and riveted in place, 2 55mm timber support legs bonded in place and its very solid.

Body mods 121.jpg

Here's the other side. Dropping the tray into the truck, I can walk all over it with no issues. Once this is bonded to the angle frame in the truck and then countersunk riveted once the bond is set I don't think it'll go too far. Alloy, you are right the 2mm would have needed more support, but the 3mm is good and solid.

Body mods 120.jpg
 

Alloy

Well-known member
I've seen 4mm alum stretch/oil can over bracing that was 12" OC. It took about 5 years for it to happen.

I'd add another row of rivets between the existing but staggerd so the rivets are in/out/in.
 

Iain_U1250

Explorer
Getting on with things Simon, will the base be removable so you can still get to the floor if it leaks? We helped a friend replace his shower base in his truck, the form -ply had rotted out under his shower from a leak somewhere, was not a pleasant smell. We destroyed the shower base getting it up, as he had glued it in with Sikaflex.

I decided to make mine from plywood, but put about 20 coats of various paints, sealers and primers on both sides. I also found some low profile P-traps so that we don't get any smell from the grey water tanks coming up through the shower drain. Our wood guy made a great grate for the bottom of the shower, solid Jarrah, I just have to re-oil it every year or so.
 

Joe917

Explorer
Shower P traps are a problem if you travel anywhere that freezing is an issue. We went without a trap and use a silicon disc over the drain when not in use. It works quite well along with always dumping graywater at every opportunity.
 

Iain_U1250

Explorer
Shower P traps are a problem if you travel anywhere that freezing is an issue. We went without a trap and use a silicon disc over the drain when not in use. It works quite well along with always dumping graywater at every opportunity.
We used these ones


Much better than a normal one, and since it doesnt hold the waterlike a normal one, it's good for freezing temperatures. I agree, dump the grey water when you cn, I was thinking of adding a motorised valve to mine, so I can open it on the road whilst driving :)
 

Sitec

Adventurer
Hi Ian and Joe.

Ian, our tray will be suspended above the main floor, as I'm using the space underneath to run services to the kitchen. The shower underside will be visible from the rear locker so I can keep an eye on it. We are using a wet wall panel on the walls, and then a thick lyno over the aliminium tray I've fabricated, so there'll be no wood involved. The tray will be glued and riveted in, but I never plan to pull it out!

Joe. Re P traps, I plan to have the sink and shower drains all coming in to the low point in a central floor locker where I'll fit a single trap (indoors) and then goes out through the floor to the grey tank. We plan to only ever use the grey tank when in camp sites, and all sinks and the shower drain will have plugs to stop any smells between the outlets and the trap.

Cheers for the input guys!
 

ErnestW

New member
Hi Sitec,

Good work there! I just bought a 1222 4x4, will start plan the conversion. However I just don't have skill set like you, a long way to learn I guess.

Also will have lots lots questions about the truck and camper setup, may be you can guild me through.
 

Attachments

  • 1503832 (1).jpg
    1503832 (1).jpg
    588.4 KB · Views: 23

Forum statistics

Threads
188,151
Messages
2,902,803
Members
229,582
Latest member
JSKepler
Top