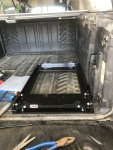
Update number 2 - the ARB Fridge/Freezer install. I purchased the ARB 63L fridge/freezer, Transit bag to keep it insulated and protected, the ARB transit bag, the ARB tie down kit, the ARB heavy duty wiring harness, and the ARB screw in connector so the cord doesn't inadvertently vibrate loose and spoil the food while out remote.
//
The reason for the 63L vs the 50L purely came down to height. The 50L while smaller, is actually taller - 3" taller than the 63L (the 63L is longer and wider). Again, have to consider the cap locking latches as they hang lower than the caps themselves. When test fitting the 63L, something I hadn't accounted for was the internal rain gutters on each side of the Avalanche. While the 63L cleared it height-wise, when I slid it out to open the lid - the lid hit the end cap of the gutter not allowing sufficient access to the fridge. Two possible solutions: 1) Change the mounting location toward the center of the bed by 4" (thus wasting the space on the outboard side of the fridge, or: 2) Remove the gutter rail and cap.
//
Given that my Avalanche has NEVER had water ingress the truck bed, and that about 5 years ago I duct taped both of those gutter rails as they were split, combined with the one that needed to be removed - this taped side was hanging DOWN thus not acting like a gutter. If my grates were working properly - water should poor off that rail and into my bed. As it is I think my grates may be plugged thus not allowing water into my bed - fine by me. Off goes the gutter rail.
//
First thing to tackle was removing the gutter rail and cap. It's all clips - took about 30 seconds. Not picture worthy.
//
Next up was the slider. The Avalanche has a seriously grippy rubber bed mat that I did not want to remove as it keeps everything from moving around. To mount the slider, I used: 4 Grade 8 5/16" course thread bolts (2")(Note - 1.5" will work for 3 of the 4 - but one of them needed every bit of the 2" to get the thread started), Grade 8 washers (1 each on the slider side), 8 Fender washers (double stack on each bolt from underneath), 5/16" Nylock nuts, Clear Silicone to seal it all up).

I cannot stress enough how important it is to check the final location by the tailgate. I did a lot of putting the fridge in, closing the tail gate, looking down to figure out spacing, testing the slide, opening the fridge lid to see how far back or forward the slide could be. Ultimately, it is the slide release latch that sticks out the furthest. So, my final mounting location was as far to the outside as I could go staying flat, and as close to the tailgate as I could get. Final position, there is about 1/16" of an inch between the slide release latch and my tailgate when closed.
//
To accomplish this position in the Avalanche, a few things had to be done. The rearmost bolts will face downward into a channel under the bed. The outermost one is accessable thanks to an opening in the channel but you need a long wobbler extension. I also used mechanical fingers to place and hold the two washers on the threads while I used the socket and extension to get the nylock started. For the rearmost inboard bolt - the channel bottom is solid. I ended up using a cutoff wheel to create a 1-1/2" x 1-1/2" square opening so I could access everything. For the forward bolts - do NOT use the ARB predrilled holes as they will go into another channel near the shock towers. I moved and drilled two new holes 1-1/2" more towards the rear of the truck. This change brought the bolts into an easily accessible are to tighten them up.

Install the tie down latches - note - threading instructions - do NOT follow the instruction on the ARB packaging - it's backwards. Use the picture on the ARB packaging -it shows it correctly. It will take you about 5 seconds to figure that out once you do it, then about 30 seconds to correct it.
//
For the wiring, I have a dual battery setup so went directly to that, threaded the wire harness down and ziptied it using openings in the frame rail. I kept it to the outside away from the exhaust. The Avalanche bed has drains in it that have a flap - I didn't want that flap held open to let dust in - so rather than run the wire through that, I drilled a hole in the hard plastic side of it and ran it through there. Once I got the length right and took out the slack, I silicone that hole to seal it up. The picture is how open that flap was when I rant the wire through the drain opening.

The ARB screw in connector is a pretty neat little deal. Iis a box that you run the wires into and it has two male blade connectors inside and shockproof boots. The way it works is the cigarette lighter plug in disconnects from the chord and has two female blade slots. You hard wire the harness to the box, then push the chord onto the mail blades, then it has a locking ring that threads into the box so it will not vibrate loose. When not using the box, it has a dust/water proof cap that pushes into and seals the opening.
//
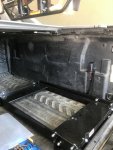
The Avalanche bed walls have some recessed areas, once of which is PERFECT for this. I ran the wires - and again had to do a mod. ARB box is designed to bring the wires in from the backside, but I didn't want to drill a hole in my storage side box. So, I mounted it facing downward, and brought the wires up - drilling a small hole on either side of the connector plug, splitting the wires, and pulling them through.
//
Not sure why - but suddenly I'm getting the "Image Failed to Upload" message again. Check the slide pics above and you can see the box I'm describing. Note - polarity matters. I ran mine wrong - and they are showing wrong on the pic. I didn't want to risk breaking the blades that I put on, so I simply unmounted the box, swapped the connections inside the box and remounted.


