Overland XJ Build. Not my first Rodeo.....(video included)

Overland History

Wanderluster
Here's how it turned out. I honestly have days where I go, "****** was I thinking?" and "Ya know it's not so bad...".

The whole point of having it down low like that, is I plan to build an aluminum wind deflector for the RTT, but the damn Lightbar largely contradicts that considering the placement.

I have yet to figure out if effectiveness trumps practicality or sense. ;)

image.jpg

image.jpg

image.jpg


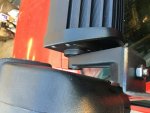
My measurements came out perfect and put it just above the windshield where I wanted it. ;)

image.jpg

image.jpg


It also just barely clears the Snorkel....

image.jpg


Another thought was to not effect visibility from the cabin, which you can see it barely does....

image.jpg
 

Attachments

  • image.jpg
    image.jpg
    526.7 KB · Views: 63

Overland History

Wanderluster
Anyways, an XJ buddy of mine gave me a rear bumper and tire carrier that he had no use for. It was built by another buddy of mine about 15yrs ago that was a member of our local club Tidewater Fourwheelers. This bumper has sat outside in the woods for the past 9 years. That says something about the "built to last" comment that I got from the guy who built it. ;)

Well, to be completely honest, it's fugly, but if I can make it look decent and convince myself to like it, then I'll end up saving myself upwards of $1,000 that a nice rear bumper and tire carrier cost.

image.jpg

image.jpg


The tire carrier hitch makes me think "Sanford and Son", so that's getting replaced with something better and safer eventually...

image.jpg


The guy who fabbed the bumper originally also apparently cut his rear quarter panels, and I only plan to trim mine, so off come the old 2x2 pieces...

image.jpg

image.jpg

image.jpg


Really all that the bumper is, is a piece of 3x3 angle iron fabbed up to work on an XJ. The original builder gets an A for effort and simplicity....

image.jpg
 
Last edited:

iluv83vettes

Adventurer
How's the glare with your bro bar being forward of the back edge of the windshield? My company sells some and I was thinking about getting one but I'm worried about how usable it is with the glare off the windshield and hood.
 

Overland History

Wanderluster
I popped off the rear bumper to mock install the rear tire carrier for visual and structural brainstorming....

image.jpg


Just as I was about to mount it, the Brown Van Santa showed up with a great big present! :D

image.jpg


This was the best packing of a box I've ever seen. The expandable foam works great to protect the product!

image.jpg


This is Rusty's Off-road Front Winch Bumper, it's got EVERY quality that I wanted in a front bumper! Simple and clean!!

http://www.rustysoffroad.com/rustys-bumper-front-trail-bumper-w-o-pre-runner-bar-xj.html

image.jpg


As you can see, not only does it keep the winch hidden AND below the radiator to keep from blocking air-flow, it also has lightening holes in it to keep weight down! Not to mention it tapers up perfectly to allow for maximum clearance for approach angle. I searched high and low and literally thought this was the perfect bumper for the build. :D

image.jpg


Needless to say, the front quarters got a trim before installation....

image.jpg

image.jpg

image.jpg
 

Overland History

Wanderluster
Installation was stupid simple with absolutely no fitment issues.

The Bumper's shipping weight was 69lbs according to the invoice. :D

image.jpg


Here's how it turned out. I absolutely love it! Again, simple and clean! I've got a Warn M8000 on order, so that'll be mounted in it very soon! ;)

image.jpg

image.jpg

image.jpg

image.jpg

image.jpg

image.jpg
 
Last edited:

Overland History

Wanderluster
Anyways, back to the rear bumper/tire carrier, here's how it looks installed and unpainted....

I've still got the stock hitch on there for now, but I later have evil plans for it. ;)

image.jpg

image.jpg

image.jpg


I managed to get the spare spaced outward enough to clear the rear wiper. I like the angle that the tire is, as it actually helps the departure angle and also follows the lines of the rear hatch.

image.jpg


As you can also see, the departure angle of the bumper is VASTLY improved, especially considering that the stock rear hitch is still installed. I hate the gap between the taillight and bumper, but I can easily fill that in with some super thin steel. ;)

image.jpg


Overall....

image.jpg

image.jpg

image.jpg
 

Overland History

Wanderluster
The plan is to trim the lower portion of the rear quarters to help departure angle and also align with the rear bumper. Once they're cut, they'll need to be tack welded back together and sealed to prevent rust....

image.jpg


Basically I'll be removing everything below the bottom angle bend...

image.jpg


Visibility out of the rear window is still good, which was also of mild concern...

image.jpg


Moving along, since I had a wheelin' trip coming up, it was hells bells to get the front axle 4.10 gears and Locker installed!

The same buddy of mine that installed my axle gears in my old '92 XJ back in 2003(whom is also a member of Tidewater Fourwheelers) found the time to do the install on this XJ!

image.jpg


I also decided to replace the balljoints, wheel bearings and axle u-joints(with flush/needle zerks) while I had the axle apart, considering the XJ now has 204K on the odometer....

image.jpg

image.jpg


The passenger side wheel bearing was toast, but the driver's side still has some life in it, so it will become a spare.

image.jpg
 

Overland History

Wanderluster
Paul is a master at setting up gears....

image.jpg

image.jpg

image.jpg


He gave up Jeeps years ago and has a slight addiction to FJ40's. He's got 3 of the currently....

image.jpg

image.jpg


He does some beautiful fabrication.....

image.jpg

image.jpg


Oh, and I painted the cover before reinstalling it :D

image.jpg


Anyways, I'm exhausted. More to come tomorrow!! ;)
 

Overland History

Wanderluster
Moving right along, since I now have the weight of the rear bumper and tire sitting on the back of the Jeep, it started to squat a little bit, which you can kinda see in the previous pics. I anticipated this problem and bought some 1-2" lift shackles for the rear a few months ago.

Stock vs. Lift. You can also see there are two holes in the shackle for lift adjustment.

image.jpg


It gave the rear a decent amount of lift on the second to last hole of the shackle. I expect with the weight of the sleep platform, and all of the other gear being stowed underneath, I'll need to not only adjust it to the very last shackle hole, but also possibly experiment with different leaves in the leafpack.

image.jpg

Both of these pictures are with everything behind the front seats completely removed.

image.jpg

image.jpg


The pinion angle of the rear axle sits perfect....

image.jpg


Next up was to deal with the rear bumper. I don't plan on using it to tow any trailers at all, but I do want to use it as a tow point at a minimum. As I'm sure y'all saw in the previous pics, it only attaches to the 8 stock bumper bolts, which isn't sufficient as a tow point at all. The guy that originally built it had it tied into the stock trailer hitch crossbar. Well, I don't want all of the extra weight of the stock hitch and to also lose the departure angle clearance.

Since I had a wheelin/camping trip coming up this past weekend, I decided to carve up my stock trailer hitch, to at least tie the frame into the bumper as a temporary solution.

I started by cutting off the frame mounts of the hitch....

image.jpg


And bolted them back to the frame. You can see where I cleaned the metal on the frame bracket to be able to weld it to the bottom of the bumper.

image.jpg


I'm really lacking pics on this part because I was in such a hurry to get it done to go on this trip this past weekend.

I lobbed another couple of pieces off of the hitch and used it to cut the scrap down to size to tie the frame mount into the bumper....

image.jpg

image.jpg
 

Overland History

Wanderluster
How they turned out after being tied into the frame. Before the armchair analysts chime in, yes it will likely need additional support and/or gussets. I plan on re-working it over the summer.

image.jpg


Anyways, as I mentioned before, my club Tidewater Fourwheelers and Virginia 4 Wheel Drive Association(both of which have the same President) organized another trail cleanup of Bald Mountain (aka Big Levels), which is a 10 mile long off-road trail through George Washington National Forrest. Since this is our second club trip to clean up the trail, we invited a few other clubs to come help, which include NOVA Jeepers, Blue Ridge Off-Roaders and Middle Peninsula Jeep Association.

We had a turnout of around 40 people, which got our foot farther into the door with the Forrest Rangers and Forrest Service to be able to build additions to the trails, which include more obstacles/challenges! :D


The Roadtrip begins with a fellow club member and friend...

image.jpg

image.jpg

image.jpg


Before hitting the campground at Sherando Lake(which the camping was given to us for free by the Forrest Service for volunteering our time), we decided to go explore part of "Shoe Creek". The trail is now split into an upper and lower half, due to people constantly trespassing on the surrounding owners private land with little to no hope for reopening. :(

image.jpg


I was only able to snap a couple of pics, as I was paying more attention to how the XJ was performing with the lift and lockers. This was a mere shakedown run before the following day's cleanup.

image.jpg

image.jpg
 

Overland History

Wanderluster
We finally made camp around 6:30pm at Sherando Lake.

image.jpg


Then promptly headed to Devil's Backbone Brewery about 15mins away.

Apparently the Rover crowd was meeting there, and there were some beautiful rigs! Again, and this isn't like me, I didn't get many pics, but that's mainly because I wanted to drink some damn beer!! :D

image.jpg

image.jpg


After we got back, that night's campfire shenanigans will remain in a sealed government file for years. ;)

The next morning brought smiling faces and a plan for the group of around 40 of us to split up, starting at each end of the 10mile trail and working our way in, picking up trash and installing signs.

image.jpg

image.jpg


On the trail, we used the 2/10th's method, which means we spread each vehicle out over the trail every 2/10th's of a mile, and each person gets out and walks forward to the next vehicle, picking up as much trash as possible. This method worked flawlessly, as we had the ENTIRE 10 miles of trail cleaned up and signs installed by 2:30pm that afternoon. :D

On to the pics....

image.jpg

image.jpg

image.jpg


A good Navigator is key ;)

image.jpg
 
Last edited:

Overland History

Wanderluster
We stopped for lunch at one of the Scenic Overlooks along the trail. My buddy Harold ate all of my chips! :(

image.jpg

image.jpg

image.jpg


Playtime....

image.jpg

image.jpg

image.jpg

image.jpg
 
Last edited:

Overland History

Wanderluster
Back at camp for some relaxing that evening....

image.jpg

image.jpg


The XJ performed flawlessly all weekend with the 4.10 gears and Lockers f/r. It went everywhere that I pointed it. The gearing is absolutely perfect with the 31's on and offroad!


Last shot of the weekend. Almost all of us who showed up to the event. I don't think I've ever laughed so hard around a campfire with so many great people!

Those who care about the environment and keeping public land access open for our hobby and enjoyment are the one's who get involved and take action! ;)

image.jpg
 
Last edited:

Forum statistics

Threads
187,616
Messages
2,895,911
Members
228,596
Latest member
donaldsonmp3
Top