OVRLND CAMPERS ONLY : Post your OVRLND Camper build here or a link to your build thread to inspire others!

rtwBound

Member
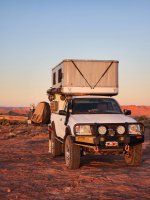
I have one on my camper, I did have to install it myself, but I purchased the brackets and hardware from OvrLnd. So far, so good.

I got my camper in late feb this year and started building it out mid March after moving to a new place with a good work space.
After having an indoor cooking space and dinette in my Alaskan so long, I really wanted to figure a way to incorporate a dinette in the smaller space and be able to easily eat and cook inside or outside depending on the conditions. I couldn't really find any other builds that had a dinette so I had to scratch my head a bit on the best way to do it without it getting to heavy or complex, plus I want it to be as modular and light as possible and easy to remove if needed.
I ended up using 80/20 2020 series to build storage benches with removable plywood tops I didn't use and hinges or latches, and the lids / seats just sit on top of the benches with some wood pieces that stay lined up within the 80/20 frame. One reason is simplicity / weight and the other is I wanted to be able to access storage inside or outside the hatch, they have never come off even in rough off road so I'm happy with that choice. The 1/4 inch side panels are just sanded plywood with a Varythane stain to match the dark wood from the factory. The benches ended up being very light which is great. they are mounted to the bed rails using M6 rivnuts, 2 per side and come out very easily. I used a sheet of 3/8 plywood as my floor painted black and some 1/2 foil backed stick on insulation on the bottom of the floor.
I had to really marinate on the best way to insulate to sides of my bare metal bed and finally had the idea to take my old bed liner and "modify" it to only cover the sides, back and wheel wells. I just cut the bed rail lips off and cut out the floor and notched reliefs where it was needed to fit the benches up against the sides. The liner has insulation on the back side of it. I also through bolted the camper to the bed to get rid of the clamps that were a challenge to build around.
I used a Lagun swiveling style table that mounts to one of the benches for the dinette and we just sit on the benches.
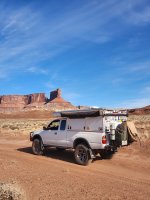
I scored a camp chef "sherpa" for super cheap awhile back that ended up being perfect for using as a way to stow cooking gear and some other things and make a nice light table to put my Coleman stove on. It just sits on top of the passenger side bench and is held down with 4 velcro straps. It can easily be removed and used outside if needed and has some legs I carry if I use it outside.
My fridge and water sit in the forward part of the cab to keep the heavy stuff in front of the rear axel. Beverages and groceries are super easy to reach through side hatch and I have a self powered little faucet. You can set the faucet any where the hose reaches which works great, it charges USB. My lighting is just some magnetic puck lights that also charge USB and you just use adhesive discs for mounting em.
The camper is insulated with 1 inch foam board and skinned with 1/4 poly / stained birch panels stuck on w/adhesive. I used an old Mexican blanket that was covering the seat in my last rigs dinette for the hatches w 1 inch insulation underneath em.
The DC system is a 100ah lithium in the trucks cab along with a BCDC 25 amp Redarc with Mppt solar input. I put the fuse panel and inverter in the camper along with charge ports and fridge hookup. I have a little cubby to charge my E-bike battery in the bench.
I also added some magnetic bug screens to the hatch and back entrance which has been perfect for keeping bugs out.

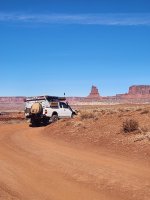
how does the first gen carry the weight of the camper? thinking of getting one for my 98 3.4l v6 manual
 

Phessor

Active member
I took a trip last month to Utah, had a blast on the White Rim Trail.
 

Attachments

  • 20250207_172343.jpg
    20250207_172343.jpg
    5.2 MB · Views: 43
  • 20250208_101614.jpg
    20250208_101614.jpg
    2.7 MB · Views: 44
  • 20250208_101802.jpg
    20250208_101802.jpg
    3.1 MB · Views: 44
  • 20250208_103941.jpg
    20250208_103941.jpg
    2.1 MB · Views: 40
  • 20250208_133748.jpg
    20250208_133748.jpg
    2.1 MB · Views: 41
  • 20250208_143856.jpg
    20250208_143856.jpg
    1.8 MB · Views: 35
  • 20250208_155237.jpg
    20250208_155237.jpg
    1.9 MB · Views: 37
  • 20250209_072215.jpg
    20250209_072215.jpg
    1.6 MB · Views: 46
  • 20250209_112036.jpg
    20250209_112036.jpg
    2.1 MB · Views: 48
  • 20250209_112628.jpg
    20250209_112628.jpg
    1.6 MB · Views: 44

Phessor

Active member
More from my Utah trip.
 

Attachments

  • 20250209_120549.jpg
    20250209_120549.jpg
    1.6 MB · Views: 28
  • 20250209_135714.jpg
    20250209_135714.jpg
    2.3 MB · Views: 36
  • 20250209_145954.jpg
    20250209_145954.jpg
    1.8 MB · Views: 36
  • 20250209_162456.jpg
    20250209_162456.jpg
    2.6 MB · Views: 38
  • 20250210_074006.jpg
    20250210_074006.jpg
    1.7 MB · Views: 33
  • 20250210_154307.jpg
    20250210_154307.jpg
    1.6 MB · Views: 33

jjgarrett0

New member
Does anyone who has used coroplast in their camper have some suggestions for what do to with it around the bed slide? I bought some 4mm sheets from Home Depot and they seem to be too thick causing the bed to get jammed up and not slide in or out.
 

Inyo_man

Don't piss down my back and tell me it's raining.
Does anyone who has used coroplast in their camper have some suggestions for what do to with it around the bed slide? I bought some 4mm sheets from Home Depot and they seem to be too thick causing the bed to get jammed up and not slide in or out.
I stopped the Coroplast short so it wouldn't bind up the bed when you slide it in and out.
My plan is to cover the strip with marine grade, low-mat carpet that I'm using on the ceiling.

Cheers
 

Foxen

New member
First day of build. Picked up our camper on Saturday. Using a NEMA box for housing a Blue Sea Fuse Block. So far just wired in a quick light, MaxxAir fan and a few places to charge the cell phones. Engel compressor fridge will find its home on a platform that replaced one section of the rear seat. Using a portable power station to feed the fuse block via the Anderson Power Pole connector on the side of the NEMA box. Finding that the C channel on the roof is to far rearward so very minimal space to add a rear solar panel. The front of the roof ahead of the Maxx Air fan has room for a large solar panel but no C Channel up front. Not sure why they ran it like that. Looking for ideas for mounting at least 200 watts of rigid panel(s).

Thank you!


View attachment IMG_0405.jpeg

View attachment IMG_0406.jpeg
 

Fergie

Expedition Leader
First day of build. Picked up our camper on Saturday. Using a NEMA box for housing a Blue Sea Fuse Block. So far just wired in a quick light, MaxxAir fan and a few places to charge the cell phones. Engel compressor fridge will find its home on a platform that replaced one section of the rear seat. Using a portable power station to feed the fuse block via the Anderson Power Pole connector on the side of the NEMA box. Finding that the C channel on the roof is to far rearward so very minimal space to add a rear solar panel. The front of the roof ahead of the Maxx Air fan has room for a large solar panel but no C Channel up front. Not sure why they ran it like that. Looking for ideas for mounting at least 200 watts of rigid panel(s).

Thank you!


View attachment 874052

View attachment 874053
Thats a clean install w that Nema box. If I ever get around to cleaning my wiring up more, I'll likely steal the idea. Great start to the build!
 

raffeke

New member
First day of build. Picked up our camper on Saturday. Using a NEMA box for housing a Blue Sea Fuse Block. So far just wired in a quick light, MaxxAir fan and a few places to charge the cell phones. Engel compressor fridge will find its home on a platform that replaced one section of the rear seat. Using a portable power station to feed the fuse block via the Anderson Power Pole connector on the side of the NEMA box. Finding that the C channel on the roof is to far rearward so very minimal space to add a rear solar panel. The front of the roof ahead of the Maxx Air fan has room for a large solar panel but no C Channel up front. Not sure why they ran it like that. Looking for ideas for mounting at least 200 watts of rigid panel(s).

Thank you!


View attachment 874052

View attachment 874053
I've got 400 watts of ridgid panels on a 3rd gen, 6ft tacoma. One behind the fan, one in front. I used L brackets bolted to the sides of the panels, and then attached those to the Unistruts. If i could do it again, I would have no channel on top and get some of the nicer flexible panels. The weight savings is enormous. 7lbs for 200 watts, vs 26 lbs for 200 watts. Having all that weight up high is a bummer for opening the camper.
 

jjgarrett0

New member
I stopped the Coroplast short so it wouldn't bind up the bed when you slide it in and out.
My plan is to cover the strip with marine grade, low-mat carpet that I'm using on the ceiling.

Cheers

This ⬆️

Here’s how I fit mine. It also helps to trim the ends and top corners of the wood lip. Sorry, it’s the best picture I have on hand.

View attachment 873651
Thanks for the tips! I have one side done now but man this part of the build is not enjoyable. I'm now wishing I didn't have so many windows.

1000004286.jpg
 

Wakeup2river

Active member
2024 F350 & OEV Hudson Bay Edition

This was a spur of the moment build video since it was just washed. I have added Sliders since the video. I learned a bit from this site so I thought Id give back, hope it helps someone
LOL speed up the video to 1.25 speed if I am talking to slow.


Forum statistics

Threads
189,017
Messages
2,911,998
Members
231,545
Latest member
JPT4648
Top