Photo Critiqing Thread

tdesanto

Expedition Leader
ARBJK%20037.JPG

Wil, I like this perspective the most. I think the angle increases the prominence of the bumper. Plus, I like that the diff cover peaks out too, but just a little so as not to be distracting.

I also like the fact that it’s not straight on, so that there is some angle to the shot. You might have varied it a little and shot from a little more to the right. You’re right, though, in keeping the winch still in the shot.

1) I might have chosen a different lens. It appears that a medium to short focal length was used. I might have tried a longer lens, say 200mm or 300mm and opened up the aperture as much as possible. Selective focus in product shots can be your friend.

2) I might have turned the jeep into the sun, thereby reducing the shadows directly under the bumper. This might make the bumper stand out a little more.

I like the fact that you’re getting out there and experimenting. Nice job!
 

HB 4X4

Adventurer
What do you guys think of this shot? I am just starting to get into photography, so any tips would be great.

DSC_0012.jpg


I also snapped one of my truck on our way back. The sun was at a bad angle, but other than that, what else could I have done differently? Assuming the circumstances are that I would want to take a picture as it sits, without having to move the truck.

DSC_0082.jpg


Hopefully they aren't too terrible for you guys, and I appreciate any feedback/tips.
 

Photog

Explorer
HB 4X4,
Photography is all about the light. Bad light on a great subject will make a bad photograph. Great light on a bad subject will make a good photograph. Even the pigeon looks pretty good. Definitely good timing.

If you don't want to move the 4Runner into better light and better background, then wait for the light to be better.

The 4Runner is in a mixture of direct sun and dark shade. The 4Runner is a dark color and the reflections are very bright. These types of contrast do not usually make a pleasing photograph. The sun appears to be very low in the sky (morning or evening). Take the same shot, with the sun below the horizon. There will be softer, more even lighting, with a little directionality to the light. The other cars (white) in the background do not help either. Have them towed away.:) Or you could move a little to the left and down, to hide the other vehicles behind your rig.

If you are willing to move the vehicle, the same suggestions apply; but now you can choose the background.

Keep at it.:victory:
 

HB 4X4

Adventurer
Hey Brian,
You may have already seen these pictures over on 120, but what would you suggest I do to make them better. Picture of off-road trips are a large majority of the pictures I take for now until I get some time this summer to go new places.


DSC_0072.jpg


DSC_0060.jpg


DSC_0037.jpg


DSC_0059.jpg
 
Last edited:

DesertBoater

Adventurer
A couple of my own

Hey Y'all,
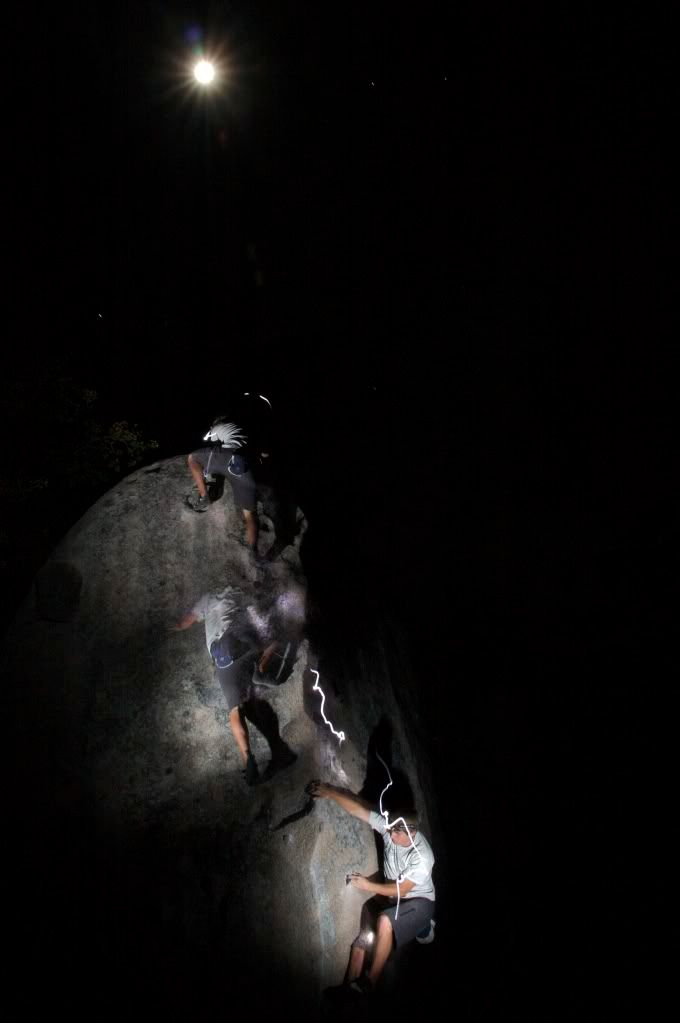
Just finishing up with a couple of photo classes at school so I thought I'd share a bit from my final project...Keep in mind they haven't been adjusted fully for printing, and they will be matted. All of the night shots were taken in one frame (small aperture with remote shutter release) with an external hand-held flash fired at different intervals throughout the climb. I've done a bit in the same style/method with the subject being whitewater kayaks at a waterfall. Those came out alright, however solid ground and rocks are much easier to control and manage.
IMG_2448.jpg


IMG_2467.jpg


IMG_2475.jpg


IMG_2483.jpg


Cheers,
West
 

DesertBoater

Adventurer
I'm in awe of all the great work here. There's plenty of talent on the forum.

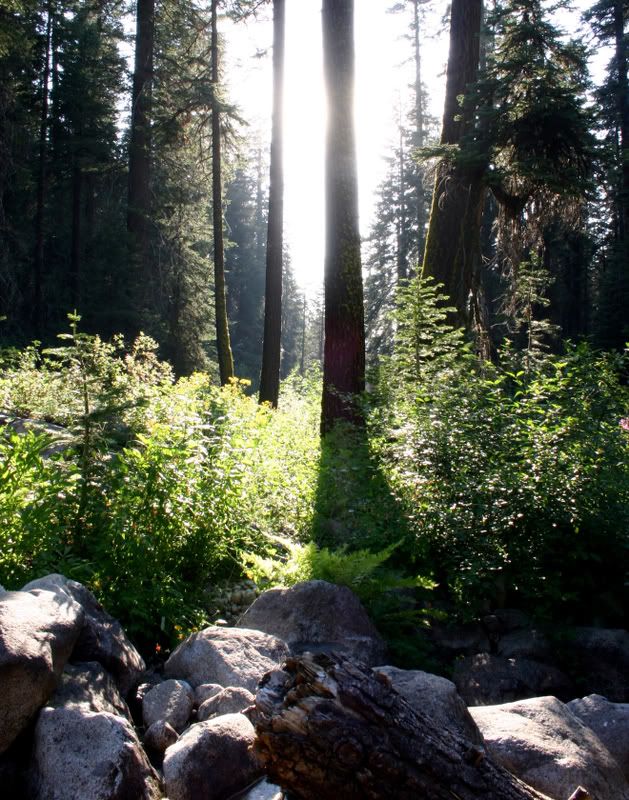
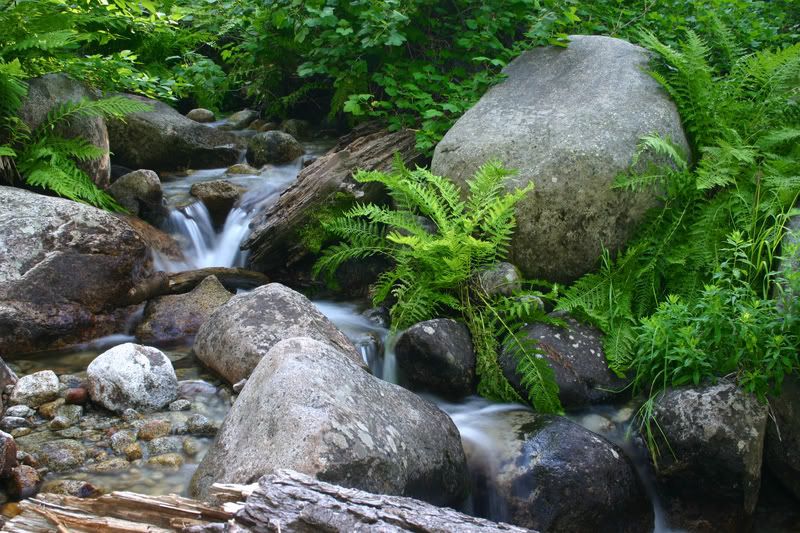
I have a few pictures from the Sequoia National Forest that could use some critique.

I really like the detail found in the waterfall one's but there's something about these pictures that I just don't like and I can't put my finger on it.

IMG_2836.jpg


IMG_3016.jpg


IMG_2834c.jpg


Thanks!

Just to look back a couple pages...These look pretty good Mark. I'll agree with Brian that the waterfall shots are exposed very well. My first impression of the top photo is that there is a whole lot going on. I've found that it can be useful to have a piece of paper or two and hold them up against the image to play with your cropping sizes before you do it on the screen. This technique is very useful if/when the photo is printed. I do like the detail in the log, but if the waterfall is your intended subject, you might consider a vertical crop so that the viewer gets a fell for the water actually falling. I'm sure the second image was spectacular in person, it's definitely too bad that camera sensors don't work as well as our eyes with that kind of stuff...Lastly, the third image, similarly to the first, seems very busy to me, there's a lot going on and a lot in focus thanks to the long shutter and small aperture. With scenes like this, you could definitely get a whole bunch of individual photos within the scene you shot here. Something that I've been working on with my own photography is starting off with the large picture view like what you've achieved, and then diving in head first and playing with moving my tripod around getting as close as I can to my intended subject and looking at things from different angles. Keep having fun with it!

Cheers,
West
 

Every Miles A Memory

Expedition Leader
I also snapped one of my truck on our way back. The sun was at a bad angle, but other than that, what else could I have done differently? Assuming the circumstances are that I would want to take a picture as it sits, without having to move the truck.

DSC_0082.jpg

If I could make a simple suggestion on how to improve on this shot the way it sits. Other than waiting for better light like Photog recommended which would be my first suggestion, I'd also say to mov a tad closer so your rig takes up 99% of the frame and bend down so it looks bigger and more menacing.

I've always found that adding odd angles, low angles and filling the frame usually make a boring picture look much better.

I'll use this shot of my truck as an example. It was taken in a parking lot during mid-day, but with a Polarizer on the camera and walking right up to the front of the hood, it added a funky angle that makes an otherwise boring shot look kinda cool

364936624_hL2MB-L-3.jpg

Are ya' pickin' up what I'm layin' down?
 

HB 4X4

Adventurer
If I could make a simple suggestion on how to improve on this shot the way it sits. Other than waiting for better light like Photog recommended which would be my first suggestion, I'd also say to mov a tad closer so your rig takes up 99% of the frame and bend down so it looks bigger and more menacing.

I've always found that adding odd angles, low angles and filling the frame usually make a boring picture look much better.

I'll use this shot of my truck as an example. It was taken in a parking lot during mid-day, but with a Polarizer on the camera and walking right up to the front of the hood, it added a funky angle that makes an otherwise boring shot look kinda cool

364936624_hL2MB-L-3.jpg

Are ya' pickin' up what I'm layin' down?

Got it, I will have to try that.

When you take pictures of your truck, which mode do you put the camera in, and at what settings?

What does the polarizing film do?
 

DesertBoater

Adventurer
The polarizer that Pat is talking about is two pieces of polarized glass mounted very close to each other. The filter screws into the end of a lens and one is allowed to spin free. It works the same way that a pair of polarized sunglasses work, it only allows light in from two directions (I think) and therefore reduces glare either from water, glass, a car's finish, etc. This allows for more detail and often times richer color in areas that would have otherwise been blown out. Hope that makes sense.
Cheers,
West
 

soonenough

Explorer
HB 4x4 - one thing to keep in mind while you're taking pictures (a "mindset" that has helped me), is to think about what makes a "good" picture good. Usually, it's because it shows something in a way that we're not used to seeing it.

Take the picture of your 4Runner you took in the parking lot. 99% of the time that a person would be looking at your 4Runner, they'd be looking at it from almost the exact same angle, lighting, etc that is shown in that photo. So, when someone looks at that picture, it doesn't grab their attention because they're used to seeing a 4Runner from that perspective. By changing your composition, lighting, depth of field, color saturation, etc you can present it in a way they've never experienced it before, and that is what captures peoples' interest.

Please don't take the criticism as being harsh; it just seemed like you were looking for suggestions to improve those pictures. Like I said, this is just my .02 that I'm offering because keeping this concept in mind while shooting has helped me improve my photos.
 
Last edited:

HB 4X4

Adventurer
HB 4x4 - one thing to keep in mind while you're taking pictures (a "mindset" that has helped me), is to think about what makes a "good" picture good. Usually, it's because it shows something in a way that we're not used to seeing it.

Take the picture of your 4Runner you took in the parking lot. 99% of the time that a person would be looking at your 4Runner, they'd be looking at it from almost the exact same angle, lighting, etc that is shown in that photo. So, when someone looks at that picture, it doesn't grab their attention because they're used to seeing a 4Runner from that perspective. By changing your composition, lighting, depth of field, color saturation, etc you can present it in a way they've never experienced it before, and that is what captures peoples' interest.

Please don't take the criticism as being harsh; it just seemed like you were looking for suggestions to improve those pictures. Like I said, this is just my .02 that I'm offering because keeping this concept in mind while shooting has helped me improve my photos.

Thanks!

A lot of the settings you mentioned are post-picture processes. What would you suggest I do at the moment I am taking the picture besides what you recommended? Any advice for camera mode/settings? Should I be in Aperture Priority mode with a low F number, high F number, etc?
 

Every Miles A Memory

Expedition Leader
Please don't take the criticism as being harsh; it just seemed like you were looking for suggestions to improve those pictures. Like I said, this is just my .02 that I'm offering because keeping this concept in mind while shooting has helped me improve my photos.


Ryan, I think this is great suggestions!

Before I take every picture, I think to myself "What is this picture going to tell someone?"

I try and make each picture tell a story.

I also pay close attention to the angles I take my photos at. Look around the next time your at a spot where there are a bunch of photographers. Most will walk up, hold the camera up to their eye and snap the picture.

They basically took the same picture that everyone else did from the same angle. 99% of the time, that is a boring picture.

By lying on the ground, take 10 steps closer to your subject of 10 steps away from your subject, you usually get a better perspective. Not always, but lots of times this helps.

I especially like super wide angle lenses that allow you to fill the whole frame and bend otherwise normally straight lines.

These type of shots usually make for better pictures with more impact.

As for what settings. There is no "Magic" setting to set the camera to. Each picture is unique in the lighting, background and goal you want to acheive.

For me, I usually leave the camera in 'AV' mode which allows me to play with my f/stop. But that's not always a given either. I adjust my settings alot when shooting.
 

Photog

Explorer
Hey Brian,
You may have already seen these pictures over on 120, but what would you suggest I do to make them better. Picture of off-road trips are a large majority of the pictures I take for now until I get some time this summer to go new places.

The guys are giving you some excellent advise on the approach to your next set of images. Learning to see what is drawing your attention to something you are looking at, will help you to choose the camera angle and distance to shoot from. Then you just have to control the light (sometimes easy, sometimes impossible).

Here is an image-by-image critique, with suggestions.(RE: Title of this thread)
Read these as technical suggestions to randomly selected images. This is in no way an attack on you. Your photography skills are improving quickly.

The idea of getting close to the vehicle with a wide angle lens will create drama. It will also draw your attention to the item that is closest to the camera and in sharp focus. This will become the subject. This shot has good drama going on, and draws your attention to the headlight. If it was your intention to show off the headlight, then you did a good job. If not, then you needed to include a bit more of the side or top of the rig (1/2 step left). It might work better as a vertical. The dirt berm and tree could be cropped out, and possibly improve the image.
DSC_0059.jpg


Try not to place the subject in the center of the frame (bullseye). With this image, try cropping some off the right and top or bottom. Within this long thread, there are descriptions of the "rule of thirds". This image could be cropped to fit that rule. See what you think.
DSC_0060.jpg


This image has the rig (subject) at the rule of thirds. Good start; but only being able to see the front of the rig, makes it feel a bit like a flat billboard. A step to the left would show the side of the rig fading back, and give a feeling of some depth. The sun (light) is coming from behind you, and provide almost now shadows in the image. This also makes an image feel flat, without depth. The white posts are the first thing the eyes are drawn to, since they are the brightest object, in focus, and high contrast. Cut them off next time.:)
DSC_0072.jpg


I like this one, the best of the bunch, although the "headlight" image is more creative. This one shows good depth, tells a story, and has decent composition. I wish your rig was not cut off on the right. A little space in in front of your rig, would allow the viewer to feel like the rig has room to move forward. This could be a difficult shot to compose, as you want to also keep the road, leading up behind the last rig. This is a part of the story. In your photo editing software, try to bring the exposure down a bit. I know the rocks a white, but the image feels overexposed a little.
DSC_0037.jpg
 
Last edited:

Photog

Explorer
West (DesertBoater),
This is a classic rock climbing shot.! It needs a bit better focus on the fingers. The contact points are the key to rock climbing; they must be sharp. You probably took this shot while he was climbing; but this shot could be posed and nobody would know (minimal background).

CLASSIC!
IMG_2448.jpg


The multi image night shots are great and worth perfecting. See if you can work out a way to see the head or face more clearly, each time the flash fires. This type of image could be used to capture the big moves for the route, the big stretches, heel hooks, finger/toe trades, the crux, etc.
IMG_2475.jpg


Rock climbing photo sessions are their own special event. The climber needs to be skilled enough to help you, by posing (turn head and hold, reach, mantle, etc.) The photographer then needs to be patient, while the climber works into that position. Be ready and get it, the first time. His guns won't last for ever. The photographer can not be the belay for this type of work!
 
Last edited:

DesertBoater

Adventurer
Thanks Brian. Just a response to your critiques. The first one is a bit blurry on the fingers because of a longer shutter and he moved his hand just before it closed. I was trying to get more of his head/face, however he was wearing a headlamp so that he could actually see what he was doing (details right?) and therefore the rock behind his head was lit up...any suggestions for that?

Cheers,
West
 

Forum statistics

Threads
188,360
Messages
2,903,733
Members
230,227
Latest member
banshee01
Top