Photo Critiqing Thread

nwoods

Expedition Leader
Thanks!

A lot of the settings you mentioned are post-picture processes. What would you suggest I do at the moment I am taking the picture besides what you recommended? Any advice for camera mode/settings? Should I be in Aperture Priority mode with a low F number, high F number, etc?


I can offer a very simple way of thinking about these parameters. I say simple because they are what I use, and I still have much to learn.

Aperture: I think in terms of depth of field. Smaller the number (bigger the aperture) the shorter the depth of field. So for a portrait shot with the background being blurred, use F2.8 to F4 and you will get that effect. Conversely, for longer focal range with near and far in focus, use smaller aperture's, like F11 to F22. In Aperture mode, I let the camera take care of shutter speed, generally.

ISO: Think in terms of available light and/or noise. The higher the ISO, the grainier or noisier the image will be, but, in low light, you can get better exposures by cranking up the ISO. I generally don't go any higher than ISO 400 unless I really need to. The newer Nikon's are amazing with high ISO capabilities though. For all my outdoor daylight shots, I use ISO 100. For most indoor, I use ISO 400

Exposure Compensation: For outdoor off road photography, I tend to set my camera to -1/3 or -2/3 exposure compensation. It creates deeper colors and tones, and things don't get blown out or "washed out" as much. Indoors I set to 0 or even +1/3" in low light situations. This -1/3 exposure setting really saves me a lot of time in post processing.

My typical daytime trail settings are:
- 16-35mm F2.8 L MkII lens mounted to a Canon 20D
- ISO 100
- Exposure: -1/3
- P mode (program mode allows RAW capture and manual flash)
- RAW image quality
- Autofocus on, (and Image Stabilization on if my lens has it)


That's pretty much it for starters. Sample around and play with it by taking LOTS of images and comparing EXIF data in your editing program of "keepers" verses "loosers" of the images you capture.
 

soonenough

Explorer
A lot of the settings you mentioned are post-picture processes. What would you suggest I do at the moment I am taking the picture besides what you recommended? Any advice for camera mode/settings? Should I be in Aperture Priority mode with a low F number, high F number, etc?
Glad I could help! Acutally, a lot of the things I mentioned are at-the-time-you're-taking-the-picture types of things.

Composition is probably one of the most important things to consider. This is one of the most basic ways to add interest to a photograph. As a few other people have mentioned, try to stick to the "rule of thirds" when composing your picture (here's a few links to some explanations - wikipedia.org, digital-photography-school.com). Another thing to keep in mind about composition - one thing that can take the interest out of a photo really quickly is when your picture lacks a subject. This usually seems to happen one of two ways - either the picture is of something so plain that no particular part attracts your attention (photog gurus would argue that this can sometimes be a good tactic, and that may be true, but I'm referring to the 95% of the time type of things), OR there is so much going on in your picture that no one thing in particular creates more interest than the other, and the viewer doesn't know what you're trying to show them. A great example of this in the car photography world is when there's a scene with 3 or 4 different cars, some landscape, plus a few people, and it ends up just looking like a snapshot. Another way to add interest using composition is to deliberately try not to shoot the picture the way most people look at it. Meaning, if you usually look at something from eye level, take the picture laying down on the ground, or looking down at the subject. If you usually see that object from ~ 10 feet away, shoot it from 1 or 2 feet away, or from a long ways off. I read a tip in a book once that said once you've found something you want to photograph, make yourself to walk around the object for at least a minute or so before you take the first picture. That will force you to think about alternate compositions and make it less likely to take a snapshot type of picture.

Sidenote - one thing that I've learned is to avoid trying to make every single picture a great photo. Doing that can become frustrating (for me at least) because you spend so much time trying, and you might only get a few pics that really come out looking great. It's okay to take some snapshots during an outing. When you look back on your pics, the great ones will always be your favorites, but it's also nice to have some pics of what was going on just for memories' sake, even if they're not works of artistic genius. Also, don't expect that you're going to start taking huge numbers of great photos by practicing a little; there's been times when I've taken 300 or 400 pictures and only had one or two (or even zero) great pictures.

Back on track - as for camera settings. I find myself shooting in Av (aperture priority) probably 95% of the time. Why? Because I like to control depth of field (and ISO), and let the camera figure out the shutter speeds for me. I am always paying attention to the shutter speeds though, because if they're getting too low the pictures won't be sharp. However, when you're first starting out, P (program mode) is a great learning tool, because you can focus (no pun intended) on composing the picture, and let the camera do the rest for you. The important thing is to be paying attention to what the camera is doing so you get a feel for what kinds of aperture and shutter speed values are normal. The times that I use Tv (shutter priority) are when I care about shutter speed. This usually happens when I'm trying to take a picture of something moving fairly quickly. The last mode is M (manual). This allows you to have total control of your picture, but takes quite a bit of practice to use well when you're taking pictures quickly. The pro photog that is doing my wedding shoots exclusively in this mode (as do a lot of pros), but he's got a LOT of practice, and can reliably get good shots using it. I'd probably recommend getting some practice in the other modes before trying this one in an environment where you don't have control of the pace of things, because trying to use it without a decent amount of practice can become frustrating quickly.

Lighting - this is probably the essence of good pictures, and it's really a huge subject to get into (and I'm in no way an expert), but suffice it to say this - the majority of awesome outdoors-type pictures that you see are taken with 30 minutes of either sunrise or sunset. It stinks that there's only a little bit of time each day for taking awesome landscape/outdoors pictures, but that's really the best time. That's not to say you can't take good pictures at high noon, it's just a lot harder. If you look at magazines like National Geographic, you'll see that the vast majority of landscape shots are taken at either dawn or dusk. I know I'm not doing this subject justice, but maybe someone else can chime in that knows more than me.

If you really want to start learning photography, I highly recommend these two books by Scott Kelby (I don't get anything for promoting these books, I've just read them and gotten a ton out of them): The Digital Photgraphy Book and The Digital Photography Book, Vol. 2. There's also a third volume due out this August :wings:

Here are a few links I posted in a thread a while back that have been helpful for me as well:

Canon Digital Learning Center

Cambridge in Colour - great site for very in-depth technical info on cameras and photography in general, and also an incredible gallery of night shots

Luminous Landscape Tutorials

Ritz/Wolf Camera Tutorials

Photoworkshop.com - a lot of different info on here...go to the "Photo 101" link on the left and scroll to the bottom for free downloads of photography books...also click on "Learning Centers" for links to other resources on the net.

Wow, I had no intention of that being so long when I started. I know that's a lot of info, and sorry for the rambling. In the end, there's no replacement for going out and practicing (something that I haven't been doing much of lately unfortunately). For me, practicing by myself usually works the best. If you have people waiting on you and moaning because they they're bored, it's hard to really concentrate on taking good pictures.
 
Last edited:

off-roader

Expedition Leader
I've always tried to get more zing out of this photo. Any suggestions?

I like it with a boost in contrast and a darkening of the shadows, midtones, & brightening the highlights.
1241497548_new_1.jpg
 

HB 4X4

Adventurer
Thanks so much for all of your help, everyone. I will try my best to apply it all to my next photography attempt. :wings:

It was mentioned to try and get the side of the vehicle in the picture as well... How's this?

DSC_0045.jpg


Is this a better crop of this picture?

DSC_0059-1.jpg


How would you re-crop this picture and/or adjust the settings on it?

DSC_0060.jpg


On a side note, does the rule of thirds apply to portrait shots of a single person too?
 
Last edited:

Photog

Explorer
Thanks Brian. ...... I was trying to get more of his head/face, however he was wearing a headlamp so that he could actually see what he was doing (details right?) and therefore the rock behind his head was lit up...any suggestions for that?

Cheers,
West

Use the wonders of flash trickery. The flash power is determined by the aperture opening, not the shutter speed. This allows you to shoot in the evening, when the climber can still see what he is doing. Just use a quicker shutter speed, and underexpose the background. It will look like it is dark outside. No head lamp needed. Or you can get more trickey, and combine all the elements. Evening light, headlamp (switched off at strategic moments)and flash.

As I said, these are their own events, for the purpose of creating wild images. Practice at a boulder, where the climber can stand on the ground, and move and switch the headlamp on/off, etc., while you determine the process necessary to create the image you want. Then take it to an actual route climb or traverse for the photo shoot.

Great photography takes serious effort.:)

The moving spot of light is cool too. Maybe have him put one headlamp on the back of his head too, just for that effect.
 

Photog

Explorer
HB 4X4,
I like the feel of those compositions, much better.

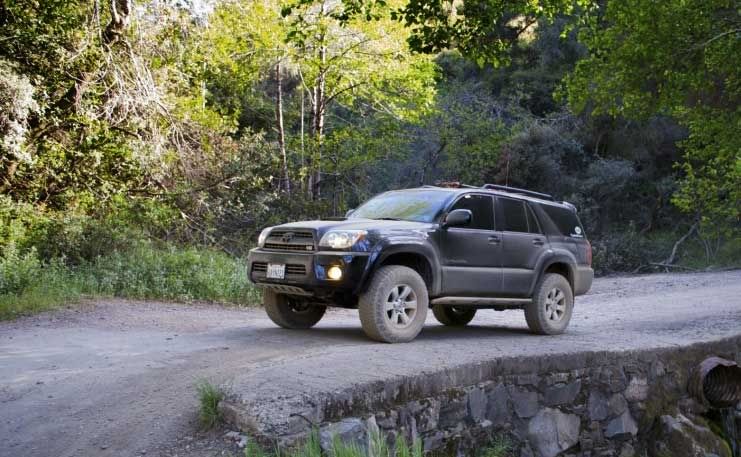
The one with the rig over the culvert: I would crop 1/2 the space behind and below the rig, and a little off the top. It needs more contrast and a bit more saturation (settings that can be set in the camera, or post processed in the computer).:)
 
Last edited:

HB 4X4

Adventurer
HB 4X4,
I like the feel of those compositions, much better.

The one with the rig over the culvert: I would crop 1/2 the space behind and below the rig, and a little off the top. It needs more contrast and a bit more saturation (settings that can be set in the camera, or post processed in the computer).:)


How about this?

DSC_0045-1.jpg
 

Photog

Explorer
That does look better. Good job. When you try to improve the images with the computer, you can learn what you could have done in the field, to improve the shot..

Isn't the culvert in this shot (below)?

I tried to follow the suggestion I provided; but it didn't work too well. It looked like you wanted to have the water as part of the image. To keep that in the image, places the rig almost in the middle. Hmmm. The light is flat in the shade, and high-contrast up in the left corner. This is also hard to work with. I did a little dodge/burn using Levels & Masks in Photoshop. It helped a bit.
DSC_00602.jpg
 
Last edited:

HB 4X4

Adventurer
Cool, thanks Brian.

What type of settings are you referring to while taking the picture, rather than doing it all on the computer at home? Like underexposing the brighter shots?
 

Photog

Explorer
When "fixing" images on the computer, you will notice that you could have composed the image differently, set the camera up for more vivd color, better sharpness, and contrast (better could be more or less than the default settings),better white balance choice, and exposure.

Read the camera manual to understand the menus and adjustment within the camera. Strive to shoot a great JPEG that does not need any work. You can capture RAW at the same time. If you have a really great image, then work with the RAW file.
 
Last edited:

HB 4X4

Adventurer
When "fixing" images on the computer, you will notice that you could have composed the image differently, set the camera up for more vivd color, better sharpness, and contrast (better could be more or less than the default settings),better white balance choice, and exposure.

Read the camera manual to understand the menus and adjustment within the camera. Strive to shoot a great JPEG that does not need any work. You can capture RAW at the same time. If you have a really great image, then work with the RAW file.

I'll keep at it, thanks for your help! :bowdown:
 

Photog

Explorer
HB,
I saw your pics over on the Random Rig Shots thread. You are starting to work with saturation and vignetting. This is good. A little heavy on both; but they still look good.
DSC_0056_2.jpg
 

HB 4X4

Adventurer
HB,
I saw your pics over on the Random Rig Shots thread. You are starting to work with saturation and vignetting. This is good. A little heavy on both; but they still look good.

I did that on purpose because I was making it my desktop wallpaper on my MacBook. Thanks though!

I am working with Aperture right now for editing. I am going to try Light Room 2 next to see how I like it, and then make my final choice after that. It's just a trial version for now. I also plan on upgrading to a MacBook Pro this summer or beginning of next semester as I get into photography more. I'm looking at classes as well, as I want to take one to better understand everything.
 

Photog

Explorer
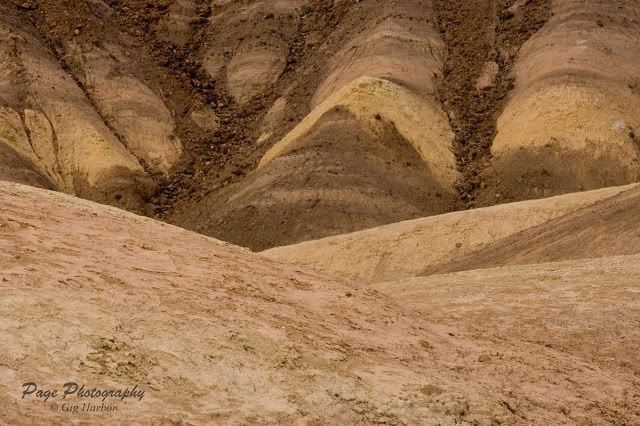
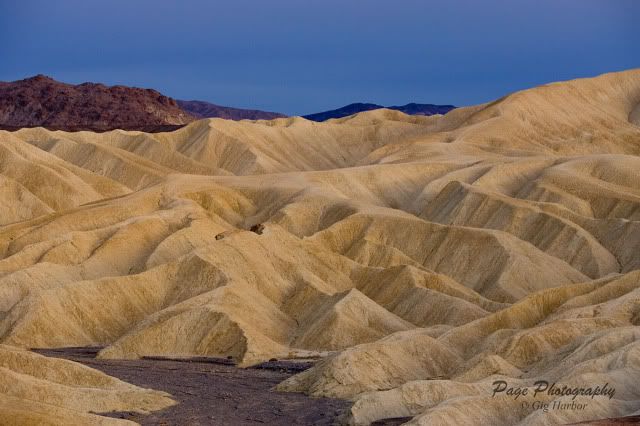
Here is a more advanced composition idea to consider. This is beyond the "rule of thirds", and shapes and % subject, etc. This has to do with the image allowing you to enter and move around, or being blocked out.

Take a look at some of your images, and see if you can pick out an example of these two situations.

These are images I have already posted in my Seattle to Death Valley thread.

This image has a foreground that blocks the viewer from entering. It makes the viewer feel like they are looking through a window, and can't get any closer. There is no way around that first hump. It cuts across the entire image. I have cropped it in an attempt to minimize this effect, but it is still a problem; without hacking off the lower 1/3 of the image.
IV8E2955a.jpg


This image allow the viewer to walk in and enjoy the view, as if standing in front of it.
IV8E2977a.jpg
 
Last edited:

Photog

Explorer
HB,
I saw your pics over on the Random Rig Shots thread. You are starting to work with saturation and vignetting. This is good. A little heavy on both; but they still look good.

I did that on purpose because I was making it my desktop wallpaper on my MacBook.......

Excellent treatment for that purpose, as it makes the edges dark, where you can place all the icons, and they won't blend in with the image.:26_7_2:
 
Last edited:

Forum statistics

Threads
188,360
Messages
2,903,731
Members
230,227
Latest member
banshee01
Top