Sprinter 4WD Conversion Idea, GMT-800 IFS.

luthj

Engineer In Residence
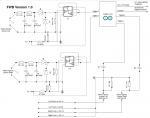
I haven been slowly working on the FWB. I was fighting a couple different issues that were masking each other. My first issue was a bug in the program, that would cause random low writes during the cycle. The second was a DC offset that was building in the input low-pass filter. This caused the votlage from the filter to drop with speed, eventually dropping to low for the op-amps to pick up. Someone suggested I try a pull down resistor parallel to D1/D2. This did the trick, and the duty cycle of the filtered output is stable regardless of speed. I am not certain it was the cause of some of the codes, but I swapped the output of the FWB to a differentiator circuit on a suggestion. This produces positive and negative output (approximately a square wave). The ESP module is just looking for zero crossings, so this keeps it happy.

I did a test drive today. No codes, no weird stuff on the scope, no ABS activation, etc. The most recent schematic is attached (ignore the Ver 1.0 on the header, I forgot to change that), this is Rev 1.5.



1566152820754.png
 

Attachments

  • FWB Rev 1.5.pdf
    65.5 KB · Views: 2

luthj

Engineer In Residence
I put a in-lb torque wrench on the pinion yesterday. Only 4 in-lbs of drag! New is 30 or so, used is 15 minimum. I guess the bearings must be worn out. There is no bad noises or free play though. I am assuming replacing them is my only option, as tightening the nut a bit would just be postponing the inevitable.

Thankfully I am not changing the R&P, so I don't have to go through all the setup to find the correct pinion depth.

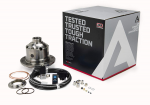
I think I have decided to go with a ARB air locker, as I already have the unit apart. Now I just need to get over the 1200$...

I can't seem to find the tool for tightening the carrier bearing adjusters. I don't want to spend $250+ for a one time use tool either (I need one for each side). I have a spec for the carrier drag with new bearings, so I should be able to tighten the adjusters with the case apart, and assemble to check the drag. Disassemble and repeat as needed. This avoids having to torque the adjusters to ~100ft-lbs to get the preload, and uses the case bolts to do the deed.
 
I think I have decided to go with a ARB air locker, as I already have the unit apart. Now I just need to get over the 1200$...

Dang. You're going all out!

Alas I can't justify keeping up with the Luths on that one! Envy.

Will be interesting to compare cost notes once we are all done.
 

luthj

Engineer In Residence
Yeah, its just the long term overlander in me, and my laziness. Once these parts go on, I don't plan on touching them for 100k miles! Our van is heavy enough in the rear, that we lift a front wheel pretty easily, so having traction the remaining wheel is important.
 

shade

Well-known member
On an related note. I now know what I want for a parts washer. I am going to take a cheap dishwasher, and put it in the garage. Put some quality detergent in, use the heated cycle, and leave it running for 4-5 hours. Cheap to buy, easy to use, easy to repair.

I didn't realize you were going to get that serious about parts washing. Do you have access to a floor drain?

A friend of mine runs two machines similar to this one in his transmission shop. One runs a caustic solution for steel/cast iron, the other uses a less aggressive, citrus based detergent for aluminum. Between the high pressure, heat, and detergent, parts come out looking new in minutes. Your dishwasher solution will take longer (I'm guessing you'll hack the timing circuit), but ought to get the job done. Use Lemi Shine with a compatible detergent (or maybe on its own), and I think you'll be happy.

1566240031047.png
 

luthj

Engineer In Residence
I played with the pinion a bit. about 25 degrees more on the nut, and the drag is about 24 in-lbs. That includes 2-4lbs from the seal. Bearings still feel fine, so I am tempted to use it as is, given that its probably turned only a few thousand miles in its life.

IMG_20190819_182415156

IMG_20190819_182459582


I got the outer carrier race out of the case. Took a bit of tapping with a punch and 2 jaw puller. I need to measure the case, as It almost feels like case bore is slightly out of round. Or maybe the race was. That would explain the failure of the bearing on that side.


Shaft bearings and seals are back in. The pilot bearing in the right stub shaft collapsed on the end when I pressed it in. The replacement bearing has a thinner walled shell I guess. The main issue is that the fit is too freaking tight. I have a replacement. I will just grind a couple thousands off the outside of the housing, that should loosen the press fit up a bit.

IMG_20190816_192353226

IMG_20190816_180335093

IMG_20190816_191709892_HDR

I put an order in for the ARB locker as well.
1566254606600.png
 

shade

Well-known member
Didn't take you long to get over $1200. :)

Do you think you could get the pilot bearing to go if you freeze the housing?
 

luthj

Engineer In Residence
Didn't take you long to get over $1200. :)

Do you think you could get the pilot bearing to go if you freeze the housing?

I could heat the shaft up, and freeze the bearing. The challenge is the bearing is 1/2" OD, so there's not much shrinkage compared to the interference fit. The other issue is the bearing has very little mass, so it would likely heat up and expand half way in... (been there, done that, and no, thats not what she said). The original bearing was tight enough that I had to regrind the shoulder on my puller to get it out.

In the big scheme of things, 1,200$ isn't a big deal, but I am a cheap ******.
 

luthj

Engineer In Residence
Now would have been a good time for a solid spacer on the pinion. I hate crush sleeves.

Wouldn't that make setting the preload difficult? Like plus/mins 2 degrees difficult? And I would have to assemble/disassemble multiple times to get the shims right.
 

Mwilliamshs

Explorer
Wouldn't that make setting the preload difficult? Like plus/mins 2 degrees difficult? And I would have to assemble/disassemble multiple times to get the shims right.
Nah. Just measure what came out and match it. That's been perfect for me several times and I had to reset and add a couple thousandths once. Much better setup though as it'll last forever, can't ever collapse on its own, and can be installed "less carefully" without catastrophic results. I say "less carefully" because you'll always be careful, of course, but with a solid sleeve a mistake will be forgiven whereas a crush sleeve must replaced.
 
Last edited:

b dkw1

Observer
Set it loose, measure endplay with dial indicator. Set shimpack for desired pre-load. I don't get to hung up on rotational torque, pre-load is what keeps them from moving around. Especially with used bearings.
 

Forum statistics

Threads
188,362
Messages
2,906,069
Members
230,117
Latest member
greatwhite24
Top