Supertramp Flagship LT pop-up slide-in pickup camper

Chadx

♫ Off road, again. Just can't wait to get...
Awesome info. Would I be able to buy and drop in the Victron batteries for an easy swap out or are the other components you mentioned required with the Victron batteries for charging and protection purposes?

The other Victron components are needed because they are not within the Victron batteries themselves. That is how the Victron batteries can be so compact. Sensors and communication board are still inside the batteries, but the main components are outside of the battery (main BMS, a Battery Protect for charge disconnect, a Battery Protect for load disconnect are external components and all are needed). But the good thing is those three items cover you whether you have one Victron battery or many (up to four in the case of Flagship). There are communication cables than run between the batteries and BMS. The BMS, in turn, connects and communicates with Battery Protect disconnects (one on charge side and one on load side) to disconnect current from charge sources and disconnect current to a load.

In my opinion, it is a bit complicated to retrofit/wire for the needed components after the fact, but it's doable. There are other brand batteries on the market that are more compact, and so can fit more capacity in the same footprint as the BattleBorn, so those are options to boost available amp hours in the same footprint as the BattleBorn batteries without needing external BMS and disconnects like is required for the Victron batteries, but none as small/dense as the Victron simply because those components are not internal and not repeated in each battery. The Victron batteries also don't have internal heat, so if heat is desired, that is an external, add-on solution.
 
Last edited:

roamie

New member
@Brown229 it’s a newer option that ST offers. I’m glad too, I was not sure how I would be able to add something aftermarket but it was something that I wanted.

@Chadx I have most of those options minus the bunk bed, so lmk if there‘s anything you need as you do that write up, I could add pics or go through the manuals I have.

Speaking of, does anyone here have the Wrappon toilet? We’re out this weekend and got it out to setup for using it later (fortunately nothing urgent needed yet) and I’m sort of baffled by it. From the manufacturer it comes with a standard 2 prong outlet plug. However, SuperTramp have modified the power cable to have a solar panel plug instead.

I have no idea where we’re meant to plug this in. I do have the external solar panel port outside, but that should be for input not output. I tried plugging it in there just to see, and it does not power on as I expected. Additionally, the cable is too short to reach there, I had to build a makeshift platform to put it on to test this out.

I messaged their tech support but I’m not sure when I’ll hear back.
 
Last edited:

Brown229

New member
The other Victron components are needed because they are not within the Victron batteries themselves. That is how the Victron batteries can be so compact. Sensors and communication board are still inside the batteries, but the main components are outside of the battery (main BMS, a Battery Protect for charge disconnect, a Battery Protect for load disconnect are external components and all are needed). But the good thing is those three items cover you whether you have one Victron battery or many (up to four in the case of Flagship). There are communication cables than run between the batteries and BMS. The BMS, in turn, connects and communicates with Battery Protect disconnects (one on charge side and one on load side) to disconnect current from charge sources and disconnect current to a load.

In my opinion, it is a bit complicated to retrofit/wire for the needed components after the fact, but it's doable. There are other brand batteries on the market that are more compact, and so can fit more capacity in the same footprint as the BattleBorn, so those are options to boost available amp hours in the same footprint as the BattleBorn batteries without needing external BMS and disconnects like is required for the Victron batteries, but none as small/dense as the Victron simply because those components are not internal and not repeated in each battery. The Victron batteries also don't have internal heat, so if heat is desired, that is an external, add-on solution.
Ok thank you for the info. I will have to look into the other options available to increase the amp hours within the same spot. 200 amp hours has been somewhat sufficient so far but if i could easily swap out my two batteries for two that have an additional 200 amp hours for a total of 400 then i would never have to think about power ever again.
 

Brown229

New member
@Brown229 it’s a newer option that ST offers. I’m glad too, I was not sure how I would be able to add something aftermarket but it was something that I wanted.

@Chadx I have most of those options minus the bunk bed, so lmk if there‘s anything you need as you do that write up, I could add pics or go through the manuals I have.

Speaking of, does anyone here have the Wrappon toilet? We’re out this weekend and got it out to setup for using it later (fortunately nothing urgent needed yet) and I’m sort of baffled by it. From the manufacturer it comes with a standard 2 prong outlet plug. However, SuperTramp have modified the power cable to have a solar panel plug instead.

I have no idea where we’re meant to plug this in. I do have the external solar panel port outside, but that should be for input not output. I tried plugging it in there just to see, and it does not power on as I expected. Additionally, the cable is too short to reach there, I had to build a makeshift platform to put it on to test this out.

I messaged their tech support but I’m not sure when I’ll hear back.
Ok bummer. I would love to have that option.

I have the Wrappon and absolutely love it it. Are you trying to use the toilet outside of the camper? I recently just purchased the 12 volt plug from Wrappon to be able to use in our outside shower awning with it plugged into the small anker power station that we have.
 

ruadhrigh

Active member
@Brown229 it’s a newer option that ST offers. I’m glad too, I was not sure how I would be able to add something aftermarket but it was something that I wanted.

@Chadx I have most of those options minus the bunk bed, so lmk if there‘s anything you need as you do that write up, I could add pics or go through the manuals I have.

Speaking of, does anyone here have the Wrappon toilet? We’re out this weekend and got it out to setup for using it later (fortunately nothing urgent needed yet) and I’m sort of baffled by it. From the manufacturer it comes with a standard 2 prong outlet plug. However, SuperTramp have modified the power cable to have a solar panel plug instead.

I have no idea where we’re meant to plug this in. I do have the external solar panel port outside, but that should be for input not output. I tried plugging it in there just to see, and it does not power on as I expected. Additionally, the cable is too short to reach there, I had to build a makeshift platform to put it on to test this out.

I messaged their tech support but I’m not sure when I’ll hear back.

From what Kelsey told me yesterday, there should be a waterproof 12v plug in the shower basin. You should be able to use the Wrappon without removing it from there.
 

roamie

New member
@ruadhrigh thank you so much, you’re right we totally overlooked that tucked in on the side in the shower basin! Our recollection was they told us it wasn’t really intended to be used inside, they must have meant the actual shower basin itself not the camper.

And yes @Brown229 we really wanted to use it outside in the shower stall, so I’ll have to see about getting a separate power cable for that like you did.

Awesome, we’re all set.
 

Brown229

New member
@Brown229 it’s a newer option that ST offers. I’m glad too, I was not sure how I would be able to add something aftermarket but it was something that I wanted.

@Chadx I have most of those options minus the bunk bed, so lmk if there‘s anything you need as you do that write up, I could add pics or go through the manuals I have.

Speaking of, does anyone here have the Wrappon toilet? We’re out this weekend and got it out to setup for using it later (fortunately nothing urgent needed yet) and I’m sort of baffled by it. From the manufacturer it comes with a standard 2 prong outlet plug. However, SuperTramp have modified the power cable to have a solar panel plug instead.

I have no idea where we’re meant to plug this in. I do have the external solar panel port outside, but that should be for input not output. I tried plugging it in there just to see, and it does not power on as I expected. Additionally, the cable is too short to reach there, I had to build a makeshift platform to put it on to test this out.

I messaged their tech support but I’m not sure when I’ll hear back.
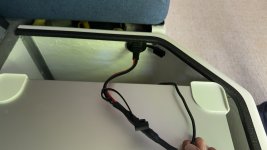
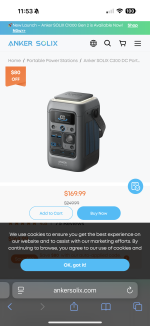
In the pictures below it shows how the Wrappon is plurged in while in use for inside the camper and then I highlighted the plug that gets unplugged to use with the Wrappon 12 volt plug and the power station we are using


IMG_8395.jpeg
IMG_8396.jpeg
IMG_8397.png
IMG_8398.png
 

SimplyAnAdventure

Well-known member
@Brown229 it’s a newer option that ST offers. I’m glad too, I was not sure how I would be able to add something aftermarket but it was something that I wanted.

@Chadx I have most of those options minus the bunk bed, so lmk if there‘s anything you need as you do that write up, I could add pics or go through the manuals I have.

Speaking of, does anyone here have the Wrappon toilet? We’re out this weekend and got it out to setup for using it later (fortunately nothing urgent needed yet) and I’m sort of baffled by it. From the manufacturer it comes with a standard 2 prong outlet plug. However, SuperTramp have modified the power cable to have a solar panel plug instead.

I have no idea where we’re meant to plug this in. I do have the external solar panel port outside, but that should be for input not output. I tried plugging it in there just to see, and it does not power on as I expected. Additionally, the cable is too short to reach there, I had to build a makeshift platform to put it on to test this out.

I messaged their tech support but I’m not sure when I’ll hear back.
So I have a Wrappon, I’m pretty sure mine was the first one ever in a ST because they gave me a TON of measurements before I committed to ordering the new version (I had a Wrappon Green and it definitely doesn’t fit). I ordered mine with the standard 12V adaptor and roll it up and place it beside the toilet. If/when you need to use it just pick up the coiled wire plug it into the 12V outlet and do your thing. I’m not sure this is something that need to be wired in by ST. And yes you can use it in place we don’t remove ours unless we are using the indoor shower.
 

KRRL

New member
Chadx, your photos from Camper Van Expo in Bozeman show an interesting step on the LT (it might be your LT !!!). The photos show a 3 step Little Giant and a fourth step which appears to be attached to the trailer receiver and sticks up above the Little Giant stepladder. Do you have any info on the fourth step and how to obtain one? Thanks
 

Chadx

♫ Off road, again. Just can't wait to get...
Chadx, your photos from Camper Van Expo in Bozeman show an interesting step on the LT (it might be your LT !!!). The photos show a 3 step Little Giant and a fourth step which appears to be attached to the trailer receiver and sticks up above the Little Giant stepladder. Do you have any info on the fourth step and how to obtain one? Thanks

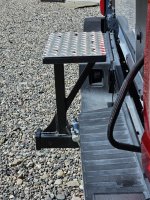
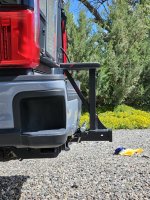
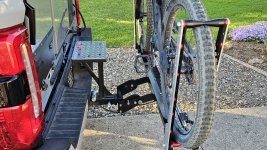
Hi @KRRL Yes, that is my LT in the Camper Van Expo picture. My fourth step is a custom weld. A three-step step stool was tall enough for our previous campers and pickup, but the Superduty is taller as is the floor height of the Flagship (with basement). You can make the step up from the three-step step stool, but it's fairly high; particularly on the step down. We replaced our previous Little Giant step stool model (Safety Step) with a different model Little Giant (Jumbo Step). I like the Safety step better, but it was too wide and would not fit in the basement drawer. Both stools were modified to remove the flip up safety/hand rail. To fit in the drawer, the Jumbo Step needed to have two of the plastic feet modified (see post https://forum.expeditionportal.com/...-in-pickup-camper.239844/page-15#post-3165428)

The step was a custom weld onto a combination receiver extension (12") and reducer (2.5" to 2"). I had a local Overlanding and hot rod "custom shop" do it. It took a month longer than they promised (couple months total) to the point I stopped at a local welding/fabricating shop, that I should have gone to in the first place, and explained the situation and they said to go pick up the extension and they would do it that week. Well, I went to get the extension and the original place had completed it. It was good design and perfect height, but kind of sloppy. I stopped back at the fabrication shop and he took a look at it. He put an extra weld on a place that needed it to seal, cleaned up all the weld splatter and sloppy (but strong) welds, and he sent me on my way with no charge except the promise to check with him first next time as he would have done it for half the price (it cost me over $300). He spend over 30 minutes on it as we were talking. He wouldn't take the $20 tip I tried to give him so I had to lay it on his workbench. I have a new connection there for any future metal projects.

Anyway, I really like the way it turned out. Step is perfect height as it 's right below the camper door and splits the difference between the top step stool step and camper. And, the spacing worked out to be about the same 9" - 10" step spacing as the step stool, so step-up spacing is consistent (not to be underestimated in importance, in my opinion). I use an anti-rattle clamp and it's rock solid. I gave it a light hand sand and a bunch of layers of black spray paint, figuring I'd have it powder coated over the winter. I never did because so far the 4 or 5 coats of spray paint have held up well. It situates our mountain bike rack and dirtbike rack out far enough that handlebars don't hit the camper and I can still get in (haven't used my swing-out hitch since). Plus, all my 2" receiver hitches go straight in without an adapter from 2.5" because the extension is also a reducer. Tow my small 3,000lb trailers (fishing boat and 16' enclosed) with no issues and run a 44.22 brand hitch slider in it when offroading, to keep it from getting too scuffed up. If I get into a really tricky situation, and need more departure angle, I can remove it for the obstacle (or leave it at home that trip).

There are all types of great steps out there, including one from Supertramp now, that make great options, too.

Some pics of the test fit (hence the anti-rattle being nuts-up, in these images, for quicker install and removal).


20240605_105349.jpg

20240605_105419.jpg

20240605_105424.jpg

20240605_105600.jpg

20240608_062938.jpg

20240608_063008.jpg

20240608_164704.jpg

20240608_165039.jpg
 

anders0ndg

New member
I’ve been meaning to post this up on this forum but didn’t have any low enough resolution photos that it would allow me to post. Took a few on the lowest setting today so hopefully this works….

Anyway I’m going to consider this a public service announcement for any Ford truck owners running without a tailgate. So since installing my camper not having a tailgate has bothered me because with a screwdriver and 30 seconds your taillights can (and do) get stolen. Now I know we all like to pretend we are only out in the back country but realistically if you park in the wrong spot when getting groceries for the week or having dinner you can come out to missing tail lights. Oh and btw, they’re a couple thousand dollars each because of the LED’s and BLIS monitors.

View attachment 894832

Here’s my solution. I have ZERO financial interest in this company so this is nothing but a plug for a company I personally use.

These brackets are made by Omaha Bravo Designs, they install in about 5 mins and basically render your lights unstealable by all but the most determined theif. They come in black but being the kind of guy I am I asked for mine raw and had them Ceracoated in Storm Trooper to match!

View attachment 894833
View attachment 894834

The other pics are of the locks I finally settled on to keep my new (also white) Fastguns from growing legs. These locks are from Infinate Rule and are 100% made in the USA out of stainless steel and are straight up beefy! I wrapped mine in 1/4” and 3/4” tubing to keep them from rattling and scratching any paint. I could not be happier on how these came out.

My truck and Supertramp live in a secure location but I was always nervous about losing my lights and or Fastguns to some opportunist @sshole walking by.

Anyway I hope this can help someone since this has been on my personal radar for almost two years now.

-SAA
Hello! Would you mind sharing which InfiniteRule lock you used for your Fastguns? I think I have found the right size but wanted to confirm.
 

KRRL

New member
Thanks much, Chadx. We have a 3 Step Little Giant from our previous camper (4 Wheel Hawk). Your fourth step looks like what we need (we also have a 1Up Bike Rack). We will see if we can get the step fabricated locally here on the Oregon Coast or will contact you about your welder if we make a trip to Montana. Thanks again for all of your help.
 

SimplyAnAdventure

Well-known member
Hello! Would you mind sharing which InfiniteRule lock you used for your Fastguns? I think I have found the right size but wanted to confirm.
Trailer Latch Lock For Up To 1-5/8" Wide Trailer Coupler Latch - (11/16" Depth) - 2PK (2) 1-5/8" Trailer Coupler Latch Locks
SKU: 61459-D

That’s what my invoice says.

As I mentioned they were a tad lose so I put some tubing over the pin to tighten them up. The lock pin is exactly 0.250” so 1/4” ID tubing worked perfectly.

Let me know if you have any other questions.
 

Chadx

♫ Off road, again. Just can't wait to get...
Thanks much, Chadx. We have a 3 Step Little Giant from our previous camper (4 Wheel Hawk). Your fourth step looks like what we need (we also have a 1Up Bike Rack). We will see if we can get the step fabricated locally here on the Oregon Coast or will contact you about your welder if we make a trip to Montana. Thanks again for all of your help.

I forgot to specify the specific Hitch extension that was my starting .
I bought a "Brophy Hitch Reducer and Extender - 2-1/2" to 2" Trailer Hitch - 7" Long" from eTrailer. The 7" is how long it extends reach vs my comment of it being about 12" long overall.

Brophy spec says 6" pin to pin. I'll have to measure when I get home. Model is HR26.
https://www.crbrophy.com/hitchacc.html

Keep in mind extensions reduce capacity. Brophy says this particular one reduces your receiver's capacity by 1/4. Leverage and all.
Still plenty for bike racks and medium sized trailers, but something to keep in mind for heavy bumper-pull trailers.
 

Forum statistics

Threads
190,330
Messages
2,926,399
Members
233,714
Latest member
DanoWall
Top