You are using an out of date browser. It may not display this or other websites correctly.
You should upgrade or use an alternative browser.
You should upgrade or use an alternative browser.
THE BUNDU GEAR BUILD - LEXUS GX470
- Thread starter bunduguy
- Start date
bigreen505
Expedition Leader
The problem with this car is that my wife now wants it! And she gives me a hard time when she can't drive it. I can't understand why she prefers this over her Subaru Outback:sombrero:
Does she know it's not black?
thecriscokid
Explorer
This is going to be a great mobile. I drove one on snow packed roads with scary bald stock tires(all my cars have snow and summer tires) for a friend. I was kind of nervous to hit the road so I found some open area and tried to do donuts for a 1/2 hour. I felt very safe and sure footed driving that. You will love it
kchristian
Adventurer
Curious if there have been any updates...
What happened to this thread? I have been wanting to know what has been / what's going to be done to this GX, as the rear suspension on my Sand Dollar Pearl GX is finally giving up the ghost, and i don't want to replace those components with stock pieces. I'd really like to convert my GX to an "every man" ride also, so I'm anxious to know where things stand on yours............any updates?
Dave Bennett
Adventurist
Patience... 
DanKunz
Adventurer
If you want to see another I replaced everything in the rear, plus a few more things.
http://www.expeditionportal.com/forum/threads/83290-My-GX470
http://www.expeditionportal.com/forum/threads/83290-My-GX470
Okay, okay, time for some updates. A lot has been done to the vehicle, but here is the next step.
After the skid plates, it was time for some baseline maintenance.
Timing belt, water pump, idler pulley etc were all replaced, as well as all fluids converted to synthetics, plugs replaced, new filters etc etc. Driving like a dream and all set to go!
After the baselining, it was time to get some better suspension on. The front was feeling soft and hard all at the same time, and I just did not like it under braking. So the good folks over at Icon Vehicle dynamics had just the answer. A stage 1 kit for the 4Runner is a perfect and instant fit onto the GX. This comprises a coilover for the front, and an aluminum shock for the rear. The front is adjustable to up to 3 1/2 inches of lift.
I had Kyle at Sierra Expeditions install it for me, since a 4hr failed attempt at removing the UCA's left me frustrated. Of course, Kyle showed me what hammers are for, and in 5 seconds flat removed the UCA with 1 swift ********** in the right place!
Anyway, this is how they arrived all shiny in the box:
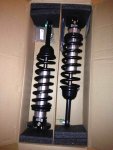
Of course I could not stop staring at them for a while since they are so darn pretty and all. By disconnecting the old shocks, I now lose the performance adjustment for sport or comfort mode. Quite frankly I could never tell the difference anyway, so no great loss there. Maybe I can just use the button position on the console for something else instead.
Here they are installed:
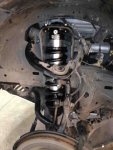
We adjusted them to give around 2" of lift, which would work out really well.
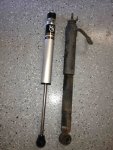
Then came the rears. This is a comparison between the old and the new:
And here they are installed:
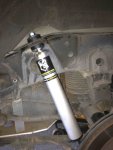
I decided to leave the airbags in the rear for now because I really like the height adjust for towing. There is a slight concern for the bags, but they are not known for failure. Of course this is not a common off-road rig, which is why they perhaps have not had many failures. I have thought about putting a limiting strap at the very least. But in various full flex situations where the top of my tire is below the bottom of my rocker, there have been no issues, so I'll leave it for a while. In order to adjust the height in the rear to match the front, we used spacers in the airbag sensor. The result is a perfectly level vehicle. I may need to adjust both front and rear as the coilovers settle, and I add the bumper and the winch up front.
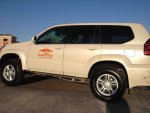
At the same time, Kyle again from sierra Expeditions, removed the steps. I also got some rather tasty treads from the very clever boys at Falken Tires. They sent me a set of Falken Rocky Mountains (since they came through the local Discount Tire dealership, they are labelled the exclusive Rocky Mountain, instead of the WildPeak, but same tire). I got mine in a 265 70 17, which makes for smidge under 32". perfect for an exploring vehicle not intended for wheeling. More details on the tires later.
so here is how the GX look with no steps, with new suspension and the new tires. You'll notice I also put a little Bundu Gear signage on too, and removed the factory rack, in preparation for the next stage..
After the skid plates, it was time for some baseline maintenance.
Timing belt, water pump, idler pulley etc were all replaced, as well as all fluids converted to synthetics, plugs replaced, new filters etc etc. Driving like a dream and all set to go!
After the baselining, it was time to get some better suspension on. The front was feeling soft and hard all at the same time, and I just did not like it under braking. So the good folks over at Icon Vehicle dynamics had just the answer. A stage 1 kit for the 4Runner is a perfect and instant fit onto the GX. This comprises a coilover for the front, and an aluminum shock for the rear. The front is adjustable to up to 3 1/2 inches of lift.
I had Kyle at Sierra Expeditions install it for me, since a 4hr failed attempt at removing the UCA's left me frustrated. Of course, Kyle showed me what hammers are for, and in 5 seconds flat removed the UCA with 1 swift ********** in the right place!
Anyway, this is how they arrived all shiny in the box:

Of course I could not stop staring at them for a while since they are so darn pretty and all. By disconnecting the old shocks, I now lose the performance adjustment for sport or comfort mode. Quite frankly I could never tell the difference anyway, so no great loss there. Maybe I can just use the button position on the console for something else instead.
Here they are installed:

We adjusted them to give around 2" of lift, which would work out really well.
Then came the rears. This is a comparison between the old and the new:

And here they are installed:

I decided to leave the airbags in the rear for now because I really like the height adjust for towing. There is a slight concern for the bags, but they are not known for failure. Of course this is not a common off-road rig, which is why they perhaps have not had many failures. I have thought about putting a limiting strap at the very least. But in various full flex situations where the top of my tire is below the bottom of my rocker, there have been no issues, so I'll leave it for a while. In order to adjust the height in the rear to match the front, we used spacers in the airbag sensor. The result is a perfectly level vehicle. I may need to adjust both front and rear as the coilovers settle, and I add the bumper and the winch up front.
At the same time, Kyle again from sierra Expeditions, removed the steps. I also got some rather tasty treads from the very clever boys at Falken Tires. They sent me a set of Falken Rocky Mountains (since they came through the local Discount Tire dealership, they are labelled the exclusive Rocky Mountain, instead of the WildPeak, but same tire). I got mine in a 265 70 17, which makes for smidge under 32". perfect for an exploring vehicle not intended for wheeling. More details on the tires later.
so here is how the GX look with no steps, with new suspension and the new tires. You'll notice I also put a little Bundu Gear signage on too, and removed the factory rack, in preparation for the next stage..

Last edited:
next items are all above the roofline.
I have been dealing with the guys at Baja Rack for a while now, and we represent each others products. They made a great rack for my LC100, and even prior to that I help test the fit and design of the EXP rack for the 100 series along with the light bar. The racks are light and low profile. They are perhaps not made for extreme loads on the roof, but that is not what your roof is made for anyway
So naturally I approached Sergio Murillo and John Giata from Baja Rack again, when I needed something for the GX. There quite literally is nothing made for the GX, so we would be developing a prototype. After some measurements, and some comparisons with existing Baja Rack lengths, we went with a modified FJ Cruiser flat rack. Amazingly, the FJC roofline is about a foot longer than the GX. So the guys created a shorter version but the same width. Then amazingly, the feet from my old LC100 rack almost fitted straight on! The front mounts were switched left to right, and a couple holes were redrilled on the drill press, and voila! Now, keep in mind, it is still a prototype. The center feet are a 1/4 too short, and the load spread needs to be shifted forward of the current mounts. But overall, it is a great fit. We will be doing a refit, and then the rack will go into production, and finally have a rack for GX owners.
Here's how she looks:
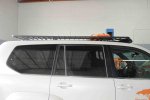
You can see how nicely low profile it is, keeping cabin noice down, and helping with COG as well.
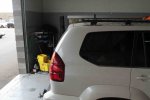
We will add around 4" to the rear, which will improve the aesthetic and follow the body lines better. Also, since the door opens sideways, we do not have to leave any hinged space. The extra 4 inches will also allow me to perhaps use a hi-lift mount back there.
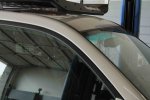
The front is just an inch off the roof, forward of the sunroof. The sunroof is fully operational, and the noise is minimal. You can definitely hear it, but I can still notice that this is a quiet car. There is enough space to also allow for flex and for it not to touch the roof even under load.
I have been dealing with the guys at Baja Rack for a while now, and we represent each others products. They made a great rack for my LC100, and even prior to that I help test the fit and design of the EXP rack for the 100 series along with the light bar. The racks are light and low profile. They are perhaps not made for extreme loads on the roof, but that is not what your roof is made for anyway
So naturally I approached Sergio Murillo and John Giata from Baja Rack again, when I needed something for the GX. There quite literally is nothing made for the GX, so we would be developing a prototype. After some measurements, and some comparisons with existing Baja Rack lengths, we went with a modified FJ Cruiser flat rack. Amazingly, the FJC roofline is about a foot longer than the GX. So the guys created a shorter version but the same width. Then amazingly, the feet from my old LC100 rack almost fitted straight on! The front mounts were switched left to right, and a couple holes were redrilled on the drill press, and voila! Now, keep in mind, it is still a prototype. The center feet are a 1/4 too short, and the load spread needs to be shifted forward of the current mounts. But overall, it is a great fit. We will be doing a refit, and then the rack will go into production, and finally have a rack for GX owners.
Here's how she looks:

You can see how nicely low profile it is, keeping cabin noice down, and helping with COG as well.

We will add around 4" to the rear, which will improve the aesthetic and follow the body lines better. Also, since the door opens sideways, we do not have to leave any hinged space. The extra 4 inches will also allow me to perhaps use a hi-lift mount back there.

The front is just an inch off the roof, forward of the sunroof. The sunroof is fully operational, and the noise is minimal. You can definitely hear it, but I can still notice that this is a quiet car. There is enough space to also allow for flex and for it not to touch the roof even under load.
Dave Bennett
Adventurist
Looking good Rou :lurk:
Thanks Dave.
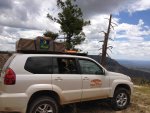
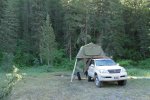
Next up is installing the RTT and awning. BajaRack makes nice awning brackets and RTT bracket mounts which make the whole process very easy. And they suit the HM mounting rails very nicely too.
I decided to install the smallest RTT that Howling Moon makes on this car. The reason being that I am either solo, or just have my 4yr old son when using the RTT. If my wife or others come along, I have the trailer. So I installed a 1.2m Deluxe tent, which is only 110lb. And this is for an expedition quality tent with the finest fabric you can buy. I placed the tent to be opening over the passenger side. Then the awning goes on the driver side:


Similar threads
- Replies
- 1
- Views
- 1K
- Replies
- 7
- Views
- 2K
- Replies
- 2
- Views
- 1K
- Replies
- 7
- Views
- 2K
