TheGillz Explo Off-Road Trailer via Geotracker90 Build!

GeoTracker90

Adventurer
Rezarf <>< said:
I'm loving what I am seeing bud, keep up the good work!:wings:

Rezarf, BN Guy, 1speed, and Jerdog53 thanks for trhe comments and kind words. Rezarf after seeing the work that you have done I really take your comment to be quite the compliment.

I get to work on it some more Thursday night as well as all day Saturday. Can't wait.

Also, I think I have found a way to finance a 1.5" dimple die so if things go as planned Clark's trailer will be the very lucky test piece for this new addition to the fabrication tool box.

Mike
 

GeoTracker90

Adventurer
TheGillz said:
Hey mike, I'm wondering if you can make something like this with any leftover piano hinge you may have, considering the price of gas and all?

So I don't have to stand around and :gunt: or :ar15: or :sport_box

LOL

Jerry_can_lock.jpg

I believe that I can work something out for that. Now, how neat would that look with some dimple die work? Hmmmm?:yikes: :safari-rig:

Mike
 

GeoTracker90

Adventurer
Update 7-5-08

One more day in the shop and more accomplished. I'm at a point where a lot of what I'm doing isn't realy cool or exciting, but some of it was worthy of some pictures.

DSCF5120.jpg

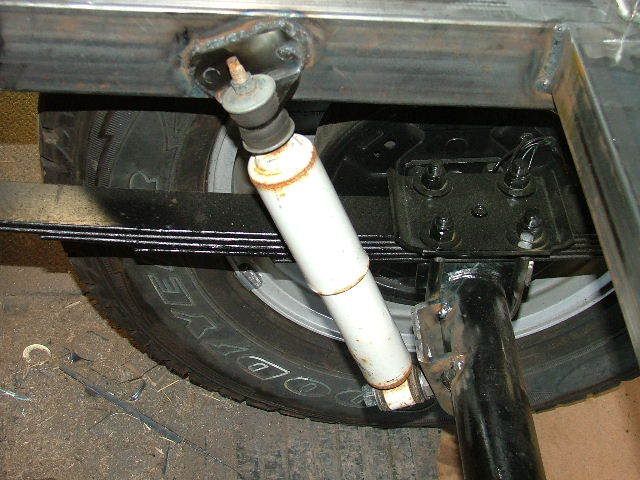
What good is an expo style trailer with out shocks? The lower shock mount is actually a spring perch with one end cut off and one of the holes opened up to accept a bolt on shock stud. The top shock mount is actually an OEM GM truck shock mount with one of the ears cut off. I held on to a pair of these back from when I worked at a local GM dealership. When they lift a truck the lift kit come with a new/different set and so these are removed and discarded. I discarded these right onto Clark's trailer.

DSCF5121.jpg

This is just a detail shot of the lower shock mount. Here you can see the clearance between the shock and the mount.

DSCF5123.jpg


DSCF5124.jpg

The shocks are actually some extras I had off of an IFS late 80's Toyota 4-Runner. In order to position the shock correctly I would jack up one side of the trailer untill the spring was at full droop and that side tire would come off the ground. With it in this position I installed the shock while it was fully extended. This matches the extension of the shock with the extension of the suspension. After doing some checking, I believe that the compression side will be just fine.

This is the point where a lot of the boring work was done. I drilled a series of holes in the floor piece so that I could plug weld the floor to the trailer frame. I placed the welds on approximately 6" centers along the outer frame perimiter as well as each of the cross members. I also welded and blended the upper corners of the main storage box as well as the sides where they wrap around the tailgate opening.

DSCF5125.jpg


DSCF5126.jpg

I put the sheet metal brak back into action and made a holding box for the 10lb propane tank that mimics the holders that I made for the fuel cans. I plan to have a strap that will hold the tank above the center weld seam. The latch will be adjustable as well as lockable. My knee was a casualty to the propane box though. I was sitting in my very comfortable shop chair resting the propane holder in my knees and welding away. I repositioned the workpiece so that I could get to an unwelded area and struck the arc. I might just as well have covered my knee in a thin sheet of flame retardant material and then held a branding iron to my knee. It put a small burn hole in my jeans and made me think all sorts of bad things, but I don't believe that I verbalized any of them. Well, lets just say I now have a blister about the same diameter of a pencil eraser and about 1/4" to 3/16" tall. Like they say, if you're not burning you're not welding.

I wanted to stay and work later untill I looked out side and realized how dark it was getting. Usually this isn't a problem, but last Thursday I bought a 1979 Yamaha XS750 motorbike from a guy at work. It's a $500.00 bike and right now the headlight isn't working. So, when I realized that I was running out of daylight I closed up shop and headed for town. Good thing I left when I did. I made it home at 9:50 pm and with out a full moon it was getting very dark very quick. I've got to figure out the headlight ASAP.

That's it untill next time. Fairly soon this is going to be ready for paint and then wiring and then it will be off to Boise.

Mike
 

highlandercj-7

Explorer
Slick idea for the shock mounts. I can usually pick them mounts up for about 12.00 a pair. XJ owners take notes. These can be used to raise the boat anchor lower mounts on our Jeeps. I'll be doing this and taking pics when I do my XJ up with a lift. :)
 

GeoTracker90

Adventurer
Dimple Dies

IMAG0707.jpg

Well the dimple dies, or flared hole dies as some call them are on their way. I should have them before the weekend. The picture above is just an example of what can be done with them and some creativity (disclaimer: that is not my work). I ordered the dies in two sizes - 3/4" and 1-1/2".

:wings:I CAN'T WAIT!!!:wings:​


Mike
 

jerdog53

Explorer
GeoTracker90 said:
IMAG0707.jpg

Well the dimple dies, or flared hole dies as some call them are on their way. I should have them before the weekend. The picture above is just an example of what can be done with them and some creativity (disclaimer: that is not my work). I ordered the dies in two sizes - 3/4" and 1-1/2".

:wings:I CAN'T WAIT!!!:wings:​


Mike


Dimple dies and cherry max rivets it looks like or are they huck clinch?
 

TheGillz

Explorer
Man those are awesome, not knowing what in the world you were talking about I just imagined regular dimples like a golf ball. But that is going to look freaking sweet as the front floor.
 

GeoTracker90

Adventurer
Update 7-7-08

I had to run out to the shop and put a new door-check in my wife's car. I admit it, I couldn't help myself and had to do some work on the trailer.

DSCF5131.jpg


DSCF5133.jpg


DSCF5134.jpg

I tackled the retaining strap for the propane tank. The strap material is a little thicker than what I wanted to use but it is what I had on hand. I started by wrapping the tank with a couple strips of masking tape so that I wouldn't mar it, and then I used the tank as a die to form the strap to the correct radius. A little cut here, a little bend there, a little concentrated heat and filler wire and "ta da" we have a propane tank holder!

DSCF5136.jpg


DSCF5137.jpg

With the dimple dies on the way, I also took a few minutes to begin forming the front decking. This piece is 16" wide and 36" long. The flanges that are bent along the edges will do two things. First, it will allow the pieces that will be on either side to be bolted together. Second, the flange will help strengthen the edges, and the deck as a whole as well. The dimple dies will also lend an element of strength to the sheet metal itself.

More updates to follow this week...

Mike
 

ZR2nit

Adventurer
Cant Wait

I can't wait to see how this trailer is going to turn out. Are you going to put a RTT on top of it??? I saw you mentioned a roof rack.. BTW GeoTracker90 whats your going rate on building a trailer???? PM me please if you don't mind sir.
 

TheGillz

Explorer
ZR2nit said:
I can't wait to see how this trailer is going to turn out. Are you going to put a RTT on top of it??? I saw you mentioned a roof rack..

We do plan on getting a RTT. Probably not this year, as our budget is gone and you are seeing the results. I have tons of plans for it once its in my hot little hands. I'm sure Mike will get sick of my special order requests for metal work over the next few years! :shakin:
 

GeoTracker90

Adventurer
Update 7-9-08

TheGillz said:
I'm sure Mike will get sick of my special order requests for metal work over the next few years! :shakin:

No, not in the least. That would just mean that I have more excuses to spend therapy time in the shop! I spent some more time out there tonight in fact. I was able to get two more segments of the front decking cut and fitted into place from some of the sheet metal drops that I had kicking around.

Sorry though, the pictures will have to wait untill tommorrow night. I have plans to do something cool tommorrow as well. :shakin:

Mike
 

GeoTracker90

Adventurer
Dimple Dies have arrived!! Now if I had the camera here instead of leaving it in the shop. I guess I'll just have to go for a drive.

Mike
 

GeoTracker90

Adventurer
Update 7-12-08 Part 1

The list of things to be done is getting shorter and shorter. Pretty soon this will be ready for powder coating. I must admit that this build has taken a bit longer than I anticipated, thanks mostly to that guy named Murphy.

DSCF5155.jpg


DSCF5153.jpg

I started by making a mock up of the "roof rack" so that I can make any adjustments before bending up the actual rails. I used a left over section of 1" square tubing to figure out the spacing and degree of the bends.

DSCF5156.jpg

I bent the other end of the tube and trimmed it to length to verify how it will look on the trailer. These will be welded to a 2-1/2" wide by 3" long plate of 3/16" steel so that they can be bolted to the trailer. This will also allow them be powder coated in black to contrast against the green of the trailer.

Clark, please weigh in here about the spacing of the rail. Currently they are spaced 1-1/2" off of the top of the trailer by a precision 2x4. If they need to be taller for the future roof-top-tent attachment please let me know and I will make the adjustment when I bend up the actual bars this week.

Now, what about those dimple dies that I was waiting for? See part 2.
 

Forum statistics

Threads
189,957
Messages
2,922,650
Members
233,207
Latest member
Goldenbora
Top