"TrailTop" modular trailer topper building components

jscherb

Expedition Leader
I guess you missed the point above where I said "sitting headroom" and also stated that the sides would not exceed 48". My sitting headroom is 40" so if I used that the ceiling would be about 55" high from the trailer floor. I might add a pop-up in the roof to stand in and have more ventilation. Thinking a big sailboat hatch.

The shelf would be an extension of the top rail of the tub so instead of a 2" surface it would then be 8" wide adding another 16" to the cabin width. The shelves would be welded in place becoming a permanent part of the tub. The width of the floor is not important as long as there is room for my feet and some storage up front. I hope that clarifies a few points.

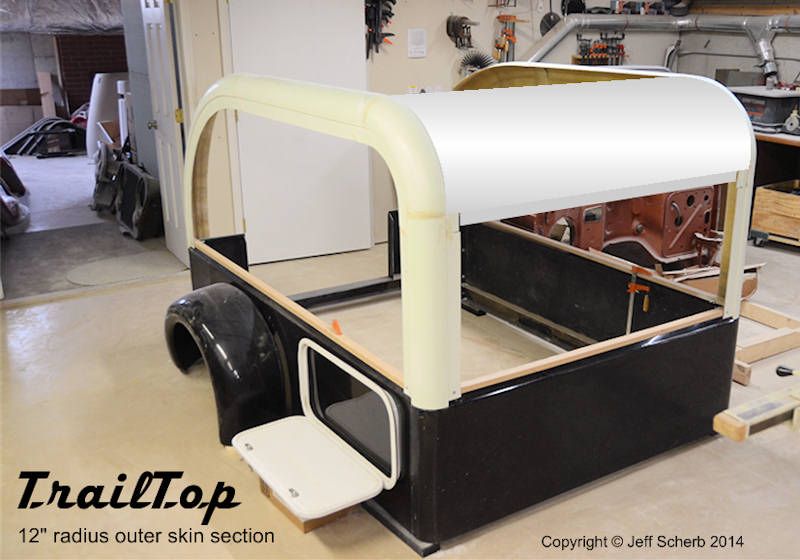
The drawing below is my best understanding of all that you've said, I hope it's close to what you meant.

The shelf is drawn in red for clarity in this drawing, it extends 6" beyond the top rail, making the top rail width 8". The ceiling about 55" from the original floor, which makes the camper top is 40" high. That shelf makes the camper top length 6' 10" (your original trailer's 70" plus 2 x 6" = 6' 10"). I added a pop-up hatch in the roof.

The tires are your 35's.

You also said:

I'd like the front wall vertical so one could sit against that wall for reading, maybe 24-30", then tapered back for streamlining. The rear wall should be vertical to facilitate a full height door.

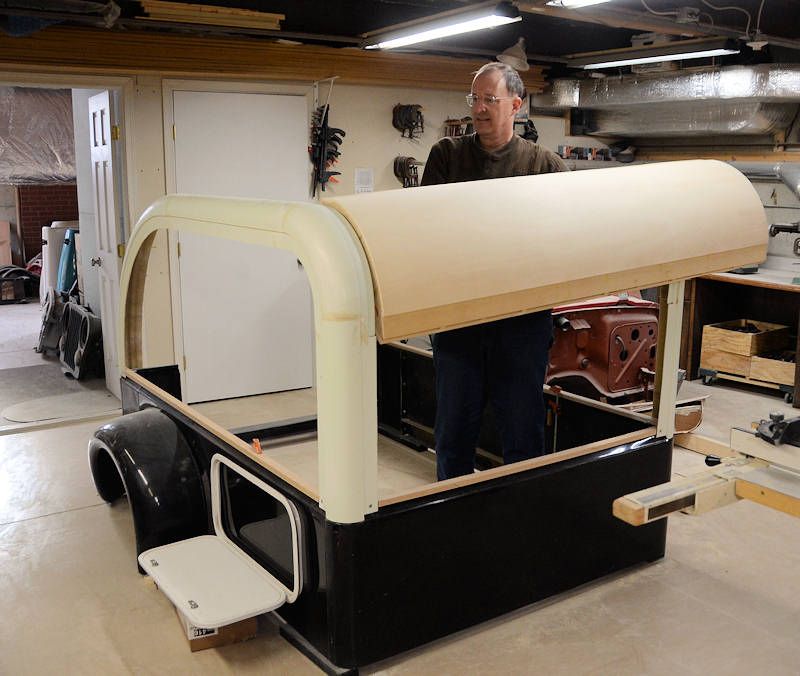
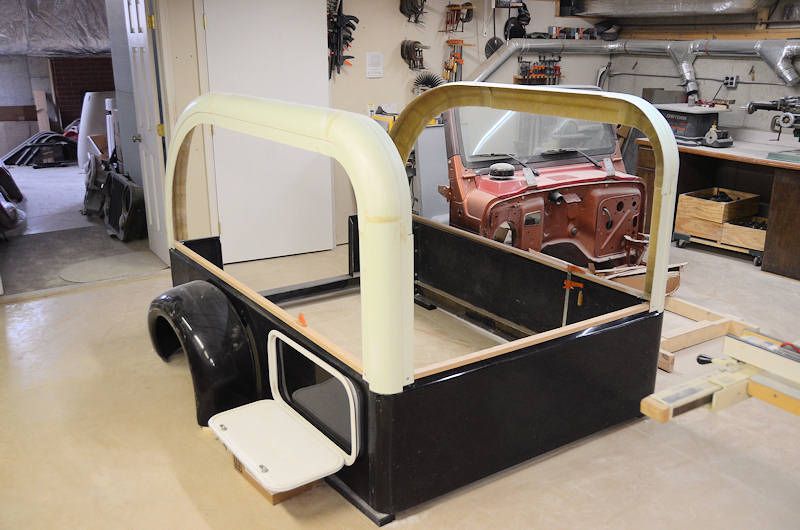
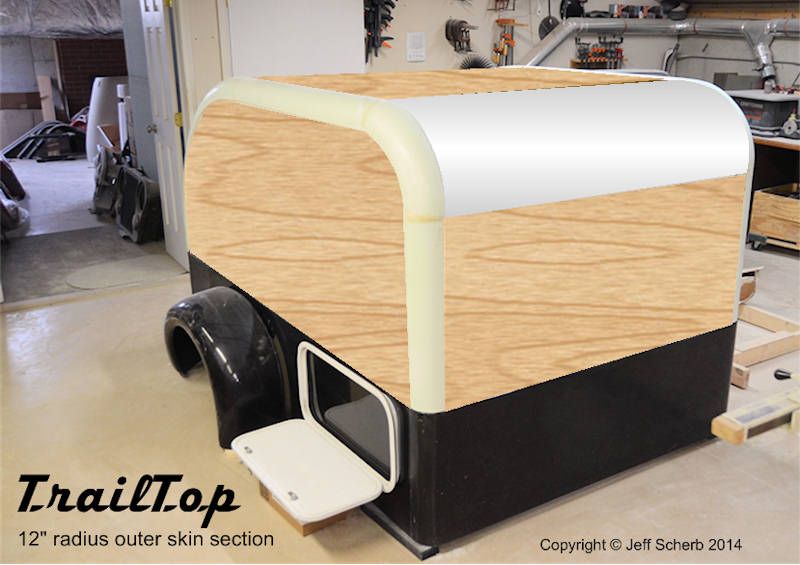
So I've tapered the front wall after about 30", and I've put a full height door in the back.

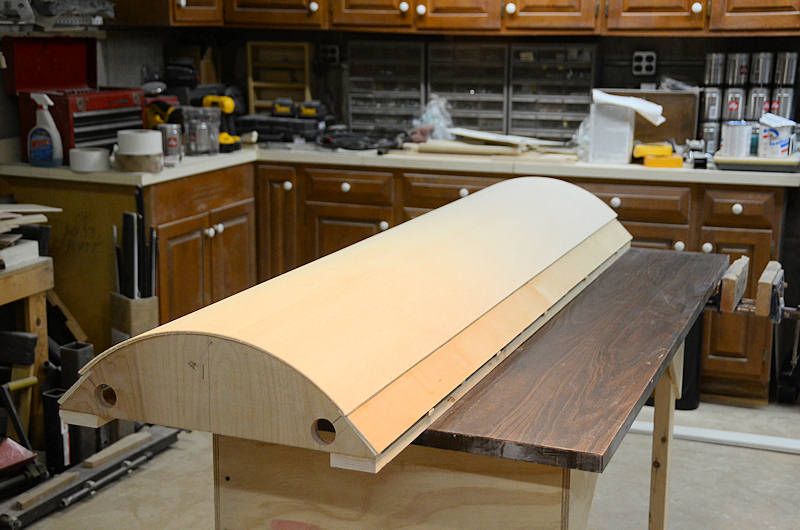
Since the sides of your trailer are diamondplate now, I've sheathed the sides of the camper box in very lightweight and thin (0.045") aluminum diamond plate (http://www.rvsurplus.net/catalog/display.php?product_id=2887) bonded to 1/4" plywood.

I think the drawing below captures what you've said, If I've misinterpreted anything you wrote, let me know and I'll be happy to make adjustments to the drawing.
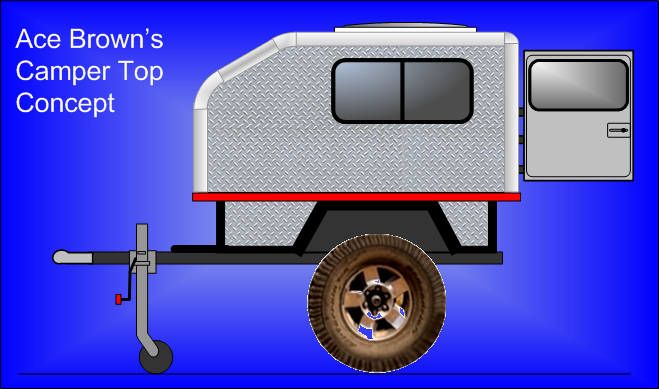
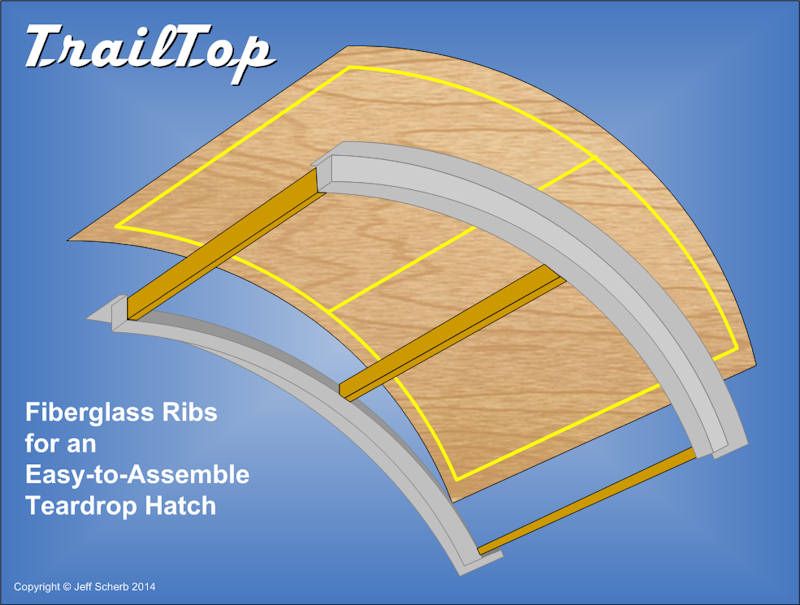
AceBrown1_zps73773987.jpg
 

jscherb

Expedition Leader
A teardrop is beginning to emerge... in these photos I've got both side frames clamped in place on the tub. I've also bolted the sill in place across the front.

SideFramesInstalled1_zps2471b027.jpg


SideFramesInstalled2_zpsdf594caa.jpg


SideFramesInstalled3_zpsda5f5825.jpg


SideFramesInstalled4_zps8fc16f49.jpg
 

Ace Brown

Retired Ol’ Fart
Jeff - I really like what you've drawn up for me. I guess I was not clear on one point. The shelf will not go across the back so the rear of the topper will be flush with the back of the box. One key in my plan is to have a simple rear access door with full height of about 52". Easy to open and close with one hand. So no Dutch doors or other things involving a tailgate and door combo. I just completed a trip to Baja and spent about 70 nights in my RTT and got real sick of messing with the zippers and ladder. The rear would look like the back of a 4Wheel pop-up camper but with the door offset fully to the right so the left side bunk (only one) would not interfere with access.

Very nice of you to provide these concept drawings. Obviously you enjoy doing them. Thanks!

Ace


Sent from my iPhone using Tapatalk
 

jscherb

Expedition Leader
Is the door/hatch on the side something you designed, or an off the shelf item?

It's an off the shelf item, I picked it up the other day at an RV surplus place for $25. I have some ideas for it, I'll write more about it and show some concepts soon.
 

jscherb

Expedition Leader
Jeff - I really like what you've drawn up for me. I guess I was not clear on one point. The shelf will not go across the back so the rear of the topper will be flush with the back of the box. One key in my plan is to have a simple rear access door with full height of about 52". Easy to open and close with one hand. So no Dutch doors or other things involving a tailgate and door combo. I just completed a trip to Baja and spent about 70 nights in my RTT and got real sick of messing with the zippers and ladder. The rear would look like the back of a 4Wheel pop-up camper but with the door offset fully to the right so the left side bunk (only one) would not interfere with access.

Very nice of you to provide these concept drawings. Obviously you enjoy doing them. Thanks!

Ace

Ace,

I'm glad I got it almost right :). Here's a corrected drawing, everything's the same except there's no rear overhang, which makes the length of the camper top about 6' 4", and I've made the door full height. This would be pretty easy to build using TrailTop parts.
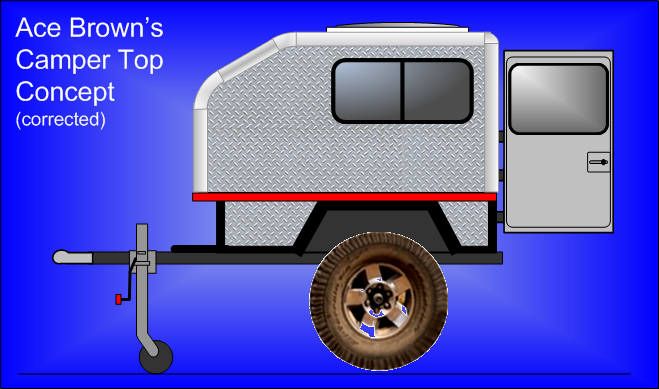
Let me know if you want any other changes to the drawing, happy to do them for you.

Jeff

AceBrown2_zps01dd8823.jpg
 

jscherb

Expedition Leader
I've gotten a few questions from people wondering how much a TrailTop weighs. The TrailTop parts weigh a little less than 1 lb. per foot (14 oz/ft actually), so it's pretty simple to calculate the weight of a TrailTop framework by estimating the number of feet required. 1/4" plywood weighs a little less than 3/4 lb. per square foot, so that's easy to estimate as well. Add a bit more for adhesive, some 1x2 cross ribs to reinforce the plywood, maybe some hardware and paint, and you can come pretty close to the weight for a basic TrailTop shell.

So the equation for TrailTop weight is:

# feet of TrailTop framing * 1 lb./foot

plus

# square feet of plywood * 3/4 lb./foot

plus 10% over that total for misc. things like adhesive, hardware, etc., plus whatever weight you add for windows and other outfitting.

For the purposes of this equation, the 36" radius TrailTop curves count as 5 linear feet, and the 12" radius curves can be calculated at 1.5' each.
 

jscherb

Expedition Leader
Today I'm going to make a mold master for the 12" radius fiberglass outer skin section. I've drawn the part on the photo below:

12RadiusSkin_zps43278be2.jpg


The reason for this part is to spare the DIY-er from having to curve plywood or whatever around the 12" radius smaller curved TrailTop framing parts. This part will go right in place on the 12" radius curves, and it will include flanges for mounting the flat plywood skin panels that joint to it.

This part isn't required, you could do your own curved skin around the 12" radius sections if you wanted, but I figure a lot of DIY-ers would opt for a simple curved piece to install rather than constructing their own curved section.

So with this part, if you were building a teardrop shape, all of the plywood panels would be flat - no bending (well, except for the galley hatch, but more on that later).

12RadiusSkin2_zps6837a197.jpg


I'll be making this part long enough so a 6'-wide TrailTop could be built with it, and like the TrailTop straight rails, it's a cut-to-length part, so it can be used for 4'-wide TrailTops, 5'-wide, etc., just by trimming it to the proper length.


And tomorrow, I plan to begin working on the mold masters for the curved galley hatch ribs. If anyone else has any comments on the hatch design, please post them today so I can accommodate your comments into the mold master if applicable.

TrailTopHatch4_zpsc6b707b3.jpg
 

Pinnacle Campers

Chateau spotter
Just wanted to chime in and express how cool I think this product idea is. I just read the whole thread and I think your concept is great.
On page 2 or 3 I was thinking how easy it would be to adapt this concept to pickup camper shells (for a fraction of a store bought shell). Luckily I was patient enough to see that it was already discussed in the thread. :)
I might be interested in a camper shell concept....

I think you should consider making a sill piece that could be assembled in multiple configurations.
1. With a lip to fit inside a pickup bed.
2. With a lip to fit on the outside taper of your existing jeep tub.
3. With a lip that the floor sits on top of or below.
4. Maybe the same piece could be used as the bracing for the roof or rear hatch for those that wanted to pay the extra expense.
Seems like this could all be done with one cleverly designed piece, and cut to length as desired.
I think it would make the finished product much stronger, more so at times when the unit is removed. Also, moisture always travels down and the sill is the spot that is going to have moisture rot first. Maybe better to have a wood alternative there more than anywhere.
Of course the piece would always be optional.

I know you wanted to keep this "on topic" but their are so many other uses for your concept, like custom storage boxes, kennels, chuck boxes....and I'm sure many others, even the kitchen drawer in some of your concepts could utilize these parts for a simple, lightweight, aesthetically pleasing drawer/shelf/box.

Additionally, a potential website idea, once you configure your trailer/parts online, even if you were not a DIY'er (or didn't have the time) you could click "Enter zip code for a list of "builders" in your area" as a carpenter and remodeling contractor I could see building a few of these on the side. :) The builder would potentially have a site of their own showcasing local builds, would accept the shipped parts on behalf of the owner and work with them on options.

Thanks for listening, and keep up the great work!
 
Last edited:

jscherb

Expedition Leader
Just wanted to chime in and express how cool I think this product idea is. I just read the whole thread and I think your concept is great.
On page 2 or 3 I was thinking how easy it would be to adapt this concept to pickup camper shells (for a fraction of a store bought shell). Luckily I was patient enough to see that it was already discussed in the thread. :)
I might be interested in a camper shell concept....
Thanks!

I think you should consider making a sill piece that could be assembled in multiple configurations.
1. With a lip to fit inside a pickup bed.
2. With a lip to fit on the outside taper of your existing jeep tub.
3. With a lip that the floor sits on top of or below.
4. Maybe the same piece could be used as the bracing for the roof or rear hatch for those that wanted to pay the extra expense.
Seems like this could all be done with one cleverly designed piece, and cut to length as desired.
I think it would make the finished product much stronger, more so at times when the unit is removed. Also, moisture always travels down and the sill is the spot that is going to have moisture rot first. Maybe better to have a wood alternative there more than anywhere.
Of course the piece would always be optional.

A fiberglass sill piece is a good idea. I think maybe that's a part that should be in a second phase of development of this concept - what I mean by that is if a company signs up to take the TrailTop system to market, maybe it would be with the basic pieces I've already made molds for, and extra things like a sill piece could be done after they get some sales under their belt and get some experience with what types of things people are building with the parts.

I know you wanted to keep this "on topic" but their are so many other uses for your concept, like custom storage boxes, kennels, chuck boxes....and I'm sure many others, even the kitchen drawer in some of your concepts could utilize these parts for a simple, lightweight, aesthetically pleasing drawer/shelf/box.
You're not the first one to suggest dog kennels... at first I was thinking wow, do they think my nicely styled TrailTop concept drawings look like dog kennels? :Wow1: But I know what you mean.

Additionally, a potential website idea, once you configure your trailer/parts online, even if you were not a DIY'er (or didn't have the time) you could click "Enter zip code for a list of "builders" in your area" as a carpenter and remodeling contractor I could see building a few of these on the side. :) The builder would potentially have a site of their own showcasing local builds, would accept the shipped parts on behalf of the owner and work with them on options.
That's a good idea for a company that might bring this to market.

Thanks for listening, and keep up the great work!
Thanks for taking the time to write such useful and thoughtful comments.
 

jscherb

Expedition Leader
Here are a few shots of the work yesterday to make the mold master for the 12" radius skin piece.

Clockwise from upper left - the basic frame; adding the recessed flanges for attaching the adjacent side/roof panels; the first layer of 1/8" plywood going on; the second layer of 1/8" plywood going on:

12RadiusMaster1_zps4e5d6369.jpg


The woodworking finished:

12RadiusMaster2_zps0c59f5d5.jpg


Now it needs a little filler, sanding and a nice finish and then it'll be ready to have a mold made from it.

Playing around with it:

12RadiusMaster3_zps8881dd6e.jpg


This camper is 5' wide, but this part can make campers up to 6' wide, it's a cut-to-length part.

And I've gotta say, given the choice of building my own curve from scratch or simply grabbing the fiberglass part, trimming it and installing it, there's no way I'd choose to build the curve myself - the fiberglass part will be sooooo much easier to work with :).
 

Forum statistics

Threads
186,819
Messages
2,889,524
Members
227,160
Latest member
roamingraven
Top