You are using an out of date browser. It may not display this or other websites correctly.
You should upgrade or use an alternative browser.
You should upgrade or use an alternative browser.
Unicorn on the Ocean - 1120AF Coming to Canada
- Thread starter whomisi
- Start date
whomisi
Active member
Yes it's odd, that length is going to clash with two cross members, and some reinforcing on the inside at the spring mount. In that case they say to weld onto any other reinforcing you find along the way.The 500 units on each side is interesting.
500mm is almost 20 inches on either side of the frame filler. That makes the scale look funny. Like the frame is 24 inches deep.
And I suspect I need too add a cross member, but I'm unsure on the spacing requirements there. I may add one that holds the hydraulic winch pump anyway with a short driveshaft to the PTO.
Yeah perhaps, they'll certainly be there in case a weld fails! I don't think big structural steel stuff has any of this when they butt weld sections together. So I feel like the angles are the backup. They're not as wide as the frame and certainly not as tall. There is a fair amount of welding detail, plus they call for qualified persons. That means the welding specifications are defined in those standards.The 1996 Turkish manual at section 4.2 and 4.3 gives drilling dimensions too. They seem more concerned about hole placement than welding type or quality. I wonder if the bolt in angle plates are doing the real work.
Sitec
Adventurer
Hello! What a clean tidy & cool truck you've managed to find! As other's have said, that larger cab is brilliant and something we'd have loved on ours! I wouldn't rush to extend the chassis, because the longer the chassis, the more work the subframe has to do. I built a rear bumper and spare wheel carrier off the back of our chassis that has the spare wheels sitting behind/under the body but carried by the chassis. I've incorporated a forklift style mast so we can lower the rear 'bumper' and wheels down to a more manageable height, because I was told early on that whatever I can do on the truck, my wife needs to be able to do (tip cab, change wheel, drive etc) in case of an accident when remote. We'll be following your build with interest! 
Geo.Lander
Well-known member
That hydraulic pump is massive! Good progress, feels really good getting the FD box off I know, next step is stripping off the redundant wiring, we had about 60kgs worth!Finally a big step, pulling the rear box. A bit sketchy unloading it in a soggy back yard with hi lift jacks, but now I have a big red shed! Boy was it a tight fit getting it back there.
Next steps are removing the generator, relocating the hydraulic pump, and extending the frame.
Does anyone have details on a hydraulic pump connected straight to the PTO? Mine runs off the back of the generator.
And anyone had their frame extended? I'm curious where others cut it and how they add the reinforcement called for in the Mercedes builders guide.
View attachment 823866
View attachment 823867
View attachment 823868
View attachment 823869
whomisi
Active member
Hello! What a clean tidy & cool truck you've managed to find! As other's have said, that larger cab is brilliant and something we'd have loved on ours! I wouldn't rush to extend the chassis, because the longer the chassis, the more work the subframe has to do. I built a rear bumper and spare wheel carrier off the back of our chassis that has the spare wheels sitting behind/under the body but carried by the chassis. I've incorporated a forklift style mast so we can lower the rear 'bumper' and wheels down to a more manageable height, because I was told early on that whatever I can do on the truck, my wife needs to be able to do (tip cab, change wheel, drive etc) in case of an accident when remote. We'll be following your build with interest!
Thank you, and yes I saw your wheel carrying system and was studying with great interest! I plan to either suspend my spare wheel from the chassis, or subframe. I don't like the idea of it hanging on the box itself. I only have one spare, so a little more managable.
I wish I could leave the chassis as it is, but we would be limited to 16ft of box, and I can't make a floorplan work for a growing family of 3+dog. Unless I did a rising roof, and at that point an extension is better. We want 18ft box, with bunk beds at the back and a lowering bed over the dining table at the front. But we're a little way away from making that final plan, so many things to decide on!
You may be looking at the 30kw 3 phase generator, in red? The pump is fairly compact and hangs off the back, I need to move it so it bolts directly to the PTO without a driveshaft big enough to push a car like the generator needed!That hydraulic pump is massive! Good progress, feels really good getting the FD box off I know, next step is stripping off the redundant wiring, we had about 60kgs worth!
That is a serious amount of wiring, I don't think we have that much, I pulled a lot before the box came off. Certainly need to strip lots of air lines for trailer brakes, simplify those circuits as best I can. Maybe move air tanks around, source fuel tanks to hang up front. I'm shooting for 2x200l. Then there is a new battery box since it was inside the rear box, in which I will also install the tilt pump mechanics and perhaps some other mechanical items that can live in a vented box. Oh and remove the auto tyre chains.... oh boy oh boy is this a long road haha.
whomisi
Active member
The teardown phase is just about complete, next step is cutting the frame for the extension. I need to source some material that matches the specs, European standards versus Canada makes that a little challenge but I have the help of a well qualified welder.
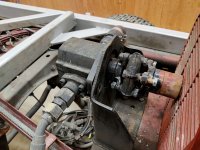
I still can't get over how clean this truck is, the brake shoes still have paint on the.
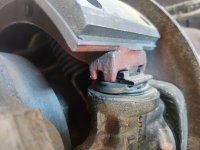
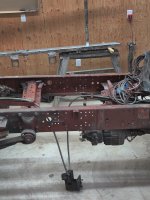
Apart from forgetting to unwind the mega winch, the chassis stripping was easy. Air system including removing trailer brake valves, giant pintle hitch, fuel tank, subframe, wiring, all pulled out. I had to plumb the winch back in to unwind it by manually turning the pump.
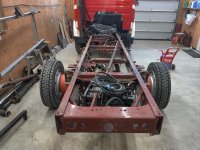
Next step is to make some frame stands, get the material and bend it before welding in. Then I'll add the reinforcement and build an extra cross member. This will also hold the air tanks as I'll move those inboard.
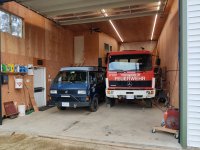
That awkward moment when the old van meets the new truck...
What do people do for exhaust exit? I'm going to ditch the stack and don't want to go right to the rear. Where does yours exit? Pics appreciated.
I still can't get over how clean this truck is, the brake shoes still have paint on the.

Apart from forgetting to unwind the mega winch, the chassis stripping was easy. Air system including removing trailer brake valves, giant pintle hitch, fuel tank, subframe, wiring, all pulled out. I had to plumb the winch back in to unwind it by manually turning the pump.

Next step is to make some frame stands, get the material and bend it before welding in. Then I'll add the reinforcement and build an extra cross member. This will also hold the air tanks as I'll move those inboard.

That awkward moment when the old van meets the new truck...

What do people do for exhaust exit? I'm going to ditch the stack and don't want to go right to the rear. Where does yours exit? Pics appreciated.
Geo.Lander
Well-known member
The teardown phase is just about complete, next step is cutting the frame for the extension. I need to source some material that matches the specs, European standards versus Canada makes that a little challenge but I have the help of a well qualified welder.
I still can't get over how clean this truck is, the brake shoes still have paint on the.
View attachment 830705
Apart from forgetting to unwind the mega winch, the chassis stripping was easy. Air system including removing trailer brake valves, giant pintle hitch, fuel tank, subframe, wiring, all pulled out. I had to plumb the winch back in to unwind it by manually turning the pump.
View attachment 830702
Next step is to make some frame stands, get the material and bend it before welding in. Then I'll add the reinforcement and build an extra cross member. This will also hold the air tanks as I'll move those inboard.
View attachment 830703
That awkward moment when the old van meets the new truck...
View attachment 830704
What do people do for exhaust exit? I'm going to ditch the stack and don't want to go right to the rear. Where does yours exit? Pics appreciated.
Do you have the MB chassis builder guide? Extending members are bolted not welded in the guide, and in the EU it is not allowed to weld directly to the chassis at.
Our new exhaust exits right down under the air tanks facing down as opposed to the side. I can get a picture later.
whomisi
Active member
I do yes, and I think I've got my head around the process. The bolted in portion is the reinforcing/backup angle parts that extend 500mm past the extension weld.Do you have the MB chassis builder guide? Extending members are bolted not welded in the guide, and in the EU it is not allowed to weld directly to the chassis at.
Our new exhaust exits right down under the air tanks facing down as opposed to the side. I can get a picture later.
A picture would be great thank you, I've noticed a lot of commercial box trucks have their exhaust do the same. But I'm thinking if it points out I can keep an eye on exhaust colour and it won't stir up as much dust. I think I'll have it exit just ahead of the rear wheel.
Trail Talk
Well-known member
View attachment 811562Here’s mine.
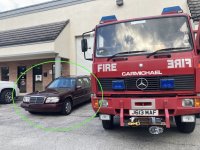
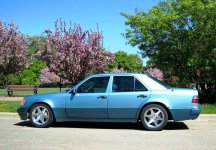
I've always admired the overlanding Mogs we run across on our travels in northern Canada. But speaking of OT, I can't get over this W124 wagon! Is it yours?
Trail Talk
Well-known member
Geo.Lander
Well-known member
I do yes, and I think I've got my head around the process. The bolted in portion is the reinforcing/backup angle parts that extend 500mm past the extension weld.
A picture would be great thank you, I've noticed a lot of commercial box trucks have their exhaust do the same. But I'm thinking if it points out I can keep an eye on exhaust colour and it won't stir up as much dust. I think I'll have it exit just ahead of the rear wheel.
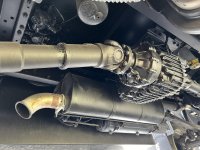
Here she is, pretty simple stuff, although Ive not had her on really dry dirt roads yet...
whomisi
Active member
Thank you for that, certainly would be the easiest and least intrusive option, I'll see how packaging our storage boxes goes and what room I have. Our boxes will likely be mounted to the subframe so they'll move with the habitat, but I'm not 100% on that yet. Might suspend them from the chassis rails.
Here she is, pretty simple stuff, although Ive not had her on really dry dirt roads yet...
View attachment 831894
whomisi
Active member
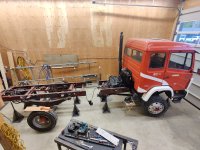
No going back now! I built 8 very tall adjustable frame stands, made lots of measurements and scribe marks along the chassis rails and sent it with a zip disc. Intimidating stuff.
Now I'm getting the extension segments made, as well as the internal stiffeners, then stitch this machine back together. The bend radius needs matching, which affects the flange lengths... trial and error to get the profile dialled in.
Lots of stringlines and straight edges will be required to ensure this all lines up just right. I couldn't find much detail online about this process so I'll document it fairly heavily in the hopes it helps someone else foolish enough to do this.
In Canada at least, finding identical material to the frame has proven impossible, so I went down the rabbit hole of learning about High Strength Low Alloy steels, grades and composition. For my chassis I've landed on the Canadian spec "350W" in 1/4 inch. It seems interchangeable with A572 Grade 50. They are a little higher in carbon content than the original material, and 10% lower in yield strength. However, I've seen test reports showing that the actual measured strength exceeds the minimum. Also, 1/4" is 6.35mm whereas my chassis is 6.0mm, but I'm calling it close enough. My second feasible option was a grade 80 material, far exceeding the strength of the stock material, which gave rise to concern about welding compatibility and failure of the weld. So I've decided a little less is better than a lot lot more. On top of all this will be the stiffening double skin frame overlapping bits.
And it's a bit overdue but the CAD model has finally been started, including a pretty poor quality 3D scan performed by my drone...
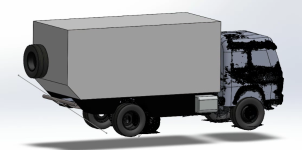
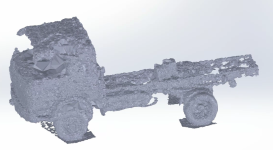
Now I'm getting the extension segments made, as well as the internal stiffeners, then stitch this machine back together. The bend radius needs matching, which affects the flange lengths... trial and error to get the profile dialled in.
Lots of stringlines and straight edges will be required to ensure this all lines up just right. I couldn't find much detail online about this process so I'll document it fairly heavily in the hopes it helps someone else foolish enough to do this.
In Canada at least, finding identical material to the frame has proven impossible, so I went down the rabbit hole of learning about High Strength Low Alloy steels, grades and composition. For my chassis I've landed on the Canadian spec "350W" in 1/4 inch. It seems interchangeable with A572 Grade 50. They are a little higher in carbon content than the original material, and 10% lower in yield strength. However, I've seen test reports showing that the actual measured strength exceeds the minimum. Also, 1/4" is 6.35mm whereas my chassis is 6.0mm, but I'm calling it close enough. My second feasible option was a grade 80 material, far exceeding the strength of the stock material, which gave rise to concern about welding compatibility and failure of the weld. So I've decided a little less is better than a lot lot more. On top of all this will be the stiffening double skin frame overlapping bits.

And it's a bit overdue but the CAD model has finally been started, including a pretty poor quality 3D scan performed by my drone...


MogsAndDogs
Active member
Wow, that is intense. I am not sure I could get the nerve to cut into my frame. Impressive.
Similar threads
- Replies
- 6
- Views
- 984
- Replies
- 5
- Views
- 2K
- Replies
- 2
- Views
- 2K

