Anyone got any details of the how you seal the edges - my fuel tanks have a pressed steel end cap - if I was bending the tank, how would I fold the edge so they don't leak, or do you just rely on the weld in the corners?
I would love to see some photos of the whole fabrication process.
Yes the weld is the bit that holds it all together but the folds give it extra strength over just straight welded corners. That's why we do lap joints instead of butts. Every time you can put a fold into sheet metal you make it stronger.
If the tank was just a conventional rectangular box we would make the main body into a hollow cylinder out of two halves and then weld end caps in. The halves of the main body can either be joined halfway along the sides, ie; 2x "U" shaped pieces, or along opposite edges, ie; 2x "L" shaped pieces. These bits would have a 10mm fold along the edges to give a lap joint instead of a butt joint. The "U" pieces for example would end up looking like a "C" section purloin in your shed. The "L" pieces would only have one folded edge because the join is on the edge.
Typically we would use the "U" method when using thicker materials like 4mm plate alloy fuel tanks for survey boats. For a SS water tank we use the "L" method.
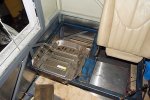
All of the baffles would be made like a cake tray with the corners cut off. The end plates would be the same as the baffles except they don't have the corners cut off.
We would assemble the two "L" (in this case) pieces together to make a hollow cylinder. Then we would push in the baffles and weld them in. Last we would weld in the end plates. We normally weld in the fittings, fillers, pickups, sender units, etc before welding the ends on.
In your case with the "weird" shapes needed it would be a case of making the hollow cylinder main body the weird shape and then have all the baffles and end plates the same. You could make say a "L" and a "V" or whatever and join them together.
If the shape was really weird ie; tapered two different ways or cutouts to clear various components you would have to use different methods. Cutouts are relatively easy, just chop out the bit you need to get rid of and fill in the gap (trying to keep the joins lap joints). If it has different tapers or whatever it might be easier to split it up into smaller more symmetrical pieces and join them together. Then it would be a case of breaking out the cardboard and seeing what you can do by making trial model.
Sorry I don't have any photos of construction. We aren't making any right at the moment either. It might be weeks or months before we do the next one.
I hope I'm not baffling you (small tank manufacture pun) too much with my descriptions. If you can post up some pics of the weird spot you want them to fit in I might be able to help you a bit better. I might even be able to draw up a couple of designs for you.