1993 HiAce Firetruck Build Thread

Pntyrmvr

Adventurer
I have explained builds like this to non technical people.

The builders have a large and varied skill set to draw from. It is the first time we have put those skills to use on this type of project. There will be a thinking phase, a design phase, an engineering phase, and a construction phase. Each one will require some amount of trial and error. We expect that.

The NEXT time we build this type of project our knowledge gained will allow a much faster outcome.

Many of us will spend years refining the first project and never build a second one. I am determined to build the second project even if on the same chassis.

Best wishes on this unique build. I like it.
 

Fenderfour

Active member
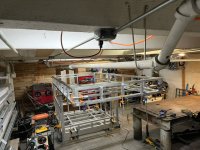
I had time to do some work this weekend. I had hoped to get the upper section of the camper frame welded up. With the exception of correcting one mistake on a panel, exactly 0 welding happened. Instead... I learned some things.

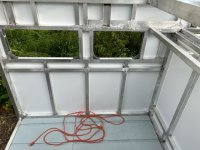
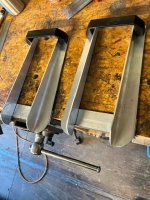
1. even a small camper is big.
image0(20).jpeg

Once clamped up in my shop, it was clear I wasn't going to rotate it to it's side to make welding easier or to navigate some corners down the hall. The beams were 2" too low for rotation on the smallest dimension. Well, ok... what If i re-clamp it on it's side and do a little extra out-of-position welding? There are two tight corners between the shop and freedom, and they are a left then a right. The camper could make either turn -if- the cabover is pointing the correct direction, which is one way for the left and the other for the right, and I already discovered I can't roll the welded frame in the hallway. so...

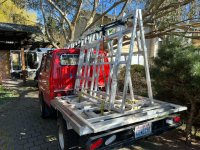
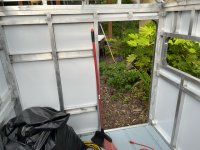
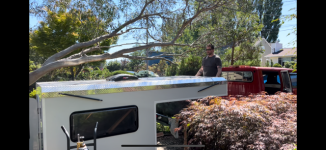
2. People stare when you are hauling a load of crappy ladders

image1(16).jpeg

Saturday traffic was bad due to highway closures, good weather and... whatever. I loaded the truck with the frame pieces with a plan to finish welding the frame in my driveway.

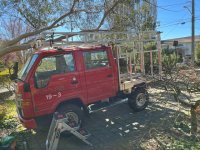
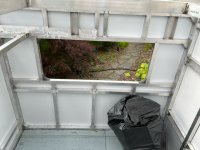
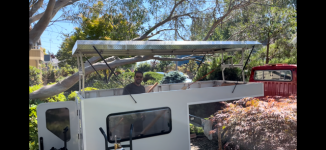
3. This stuff always takes waaay longer than you think.

image1(15).jpeg
I thought I would be able to get the camper clamped up on the truck and welded on sunday. It took a very long time to get the camper clamped and (sorta) squared. I noticed a large gap at the front of the cabover. The roof brackets were floating above the gutter. I then had to make some spacer washers for the 8 bed mounts to get everything to line up. I have plenty of tools at home, but no real shop, so that took a while. I also had to rummage around to find some appropriate material, etc... before I knew it, it was time for dinner and I hadn't even hooked up the welder. Of well.

After I did a little trial and error with the spacers, I had the cabover landing nicely on the gutter with no gap. -phew-

There was a problem with the pinch welds on the back of the cab. One stuck out far enough to interfere with the fwd wall that sits behind the truck cab. A couple will interfere with the ACM skin I will be adding later. Now to decide if i should cut them or pound them over....

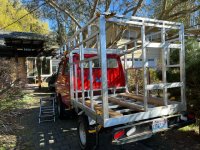
4. The camper is all at once bigger and smaller than expected.
image0(19).jpeg

I have a long history working on large projects in CAD, and nothing quite compares to standing in front of the parts that are starting to look like what's been in your head for months.
 

allochris

Adventurer
I had time to do some work this weekend. I had hoped to get the upper section of the camper frame welded up. With the exception of correcting one mistake on a panel, exactly 0 welding happened. Instead... I learned some things.

1. even a small camper is big.
View attachment 824958

Once clamped up in my shop, it was clear I wasn't going to rotate it to it's side to make welding easier or to navigate some corners down the hall. The beams were 2" too low for rotation on the smallest dimension. Well, ok... what If i re-clamp it on it's side and do a little extra out-of-position welding? There are two tight corners between the shop and freedom, and they are a left then a right. The camper could make either turn -if- the cabover is pointing the correct direction, which is one way for the left and the other for the right, and I already discovered I can't roll the welded frame in the hallway. so...

2. People stare when you are hauling a load of crappy ladders

View attachment 824959

Saturday traffic was bad due to highway closures, good weather and... whatever. I loaded the truck with the frame pieces with a plan to finish welding the frame in my driveway.

3. This stuff always takes waaay longer than you think.

View attachment 824971
I thought I would be able to get the camper clamped up on the truck and welded on sunday. It took a very long time to get the camper clamped and (sorta) squared. I noticed a large gap at the front of the cabover. The roof brackets were floating above the gutter. I then had to make some spacer washers for the 8 bed mounts to get everything to line up. I have plenty of tools at home, but no real shop, so that took a while. I also had to rummage around to find some appropriate material, etc... before I knew it, it was time for dinner and I hadn't even hooked up the welder. Of well.

After I did a little trial and error with the spacers, I had the cabover landing nicely on the gutter with no gap. -phew-

There was a problem with the pinch welds on the back of the cab. One stuck out far enough to interfere with the fwd wall that sits behind the truck cab. A couple will interfere with the ACM skin I will be adding later. Now to decide if i should cut them or pound them over....

4. The camper is all at once bigger and smaller than expected.
View attachment 824982

I have a long history working on large projects in CAD, and nothing quite compares to standing in front of the parts that are starting to look like what's been in your head for months.
Amazing! That feeling of awe looking at a naked camper frame takes me back to 2007 on a driveway in Montreal!!! Congrats!!!
 

Fenderfour

Active member
I've continued work on the camper frame, but it's not exciting work. It's chamfer, clean, weld, grind, repeat. Not really anything to show pictures of. Ruminating more on the nature of large projects, most of the time working on something isn't progress pics that anyone but you cares about, it's repetitive work that slowly builds to a whole; also known as the time that gets edited out by the youtube content creators.

I've gotten all of the panels welded together. Most of those welds are cleaned up. I still need to come back with the die grinder to clean up welds in tight areas. Since I'm terrible at overhead welding, I pulled the frame off the truck and flipped it on its side to finish backside welding on some of the panels.

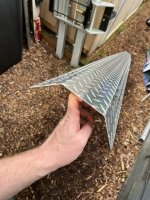
I have the pop-up roof started. The 12' x 6' rectangular frame is welded and the rafter assemblies are almost ready to attach to the frame. I'm using some pre-bent aluminum diamond plate for the top leading corner of the camper roof. It's 3" vertical, 3" at 45 degrees and 3" horizontal. I need the rafter assemblies to match that profile, so I built them with square ends, to do a final trim to match the diamond plate. These pieces allow me to use one large piece of ACM on the roof, avoiding a seam and opportunities for leaks.

It's raining here in Seattle for the next few days, so I'll not be working on much, but I'm hoping to have this thing ready for NWOR in June.
 

Ptron

New member
It seems like a big part of modern overlanding is spending money to make the coolest looking rig, the most luxurious, the -istiest ride we can. I'm going a little differently. Building a rig on a JDM platform is plenty expensive for me, so I'm cutting costs where I can. I've had my eye on a set of 15" aluminum wheels that will save ~10 lbs at each corner. They are very modestly priced at $170 per wheel, but that's $700 I can spend on better materials, so I've put it off. I just happened to be browsing marketplace and someone nearby had a used set of the same wheels for $100. Sure, they are a little dinged and need a polish & seal, but at $100, they can't be beat.

View attachment 819632

I didn't check before getting them installed, but I think my old rims were 0 or +8 offset. I think these are -38mm offset, so they stick out a little. I like the wider stance. I do need to trim that forward step a little. The tires rub a bit.

Also, the shop I had install them used an ummm... interesting method to jack up the truck...

View attachment 819633

A tripod is stable, right?
😂😂 as long as you don’t take a corner fast!!
 

Fenderfour

Active member
It's been a while since I posted here. Things I've gotten done:
Bought Coosa board for the floor and bed platform. It's glass fiber reinforced polyurethane foam, used in boat building as a plywood replacement in transoms. It's expensive, but will not rot and only absorbs a tiny bit of water, precluding most mold issues.

It took a while to figure out how I was going to attach the boards to the frame. I wanted some kind of blind fastener so I didn't need to have a helper under the truck holding a nut. There are options like Nutserts or rivnuts, but I needed a little bit of float on the fasteners so I can hit the holes. I settled on clip nuts (u-nuts). They have a little retention device that fits in a 10mm hole (for a 6mm fastener). I wanted a little float, so I can pull that hole to 11mm and not affect the nut. The threaded portion of the nut is squeezed a little to act as a locking feature. This is common in the aircraft industry.

I cut and drilled the coosa board, creating a lot of unpleasant dust. I painted the boards to reduce fiberglass splinters and dropped them in. The floor in the camper has 6 Ltracks from fore to aft to be used as the primary mounts for any cabinetry I add later. The floor is held in by a bunch of 6mm screws through these tracks into clipnuts underneath.

There was an issue with window sizing. I'm using arctic tern windows, and I thought I could fit a 300x700 under the bed platform overhang inside the camper, but there was no space for the shade assembly on the inside. I did some measuring, and I could easily mod the window opening for a 300x500 window just by adding a new vertical brace, and everything else would fit. I was able to exchange the window at Tern Overland, which was great. It wasn't free, but it was worth the effort.

All of the welds have been ground and cleaned up. I can get the material to stick together, but it's not always pretty. I had to add a bunch of little mounting points throught the frame for lift mechanism bits, external mounts, lighting, etc... It took forever to figure out and get together.

I've been perseverating over the lift mechanism. My first idea was to use a smallish boat winch hooked up to a scissor lift. I would run the cable from the sides of the pop-top to the back of the camper and the winch would pull up the pop-top. I liked the mechanical aspect of this design, no power, simple, etc... but routing the ropes would be tricky and would leave them exposed in the camper. The slides also take up space in the interior, and need a bunch of extra bracketry to attach to the primary structure.

The next idea was a couple of linear actuators pushing the scissor mechanism to open the top. This solved the rope routing issue but introduced the need for power, mounting large actuators, custom brackets, careful alignment, etc...

I'm starting to think about a set of gas struts and a simple locking lever mechanism inside. It's tried and true and relatively easy. I don't like having the gas struts hanging outside the truck to create wind resistance and maybe get scraped off by a low-hanging branch, but it's looking like a pretty good compromise. There's a reason most of the big companies do it this way.

If I can find some dry weather in Seattle, I will start skinning the camper. All the welding is done and cleaned up. All the windows and doors test fit. I guess I still need to create fillets for the window openings, but that's easy.
 

rruff

Explorer
Bought Coosa board for the floor and bed platform. It's glass fiber reinforced polyurethane foam, used in boat building as a plywood replacement in transoms. It's expensive, but will not rot and only absorbs a tiny bit of water, precluding most mold issues.
I kinda wish I'd bought that to build my underbed storage boxes... instead of expanded PVC with wet layup of fiberglass. Somehow I never learn to make my tasks easier. Coosa is expensive, especially if you need to have it shipped.

I'd just use plywood for interiors, but that's me... I don't live in humid environments.

Did you buy it locally? Cost?
 

Fenderfour

Active member
I kinda wish I'd bought that to build my underbed storage boxes... instead of expanded PVC with wet layup of fiberglass. Somehow I never learn to make my tasks easier. Coosa is expensive, especially if you need to have it shipped.

I'd just use plywood for interiors, but that's me... I don't live in humid environments.

Did you buy it locally? Cost?
I spent a lot of time trying to find a weather proof decking material for the camper floor, and I couldn't find anything that was weatherproof and less expensive than coosa. I even looked at some plastic and composite deck materials. Adding seals between the boards was a tough design problem and the cost wasn't much different. I was very close to doing something with plywood, but got an unexpected raise, so went with the good stuff.

I live in Seattle and there is a large boating/boat building community here. I went to Fisheries Supply which is a few miles from my home. A 4x8x3/4 24# density board was $320 + tax. I needed 4 for the support layout on the bed platform and the floor, which is a lot of extra. I may use it to build cabinets because I have it, but will most certainly build a temp layout with plywood.

Working with coosa isn't pleasant. The fibers come out of the foam fairly easily when cutting. You need a mask and really good dust collection (which I didn't have). The final structure needs to be painted/sealed to prevent glass itchiness.

As an aside, Fisheries has a lot of great stuff for camper building. Galley equipment is better quality than most overlanding stuff, power systems, composites, glues, seals, etc...
 

Fenderfour

Active member
Seattle had a break of nice weather late last week and into the weekend. I took the time to get some things done.

image1(13).jpeg image0(17).jpeg

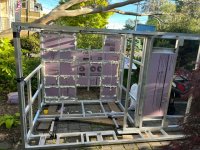
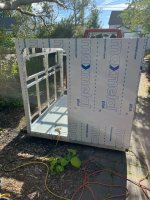
Thursday/friday I insulated the floor with 1.5" XPS foam. The floor structure is fairly complicated with 6 pieces of L-track connecting through the camper floor to hold the interior in. I needed access from both sides to get the foam in. Luckily the frame only weighs ~230lbs, so I was able to tip it over on my own. The foam took a while to cut and trim around all of the brackets and attach points, but it's there and I used expanding foam to fill around the panels.

Under that, I added a layer of Filon fiberglass RV siding to protect the foam from road debris. The filon is tucked between the foam and the frame where possible, then glued in with a urethane adhesive.

image0(18).jpeg image1(14).jpeg

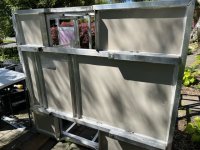
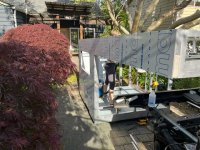
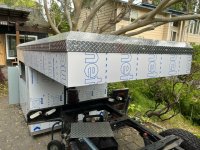
Saturday I had time to get two faces covered in ACM. I found some 5'x12' sheets that I could have delivered and designed around that. The length of the camper + overhang is 12', so i don't have to manage a seam anywhere except the bottom of the overhang. I had a few friends help manage the large sheets and it was invaluable.

image2(9).jpeg image3(9).jpeg

image4(6).jpeg

Sunday was spent getting two more sides on. I'm using VHB tape to mount the panel, then I'm trimming the panel with a flush trim bit in a router. It's messy as hell, but all the panels fit perfectly.
 

Fenderfour

Active member
It was a mostly wet weekend in Seattle. I spent a little time trying to fix a couple of misaligned clip nuts in the floor. I was able to grab one with a sharpened bolt and get it aligned for the countersunk screw. The other one just won't grab. Oh well. I'll have to pull all 6 seat tracks and both floor panels to get in and replace it. It's just how things go.

Sunday was sort of dry and I spent some time looking at my dwindling supply of aluminum to design and build a simple hinge lift system, sort of like the old vanagons has. It's just two frames connected with a piano hinge attached to the frame with more piano hinges. I'm feeling pretty good about how little material is left in my pile. It's easy to over or under buy that sort of thing.

I did get the frames built and the welds ground flat. These frames are pretty much the only welded components that will be exposed to the cabin and I want them to look and feel nice. There will be a fair amount of time spent sanding an finishing before they go in.

I also managed to find a local guy on craigslist to bend some .045 al diamond plate into corners for the roof. I bought 3 pieces of 10' pre-bent plate only to find out they were not 10' but 100". I should be bothered by this, but they were really cheap. I also bought some 100" long pieces of flat plate so I have the same material to fab a fourth piece of the corner material.

My goal is to use the camper on July 13. I still need to assemble the roof, order and install corners on the exposed edges, design and sew the tent, install the lift and remount the camper on the truck. I think I can get it done.
 

Fenderfour

Active member
More progress this weekend. I designed the camper to be small and lightweight. This was to not overburden the very small engine, retain some offroad capability, and also to eliminate the need for seams in the roof and sides. I found some 5'x12' sheets of ACM at Grimco. My truck is 67" wide, not 60" wide, so I still needed something to make up the extra width.

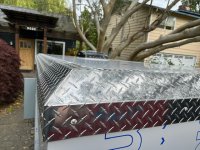
I've been scanning CL and FB Marketplace for material deals and I found a guy selling aluminum diamond plate corners that look like this:
corner.jpeg
They are .045 (18g) 6xxx series. He said they were 10' long, so I bought enough to line the top edge of my camper, creating the extra width I need. The material sat for a long time while I got the frame build, then did other tasks until it was time to plan the roof build. It was only then that I realized the corners were only 100" long, not the expected 120". This was inconvenient because I no longer had enough material to cover the roof. Luckily, i bought a couple of extra flat pieces of diamondplate from the same guy. I found a sheet metal guy to bend one of my flat pieces into the needed corner, and it only took a few hours after work.

I still had a problem. The front and sides of the roof will have this aluminum corner on them, and I needed to cut the miter at two corners and somehow attach them to provide a (mostly) water proof seam and needed to stabilize it so it didn't' come loose.

I've been using a YesWelder Mig 250 Pro for most of the frame assembly. I visited some forums and the welding community was sure it was impossible to mig weld material this thin. The consensus was .125" was doable, .0625" might be doable, but .045" required tig.

Well, I'm not very good at listening to the experts, so I grabbed a piece of scrap and gave it a try. It took a little while, but I managed to find a power setting and feed that gave a reasonable (if a little cold) weld that held. It even survived my repeated bending, breaking from fatigue next to the weld. I clamped up the corner and got to work slowly welding it up. After a little grinding, I had two respectable miters. This was one of the biggest wins of the build, i think.

image3(10).jpeg

After that, I added the remaining corners, with generous lap joints pointed to the aft of the camper. Most of it was held on with ACM, the front weldment was glued on. I came back with rivets every 15" or so, as these are on the camper to reduce damage from low-hanging branches. I didn't want them to get pulled off. I then added a bead of RV roof sealant and will finish with some self-leveling compound. Belt, suspenders, another belt, some more suspenders...

Also note that the aluminum comes down below the roof split. I'm hoping this prevents rain and wind from getting pushed past the seal (yet to be installed). There is a 1/4"+ gap between the aluminum corner and the camper base.

image0(20).jpeg

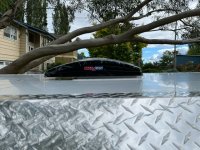
Maxxfan is installed but not wired,

image1(15).jpeg

the whole thing is looking pretty good, I think.

After a few victories on Saturday, Sunday brought a defeat. I had spent two days building a hinged lift system only to find out it wasn't going to work and had to scrap it. I ordered a bit more material from Alcobra Metal and redesigned it. Oh well.
 

Fenderfour

Active member
I had a lot going on in July and didn't make much progress. July 11 was my (hopeful) first trip date for the truck, but the truck simply wasn't ready and I had to tent camp. Oh well. It was still a fun outing.

I've been making some progress. As I said in my last post, the first lift I built didn't work. I had a few fumbles ordering material and finally had the material and the time to make the H-lift mechanisms.

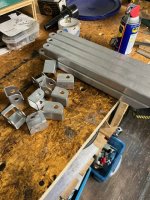
I used my little Axiom CNC to cut some brackets for the lift
image2(11).jpeg

A spiral up cut bit with a modest DOC and wd-40 as lubricant yielded pretty good results.

I had no real plan for the handles, but managed to get something sorted from the scrap bin.

image0(22).jpeg

The key here was to remove hard corners as one of these handles is at the end of the bed.

I spent some time getting the roof propped up on 2x4's at the right height and was able to weld the lift mechanism in to the frame. I had hoped to use some steel rivets to attach it, but a similar loading situation on the gas struts caused the rivets to fail, so I didn't even bother with them.

image0(1).png

Here it is, all together. The struts are 70lb, which through the design, i thought would be too much, or too little, etc... Turns out they are a little too much, but that should allow me to add 300 watts of solar and still have good action on the struts.

image1.png

This felt like a major milestone in the build. I had originally planned an electric scissor lift using linear actuators and prismatic linear rails. That whole thing got a little out of hand and I decided to go to the tried-and-true H-lift and gas strut system I see on most pop ups. I'm happy I did, as it simplified sooooo much.

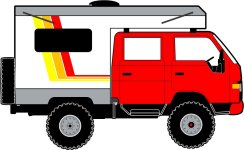
As this is an odd truck, it gets a lot of attention, which is fun. Most folks like the cutesy-toughness of the truck itself and many people stop by my driveway while I'm working to comment on the camper. I'll be making stickers to give to folks once I start going on trips. It's not to promote a brand, a channel, or to be some kind of influencer, it's just a little gift to make folks happy. You can also see my plan to add classic toyota stripes to the back.

image0(23).jpeg

Anyway... untill next time.
 

Forum statistics

Threads
188,011
Messages
2,901,125
Members
229,411
Latest member
IvaBru
Top