1993 HiAce Firetruck Build Thread

Fenderfour

Active member
I found the original catalog for the 1994 line of Hiace trucks. I'm sure there is a lot of really good info in there, if I could read Japanese. I'll use google translate eventually, just haven't had time.

I took the truck (bare frame) to the CAT scales north of Seattle. The truck weighs a total of 3500lbs (2440 front axle, 1060 rear axle). I'm sure the bed changes that, but not much. It can't weigh more than 150 lbs.

I know that the double cab trucks were 3/4 ton (metric), so that's a payload of 1,650 lbs. I'm having trouble finding a dry weight for the truck. My registration says 4200 lbs, the Toyota history website says 2900lbs, but neither really makes sense. I suppose the 2900lbs might be for the single cab, which allows total GVW to be 5100lbs, I don't really know, but assuming my naked truck can handle 1,650lbs seems safe and I don't plan to get close to that number if I can help it.

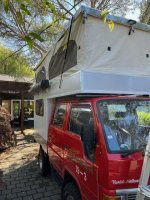
Did some more work on the truck this weekend, namely I got the camper on the frame.

image2(12).jpeg

You are probably thinking that the overhang above the cab is very tight. It is because they will be attached. The very short wheel base and box frame make this a very stiff platform. I tried to flex the frame on ramps and wasn't able to get more than 1/2". The camper is mounted to urethane bushings similar to the cab. The two should move together. This will probably add some noise to the cab, but I will be ok with it.

image0(24).jpeg

you can see the beefy roof bracket tucked in there. You can also see the awning bracket I had to fabricate to make room for the gas struts.

image4(7).jpeg

For size reference, the camper is 12' long, 6' for the cantilever, 6' for the box in back.

image1(16).jpeg

image3(11).jpeg

Still more work before she's ready to go anywhere but down the block for pictures. Some things need to get bolted down, the fenders need trimming, and the tent needs to get finished and installed.

Over the fall/winter, I hope to finish insulated the camper with foam board. Only the floor is insulated now. The rest is just skin and 1.5" framing.
 

Fenderfour

Active member
Last weekend was a lot of drilling. 540 holes to be accurate.

I'm using nutserts and some standard RV extrusion to hold the pop-up tent on to the frame. I thought about using self-drilling screws, but they only work well once.

Nutserts or plusnuts, or rivnuts... need holes. The RV extrusions I bought were already drilled, each hole was about 6" apart (maybe closer, I didn't measure). This is closer than I would have chosen, but that's how it is.

The lower extrusion has a flat bottom, and the plusnuts have a flange. I didn't want the extrusion to have a gap under it, so I needed to counterbore all of the holes on the bottom frame. This is easy with a drill press, but i don't have a drill press big enough to swing over my camper. Yeah, maybe I should have thought of this and drilled the stock before I welded it all up, but here we are.

I found some inexpensive counterbore bits on amazon.

I cut my extrusions and clamped them on the frame, marked holes with a center punch, and drilled 3mm pilot holes. The correctly sized counterbore bit needed a 5.5mm hole, so I redrilled 90 holes to 5.5mm. this allowed the pilot on the counterbore to fit nicely and I could carefully counterbore with a cordless drill, checking depth against a nutsert. Last step was to redrill the through hole to 6mm for the nutsert.

The upper frame was easier. The extrusion for that area has a recess behind it, so I didn't counterbore. I just drilled pilot holes and final holes.

Adding 180 nutserts with a manual tool took a while. It was kinda zen.

image0(25).jpeg

I also spent some time working on the tent. I had three more windows to sew in to the body, and four screens to add to the outside of the windows.
image4(8).jpeg

The tent (36" x 30') does fit through my normal size sewing machine.
image2(13).jpeg
Working with no-see-um mesh was irritating. I needed to roll the edge to strengthen the seam, but it was slippery and didn't want to stay put. I ended up using some 1/4" masking tape to define the edge then used the tape a core to roll the mesh on itself three times, ironing at medium heat for each fold. The end result was a crisp tidy seam that was easy to sew.

image3(12).jpeg

I sewed the screens over the outside of the window. This was an error. I should have sewed the screens to the window/zipper assembly before I sewed the window into the body. My design will work just fine, but having it pre-assembled to the window would have looked a lot better.

Hoping to get the tent installed this weekend. Maybe I can get one trip in before the weather gets really wet here in Seattle.
 

Fenderfour

Active member
More progress this weekend. Saturday was mostly rainy and that was bringing me down a bit, however, I had some more details to finish on the tent. About the time the tent was done, the chance of rain was down to 20% and I decided to try installing it.
image0(26).jpeg

This pic is from the dry-fit. i clamped the corners in to make sure all my measurements were correct.

After that, i added double-stick tape to the lower frame rails to help hold the tent in place. The tent is mechanically held on with standard RV screw extrusions, a 90 degree corner on bottom and a flat on top. Since everything was pre-drilled and inserted, it was pretty easy to pull the tent on to the double-stick tape, add the piece of extrusion, poke a few holes and add screws.

image1(18).jpeg

I closed up the camper just as another heavy bout of rain hit my neighborhood.

The weather on sunday was supposed to be more stable and dry. I called a friend to help with the upper attachments, and it went well. I couldn't imagine doing this part on my own. We had to fold the fabric up, get the extrusion located, poke a hole and add a screw, all while standing on a 7' ladder and navigating the many plantings around my driveway.

image2(14).jpeg

that all went exceedingly well. It's good to know other tool-wielding humans who are ready to help out.

image3(13).jpeg

The last steps for the weekend were to trim the extra fabric on the top edge and install the vinyl insert for the screw extrusions.

image4(9).jpeg

When I first went in to this project, I couldn't believe (mostly) empty camper shells cost $30k. I think I'm beginning to understand why. Sure, this is a prototype, none of the steps have been productionized, etc... but dammit, building a camper is a lot of work.

I hope to take the truck out next weekend as a shake-down trip. There will be no interior, just a mattress on the upper section, bare boards on the floor and exposed framing and skin on the walls. It should be fun.
 

Attachments

  • image3(13).jpeg
    image3(13).jpeg
    94.4 KB · Views: 2

rruff

Explorer
When I first went in to this project, I couldn't believe (mostly) empty camper shells cost $30k. I think I'm beginning to understand why. Sure, this is a prototype, none of the steps have been productionized, etc... but dammit, building a camper is a lot of work.
So true...
 

Fenderfour

Active member
image0(27).jpeg

I got her out this weekend. There is still a lot to sort out, as she is just a shell, but we had fun camping at the end of an old FSR with an great view of Mt. Rainier and Keecheelus Lake in Washington State.

Things that are great:
Swing out awning: it was great to get leveled then swing out some shade.

Queen size bed with real mattress: doy

Windows in the bed area: Having an un-obstructed view of the sunrise hitting Rainer from bed was amazing.

Simple Bluetti power pack and 100watt solar panel to run National Luna fridge: The small battery was topped up in the first few hours of the day and stayed full until dusk. The fridge only used 25-30% overnight. I'm thinking I will stick with a simple (but larger) solar generator system instead of building a custom victron set up.

Some folks came through camp on SXS's and were charmed by my silly little truck. Folks love how different it is, and that's fun

Things that need work:
The wheels: I mounted some classic Chevy rims I found on craigslist with a significantly wider offset. Now that the truck has some load, the tires rub in a bad way. Need to replace the wheels with the correct offset

The camper door: It kept popping open while we were driving, I need to make some adjustments to enure it stays latched.

The engine: She is slow. We did about 35mph over snoqualmie pass. It's not a big deal, as we stayed in the right lane and kept pace with the slowest of the big trucks. I have an Australian turbo kit form HD automotive that I need to figure out how to pack in the engine bay. The aussies have been adding turbos to theses NA Diesels since they came out. I can probably eke out another 25-30hp without affecting the engine longevity too much.
 

Fenderfour

Active member
Not much to report on the build since Labor Day. its been nice having a bit of a break, if I'm being honest. I did add some classic Toyota stripes.
image0(28).jpeg

People just love this truck when they see it. While I was camping over Labor day, a few good old boys came by on their SXSs. I'm getting new stickers printed to offer to folks.

Nelly Cartoon Right.png

I'm starting a new list of todo's. Ive got foam insulation board to install in the camper, speakers and killmat for the cab... need to figure out how to install the turbo kit, mostly just get the intake and intercooler routed...
 

allochris

Adventurer
The engine: She is slow. We did about 35mph over snoqualmie pass. It's not a big deal, as we stayed in the right lane and kept pace with the slowest of the big trucks. I have an Australian turbo kit form HD automotive that I need to figure out how to pack in the engine bay. The aussies have been adding turbos to theses NA Diesels since they came out. I can probably eke out another 25-30hp without affecting the engine longevity too much.

Is yours a 3L? I have a 5L and it's not that much faster when loaded/pulling a 1500-3500lbs trailer. Can you show some info/links for the turbo / kit you are using? I'm about to do the same engine mod & would like to see what parts you got planned for!

Also, do you have a dyno shop near by? Would be nice to get a baseline (before & after) hp/torque curve. How are you planning to tune the fuel pump to get a safe but more powerful tune?
 

Fenderfour

Active member
Is yours a 3L? I have a 5L and it's not that much faster when loaded/pulling a 1500-3500lbs trailer. Can you show some info/links for the turbo / kit you are using? I'm about to do the same engine mod & would like to see what parts you got planned for!
Sure:

I have the 2L/3L hotside kit from HD Automotive in Australia. They seem expensive, but it was quite reasonable once I checked out the exchange rate, even with shipping. HD Automotive has an installation video online.

One of these kits (notably, the 5L kit with a different manifold) has been successfully installed on an LH85. There's a thread over at IH8Mud.

Most of the issues are in packaging. The thread at iH8Mud very clearly shows a modified exhaust manifold. The flange going to the turbo has been shortened and the EGT bung removed. That manifold has the turbo flange in the middle of the four collector pipes, not between 1&2. I hope that there is more room further back in the engine bay for the turbo, but I don't know.

The crossover pipes are the tightest fit. There is about 1.5" between the valve cover and the shift linkage. I'm thinking about creating a custom fiberglass/carbon fiber plenum/pipe for this. I can reduce height and increase width to retain the flow of the turbo inlet. The install at iH8Mud goes in front of the engine, down to an intercooler mounted in front and below the radiator, on the IFS structure. I think this intercooler is a little big and will probably get beaten up on trails.

Air intake is on the left side of the engine, and I want to move it to the right side. Similar era Hiace vans have the intake on the right, and I think there may be space to work it in. I need to do some more investigating. Moving the intake means I only have to cross the engine once instead of twice. The IH8Mud install fudges in a cone filter right in the engine bay. I'm not a fan of this, as it would pull in lots of hot air, reducing the efficiency of the turbo. I'm hoping to add a minimalist airbox and pull cold air out the side of the truck, similar to Hiace vans. The current air cleaner location will provide space for a small air-to-air intercooler.

I have a 3dScanner, and I think the next steps are to get some good scans of the engine bay and get it as stitched up as I can. That tells me what I'm working with. I also have a cheap inspection camera to look at some things on the engine to ensure it's got the oil feed bung as shown in the HD Automotive video.
 

Forum statistics

Threads
187,706
Messages
2,897,021
Members
228,700
Latest member
Jay2thaC
Top