You are using an out of date browser. It may not display this or other websites correctly.
You should upgrade or use an alternative browser.
You should upgrade or use an alternative browser.
2013 Toyota 4Runner, Equipt Edition Build
- Thread starter Equipt
- Start date
Equipt
Supporting Sponsor Presenting Sponsor of Overland
Eezi-Awn K9 Table and Roof Rack Table Mount
Eezi-Awn K9 Table and Roof Rack Table Mount
Ask and yee shall receive. Great timing on the question. Sorry for the delay in updating the build thread here. It's been really busy since the Expo, so let's get caught up.
Eezi-Awn K9 Stainless Steel Camp Tables
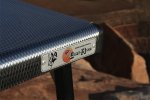
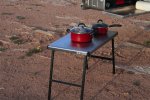
One of the most popular options on the South African expedition racks had been the capability of installing a camping table to the bottom of the rack. A camping table is endlessly useful and usually a pain to store inside. Eezi-Awn partnered with National Luna to create one of the best looking camping tables I have ever seen. It is made of a rigidized stainless steel top and a set of aluminum folding legs. The top is the same material used on the National Luna stainless steel fridges, only hollow underneath to accommodate the folding legs inside. The table comes in 3 sizes, and because of the width of the roof rack on the 4Runner we went with the medium sized table on the truck. We will be fitting the large size on the Chaser very soon.
Eezi-Awn K9 Table Mounting Channels
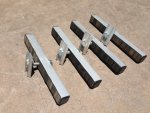
The K9 stainless steel tables fit into a pair of channels that attach to the cross bracing extrusions on the bottom of the K9 Roof Racks. The cross bracing extrusions are the same ones that the feet for the rack attach to. The K9 Table mount channels are slotted, to allow you to attache these channels to a number of rack configurations with having to modify the mount. The channels are lined with outdoor carpet to mitigate scratching of the top, and they have a bracket attached to the inside of the channel to stop the table from sliding through the front of the channel. It is located in a spot to stop the large table, but with a little adjustment I was able to move the bracket forward to a position to stop the medium table easy enough.
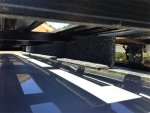
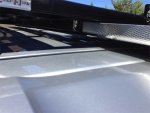
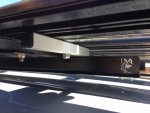
The table is secured to the roof rack with a pivoting latch that mounts to the back of the K9 Roof Rack with a aluminum extruded bracket the mounts to the rack edge. This brackets pivots up, counter clockwise to allow the table to slide in, and then down to mate to another portion of the bracket to hold it in place. These two bracket pieces have holes in them to allow you lock the table in place. I have been using a small carabineer, but a small padlock would keep it secure quite well.
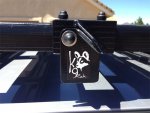
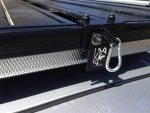
It was an interesting install, as I had to remove the shark fin antenna on the rear roof to do so. The resulting hole has been sealed with a couple large fender washers and neoprene fender washers. Not a permanent solutions by any means. I will return to this item and a relocation of the satellite antenna in a little while. The things we do for Expo. Attaching the channels to the bottom of the rack was quite simple. The rack extrusions have a 8mm hex head bolt channel built into them for the feet to attach, so we added a few bolts to the channels, chose a centered location for the table and slid the channels together to fit the table snugly. Attaching the latch was simple enough. The latch extrusion mates to the K9 Roof Rack edge and tightens in place with a couple 6mm bolts.
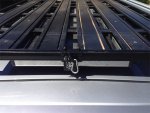
So now we have our camping table up and out of the way. It easy to access at any time and stays with the vehicle at all times. I missed this piece of equipment from the 100 Series and am glad we could get on on here to use.
Cheers,
Eezi-Awn K9 Table and Roof Rack Table Mount
Ask and yee shall receive. Great timing on the question. Sorry for the delay in updating the build thread here. It's been really busy since the Expo, so let's get caught up.
Eezi-Awn K9 Stainless Steel Camp Tables
One of the most popular options on the South African expedition racks had been the capability of installing a camping table to the bottom of the rack. A camping table is endlessly useful and usually a pain to store inside. Eezi-Awn partnered with National Luna to create one of the best looking camping tables I have ever seen. It is made of a rigidized stainless steel top and a set of aluminum folding legs. The top is the same material used on the National Luna stainless steel fridges, only hollow underneath to accommodate the folding legs inside. The table comes in 3 sizes, and because of the width of the roof rack on the 4Runner we went with the medium sized table on the truck. We will be fitting the large size on the Chaser very soon.


Eezi-Awn K9 Table Mounting Channels
The K9 stainless steel tables fit into a pair of channels that attach to the cross bracing extrusions on the bottom of the K9 Roof Racks. The cross bracing extrusions are the same ones that the feet for the rack attach to. The K9 Table mount channels are slotted, to allow you to attache these channels to a number of rack configurations with having to modify the mount. The channels are lined with outdoor carpet to mitigate scratching of the top, and they have a bracket attached to the inside of the channel to stop the table from sliding through the front of the channel. It is located in a spot to stop the large table, but with a little adjustment I was able to move the bracket forward to a position to stop the medium table easy enough.


The table is secured to the roof rack with a pivoting latch that mounts to the back of the K9 Roof Rack with a aluminum extruded bracket the mounts to the rack edge. This brackets pivots up, counter clockwise to allow the table to slide in, and then down to mate to another portion of the bracket to hold it in place. These two bracket pieces have holes in them to allow you lock the table in place. I have been using a small carabineer, but a small padlock would keep it secure quite well.


It was an interesting install, as I had to remove the shark fin antenna on the rear roof to do so. The resulting hole has been sealed with a couple large fender washers and neoprene fender washers. Not a permanent solutions by any means. I will return to this item and a relocation of the satellite antenna in a little while. The things we do for Expo. Attaching the channels to the bottom of the rack was quite simple. The rack extrusions have a 8mm hex head bolt channel built into them for the feet to attach, so we added a few bolts to the channels, chose a centered location for the table and slid the channels together to fit the table snugly. Attaching the latch was simple enough. The latch extrusion mates to the K9 Roof Rack edge and tightens in place with a couple 6mm bolts.

So now we have our camping table up and out of the way. It easy to access at any time and stays with the vehicle at all times. I missed this piece of equipment from the 100 Series and am glad we could get on on here to use.
Cheers,
Equipt
Supporting Sponsor Presenting Sponsor of Overland
Speaking of Utah, your "Location" still says, SLC!
Thanks for the heads up. I changed my signature but not my location. All good now.
Cheers,
Equipt
Supporting Sponsor Presenting Sponsor of Overland
5th Gen 4Runner Alternator Output
Thanks Pierre,
The 5th Gen 4Runners came with two options on the alternator. The come with a 100 Amp alternator standard, or a 130 Amp alternator if they have the towing package. My truck has the towing package, so I'm rocking a 130 Amp rated alternator. Plenty of poop to charge the two batteries. In comparison, the 100 Series came stock with an 80 Amp alternator or 100 Amps if it has rear A/C. Mine did, so it ran at 100 Amps and charged the batteries fine as well. It is interesting to me that the new 4Runner with a V6 is running a higher output than the V8 in the 100 Series. Not exactly sure why, but my thought is that vehicle users are demanding more electrical capacity for their daily life than before. Built in inverters (got one), navigation/video/audio, electronics charging, games, etc. That was a great question.
We built a custom one off mounting bracket for the 4Runner, to which we mounted a very standard group 31 sized battery tray. We also attached a couple plastic pieces to the tray to keep our group 65 battery from sliding back and forth in the large tray. None of it was from National Luna.
Cheers,
Equipt
Supporting Sponsor Presenting Sponsor of Overland
Eezi-Awn XKLUSIV 1400 Roof Top Tent
Eezi-Awn XKLUSIV 1400 Roof Top Tent
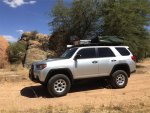
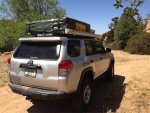
The next step on the evolution of the 4Runner was to install a roof top tent. I had the opportunity to put an XKLUSIV model from Eezi-Awn on the vehicle. The size I chose was the 1400. All the model of Eezi-Awn tents are noted with a number. That number is correlated to the width of the tent, so the 1400 is 1400mm wide or roughly 55". Every model of Series 3 or XKLUSIV lines are the same length, namely 48" long closed and 96" open. So the closed measurements of the XKLUSIV 1400 are 48" long and 55" wide. The rack on the 4Runner is 1250mm wide, which measures out very close to 50". This worked out great for us to orient the roof top tent to open off the opposing side from the awning mounted on the truck. That would be the driver's side of the vehicle. The roof top tent is aligned with the rear of the rack and stretches 55" forward on the rack. Leaving a couple inches to play with getting the cover on and off leaves us about 30" on the front of the rack for other equipment. More on that in a bit.
I chose the 1400 size for a couple reasons. I like the 1400 because it provided plenty of space for 2 adults, and it is easy enough to manage stowing it away solo. The bigger the tent, the tougher it is on one person. I do a lot of traveling solo, so this works out well. When I travel with my wife Heather, we usually take the Chaser with us and that has it's own tents. Spoiled, I know. The 1400 size also allows for plenty of room left on the rack for fuel cans or other gear.
Installation
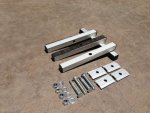
Installing the XKLUSIV tent to the K9 roof rack could not be easier. The K9 roof rack is completely flat, so the tent lays directly onto the rack surface for complete support. The slats on the K9 rack run front to back, and the extrusions on the XKLUSIV run the perimeter of the tent base. Eezi-Awn came out with a K9 Tent Mounting Kit, composed of 4 square aluminum tubes and hardware. Each tube has a non-skid surface on one side. The XKLUSIV comes with what they call a "DIY Kit" that includes 4 extruded rectangular washer that fit into the extrusions on the bottom of the tent, and 4 bolt/washer/nut sets. So installation is quite simple. Install the 8mm bolt through the rectangular washer, then insert one of the square aluminum bars with the non-skid surface facing the rectangular washer, then add a washer and a nylock nut loosely. Repeat 3 more times so you have 4 assemblies. Lift the tent onto the K9 rack and slide it close to where you want it. Now lift the front or back end of the tent and insert 2 of the assemblies into the slot in the tent extrusion running perpendicular to the slats on the roof rack. That would be the extrusion running left to right on your truck. Positions the square aluminum bars to face parallel with the rack, so that when you let the roof top tent down the bars will fit in the space between the slats. Repeat at the other end of the tent with the other 2 assemblies. The goal is to have an assembly close to each corner of the tent. The square aluminum bars can now be turned 90 degrees and tightened up to the bottom surface of the rack, sandwiching the rack between the roof top tent and the bars. The non-skid surface will ensure that the tent will go now where. Done.
Now, if you ever need to remove your tent it is a simple matter of loosening 4 nuts, turn the bars parallel to the slats and lifting off. You could easily install or remove a roof top tent in minutes. I think this is a great feature to the combination of these two pieces of equipment. Removing a tent that easily means the it can be stored out of the weather when not needed and the rack can serve other needs quickly. And it works out great in conjunction to the K9 Table mounted underneath.

Setup
I really like how the XKLUSIV model sets up. It is literally a Series 3 roof top tent, with an extended roof line sewn onto it. The roof line extends over the ladder area when opened, and you attach a series of 4 panels the the overhanging portion of the tent to create a room to ground level. You can attach one panel if the goal is shade or wind break, or all 4 for absolute privacy. Very modular. Or if you don't want any walls at all you can use the tent without them. There is a screen window and a solid panel door at the top of the ladder. This is my preference when I am only staying somewhere for a night. When I plan to stay for a while, I will attach the wall set and stake it down.
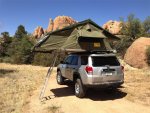
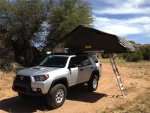
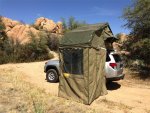
We installed the XKLUSIV on the 4Runner and had it open for the entire Overland Expo. We had a great deal of interest in the tent and the rack system. Jess Stuhler, owner of Eezi-Awn, joined us for the Expo and was a great addition to the team there. More to come on that event too.
Cheers,
Eezi-Awn XKLUSIV 1400 Roof Top Tent
The next step on the evolution of the 4Runner was to install a roof top tent. I had the opportunity to put an XKLUSIV model from Eezi-Awn on the vehicle. The size I chose was the 1400. All the model of Eezi-Awn tents are noted with a number. That number is correlated to the width of the tent, so the 1400 is 1400mm wide or roughly 55". Every model of Series 3 or XKLUSIV lines are the same length, namely 48" long closed and 96" open. So the closed measurements of the XKLUSIV 1400 are 48" long and 55" wide. The rack on the 4Runner is 1250mm wide, which measures out very close to 50". This worked out great for us to orient the roof top tent to open off the opposing side from the awning mounted on the truck. That would be the driver's side of the vehicle. The roof top tent is aligned with the rear of the rack and stretches 55" forward on the rack. Leaving a couple inches to play with getting the cover on and off leaves us about 30" on the front of the rack for other equipment. More on that in a bit.
I chose the 1400 size for a couple reasons. I like the 1400 because it provided plenty of space for 2 adults, and it is easy enough to manage stowing it away solo. The bigger the tent, the tougher it is on one person. I do a lot of traveling solo, so this works out well. When I travel with my wife Heather, we usually take the Chaser with us and that has it's own tents. Spoiled, I know. The 1400 size also allows for plenty of room left on the rack for fuel cans or other gear.
Installation
Installing the XKLUSIV tent to the K9 roof rack could not be easier. The K9 roof rack is completely flat, so the tent lays directly onto the rack surface for complete support. The slats on the K9 rack run front to back, and the extrusions on the XKLUSIV run the perimeter of the tent base. Eezi-Awn came out with a K9 Tent Mounting Kit, composed of 4 square aluminum tubes and hardware. Each tube has a non-skid surface on one side. The XKLUSIV comes with what they call a "DIY Kit" that includes 4 extruded rectangular washer that fit into the extrusions on the bottom of the tent, and 4 bolt/washer/nut sets. So installation is quite simple. Install the 8mm bolt through the rectangular washer, then insert one of the square aluminum bars with the non-skid surface facing the rectangular washer, then add a washer and a nylock nut loosely. Repeat 3 more times so you have 4 assemblies. Lift the tent onto the K9 rack and slide it close to where you want it. Now lift the front or back end of the tent and insert 2 of the assemblies into the slot in the tent extrusion running perpendicular to the slats on the roof rack. That would be the extrusion running left to right on your truck. Positions the square aluminum bars to face parallel with the rack, so that when you let the roof top tent down the bars will fit in the space between the slats. Repeat at the other end of the tent with the other 2 assemblies. The goal is to have an assembly close to each corner of the tent. The square aluminum bars can now be turned 90 degrees and tightened up to the bottom surface of the rack, sandwiching the rack between the roof top tent and the bars. The non-skid surface will ensure that the tent will go now where. Done.


Now, if you ever need to remove your tent it is a simple matter of loosening 4 nuts, turn the bars parallel to the slats and lifting off. You could easily install or remove a roof top tent in minutes. I think this is a great feature to the combination of these two pieces of equipment. Removing a tent that easily means the it can be stored out of the weather when not needed and the rack can serve other needs quickly. And it works out great in conjunction to the K9 Table mounted underneath.


Setup
I really like how the XKLUSIV model sets up. It is literally a Series 3 roof top tent, with an extended roof line sewn onto it. The roof line extends over the ladder area when opened, and you attach a series of 4 panels the the overhanging portion of the tent to create a room to ground level. You can attach one panel if the goal is shade or wind break, or all 4 for absolute privacy. Very modular. Or if you don't want any walls at all you can use the tent without them. There is a screen window and a solid panel door at the top of the ladder. This is my preference when I am only staying somewhere for a night. When I plan to stay for a while, I will attach the wall set and stake it down.


We installed the XKLUSIV on the 4Runner and had it open for the entire Overland Expo. We had a great deal of interest in the tent and the rack system. Jess Stuhler, owner of Eezi-Awn, joined us for the Expo and was a great addition to the team there. More to come on that event too.
Cheers,
Attachments
Equipt
Supporting Sponsor Presenting Sponsor of Overland
Maybe I'm an idiot, but I can't seem to find the tables on your site. Any info on those? Very cool you can store them under the rack. Any interference with the sunroof with the large size?
No Intelligence issue on your behalf. Slacker issues on this side. We will have all the info up on the site very soon.
thanks,
Titanpat57
Expedition Leader
Enjoying the build out Paul..happen to be a bit partial to the color:ylsmoke:
With the lift on, how does the tent feel on top?
After seeing Benji's Eezi Awn @Vermont 2 years ago...it's really top notch stuff. I'm guessing we may get you to the Vermont Overland Rally at some point?
With the lift on, how does the tent feel on top?
After seeing Benji's Eezi Awn @Vermont 2 years ago...it's really top notch stuff. I'm guessing we may get you to the Vermont Overland Rally at some point?
Larry
Bigassgas Explorer
Awesome ride Paul. :drool: If Toyota offered 3rd row seating in the Trail Edition I would have Salsa red one in my garage now instead of a Tahoe Z71. As far as the bumper, I too vote for an ARB :sombrero:
After seeing the new face on the 2014 I bet you are glad you got a 2013. Looks like adding an aftermarket bumper on a 2014 is going to be a bigger hassle the way the bumper cover comes up through middle of the grill.
After seeing the new face on the 2014 I bet you are glad you got a 2013. Looks like adding an aftermarket bumper on a 2014 is going to be a bigger hassle the way the bumper cover comes up through middle of the grill.
Last edited:
Equipt
Supporting Sponsor Presenting Sponsor of Overland
Hey Guys,
Thanks for the comments. The tent feels very solid on the roof. It's secure to the K9 Rack, and there little if no change in noise level. A bit more drag, as you would expect. But less that I anticipated. We installed the heaviest coil set available on the truck so actually the extra weight has smoothed out the ride but still handles incredibly well. Even when towing the fully loaded Chaser trailer around. No sag in the back at all. Honestly, it is handling better than the 100 Series did, but I had a whale of a lot of weight on the 100 Series that I haven't added to the 4Runner.....yet.
The XKLUSIV tents have a variable and a constant. The variable is the built in ladder extension. As it stands without the extension used you can mount to a height of around 79-80". The ladder extension integrated into the bottom of the ladder will extend up to another 10-12", with several positions in between. So you can adjust to height and terrain as necessary. There is also angle of ladder to fine tune that need. The constant is wall length. We import the tents with a 2.1 meter wall length, which equates to about 84". We tried the international standard length of 2 meters or 79", and always seemed to be a bit short. It is more feasible to have a little material on the ground than to have the walls hanging in mid air. Hence the length. On the 4Runner, it worked out to within a inch or so of being spot on the right length.
Cheers,
Equipt
Supporting Sponsor Presenting Sponsor of Overland
We finally placed our tables and mount on the Equipt1.com site under products/Eezi-awn K9 racks/rack accessories. Take a look if you are interested in seeing more a out them. Www.Equipt1.com
Cheers
Cheers
fireball
Explorer
Just read through your build, looking great! If you haven't finalized bumper decision yet, here's another vote for Shrockworks. I had their sliders and front bumper on my 3rd gen 4R. Awesome stuff!
Regarding the awning, do you leave it on all the time or take it off and install just when you're planning to use it? Also, is it possible to mount to my Yakima rack bars?
Thanks!
Regarding the awning, do you leave it on all the time or take it off and install just when you're planning to use it? Also, is it possible to mount to my Yakima rack bars?
Thanks!
Similar threads
- Replies
- 1
- Views
- 753
- Replies
- 9
- Views
- 3K
- Replies
- 3
- Views
- 1K
- Replies
- 0
- Views
- 635

