Fiberglass M416/M100 Military-style Trailer Tub Kit

jscherb

Expedition Leader
Jeff, some quick thoughts:

- You show lift supports in the concept pic - would these come standard?
That's a decision the company would be making, not me (I'm just the the designer :)). Perhaps they would offer a version with and a version without, so depending on a person's needs and budget they could get what suits them best, but I'm just guessing at that.

- Would like the latches to be lockable in some way, at minimum with padlocks. Could the lid support lockable paddle latches?
The latches I plan to use on the prototype build are lockable, in my opinion that's a requirement. I've found some affordable commercial latches that I like, I'm working on a drawing showing the latchs, I'll get it posted in the next day or two.

- Would the lid come in one hinge configuration but also have the hardware to adapt it to the other, or would you (or the manufacturer) see that as an order option? Or even a left as a DIY step by the customer?
Again those are decisions the company would make. I'm designing everything so that the cover could be hinged either way, and the configuration could be changed at a later date by the owner if they decide a different configuration would suit their needs or their needs change. The way I've designed things for the prototype implementation, one single tub-side strut bracket design and one single cover-side strut bracket design will work in all configurations - center hinged, side hinged and end hinged. It may be that the design has to differ a bit if changes are made to some details of the tub design when it goes into production, so nothing is final yet.

I've been working on some diagrams showing different cover configurations and how the hardware would be set up, I should have something posted soon.

- For tubs with a tailgate, it would be nice to not have to remove or open the lid to open the tailgate.
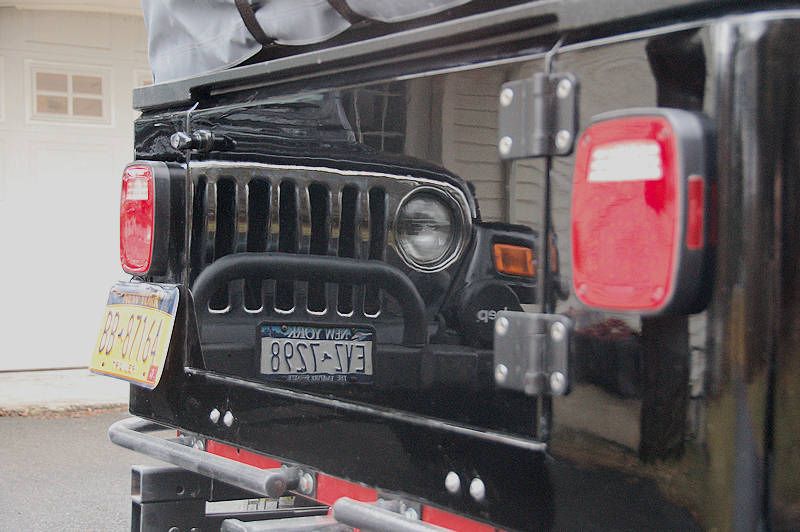
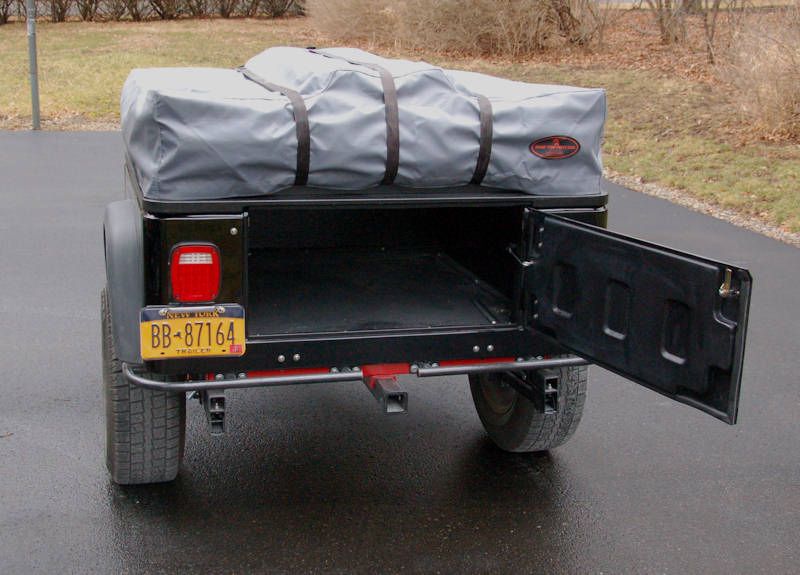
How about a tailgate with external latches? When I did the design for the Dinoot Jeep-tub trailer, I included a tailgate with external latches that can be configured as either a side-swing or a drop-down. Below is a photo of one configured as a side-swing on a Dinoot Jeep-tub trailer. It's got one external latch/lock. When configured as a drop-down, it would have two external latches/locks, one on each side. This tailgate is in production, and will fit the military tub perfectly, and will open/latch/lock without having to open the cover in either drop-down or side-swing configuration.

SideSwingDone4-1.jpg


FinalTent2-1.jpg


I can see lots of other little things like mounting lights inside the lid or ways to hang things, but these are all probably best left as DIY by customer.

Agreed. My goal with this kit is to enable lots of customization and personalized configuration by the builder.

Really cool to see this come to life!
Thanks! And thanks for the good questions. Keep 'em coming :).
 

jscherb

Expedition Leader
I'm working on the hardware design for several possible configurations and hinging options of the two-piece hard cover:

CoverConfigurations2_zps6bddf7cc.jpg


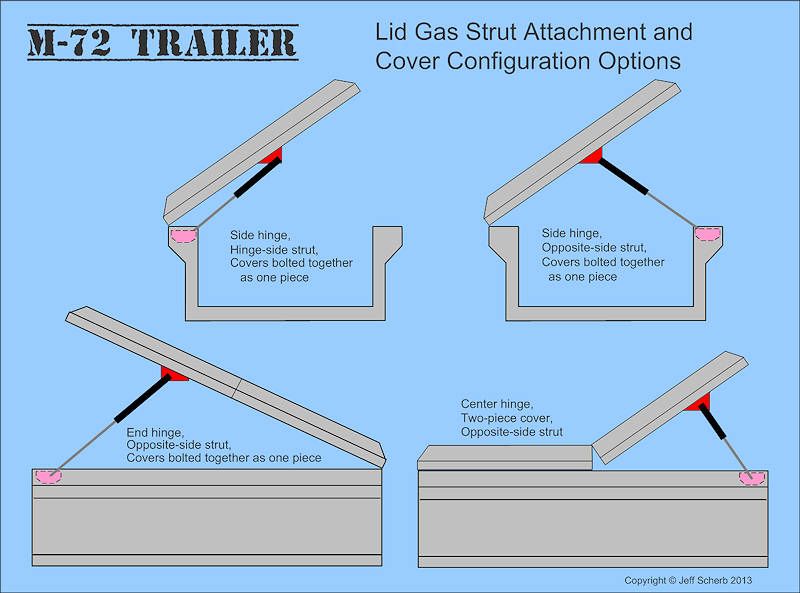
In the center-hinged configuration (center drawing), both sides would open, although only one side would open at a time.

The two one-piece configurations are intended for mounting a tent. In both of these configurations, the two pieces of the cover are bolted together to make a single piece cover.

The center-hinged design isn't intended for a tent, but each side could have a cargo rack mounted.

Here are a some design sketches showing how gas struts could be installed. A single design for the tub side bracket (shown in pink, dashed lines because they go inside the tub) and a single design for the cover side brackets (red) will work in any configuration due to the design of the prototype tub. Strut lengths and weight capacities would probably need to differ by configuration.

StrutConfigOptions_zpsbb95fd4b.jpg


Which configurations do you think make the most sense to implement?
 

jscherb

Expedition Leader
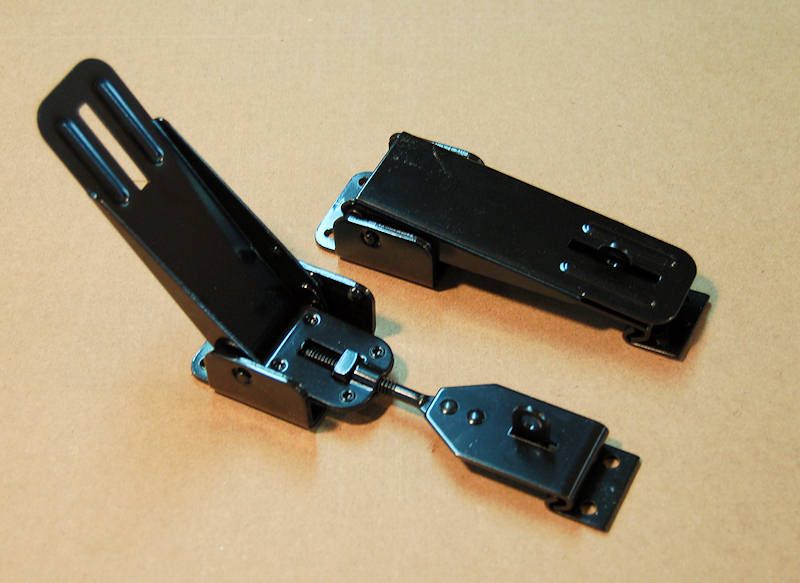
Another detail for the hard cover... these are the latches that I'm going to use on the prototype installation. They're from the RV industry and are designed to hold the tops of pop-up campers closed. I've found them in chrome, zinc plate, white powder coat and black powder coat. They're reasonably priced.

Latches1_zpsa2fbd9e1.jpg


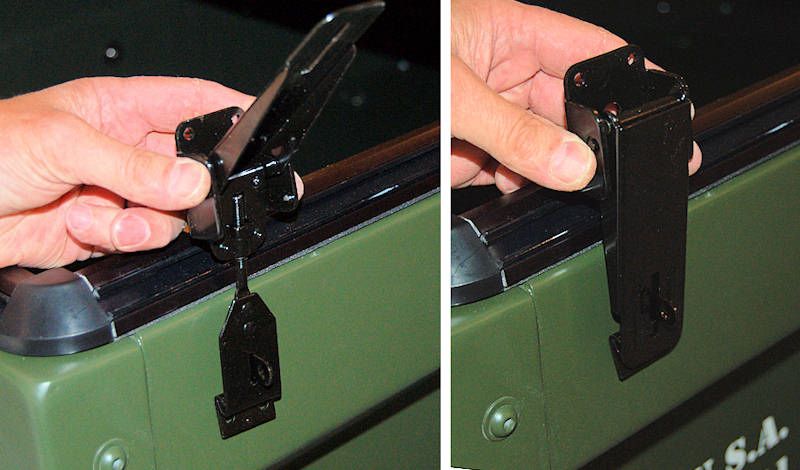
Below I'm holding them up against the tub with one hand and holding the camera with the other, so the photos aren't the best, but these photos give you a sense of the size of the latches. Also the tonneau cover snap rail is still in place, which it wouldn't be when the hard cover is installed:

latches2_zpse4b84c1a.jpg


I've been working on the mold master for the cover, some photos of the work in progress are in the main build thread in the Trailer Adventuring Forum: http://tventuring.com/trailerforum/thread-119.html
 

Papasxj

New member
Another detail for the hard cover... these are the latches that I'm going to use on the prototype installation. They're from the RV industry and are designed to hold the tops of pop-up campers closed. I've found them in chrome, zinc plate, white powder coat and black powder coat. They're reasonably priced.

Could you provide a source or search-able name for the latches?
 

jscherb

Expedition Leader
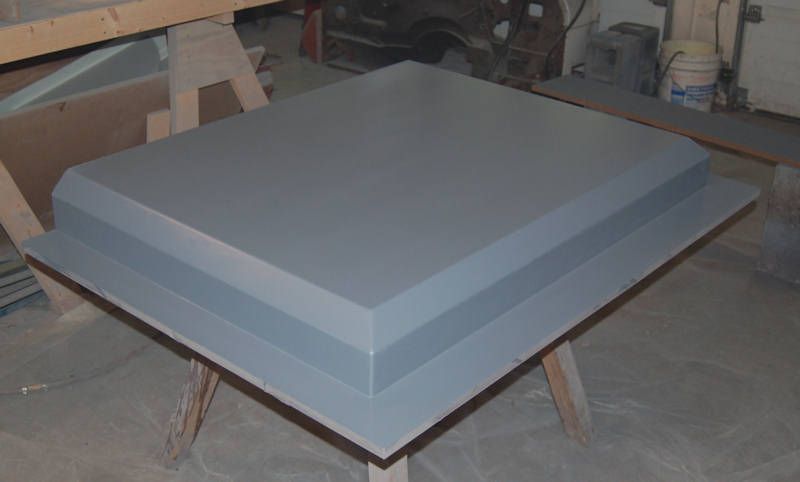
I've been working on the mold master for the fiberglass cover. Here's a photo of it in epoxy primer:

CoverMaster8_zpsd2fd8430.jpg


It still needs several coats of high build primer, a 320-grit sanding, and two final coats of epoxy before it's ready to make a mold from, but it's nearly there.
 

jscherb

Expedition Leader
I'm planning to make the fiberglass cover easily removable so the trailer can be used without the cover when needed for tall cargo. One idea is to use Jeep door hinges - Jeep doors are hinged with "lift off" hinges, which allow the doors to be removed very quickly:

JeepDoorHinges_zps9278c279.jpg


I don't think Jeep hinges would really look right on the cover though, so I've been searching for some appropriate off-the-shelf lift-off hinges. Since I haven't found anything that I really like yet, I'm making my own hinges.

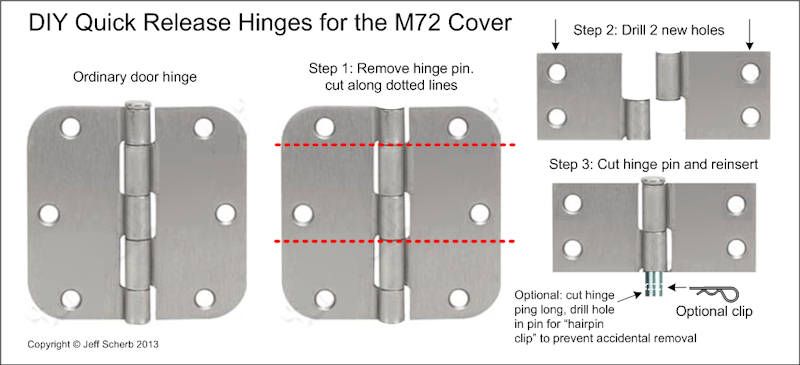
It's quick and easy to make lift-off hinges out of an ordinary door hinge...

DIYCoverHinges_zpsf30db770.jpg


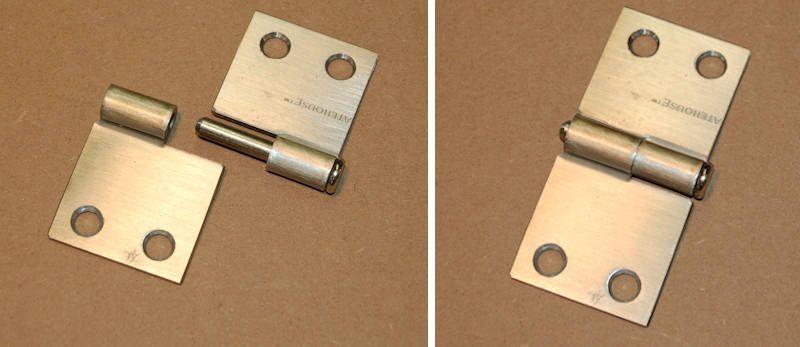
Here's a completed hinge:

DIYCoverHinges4_zps49a82092.jpg


One thing I did on the one above that isn't shown in the step-by-step drawing is that I beveled the end of the hinge pin, that will make it easier to hit the target on all off the hinges when sliding the cover on.

I'm making four of these, since the cover is bolted together in the middle and I'll be putting a tent on top, it's best to provide four points of support along the cover:

DIYCoverHinges2_zps975460c1.jpg


I used hinges from Lowes costing less than $3.00 each, so making four of my own costs less than $12.

I'll either paint the hinges olive drab so they blend in, or I'll paint them black so they'll match the latches on the other side, I haven't decided yet.

Using these modified hinges will permit the cover to be slipped off the hinges just like Jeep doors. The only tool necessary to remove the cover will be a wrench to undo the tub end of the lift struts.
 

jscherb

Expedition Leader
A few more options for the DIY lift-off hinges...

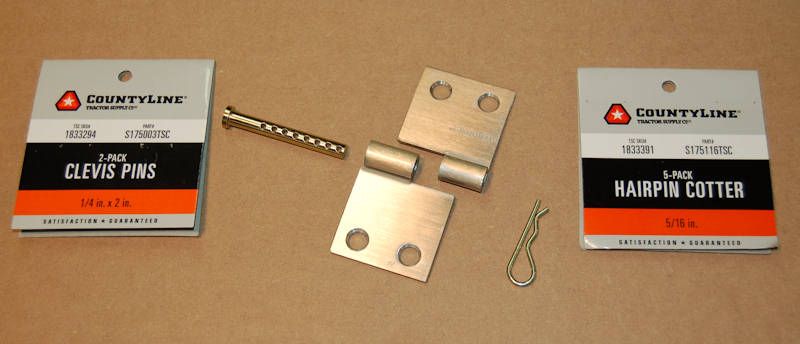
In the drawing in the previous post I said that optionally the hinge pin could be left long and drilled for a hairpin clip which would prevent accidental removal of the hinge in case anyone was worried about that. Another way to accomplish that is to replace the hinge pins with clevis pins:

DIYCoverHinges5_zps4ce67ee9.jpg


The clevis pin could be left loose, which would allow the cover to be put in place without first lining up the hinge pins with the other half of the hinge, then the cover position could be adjusted and the clevis pins inserted in the hinges and the hairpin clips put in. Or the clevis pin could be fixed in one side of the hinge.

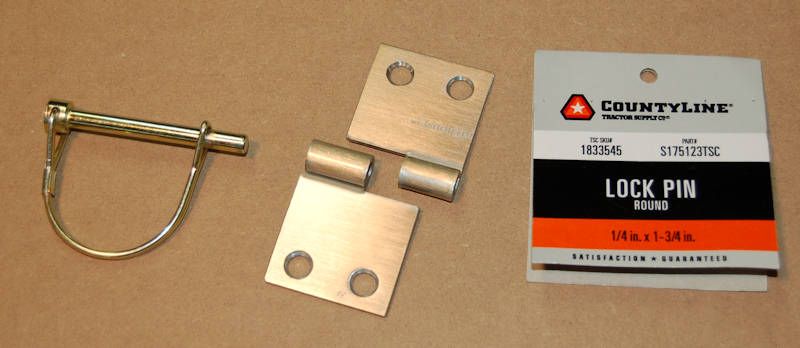
Another option would be lock pins:

DIYCoverHinges6_zps48047aff.jpg


These might also be nice to allow the cover to set in place without the need to align the hinge pins first, then these could be inserted once the cover is aligned.

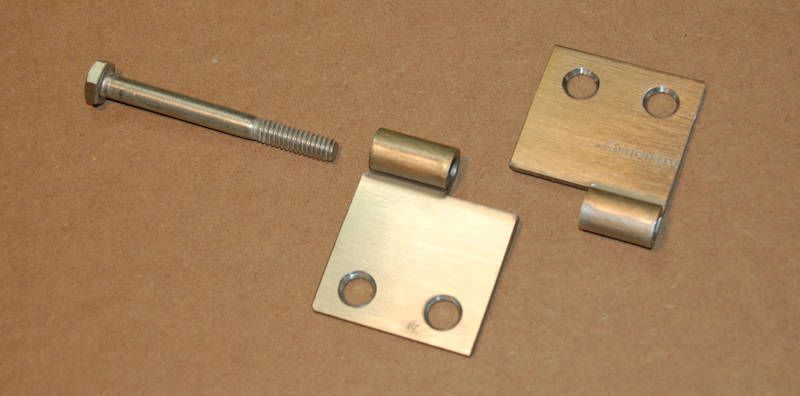
Ans one more option would be to insert bolts; a bolt like this one with a long enough smooth shank could be used, then optionally, nuts could be spun in place. Perhaps acorn nuts for a nice look. The bolt in the photo is stainless, so it's also a nice way to get rustproof hinge pins.

DIYCoverHinges7_zps1741bbe1.jpg


Different hinges might have slightly different diameter hinge pins and hine pin holes, so some fitting may be required for some of the above parts, it depends on the exact hinges used.
 

jscherb

Expedition Leader
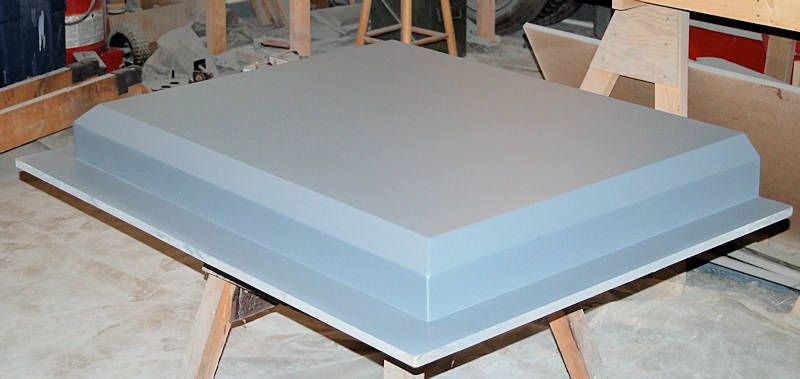
The cover master is finished and ready to make a mold. Since the last photo I posted it's had 4 coats of high build primer, the high build has been hand sanded with 320 grit in long board sanders to remove any final imperfections, and it's been shot again with a top coat of epoxy primer. The mold making will have to wait a few days though, I was a little short on a few fiberglass materials so I've got to wait for my order to arrive.

CoverMaster12_zpsf2ce9773.jpg
 

jscherb

Expedition Leader
I designed this kit to be DIY-built and customized to the needs of the builder, so here's a fairly simple DIY customization idea :).

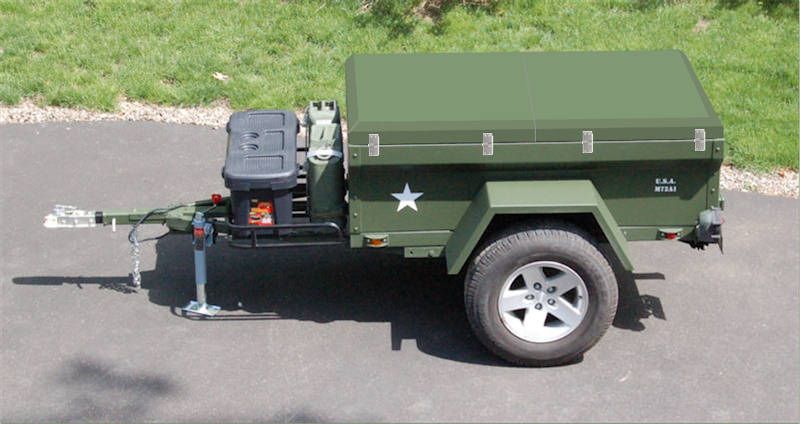
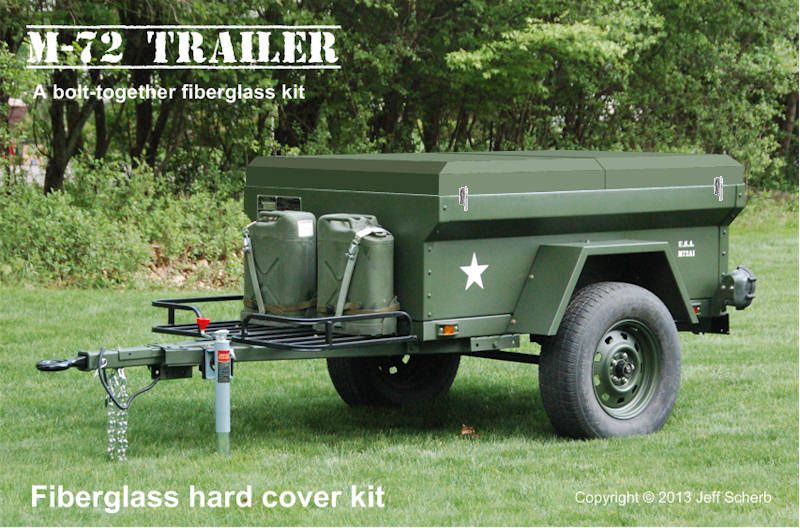
I've shown this concept drawing of the fiberglass hard cover before:

CoverMilitary1_zps29d4e37c.jpg


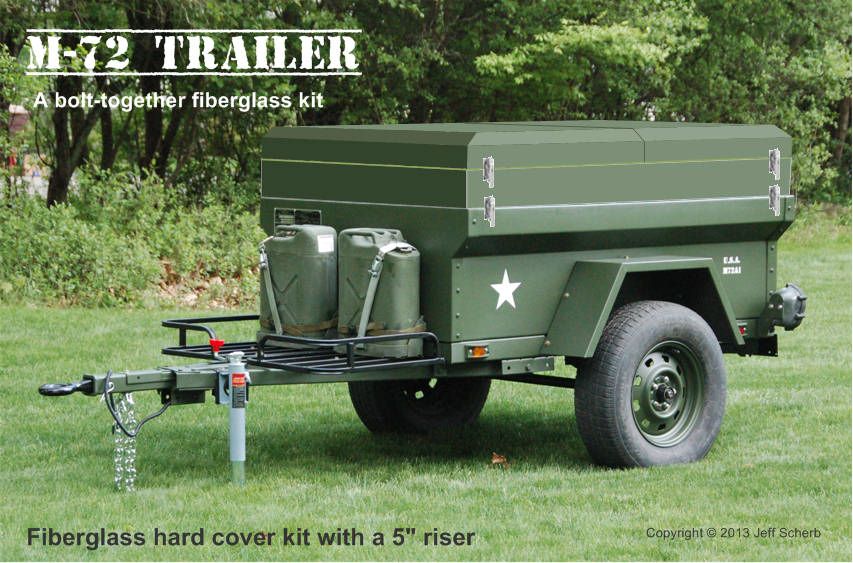
What if you need more storage space under the hard cover? Because of the inward facing lip design of both the M72 tub and the hard cover, it's easy to build simple cover risers out of wood. Here's what a 5" riser might look like:

CoverRiser5_zps91bf726d.jpg


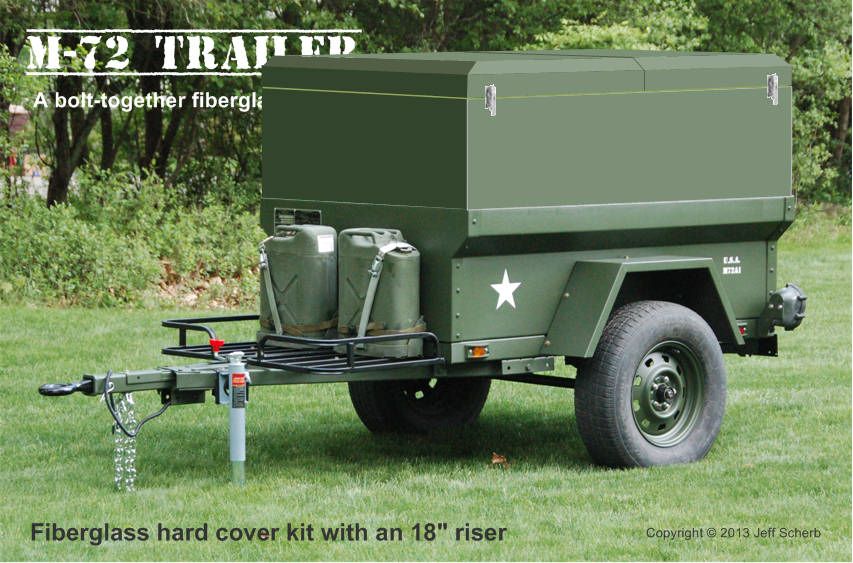
Or even 18":

CoverRiser18_zps53a28011.jpg


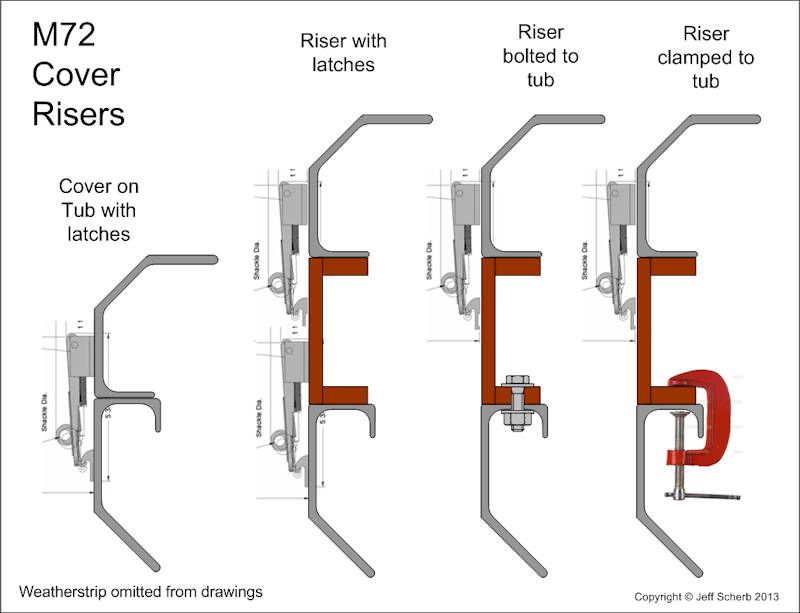
The riser could be attached with a second set of latches, as show in the 5" example above, or it could be bolted or clamped to the tub as shown below. Bolting or clamping is probably the best way to go for taller risers.

CoverRiserDesign1_zps4db40969.jpg


Risers could be made from pine with a plywood face, and painted to match the tub and cover. At the rear, a hinged door/hatch might be constructed above the tailgate on taller risers to provide better access to cargo. And as long as they're built strong enough, there's no reason that a tent couldn't still be put on top of the cover.

Just some food for thought for increasing weatherproof and secure storage space :).
 

notdeankane

New member
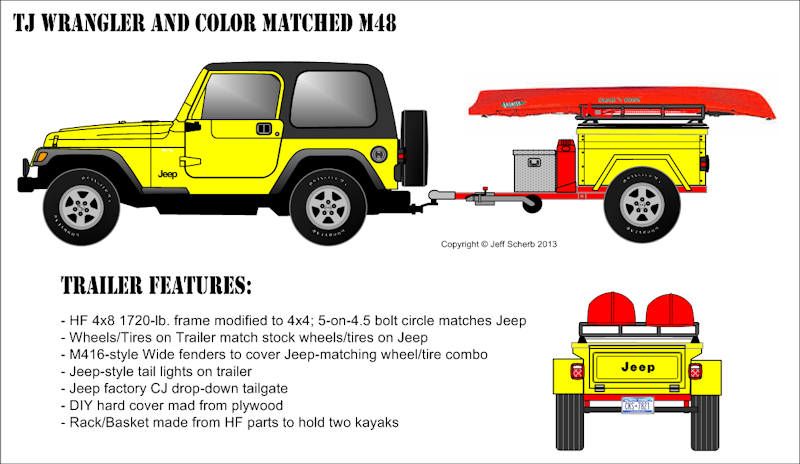
Here's a build concept for the M48 version of the tub kit. It's painted to match the builder's Jeep, and has a rack to carry a pair of kayaks. It uses the rack basket made from Harbor Freight parts that I posted earlier:

YellowTJ-M48-1_zps987a2738.jpg


I'm happy to draw anyone else's favorite build ideas for this tub kit too, just post up your ideas and plans ;).

I have read thru this thread a couple times now, and really appreciate what you have accomplished! Very cool stuff! So cool that I am considering selling my offshore fishing boat to finance a trailer project...(well maybe..)

Living in south FL , I don't get too much opportunity to get out in the boonies, but a weekend camping trip to the Keys or 'glades to kayak fish, supported by an expedition trailer would be awesome.


My question is this: What would be your thoughts on trailering kayaks (like the pic in your post), but also including an RTT on the trailer? I am guessing some sort of racking system coming off the front and back of the frame (thus keeping the rear receiver free)?

again, simply incredible work! This thread has been my 'go-to' resource for considering a trailer build :)
 

jscherb

Expedition Leader
I have read thru this thread a couple times now, and really appreciate what you have accomplished! Very cool stuff! So cool that I am considering selling my offshore fishing boat to finance a trailer project...(well maybe..)

Living in south FL , I don't get too much opportunity to get out in the boonies, but a weekend camping trip to the Keys or 'glades to kayak fish, supported by an expedition trailer would be awesome.


My question is this: What would be your thoughts on trailering kayaks (like the pic in your post), but also including an RTT on the trailer? I am guessing some sort of racking system coming off the front and back of the frame (thus keeping the rear receiver free)?

It wouldn't be a problem at all. Here's what I would do, and I'll illustrate it with some photos of my Jeep-tub trailer, although the concept would be identical on the military trailer.

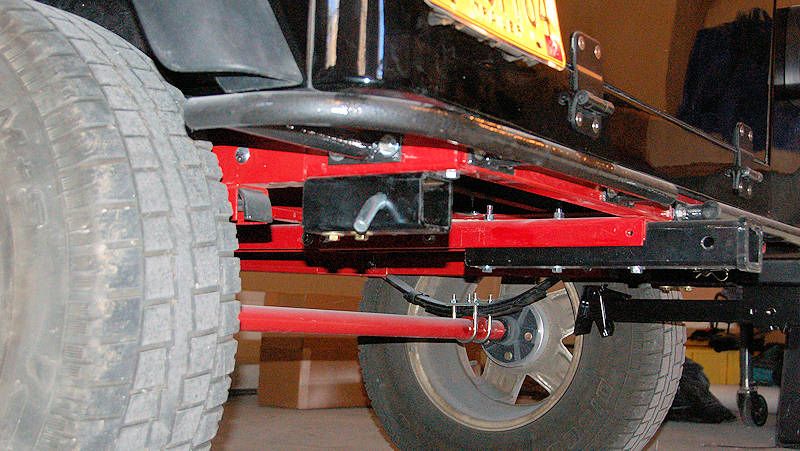
When I built that trailer, I installed three receivers on the back. The center one I intended for a bicycle carrier, but I also installed one at the back of each side rail:

Stabilizers4.jpg


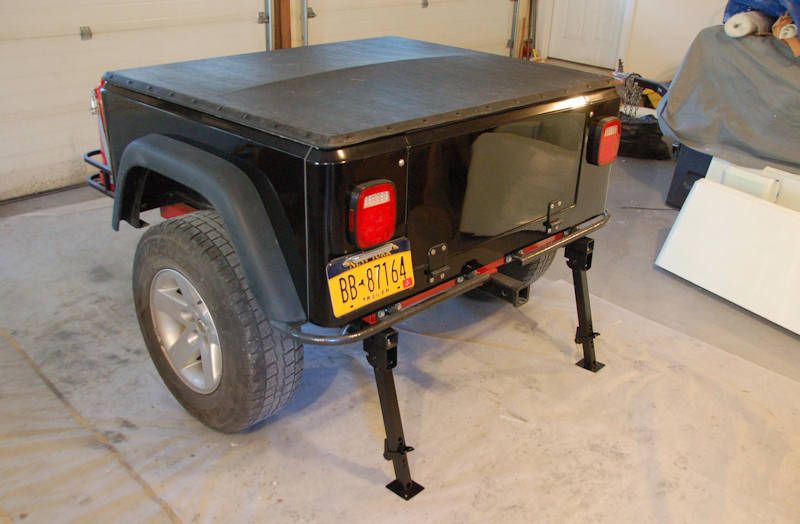
To stabilize the trailer for use with a roof top tent, I mounted stabilizer jacks on pieces of 2" square tubing so they could slip into the receivers:

Stabilizers1.jpg


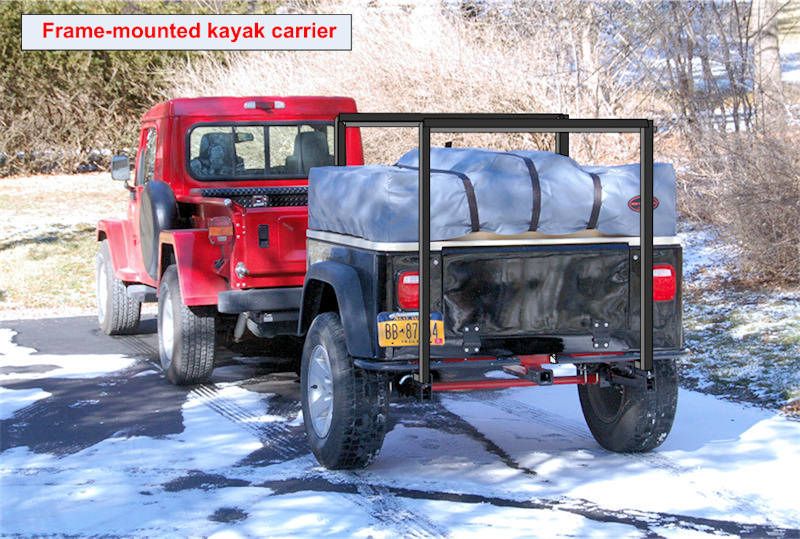
But I also was thinking ahead to other uses of those receivers, such as a frame that could carry kayaks above the stowed roof top tent. Here's a concept drawing:

KayakRack_zps8a70bb14.jpg


You could install receivers on the front of the frame to mount the front rack, or you could bolt the front rack to the tongue.

You might try a "t"-shaped kayak rack mounted in a center receiver instead of the two-receiver mount I drew in the photo above. I'm not really a fan of "t" racks, I think they sway and rattle too much, but making one that's strong enough for two kayaks wouldn't be hard. The other thing I don't like about "t" racks is that they block access to the tailgate - the double leg one I drew would allow the tailgate to be opened with the rack in place. Maybe just do a "t" rack in the front and bolt it to the tongue of the frame?

Anyway, that's a long answer to your question, but in summary, there wouldn't be a problem carrying a RTT and two kayaks, all it takes is a rack something like this.

again, simply incredible work! This thread has been my 'go-to' resource for considering a trailer build :)
Thank you very much.

Funny coincidence about South Florida, I just sold the black trailer pictured in the photos on eBay, and the buyer is in Ft. Myers. My mom lives in that area, and my family is having an 80th birthday gathering for my mom next month, and I plan to drive there, so I told the buyer I'd deliver the trailer to him.
 
Last edited:

jscherb

Expedition Leader
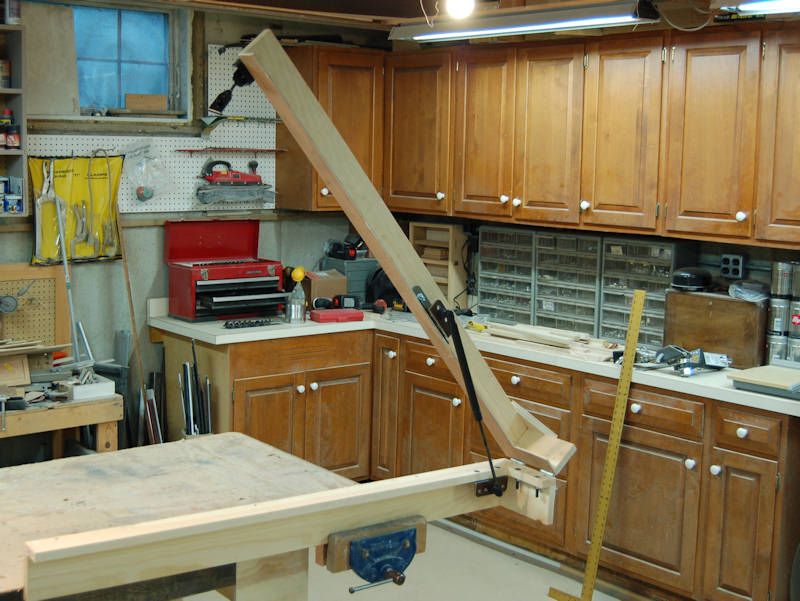
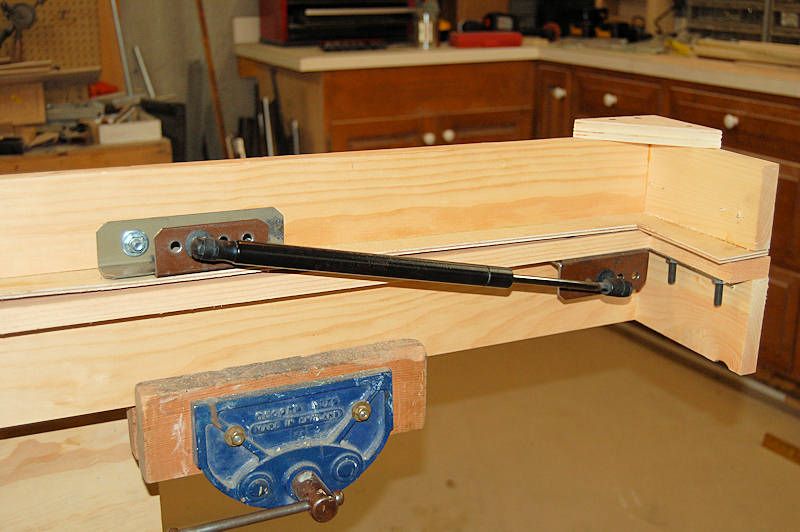
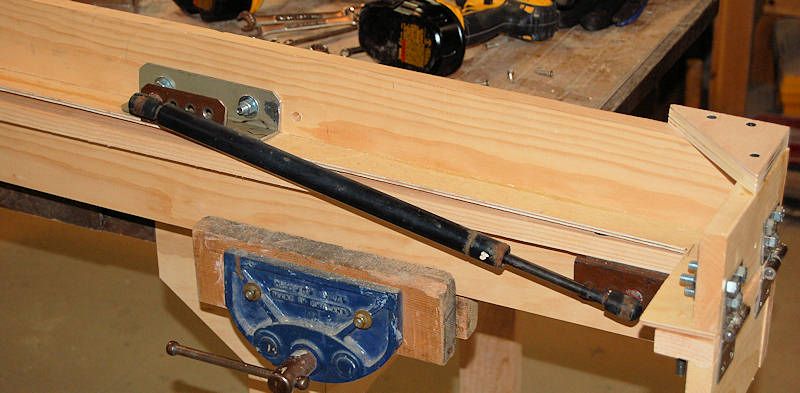
I've worked up a mockup of the strut installation that simulates the main dimensions of the fiberglass tub. Here's the mockup in the open position:

StrutMockup1_zps58238de7.jpg


I've hinged the mockup with a pair of the DIY lift-off hinges I posted the other day so I can test those; I've also put one of the latches on the end so I can test those too.

I picked up a pair of these struts at the u-pull yard the other day. They're from the liftgate of an '08 Dodge Caliber; I picked them because the Caliber liftgate is a little smaller than a typical minivan liftgate, so these are a little weaker than minivan struts. Best I can guess but trying to compress these manually is that they're about 125/150-lb. rated struts, although that's just a guess.

I've put a series of adjustment holes in both the tub-side and the cover-side brackets, so that different length struts can be supported and "fine tuning" adjustments can be made with the struts.

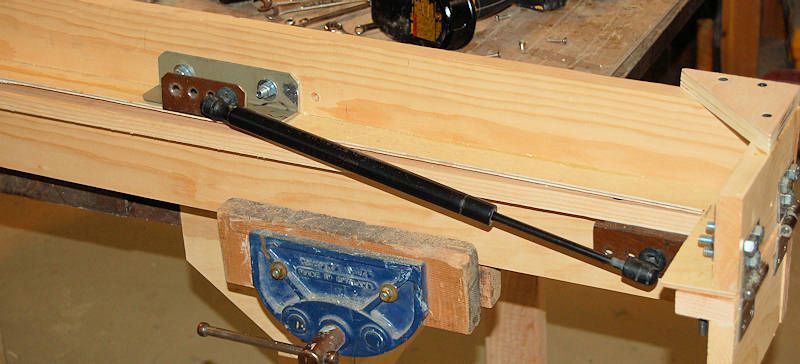
Here's a closed view:

StrutMockup2_zps526afaf0.jpg


Mounted like this, the strut doesn't interfere with the tailgate opening, so if you needed to carry a long object with the tailgate open but the cover shut, that would work just fine.

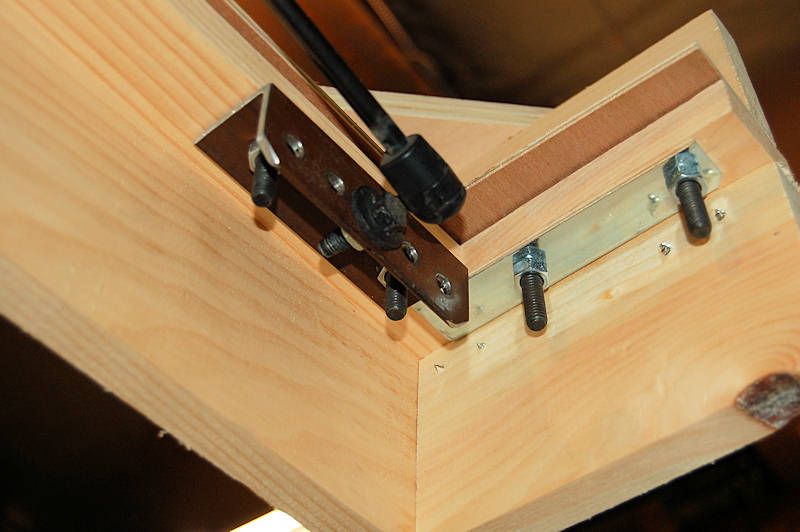
And here's an underside view:

StrutMockup4_zps5dda7fe0.jpg


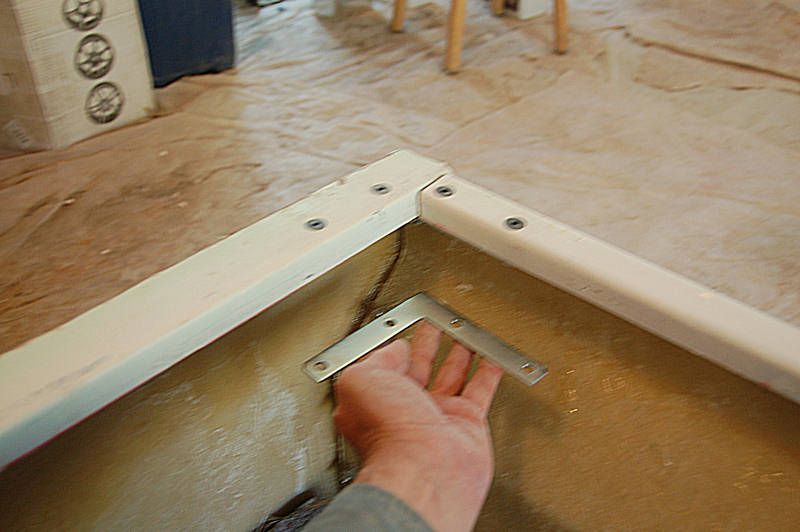
The angle bracket is already part of the tub design, it's used to reinforce the corners (I posted the photo below a while back when I was assembling the tub). The tub-side strut bracket bolts right up to the same bolts (in this case, I used longer bolts, that's all I on hand while building this prototype). Because it ties in to the angle bracket reinforcing the corner, there's no issue with the force the strut exerts on the tub. Also, the angle bracket and the strut brackets are symmetric, meaning that the strut bracket can mount on either the left or right, and it can be used in the side hinge cover configuration or the center-hinged or end-hinged configurations. The cover-side bracket is also symmetric and can also be used in any configuration.

CornerBracket_zps9f7ce938.jpg


I plan to grab a stronger strut from the junkyard, perhaps from a minivan, so I can test that too, in case these struts end up not being quite strong enough to support and open cover with a tent on it. I won't really be able to test the amount of strength that's needed until I get the cover and the tent installed on the tub, but I can try out different struts on this mockup.
 
Last edited:

jscherb

Expedition Leader
I've done a little more work on the strut setup. Here's the same strut as the previous post, but I've moved the cover-side strut bracket to the left a bit so this strut mounts in the closest hole.

StrutMockup5_zpsfacd3d28.jpg


And below is a much stronger strut from a Ford Explorer. It's slightly longer, so it mounts in the furthest hole. I think this strut may be too strong - it may be more than will be required to lift and hold the cover up with a tent on it. It put so much stress on the DIY lift-off hinges in the very soft pine that I added an extra bolt to each hinge.

StrutMockup6_zps8ef39191.jpg


The tub-side bracket is in its final form, but I'm going to put more adjustment holes in the final cover-side bracket so a wider range of struts can be supported. I'll post photos of the final hardware when it's complete.

Also, after feeling just how much pressure the Explorer struts exert, I've decided to upgrade the DIY lift-off hinges. I'm sure the hinges I made the other day would be fine with the lesser strength struts, but I want to make sure the hinges can handle the stronger struts in case those are the ones I need. Stay tuned for stronger DIY lift-off hinges.
 

Forum statistics

Threads
188,375
Messages
2,903,887
Members
230,227
Latest member
banshee01
Top