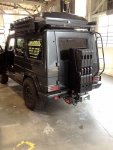
O'erlanderwagen build

RBA

Adventurer
Awesome, congrats!
Yes, once you go with bi-xenon's or bi-LED's, the stock halogens(which I never understood MBZ included halogens on such an expensive truck anyways!) are poor. The only issue with the LED's is if you drive in a lot of snow/ice, the LED's are so cool they won't melt the snow/ice.

It'd be pretty straight forward to do a Rigid bar on top of the lower horizontal bar, where the 2 fasteners are pre-installed for aux light location. I've of course noticed in the fog/blizzard snow my 50" makes driving much more difficult, so I'd need to add a Rigid on the brush guard with an amber cover for fog use. Thankfully it's usually not that foggy in OR.

Any chance you will mount your additional Rigid bar on the bull bar in the coming weeks? Any chance I could buy whatever brackets you develop to mount mine?? Maybe get them installed on the 20th? :)
 

mk216v

Der Chef der Fahrzeuge
Any chance you will mount your additional Rigid bar on the bull bar in the coming weeks? Any chance I could buy whatever brackets you develop to mount mine?? Maybe get them installed on the 20th? :)

Oh, I won't be doing an add'l Rigid bar(I haven't yet measured how wide I can go there) on my brush guard for some time. I haven't encountered THAT much fog to necessitate the added cost. But I think that RI's own adjustable bar mount kit would be the ticket;
http://powersports.rigidindustries.com/mounting-options

Certainly anyone in Cali could do this setup for you too in case you just want to drive straight(with stopping to say hi really quick) to Cali.
 

mk216v

Der Chef der Fahrzeuge
Oh, I won't be doing an add'l Rigid bar(I haven't yet measured how wide I can go there) on my brush guard for some time. I haven't encountered THAT much fog to necessitate the added cost. But I think that RI's own adjustable bar mount kit would be the ticket;
http://powersports.rigidindustries.com/mounting-options

Certainly anyone in Cali could do this setup for you too in case you just want to drive straight(with stopping to say hi really quick) to Cali.

FYI, I finally had a chance to wash my truck today. I measured the front lower horizontal bar on the brush guard. There's about 30.25" width between the 2 main vertical supports. Damn, the new 28" is just too wide at 30.875"OD http://www.rigidindustries.com/sites/default/files/catalog/17.pdf
Looks like you'd have to go with the 20".
 

RBA

Adventurer
oh, that sucks!!! So close....

I wish I could hook that up for my drive back home from Seattle but I suck at electrical work, plus I'm not detail oriented and I want a nice clean install.

Tell me a bit about the Nolden headlights. Is that an easy DIY upgrade?
 

mk216v

Der Chef der Fahrzeuge
oh, that sucks!!! So close....

I wish I could hook that up for my drive back home from Seattle but I suck at electrical work, plus I'm not detail oriented and I want a nice clean install.

Tell me a bit about the Nolden headlights. Is that an easy DIY upgrade?

Yeah, and with the fasteners on the ends even with the "bar" clamps, I don't think you could shorten the threads of the 2 fasteners enough to make it all clear.
There have to be PLENTY of good places in Cali, even skilled stereo shops, who can easily take care of this for you.
Yes, pretty straightforward. Drop down the bull bar w/ factory tool, remove the 4 fasteners on top of cowl which secure the grille, remove the 2 Phillips screws underneath each body-colored headlight surround, pull up driver and pass headlight surround, pull up on the grille, pull headlight surround tabs out from behind grille, remove headlight/bucket assembly, unclip 3 plastic clips which hold lamp to bucket assy, install Nolden lamp using supplied custom bracket/SS hardware, trim off their weatherpak connector for the "city" light bulb, install male/female spade connectors, plug in the lamps, re-install lamp/bucket assy into car, reassemble in reverse order from above. Can you tell I've done this at least a few times? ;) The issue with the Nolden's right now is that many of the Osram components for them are used for new vehicles, so large production runs need to be done to keep costs down, and of course there aren't THAT many G's who are looking to upgrade headlights, so we need to piggyback our order with another (Euro) companies' order due to the VERY low quantities requested in the USA. We have about 3-5 people interested and ready--trying to get to 10 people.
 

mk216v

Der Chef der Fahrzeuge
@ mk216v

if i remember correctly, you said before that the shimmy you encounter might be due to the size of the tires. if you have so much trouble getting rid of this shimmy, why not go back on or two tire sizes? In the army they told me always that you could better have a small high tire instead of a wider one, because if you air down the smaller higher one, your imprint on the soil wil be longer, and therefore you have more surface to the ground compared to the wider tire.

I hope this might work for you?

I guess I hadn't updated about the "phantom" shimmy thru the steering wheel/truck is pretty much gone.
Before the big SW trip, we re-installed the wheels/tires onto the G using a few of our Go-Jaks(devices that go in front/rear of a tire and by "pumping up" the Go-Jak pedal, it will lift up the vehicle). We put the rear axle on jack stands, removed the rear wheel/tire assemblies from the truck, measured the hub bore on the G(~85mm), measured the centerbore of the Hutchinson(~84mm)....aha, that needs to be solved(Tony at Motorsports is on Hutchinson about their engineers making these perfectly hubcentric. Long story.......). So I pulled out our roll of black gaffer's tape, measured a 10.5" length(this is the circumference inside the Hutchinson centerbore), stacked 2 strips of gaffer's on top of each other, measured crush with a mic, pretty darn close to 0.5mm(in layman's terms 0.5mm on "bottom" of circle + 0.5mm on "top" of circle = our 1mm difference). Applied that tape "ring" to the inside of the Hutchie, put the wheel/tire on the Go-Jak(truck is on jack stands remember), pumped the Go-Jak up to where the Hutchie centerbore perfectly lined up with the vehicle hub outer, pushed the Go-Jak/wheel&tire onto the vehicle hub, made sure the tape WASN'T bunching(this is the most important detail, then equally hand tightened 5 lugs in a star pattern, tighter and tighter and then with socket and then with torque wrench(110ft/lbs is spec for mine). We did the same procedure for the front axle. Major shimmy is gone because now the wheels/tires are [almost] truly hubcentric.

After the huge mud adventure in the SW, there was LOTS of mud caked in the RR wheel, and going down the freeway the horrible shimmy came back thru the entire truck. This shows how important wheel balance(I'm using Counteract balancing beads, similar to Equal which Tony is now using standard in all Hutchie setups) and hubcentricity(that a word?) is.
 

Capo

Happy Camper
The fuel cell looks awesome! For better ground clearance and weight distribution you may want to stow the winch and the fuel cell inside, low. Also if somebody slides into you causing the fuel to catch a light, there will be misery. My rear winch is secured on the floor replacing the fifth rear seat and shares that place together with the rest of the recovery gear for easy access. The winch locks into place with a pin straight onto the hitch ball, neat. It's rarely used so it's a pity sand/mud spraying it and pounding it back on the hitch during the whole trip. It stays reasonably clean even when in use since the winch recovery is a slow process and the rear wheels spray the sand/mud the other way. For easy handling and weight saving I downsized my rear winch by half compared to my fixed front winch and instead I double back with a snatch block. When going solo a rear winch is a splendid piece of kit to have.
 

Attachments

  • image.jpg
    image.jpg
    76.4 KB · Views: 81
Last edited:

mk216v

Der Chef der Fahrzeuge
The fuel cell looks awesome! For better ground clearance and weight distribution you may want to stow the winch and the fuel cell inside, low. Also if somebody slides into you causing the fuel to catch a light, there will be misery. My rear winch is secured on the floor replacing the fifth rear seat and shares that place together with the rest of the recovery gear for easy access. The winch locks into place with a pin straight onto the hitch ball, neat. It's rarely used so it's a pity sand/mud spraying it and pounding it back on the hitch during the whole trip. It stays reasonably clean even when in use since the winch recovery is a slow process and the rear wheels spray the sand/mud the other way. For easy handling and weight saving I downsized my rear winch by half compared to my fixed front winch and instead I double back with a snatch block. When going solo a rear winch is a splendid piece of kit to have.

Thanks for your thoughts. There was a lot of thinking going on before we fab'd the fuel can holder. Of course RotoPax doesn't recommend storing gasoline/petrol inside. Biodiesel would ok I suppose.
I borrowed the winch from a friend as we figured it might appease Mr. Murphy(Murphy's Law; take it and we won't need it. Don't take it and we'll need it. Thankfully we didn't need it).
 

swb

Observer
There should be plenty of companies who could make a proper long-range fuel tank to replace the existing fuel tank.
Very popular option here downunder, where we have big distances between fuel stops for many overland trips.
Although nobody makes an off-the-shelf long-range tank for a G here (unlike for most other 4wd's like Toyotas and Nissans) there are fabricators who can custom make them.

My old mans 2002 Toyota Prado has 2x90L tanks, factory standard!
 

mk216v

Der Chef der Fahrzeuge
There should be plenty of companies who could make a proper long-range fuel tank to replace the existing fuel tank.
Very popular option here downunder, where we have big distances between fuel stops for many overland trips.
Although nobody makes an off-the-shelf long-range tank for a G here (unlike for most other 4wd's like Toyotas and Nissans) there are fabricators who can custom make them.

My old mans 2002 Toyota Prado has 2x90L tanks, factory standard!

There aren't, because the G is more of a rare bird compared to a Toyota LandCruiser or HiLux. :(

Off the shelf options are;
-ORC (petrol or diesel)
-Front Runner (diesel only)
-Custom using AlanM's schematics for the one he built for his diesel
-Totally custom design of your own

2 90L's(23.8gal's) standard--jealous!
 

Capo

Happy Camper
Custom made is probably a good way forward. Mine is a custom made 140 litre tank but I wouldn't recommend it for petrol since it's location is right inside of the rear door and stretches to the rear seat bank. An extreme rear collision could probably be dangerous in case of petrol albeit the risk is low. I'd go for a central position and flank it with water tanks for maximum security in case of an extreme side collision.

Alternatively, you could have a tank in the rear and install a protective water tank between the rear door and the petrol tank?

Just a thought.:)
 

swb

Observer
I guess thats why fuel tanks inside is illegal here. They do not comply with our vehicle standards.

Although I have carried 40L of diesel in jerry cans inside, well tied down. Using the mil-spec plastic Sceptre tanks (the best IMHO)
Tom Sheppard carried plenty inside on his trips.

Many people here fit dual swing out wheel carriers and use one of them for double 20L jerry cans.
 

Capo

Happy Camper
Many people here fit dual swing out wheel carriers and use one of them for double 20L jerry cans.

That is practical but in case you get hit hard in the rear and have petrol in the jerries - it's going to be a story... Inside or underneath are the most protected places. It just needs to be done by a pro.
 

swb

Observer
But you have a G400 - diesel?

Diesel is great for overlanding. Better economy, inherently safer, available everywhere particularly far-flung remote places (because its the fuel of choice for freight, farming, generators, heating, fishing fleets, military) Plus the biodiesel options.

Also is smells and sounds good (my G) (IMHO)
 

mk216v

Der Chef der Fahrzeuge
But you have a G400 - diesel?

Diesel is great for overlanding. Better economy, inherently safer, available everywhere particularly far-flung remote places (because its the fuel of choice for freight, farming, generators, heating, fishing fleets, military) Plus the biodiesel options.

Also is smells and sounds good (my G) (IMHO)

As long as it's not the ULSD which many newer trucks with high injection pressures use....I've heard that is difficult to find in far-flung places.
 

Forum statistics

Threads
187,639
Messages
2,896,135
Members
228,596
Latest member
donaldsonmp3
Top