seanpistol's 01 Tundra

seanpistol

Explorer
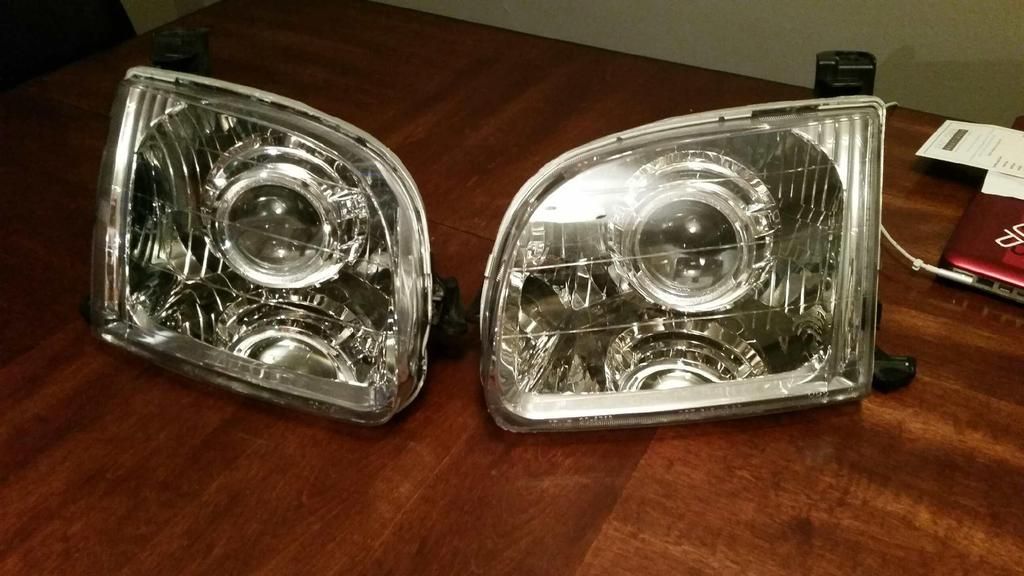
Also, I may as well throw out there that I'd like to sell these brand new headlights I have sitting in boxes on my dinner table. Rickashay put them together. I've just decided to go another route. Everything is brand new and never been installed. They have BOTH high and low beam.

FX-R 3" Bi-Xenon Projectors (hi/low beam projectors): (TRS info here: http://www.theretrofitsource.com/com...l#.VO57F1PF8Z0)
4300k pure white Morimoto HID bulbs (35w)
Morimoto HID Ballasts (35w)
H4 HD Relay Harness
TYC OEM Replacement Headlight Assemblies
Apollo 1 shrouds


This is a complete "plug and play" headlight setup. You will need to install the ballasts and wiring harness (2/10 difficulty and I have instructions) and then aim the headlights once on the truck using a 10mm ratchet (also have aiming instructions).

And here they are -


This Tundra has a near identical setup also put together by Rickashay-

c779489d494a5722d81542c90f786e7d.jpg

2b62125716db7fbd26bb1c8d60b7a2d8.jpg

9e4599cf29a65cfc8bb963e8cea1cde2.jpg


I'd like $600 for them. I paid more getting them across the border.
 

dyogim

Explorer
If I didn't have to pay for a head gasket repair on our highlander and wasn't looking for a set of 17" wheels for 37" tires, I'd take this off your hands. Good luck with the sale.
 

seanpistol

Explorer
Started on the tub today. I took off as little as possible at a time- constantly mounting the tire, jacking up the LCA to mock full compression, cycling the suspension, and cutting where I had interference. I had to remove quite a bit of material... could be that this brand-new old-style MTR is a slightly larger tire than what others have used.

Finally ended up with this-


The lower "plain" piece of cardboard is where I'll beef up the structure with 3/16". The rest of it will be 16 ga. It will be heavy duty.


I'm going to weld in two separate pieces of 16 ga instead of trying to get one sheet to conform to the entire thing. It will look more like this, but with the 3/16 plate being a third piece on the lower structure of the door jamb.

12193700770.jpg


Bumper needs trimmed-


My interior bubble. There is a smaller sized one in there from the factory, and my E-brake is fully depressed here. I don't see this being uncomfortable at all, but I'm sure I'll have to trim the kick panel to fit. No big deal.


Going to cut up the passenger side tomorrow, and transfer the templates to steel using my buddies plasma cutter on Sunday- then weld it in (bought .025 wire for the sheet metal), seam seal it, undercoat the bottom, paint everything underneath the fenders, and get tires mounted Monday. After I mounted the brand-new old-style MTR on my spare wheel, I found a set of 6 old style MTRs with 12/32 tread for $500. Currently trying to sell two since I have 7 of them. :Wow1: I figured I'd run these for a roadtrip this summer and throughout the fall, and then possibly pick something brand new up when the snow falls.
 
Last edited:

rickashay

Explorer
Nice moves Sean!

Looks like your taking more off than I did... whats the backspacing of the spare wheel? Wheel spacers? Our height of the tub looks about the same, just looks like you went a bit more towards the center. Good idea on beefing up that lower section too!
 

seanpistol

Explorer
My spare has 4.5" backspacing, same as the rest of my wheels. Spacers are 1.25". So 3.25" backspacing and you're at 3.5"... if anything you'd be slightly further in than I am. That's why I'm thinking this tire could just be a bigger 315! I initially took out a very similar amount to what you did and was rubbing all over the place.
 
Last edited:

toyotech

Expedition Leader
Ah I wanna do mine now. Looks good. I probably won't need to do as much but it's nice to see how much work I'll need to do.


Sent from my iPad using Tapatalk
 

Kya

Adventurer
Looking good! Are you, and anyone else running 35s on stock LCA, worried about the "L bracket" that connects the lower ball joint to the LCA failing under 35s? If so, would a gusset for the L bracket be worth the time to fabricate up? That one piece always looked sketchy to me, but maybe its a problem that doesn't exist.

11425760_10206781380431538_5921328458971382878_o.jpg
 

Benc

Explorer
Looking good! I do have a couple suggestions though,
I would be very careful about using a plasma cutter. It is very easy to shoot sparks where they shouldn't go. Also with all the layers, you will not be able to get to all of them with the plasma. I have done several tub jobs and my tool of choice is still a 4 1/2 grinder with cut off wheel.
I'm sure you already know this but you will need to have someone in the cab with a wet towel to put out the fires while welding. You may also want to he a small fan inside the cab to try and keep some fumes out.
I used the same tire for mock up on my tacoma but the new mtrs run a little bigger. After that I always remove as much as possible the first time. Fwiw, I did have to cut into the door hinge and trim the body mount on my brother in laws tundra and he still rubs a little with the new style mtrs,
Good luck, you won't regret the 35s!


Sent from my iPhone using Tapatalk
 

seanpistol

Explorer
Thanks! Plasma cutter is just for transferring the cardboard templates to steel. All the squiggles and uneveness will be much easier with a plasma than with an angle grinder.

All of the cutting in the wheel well was done with an angle grinder with cutoff wheel. And yes, someone was sitting inside with a wet towel and a fire extinguisher!
 

amgvr4

Adventurer
Tubs are looking good. I think you will like the old MTRs, they have been great for me in two sizes and on two different trucks.
 

seanpistol

Explorer
"Welding sheet metal is fun" - said no one ever.

Haha, stock sheet metal is only about 22 ga! No problems, just very tedious. I'll finish the passenger side tomorrow and seam seal everything. Need to drive my truck to work Wednesday.


Forum statistics

Threads
186,977
Messages
2,889,914
Members
227,613
Latest member
WRL
Top