Stumptaco's has gone over to the darkside..XJ style.

SEREvince

Adventurer
stumptaco said:
Made some progress today.

DSCN0519.jpg


AWESOME!!!
 

StumpXJ

SE Expedition Society
It is still Teal....

It is still Teal, but it is WAY more ************ now. With a huge help from SEREVince (Vince), we got the rear pretty much finished this morning. Everything went suprising smooth....until the drivers side front spring hanger bolt came into play.

I was a motorcycle mechanic in the States for almost 11 years, and I have dealt with my fair shair of "stubborn" bolts, but this bolt easily made it into the top three "biggest pain in my butt" category. It was seized inside the bushing sleeve, and it did not want to play nicely. I ended up fabricating/welding a slide hammer device with some scrap metal I had laying around to try and hammer/pull the bolt by the head out of the sleeve, but it still did not budge with just the hammer alone. Finally, Vince and I hooked a 5000 pound ratchet strap to the rock slider on his Tacoma, and connected it to my slide hammer while it was on the bolt head. We put an insanely large amount of pulling force on the head of the bolt with the ratchet strap, used almost an entire can of liquid wrench, and I proceded to turn the bolt with a 5 foot breaker bar. It FINALLY started coming out of the sleeve. We faught this thing for literally 2 hours. After that, it was a cake walk. :)

Still on the list of things to do to "finish" the entire suspension:

Install extended front brake lines and bleed
Install extended rear brake line and bleed.
Install front track bar
Install SYE and send a measurement to Tom Woods for my CV driveshaft.
Install the driveshaft
Install the JKS quick disconnects.
After all of that, set the track and caster on the front.

Not entirely sure how to go about setting the track (what to measure off of?) or setting the caster. The caster spec says 4.5-5 degrees, but in reference to what? Absolute vertical? Do you take the measurement on the knuckle? Hopefully John or someone can shed some light.

Here are some pictures. Not quite as Chicano/Hooptie style any more. :xxrotflma

DSCN0521.jpg


DSCN0523.jpg


DSCN0524.jpg


~James
 

SEREvince

Adventurer
That is a thing of beauty! Teal and all:exclaim:

Glad I could pay back just little of all the hard work you've put in on the Taco.

Time to have a beer or three to celebrate :beer:

Drink one for me. I still have a paper to finish!

Cheers

Vince
 

OverlandZJ

Expedition Leader
:clapsmile Looks awesome James. Your work is really showing now.

I'm not an expert in front end alignment at any level, but i'll attempt to steer you straight... :elkgrin:


Centering the front axle side to side is achieved by adjusting your trackbar. I just did this and the most accurate way i found (after lying awake one night recently) was to take a piece of string with a small nut tied to one end. Hold the string against the unirail just infront of the coil spring and let it hang just infront of the axle tube. You'll see that the string will be just inside of the coil spring perch... measure the distance from string to the perch. Now, please notice that on the drivers side you'll be placing the string against the trackbar bracket as it sits over the unirail,so you'll need to take that thickness into consideration when you compare the distance side to side. Shorten of lengthen the trackbar to center the axle.

On my RE trackbar i disconnect the frame end and adjust the length. To reconnect i have someone turn the steering wheel which will move the vehicle side to side over the axle to align the bolt. No need to push the body over.

On a stock XJ the caster spec is 7* positive. Meaning the upper ball joint is rotated towards the passenger compartment compared to the lower balljoint. (vertical)

Now adjusting your caster on your rig will be a compromise of caster and pinion angle. I'm still working on mine... and paying a pro most likely wont help as it's going to come down to feel. Vibe from driveshaft vs wandering/heavy steering. Keep in mind caster has no effect on tire wear.. so it wont hurt as you drive and adjust periodically. I'd remove the front driveshaft as your adjusting to rule out any vibes from a bad ujoint or slip joint. Concentrate on steering first.

Alot of the guys running at our lift height state they are in the 3*-5* positive range. I have no idea where mine is honestly.

Take a peek at your pinion yoke, it should be slightly down from vertical (EDIT TO HORIZONTAL) to transfercase. Start there and see how she handles. Once you find something that feels good try the driveshaft, if you add heavy vibes start adjusting the pinion up till you find a happy medium.

Heres a few links to help if my shadetree mechanical explanations were of no assistance.

http://go.jeep-xj.info/HowtoAlignment.htm

Search results @ NAXJA for "adjusting caster"

http://naxja.org/forum/search.php?searchid=2321625

Hope this helps a lil James. OK, ready for second cup now.. :coffee:
 
Last edited:

StumpXJ

SE Expedition Society
John, an absolute perfect explanation on all points. The string thing is genious, and setting the caster to feel makes perfect sense considering the extreme angle on the pinion. I was staring at the pinion angle on the front of the rig today and it is not exactly ideal to say the least...

Do any of the jeep guys rotate their knuckles on the axles and then re-weld? I know a lot of the Toyota guys do this. It would only be worth it if the upper arms could be adjusted enough to get a good pinion angle.

Thanks for the great ideas and info!!
 

OverlandZJ

Expedition Leader
Rotating the knuckles... not usually. Most find they can get an acceptable compromise with adjustments. Now if your building a Dana 44/60.. sure, set everything to spec at static ride height from the get go.

The Toyota front axle is signifigantly stronger and worthy of the mods when running a big tire vs the Dana 30. You really start pushing your luck with a Dana 30 and a tire over 33" unless you drop alot of money into it... and at what point is a D44 donor the better choice for a build platform.

If i were still running the rocks i would have built a HP D44 using Grand Waggy length axleshafts instead of another D30. But i would like manual hubs though..
 

StumpXJ

SE Expedition Society
Did yours have the high pinion or low pinion 30 in it?

You are right about not messing with the 30 as far as rotating knuckles, just not worth the effort. My ultimate plan is to put in a 60 rear and 44 front when we get to back to the states, but that is still 2 years away... Arrghhh! Decisions decisions....

Finding a donor 44 over here would be like finding a needle in a haystack. I guess I will play with what I have and hope for the best until we get back home. Thanks for the links too, just got finished reading those.

~James
 

OverlandZJ

Expedition Leader
Mine is a HP D30, makes no sense in using a LP D30 when building considering a used HP housing is so cheap to aquire. Other than carrier and gearset it uses the same parts outward.. and you most likely are swapping those in a gear/carrier swap anyway. JMHO

Glad i could help, i'll bet others here will chime in with additional input as well. Again, i'm no expert and could use some enlightenment as well.

:beer:
 

StumpXJ

SE Expedition Society
I hear you about the hp and lp, unfortunately mine is the low pinion. I just stumbled on this at NAXJA.

http://www.naxja.org/forum/showthread.php?t=935127&page=5&highlight=rotate+knuckles

It seems easy enough to do over a weekend, and I dont have to remove the axle assembly persay. It will be time consuming, but very little costs involved and the benefits would be huge I would imagine. I need to replace the upper and lower ball joints on both sides soon anyway....

This freekin internet is going to cause me to spend more time in my shop than I want to. I just dont want to be fighting poor handling and driveline vibrations after spending all this money on suspension and tires. I will give it a shot like it is now, and if it doesnt work to my satisfaction, I will break out the grinder. Thanks again, ~ James :smiley_drive:
 

OverlandZJ

Expedition Leader
LP... you sure? Unless someone swapped that axle in you should have a HP D30. I think it was 00 when the XJ got that LP axle.
 

StumpXJ

SE Expedition Society
I could be retarded (entirely possible), but I am fairly sure its LP. I looked at enough in the last few days that I should be sure, but now you have me wondering. Its dark and cold outside right now, but I will double check in the morning. I did see quite a bit of orange RTV sealer type stuff around the diff cover that didnt look "factory", maybe it had been swapped. Not sure, but will find out in the morn.

~James
 

StumpXJ

SE Expedition Society
Edit: I think I am confusing it with the rear diff.... I looked at that most recently in the past few days as I was installing the rear lift, but have been thinking of the front end tonight. I guess I am going to have to break out the flash light and go look now....

~James
 

StumpXJ

SE Expedition Society
stumptaco said:
Still on the list of things to do to "finish" the entire suspension:

Install extended front brake lines and bleed
Install extended rear brake line and bleed.
Install front track bar
Install SYE and send a measurement to Tom Woods for my CV driveshaft.
Install the driveshaft
Install the JKS quick disconnects.
After all of that, set the track and caster on the front.

James

I have been working on making this list shorter over the last few days.

Last night:
I installed the front steel braided extended brake lines and got the system blead manually (by myself no less, using a little redneck engineering.... )

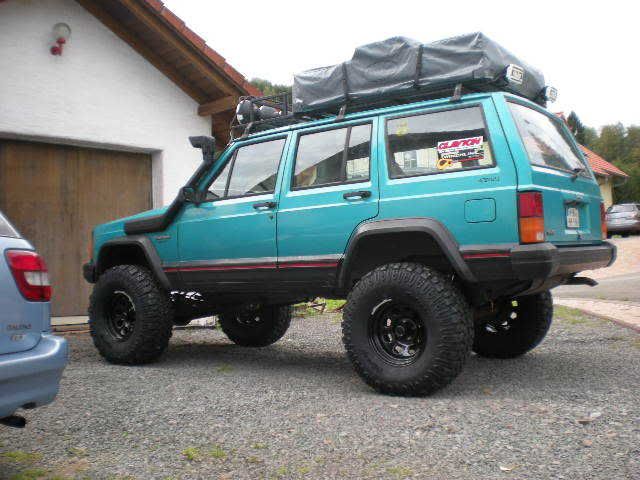
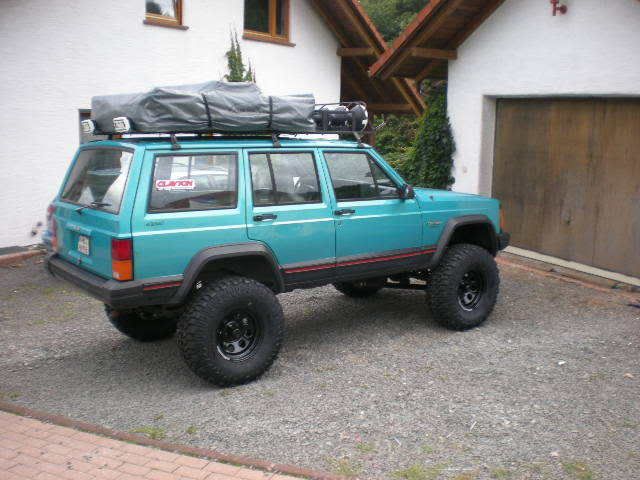
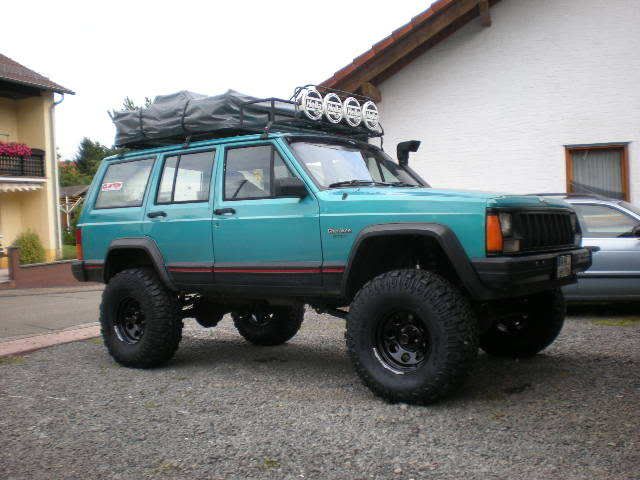
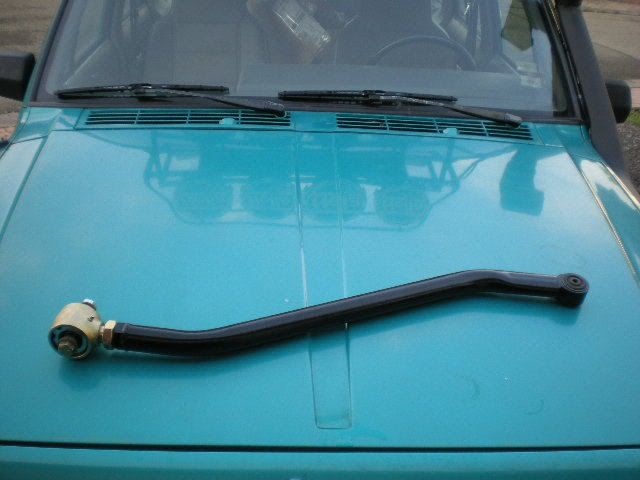
Installed the track bar and set the track as close as possible using the "overlandXJ method" (thanks John, worked like a champ!)

DSCN0528.jpg


Installed the JKS Quick Disconnects. Nice product, hopefully they hold up well.

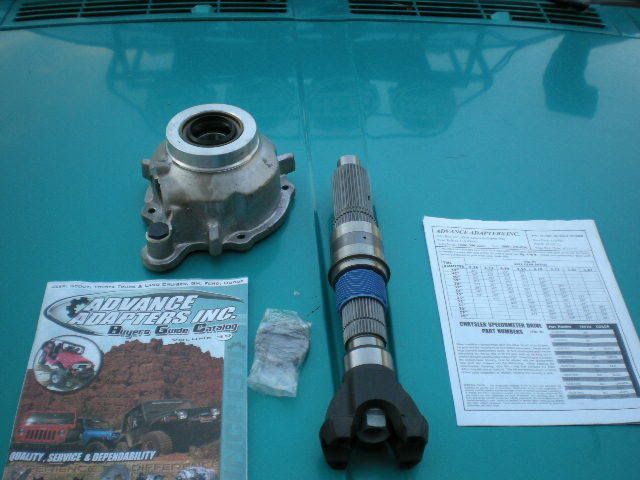
Today: Installed the Advanced Adapters SYE kit. This wasnt too bad honsetly. Looking at the instructions and reading the nightmares from other people doing them, I was a little concerned. It all worked out fairly well. A messy job, but MUCH easier now that my Jeep is a WHOLE lot higher! :) Its nice to be able to drain your engine oil into a 5 gallon bucket without using a jack...

DSCN0529.jpg


Got the measurement for my Tom Woods driveshaft after the SYE install, and have emailed the info to them. I should have the driveshaft in a week or so.

Still on the list to do because of the suspension install:

1. Install drive shaft
2. Install rear extended brake line and bleed
3. Set Caster, its WAY off right now. I drove the jeep to the end of my street in 4 high and it was SCARY.
4. Drive it slowly to the base to use the lift and adjust everything, and make sure its all tight and lubed. I am DONE with working in the rocks in my driveway.

On the very near future list:

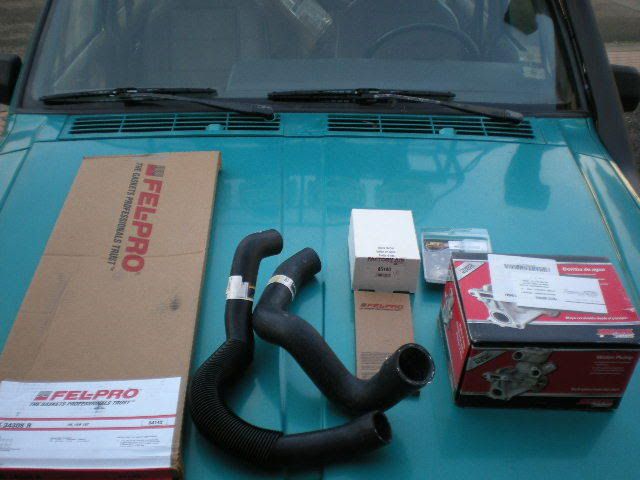
The day before I started the suspension, my water pump crapped out on me. Not exactly an un-common thing on XJ's and I was kind of expecting it any time because of the mileage and known weakness. So, I ordered a new water pump, new thermostat and thermostat housing, new upper and lower radiator hoses, and a new 3 core aluminum radiator. I got everything in so far except the radiator. This stuff will be installed in the next couple of weeks. While I was ordering those parts, I ordered an oil pan gasket, and new rear main seal set, since mine is leaking. I will replace this stuff one weekend in the next couple of months.

DSCN0526.jpg


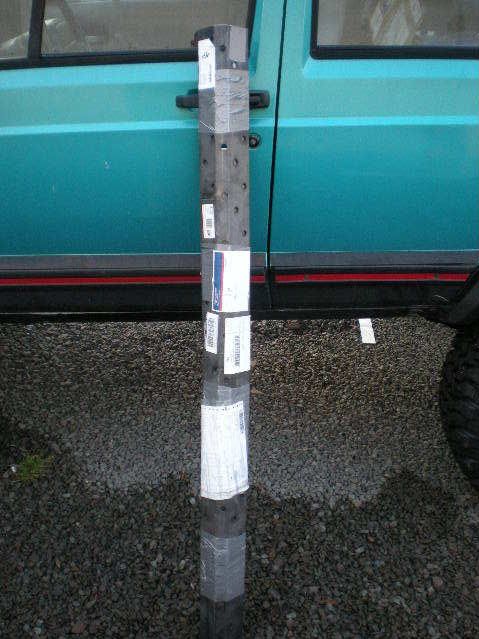
I also ordered a set of frame stiffeners I saw on NAXJA from HD Offroad Engineering. These are plasma cut pre-bent pre-roset drilled 10 guage steel plates that get welded to the mid section of the frame. They are very nice quality and the price was very good considering the amount of effort and time they will save me. Just got to grind away the underbody coating and weld them on. Yet another weekend job in the next coule of weeks. This will make installing my sliders much stronger when I get around to it.

DSCN0530.jpg


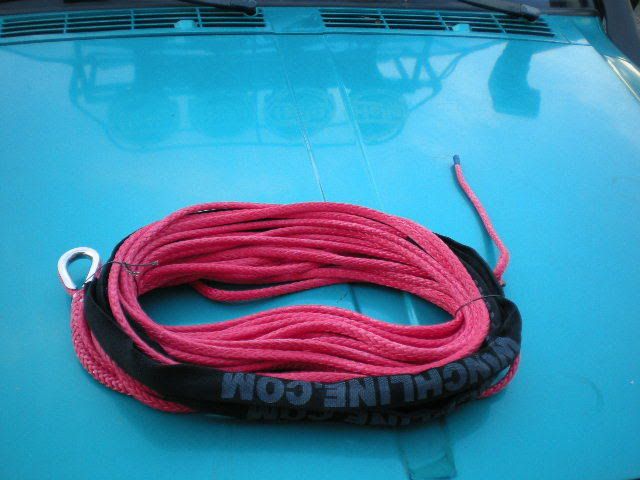
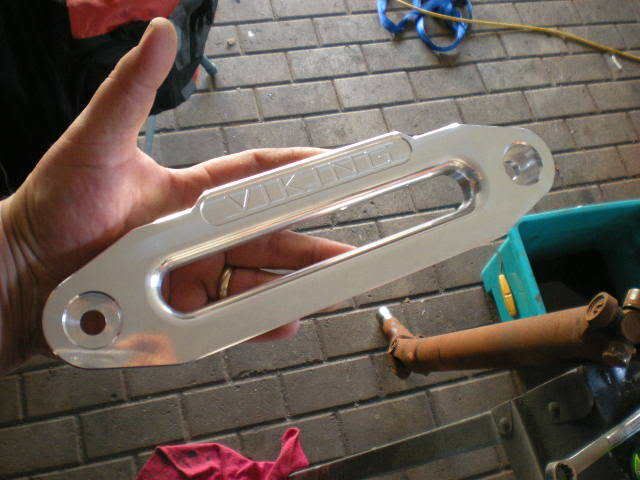
When Vince was here, I got extremely jealous of his synthetic winch line, so I ordered one of those as well (its his fault). 100 feet of red amsteel blue sythentic winch line from viking offroad/winchline.com to replace my kinked up, skin shredding old steel cable.

DSCN0527.jpg


Of course, I needed a new hawse fairlead since my old roller fairlead was chewed up from the steel cable, so I placed an order with our friends at Sierra Expeditions and got this, along with some cool new SE stickers. (Thanks Wendy!)

DSCN0531.jpg


We both have the same winch, the cheap little smittybuilt XR8, and while its not a warn, it does a very good job of getting you out of the nasty stuff. It has saved me multiple times, and I am very pleased with it. Yes, it is slow, but I can deal with that. Also, the "chrome" bolts rusted on both of our winches about 2 weeks after installing them, so a couple weeks back we found stainless steel hardware to replace all of the bolts. Problem solved. Also, the two chrome cross bars rusted, as well as the engage/dis-engage handle. We pulled the chrome bars off, I threw them in the lathe and removed the chrome plating, then we painted them with black spray paint. We also removed the handle, and gave them a good coat of black paint. MUCH better now. I want to get another one of these for the rear of my XJ!

The front bumper will most likely be my first armor build, and will happen very soon. I have just have to figure out a few more things, then I will start on it. I am a big fan of tube bumpers, so this will likely be just that. I also have to include a stinger, because I think they look good if done right. I wont try to fool you into believing I need a stinger, because I probably dont. But I want one, so thats that.

Thanks, James
 

micahtbyrd

New member
I love how your build is comming along. I am planning very much the same build on my Xj in the future. Yours looks great I love seeing a a nise build with good products.
What trac bar did you install with your current setup, and how much lift are you running. I am planning on longarms and 33's with 4.5 lift in the future but haven't got a new adj trac bar yet.

Can't wait to see more. Micah.
 

Forum statistics

Threads
189,860
Messages
2,921,638
Members
233,030
Latest member
Houie
Top