WOOD vs. METAL Trailer Wall Construction

JPK

Explorer
For those interested in a wood build, you should know that in cold molded laminate boat/yacht construction almost all mechanical fasteners are removed. Screws are used by the thousands to secure the wood while the epoxy is drying, but they are removed and the holes filled with an epoxy/filler combination that varries, but think dry wall compound or putty for typical consistancy.

Simlar pastes are used for fillets, along with wood for the larger joints.

When hardware or mechanical fasteners are required, they are bedded in epoxy or the epoxy/filler compound. The end result is bonding as a strong or stronger than the wood and no loosening. (See the Gudgeon Bros. or West Systems websites for more info.)

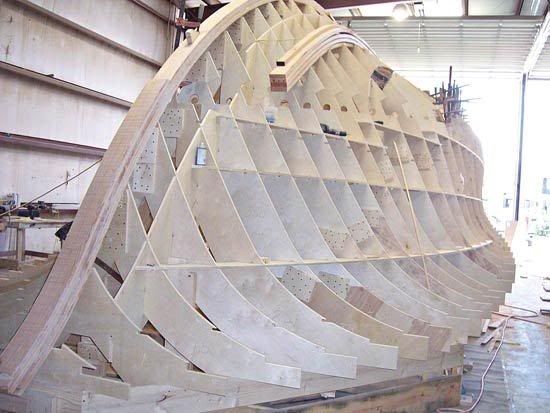
The boats are built on jigs btw, and the jig is removed once the hull is complete, leaving only the longitudinal keel, engine beds and stringers. That makes for the maximum internal space - no frames eating up internal cubes. Structural cross members are added after hull construction, using the fillets and putty to tie them in, but they are few in number and relatively far apart, like the engine room bulkheads, maybe 12 or 15' apart.

[And then there is plank on frame with epoxy, a different build technique, but very successful for decades]

JPK
 

Titanpat57

Expedition Leader
Wow guys...we're really rolling now!! :smiley_drive: Thanks for the contributions..:sombrero:

Please include any pictures (your own build), construction photos, links, etc. to help the folks that may not an idea of what some of the folks with extensive experience are referring to, or talking about.

Now my attempt...

I started with a wood "Pod" or top constructed on a metal flatbed Military trailer. Metal wasn't an option at the time, because my skill set (and tool collection) were not up to par to complete a full metal build. I used Google Sketch Up to design it, and really the only thing that changed from design to construction, was the nose gear was moved inside the box to make way for a propane bottle.

roam3.jpg


Obviously, they same problems that plague all wood to metal connections are wood shrinkage, metal shrinkage, and temperature differences. The pod was constructed from 2" x 4" on the flat, was screwed together with Scorpion brand fasteners, which have a higher tensile strength than commonly used sheetrock screws, plus, they have a cutter tip and are square-drive, ceramic coated. The glue used was PL Polyurethane construction adhesive, both on the joints, and on the 1/2" cdx plywood that was used on the exterior. Extra support (solid blocking)was addressed on the roof to support the RTT, the rack it mounted to, and my fat ********....and of course the better half. My other thoughts were to prevent wracking, and potential joint failure from any movement. I had bolted thru the entire frame and nutted up from underneath. The taillights actually were designed to prohibit side to side movement of the rear door area, which is the weakest spot, especially with the placement of the RTT. Even though the trailer platform (M116A2) has a fantastic suspension, I added the Monroe SensaTrac's to increase performance (thanks Tom Foolery) and help accommodate the weight.

One thing that constantly gnaws at me, is what would this build be like with composite walls, or how much easier would it be to design a fiberglass pod, and use this platform, or even slide the pod, with a sealed floor, on a trailer?

It never ends...does it?...lol

Now with more experience, and understanding metal a little better, I realize I couldv'e constructed this design in metal also. I would really love to do something in aluminum.

Let's keep things going, thanks again guys for the input.
 

bob

Adventurer
Pro Trac trailers was one of the first compaines to build off road fiberglass trailers. 1983 I think. It was contructed of 6 molded pieces, front, top 2 side walls, back openning and door.rivoted together. It had hoop frame and the fiberglass sides and top were bolted to the frame. The floor was wood and the molded pieces were wrapped at the bootom so they could be attached under the wood and between the metal of the frame out riggers. Main problem with the trailer was the water leakage around the fender wells. It was a space age looking trailer and very popular. I built about 50 of them and many are still on the road. I built a 36 foot tri axle, that was the best looking trailer I ever made. I do not know what happended to it, but I still have pictures of it somewhere, all though they are poloroids. No way to post them I am afraid. The next real problem with them was the cost, the molds were ungodly expensive and the maintaining them and parts made were unbelieveable. If memory serves me correct it was near 4200 bucks for a 12 foot box and a 200 dollar maintenance fee for the molds. I do not know if it has went up or down, but my guess is up. I have a friend/actually the guy that built my parts and maintained the molds, in Hemet. I have been thinking about a nose cone front out of fiberglass, I will talk to him tomorrow if possible. Too get an idea on a pod Pat. Being in Californian there are strict environmental laws regarding fiberglass, most fiberglass shops have moved to Mexico, I know they were when I was building these.

My build is on the forum for all to see, how the frame was built, the upper frame, the attachment of the wood, the attachment of the walls, and just about everything else. The reasons for what was done and what was not done, or mistakes that I made.

I will say one thing about my trailer, it is not nose heavy, you an actually stand on the back of the trailer, jump up and down and it will not come up, but you can also go the front and lift the nose with no problems. Meaning steel does not have to make the trailer unmoveable. Depends on the location of the axle and tongue length.
 

Heifer Boy

Adventurer
my doubts are very few are making trailers to the boating industry standards.

Got to agree with you there Bob. I've seen little info online about the construction of many of the commercial trailers and teardrops available. Those I have seen still appear to use traditional methods of construction even if they use hi-tech materials to build with. What 'panel' is used for the outer shell is fairly irrellevent IMHO - but joint strength is everything.

For those interested in a wood build, you should know that in cold molded laminate boat/yacht construction almost all mechanical fasteners are removed. Screws are used by the thousands to secure the wood while the epoxy is drying, but they are removed and the holes filled with an epoxy/filler combination.

This I think is one of the biggest differences in boat vs trailer builds with wood. Making a true joint bond with epoxy and fillets and removing all screws makes a huge difference. It was the BIG revelation for me when I started my 2nd build. My first one was construction glued and screwed but just shook apart and leaked everywhere. Built like a house and not a boat!! My experiments with epoxies showed me the right way to do wood.

The other thing is the any screws left in the structure create a moisture bridge across the joint. Not good for longevity. Burying them deep in epoxy helps but for most camper joints I think removing them all would be the way to go without compromising strength in any way. Nothing to shake loose, nothing to rot or break down.

I can't wait to get into a teardrop using these methods.
 

jscherb

Expedition Leader
I'm a big fan of fiberglass for trailer construction. Here are photos of two trailers under construction.

This one has a fiberglass tub:

AssembledWithBike-3.jpg


Assembled1-1.jpg


And this one has a fiberglass camper top (no windows installed yet) sitting on a metal tub (only because this tub was built before the mold for the fiberglass tub was completed):

CamperShow4.jpg


CamperAssyDone9.jpg


Both are still under construction and what you're seeing here is at the rough-fitting stage; more fitting and finishing work to be done.
 

JPK

Explorer
I'd never considered glued and screwed fiberglass layup. If I had a mold, I'd vacuum bag foam cores and resin transfer it. No screws.

Long but thorough video of the process:
http://www.youtube.com/watch?v=VodfQcrXpxc

In cold molded laminate construction there is no mold or mould. Whatever is being built is built on a jig, which is essentially a temporary frame to hold the wood components in place while assembling.

The "cold molded" terminology refers to molding or bending the wood while it is cold, as opposed to the traditional method of using steam, it's moisture and heat, to bend wood.

What is being molded varies from builder to builder, each with his favorites, which may vary based on location within the structure. Some use okuma marine plywood, some use fir marine ply, some use mahogany strips, some use cedar strips.... I'm 100% sure that that list in not inclusive!

Complex curves can be achieved with cold molding and the more complex the curve sought the narrower the stip planking or the plywood strip.

I will try to find some photos.

I should add that some cold molded builders do use vacum bagging, but I understand that it requires a layer of mat between layers of wood through which to draw the expoxy, and that means the finished hull will weigh more, since, 1 mat will hold more epoxy reguardless of application method, and 2 the mat isn't weightless itself. Mat isn't structural.

JPK
 
Last edited:

JPK

Explorer
So I found a series of photos of a cold molded sportfish being built. What is you all's tolerance for a dozen photos? They show the jig and partially complete hull in the early stages through finished and running.

Want to see them?

JPK
 

bob

Adventurer
Please sir.

I guess I am caught with the tools needed and the bare knowledge to do the steel trailers, and most likely will not have the time to learn the boat building technique, too damned old.

I have not heard a response if the our current woodwalled trailers are built this way or if they are traditional built.
 

Wavebreaker

Adventurer
one thing to note in cold molding . strips first layer is 45 degrees to keel each canted to 45 degrees from last. last layer is layed for and aft. for cosmetics. Some builders use mat between layers of wood strips. mat is uni directional reinforcement/woven roving is bi-directional reinforcement. If you want to explore vacuum bagging try simple layups before you get into infusion molding. I have build objects from simple kite boards to structural walls using both process's . Infusion molding is the best of the two but takes a couple more steps.
 

JPK

Explorer
OK, photos.

This one shows the jig - which looks like framing but its only to hold the pieces together through assembly. I have seen steel jigs used in Fla, where the steel frame held the stringers for assembly. Jigs can be re-used most of the time. This photo is not one of the sries, but I'm including it too show the laminated keel and chine and also so you can see the notch in the jig where another chine will go. I don't know what sort of boat this is, btw, and the shape is atypical for a sportfish.
PMYP-110500-BB-1_550w.jpg


Here is the first in the series showing the jig, which is removed after building. Note that construction is bottom up, and that would be how a trailer body would be built (though it would be top down.)
5_02.jpg


From the bow, progress made.
5_03.jpg


Hull complete, glass applied, the glass was probably vacum bagged, but probably not the underlying layers of wood. Though some builders do use a layer of mat between wood layers and vacum bag the majority do not.
5_04.jpg


Application of epoxy/filler putty or compound which is sanded and ultimately finish sanded. Some boats, primarily sailboats are finished with clear UV protected epoxy and reveal the wood stripping. Makes for a beautiful boat, but paint can be touched up a hell of a lot easier.
5_05.jpg


The hull being turned over for instalation of the interior, engines, etc, and the "house" as the upper struture below the bridge is called (bridge = where the boat is run from) Note that the jig is removed. Note also the temporary cross members to keep the hull shape as it is lifted and turned, in particular note the relatively few (2) and spacing (great.) Lastly, note the primer applied to the hull.
5_06.jpg


House installed. The house may be "stick built," which is traditionall built onto the hull with frames and ply "planking" or it may be jig built seperately and then placed and secured, or it may be moulded, if moulded then typically with foam sandwich and vacum bagged to keep weight down.
5_07.jpg


The finished product, up and running. BTW, the front "windows" are typically merely black paint for style. The use of glass or other real windows is largely a thing of the past since they will likely see heavy seas which could cave them in. This series is of the same boat being built. It was built by Sonny Briggs in Wanchese, NC (I think Wanchese, but definiely in the Wanchese area) and is named Ann Warwick. I'm guessing about 65'.
5_08.jpg


I'll look for an unfished interior shot which should show the lack of framing with cold molded construction. No framing = maximum interior cubes for the dimensions and also less weight.

The application of cold molded or plank and frame epoxy construction to off road trailers is a natural, imo, and would produce a light and very strong trailer. The right guy - not me! - could build one in his garage.

JPK
 
Last edited:

JPK

Explorer
Here are two photos of a smaller, 39' sportfishing hull finished. Note the absence of framing and the maximum cubes available.
T2120Rudder20and20strut20blocking.jpg


T2220All20longitudinals20lead20to20the20stem.jpg


BTW, the two reinforced areas on each side of the bottom of the hull are where the shaft logs go - think boat DS's passing through the hull, and where the struts and rudders go - struts = shaft supports just ahead of where the propellers are bolted onto the splined shaft.

JPK
 
Last edited:

bob

Adventurer
I am guessing that these procedures are not used by any trailer builder JPK. Thank you for telling us how and what you were talking about. Pretty amazing to say the least. My guess is that these are boats that cost in the hundreds of thousands of dollars. More a work of art than anything we build.
 

Heifer Boy

Adventurer
Following on from JPK's excellent example, here's something a little more to scale with a teardrop or expo trailer build. It's from http://www.woodworkforums.com/ in particular the boat building section. This is a Michael Storer Quick Canoe and is next on my list to build before summer is over.

Full story is with loads of photos here http://www.woodworkforums.com/f169/quick-canoe-155-pj-cliffs-one-week-build-tinaroo-raid-118846/

The reason I've posted this is it's an example of a 'stitch and glue' build method which I think is a great way to build. In this case it is 'tape and glue' but you can also use 'screw and glue' which I did for my build. These guys used 4mm marine ply and it weighs just 28kg (60lbs). Obviously a bit light for a camper but you get the idea of what can be done.
Quick%20Canoe%20008.jpg
Cutting out the panels. This is about 16' long so the ply is butt jointed with a fibreglass overlay to get the desired panel size.
Quick%20Canoe%20027.jpg
The canoe is 'stitched' together with duct tape to form the shape. No screws, nails or framing is used or needed. Remember - 4mm ply!!!
Quick%20Canoe%20030.jpg
The joints are covered so when the epoxy glue is added from the inside it doesn't run out. All woodwork is pre-coated in a penetrating epoxy before being assembled and then coated in un-thickened epoxy afterwards as part of the painting process. You can see the panel joint in this photo.
Quick%20Canoe%20044.jpg
Inside joints are glued and filleted to form a waterproof and very strong joint. All the cross bracing is temporary just to maintain the shape and is removed later.
Quick%20Canoe%20054.jpg
The outside corners are filled and fibreglass taped for strength and abrasion resistance. Some builders 'glass the whole bottom (especially with 4mm) if they are running up on rocky shores or oyster beds but normally it's not needed. If they build with 6mm no-one does as it just adds un-necessary weight. How many scrapes does an offroad camper get compared to landing a canoe or a boat on a rocky shoreline?
Quick%20Canoe%20119.jpg
2 breasthooks are added for a bit of bracing at the high stress ends. Still no screws.
Quick%20Canoe%20131.jpg
Seats are added and it's all done. The only brace left is the center thwart. Some designs use a 'rib' instead of the thwart so the cockpit remains open. I will be using ribs in the teardrop design I'm going to build to keep the open space inside. Only a couple are needed and they are very small.
Quick%20Canoe%20152.JPG
Painted up and she's ready to paddle. Not bad for 4 1/2 days work!!!

I learned a huge amount from these forums for my camper box build and I still way overbuilt it. The whole torsion box effect achieved with panels connected by fully epoxied joints and in particular, the fillets, make it a very strong stucture. High load points can be reinforced but framing is not generally required.

Use your imagination for an offroad teardrop built like this and see what you come up with. I have.
 
Last edited:

Forum statistics

Threads
189,878
Messages
2,921,787
Members
233,084
Latest member
Off Road Vagabond
Top