Blender, My LX450/FZJ80 + FJ45esk + GM + Land Rover crazy concoction

Metcalf

Expedition Leader
Just little stuff while I wait for my seats to show up...


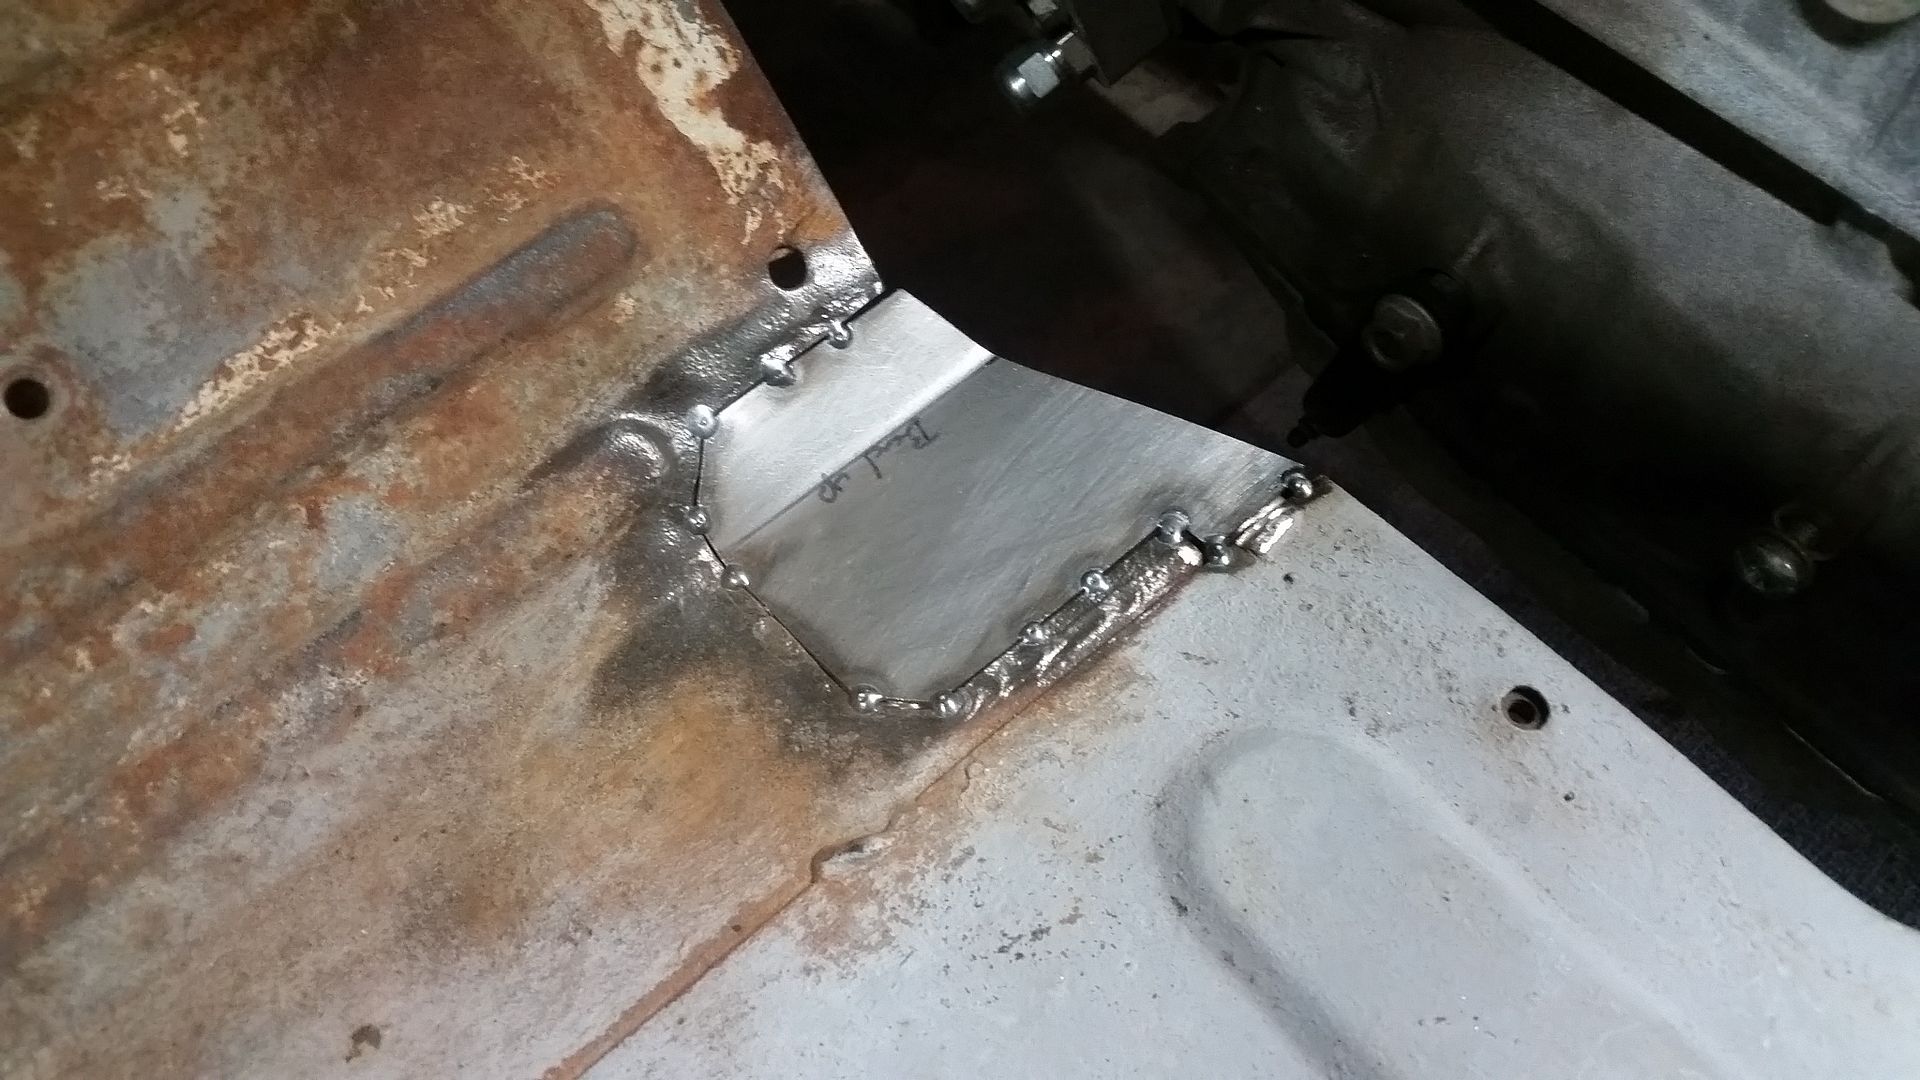
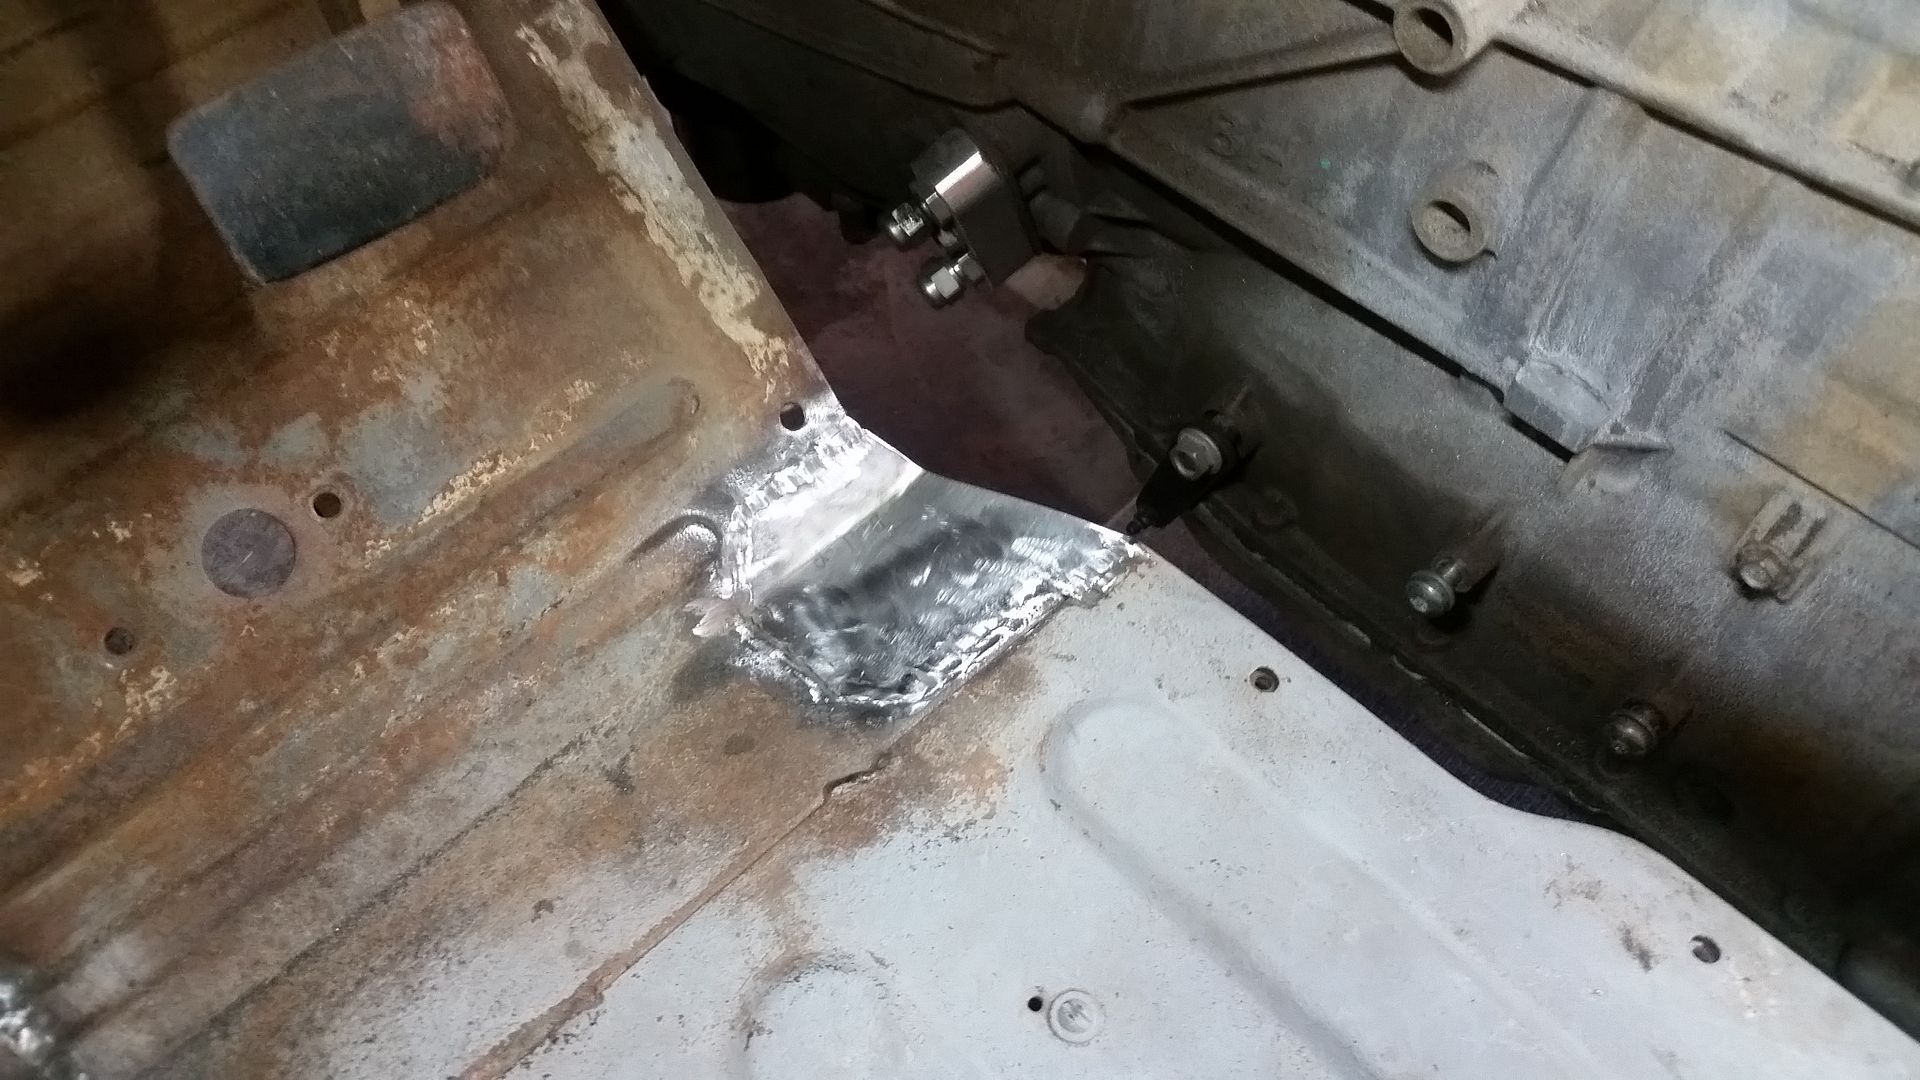
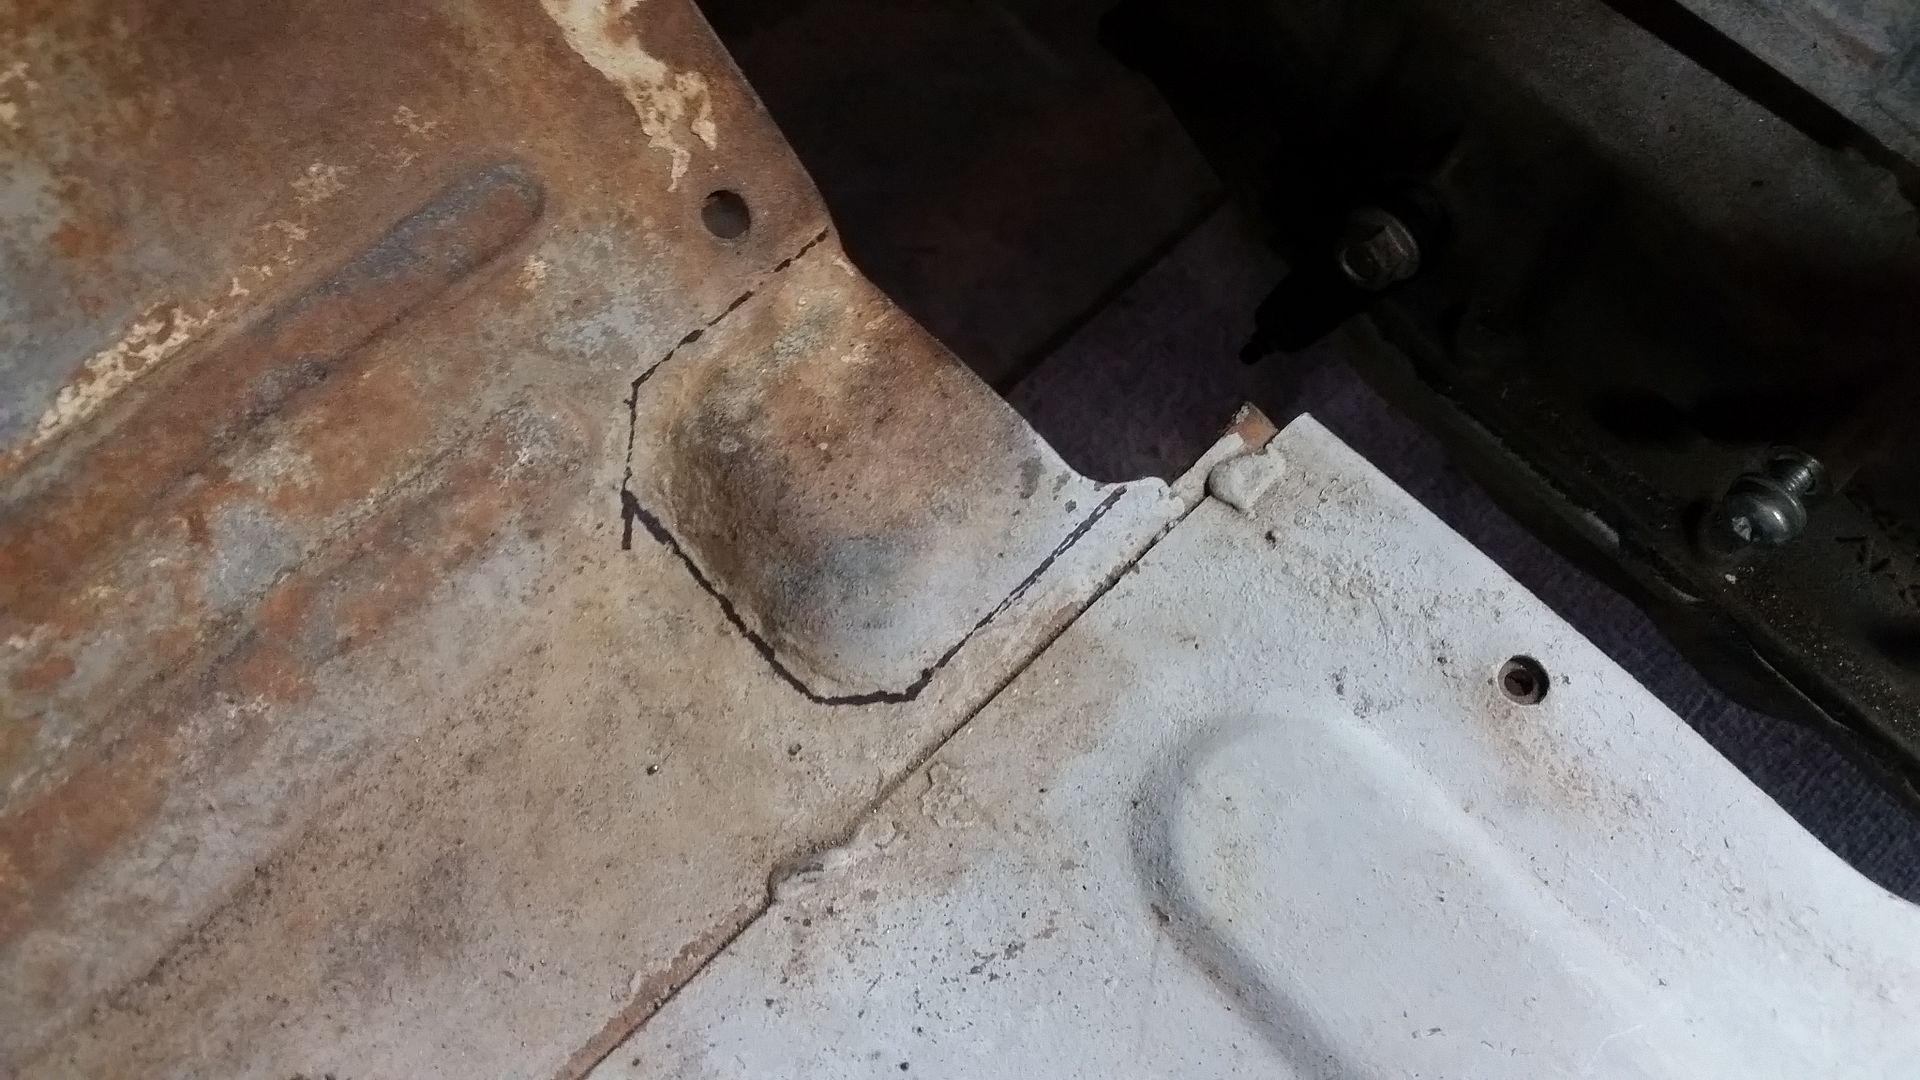
I don't know what that dumb bump in the floor was for originally? It's gone now! I think this will make it much easier to make the future tunnel. I am going to try and make as much room for the drivers right foot as possible in an effort to keep my bad knees for acting up.

Odd question of the day. Does anyone know what you would call the thick paperboard material that you find on the back of a notebook? Brown, light texture, about 1/16" thick, fairly rigid. I want to buy it in large sheets.
 

Metcalf

Expedition Leader

Metcalf

Expedition Leader
That stuff seems to stay fairly flat until you get towards the tighter radius at the end of the roll- but not perfect. You could also try some flavor of:

http://m.uline.com/h5/r/www.uline.com/BL_1851/Large-Corrugated-Pads?keywords=

Sent from the fridge using Tapatalk

Thank you for the suggestions.

It is not really a 'flat' problem, it is a support problem.....the material needs to be the same thickness as the metal, fairly rigid, and cheap enough to mess up many times. Cardboard/foam core board is too thick typically to use for mocking up something complex like a tunnel if you really need the shapes to be accurate for multi-bend templates. Common foam core is about 3/16 thick. I need something very close to the same thickness as the 16 gauge sheetmetal which is about 1/16"/0.06" thick.
 

Healeyjet

Explorer
Metcalf, a quick google search led me to this. From this I would approach a local print shop and ask for 60pt chipboard.

Ward


Quote
Paper jargon is hard to follow. It's true. Paper thicknesses are referred to in “weight”, #(pound), Lb. (pound), GSM (grams per square meter), and by terms like Text/Bond, Index, Pt (point), Cover, and chipboard. And of these, only pt actually refers to thickness! The rest are literal weight or strength.

To get an idea as to how the range works: Bible paper, or Onion Skin is around 45gsm or 9lb and a traditional paper chess/checkers board is 60pt chipboard covered in 80lb gloss text.

“Cover” refers to cover stock, what people call “card stock” and is the generic name of the stock (stock= paper) you want for cards and play mats. “Index” is a thinner cover stock, not really necessary for anything and not all that common.

“Text” refers to thinner writing papers, what people use in copiers, notepads are made of, and stationary is printed on.

“Chipboard” is used as to supplement printed products but not for printing. Cardboard chits/tokens, game boards, the backer for stacks of money are all chipboard. (Example: the backer for yellow legal pads) For the chits/tokens and board they are covered in a lamination process by a text weight paper that is good for printing. This comes in different thicknesses measured in points. 60pt = .06 inch.
 
Last edited:

Metcalf

Expedition Leader
What does everyone think on the tunnel....

Make it removable or weld it in place?

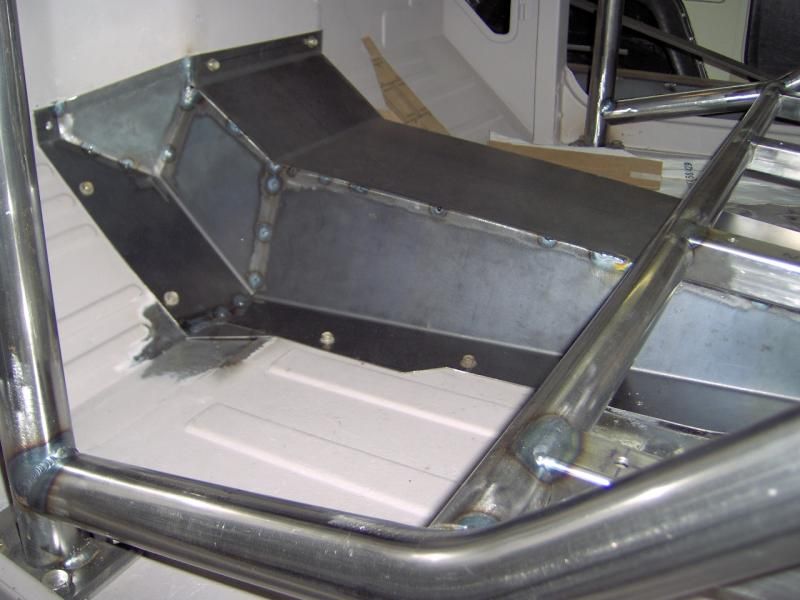
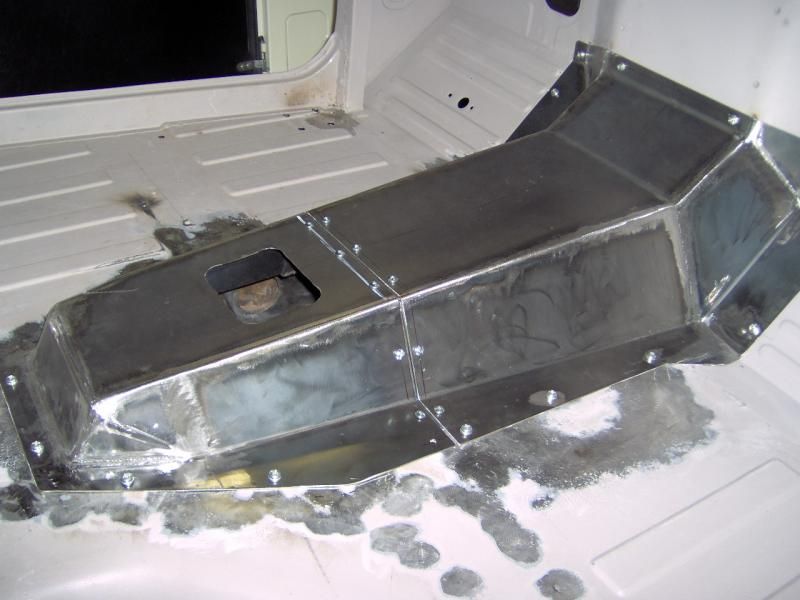
I found this excellent example on Ih8mud....


Mine will have to be a little more complex over the transfer case. My LT230 is pretty high in the chassis and not a petite unit.
 

justcuz

Explorer
Removable, always removable. You work a lot by yourself, having a removable tunnel so you can have top and bottom access to your trans and t-case is much more convenient for linkage and component installation and adjustments. Plus you can hang straps and come alongs to your roll bar to help install and remove said parts.
I used to lay a pipe across the window sills and use a come along to drop the SM420 out of my 63 Chevy 4x4 to replace the clutch. I was thankful for that removable floor tunnel.

On your cab ribbing are you limited by the throat or depth of your tools? Most truck cab ribs seem to be a few inches above the bottom cab seam and extend maybe a third of the way up the back of the cab. They don't come very close to the window level at all. Your surface area compared to the back of a full size pickup cab is much smaller and if your metal is thicker than standard cab stampings you may be able to get by without any strengthing ribs.
 

Metcalf

Expedition Leader
Removable, always removable. You work a lot by yourself, having a removable tunnel so you can have top and bottom access to your trans and t-case is much more convenient for linkage and component installation and adjustments. Plus you can hang straps and come alongs to your roll bar to help install and remove said parts.
I used to lay a pipe across the window sills and use a come along to drop the SM420 out of my 63 Chevy 4x4 to replace the clutch. I was thankful for that removable floor tunnel.

On your cab ribbing are you limited by the throat or depth of your tools? Most truck cab ribs seem to be a few inches above the bottom cab seam and extend maybe a third of the way up the back of the cab. They don't come very close to the window level at all. Your surface area compared to the back of a full size pickup cab is much smaller and if your metal is thicker than standard cab stampings you may be able to get by without any strengthing ribs.

On the tunnel....

I hear where you are coming from....but ugh. When you start looking at all the details envolved in trying to implement that it starts to look like not such a good idea....

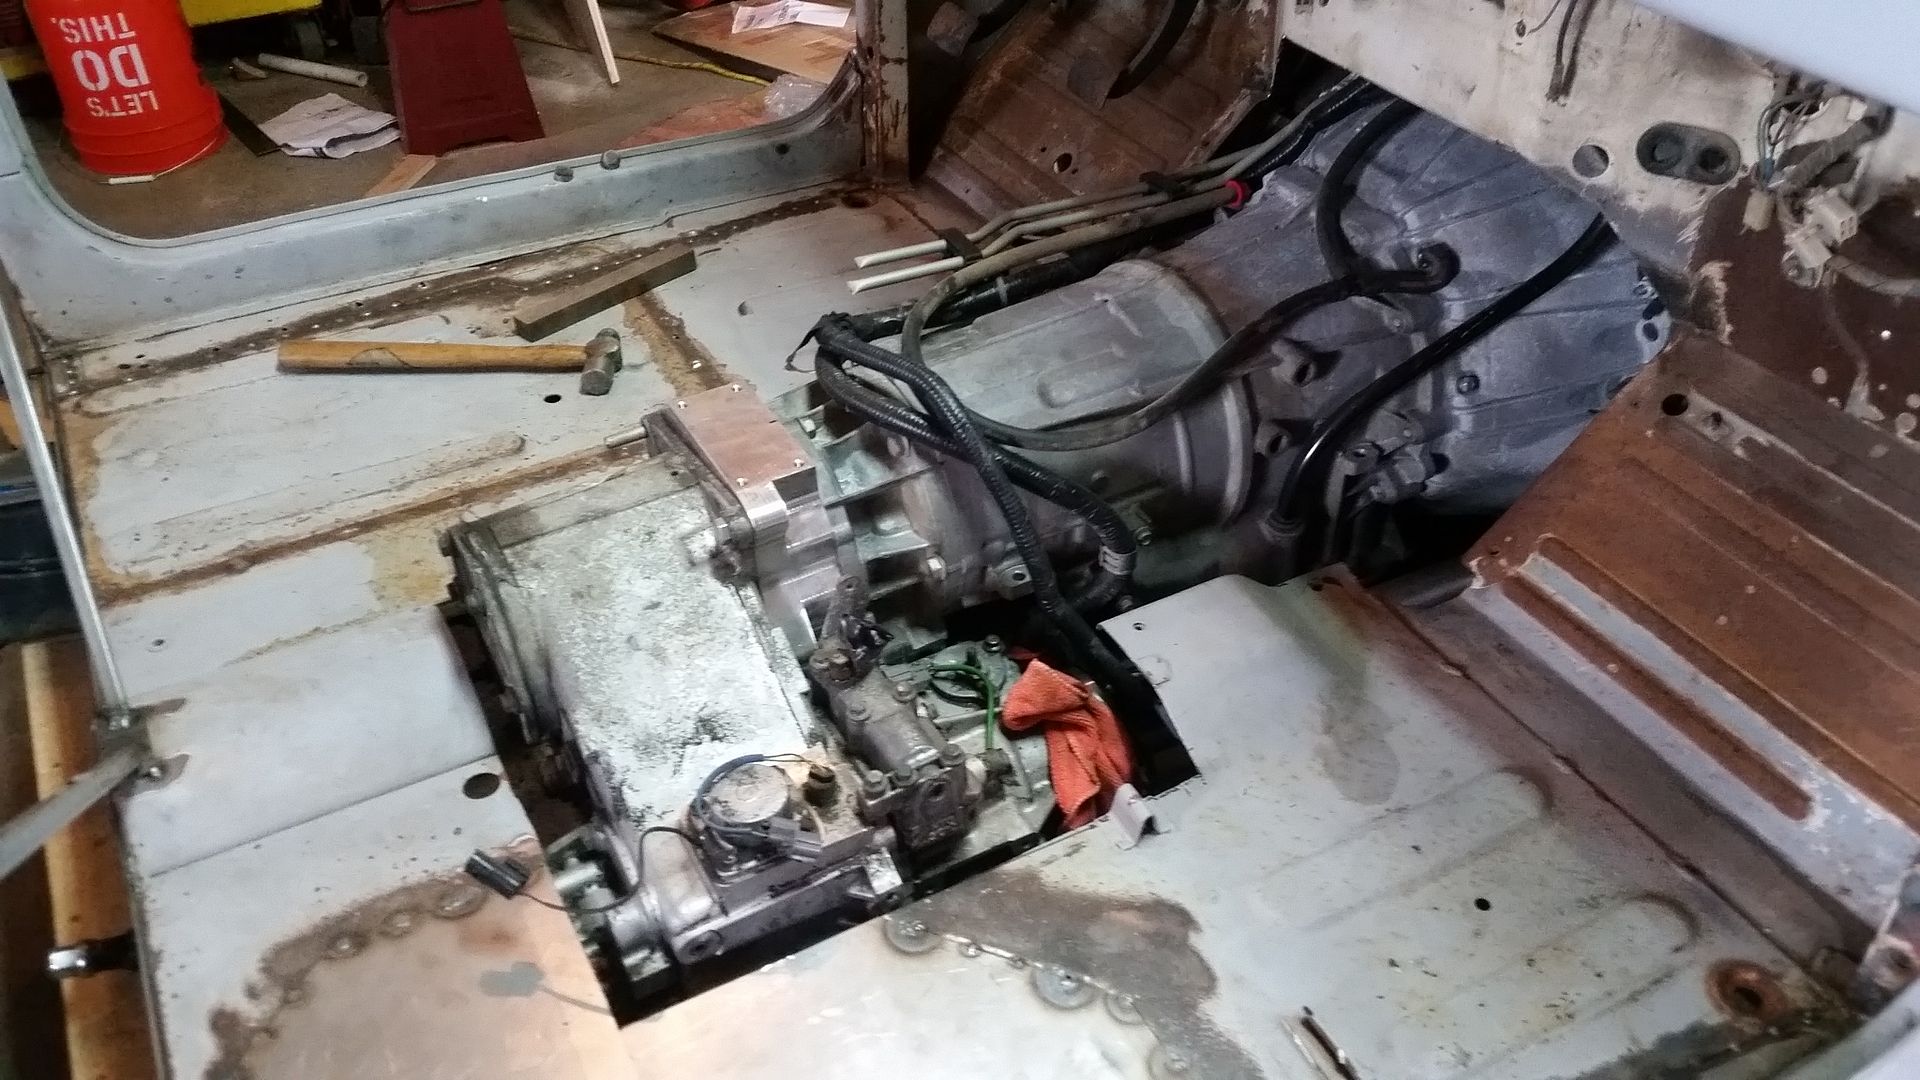
This is where I am at basically.


Good things about a removable tunnel....

-You can get at stuff

Issues I see....

-It doesn't provide as much support in the floor. A welded structure will be stronger
-The inner seat mounts on this narrowed cab will likely be on top of the transfer case. Combining the seat mounts into/onto a removeable part doesn't give me a warm fuzzy feeling.
-Removing the tunnel, once the seats, shifters, and pedals are in place will not be an easy thing to do. It would likely require sub panels on a removable tunnel to be able to take everything apart.
-Removing the entire tunnel to get at a small issue seems like a lot of work. You could add sub panels but that is a lot of extra parts.
-Typically I find that captured hardware on the underside of the vehicle doesn't last long with dirt/mud. There are sealed back rivet-nuts now that are promising.

With the flat belly the transmission ended up pretty far up into the floor along with the transfer case.

I did design this cab with an interesting body mounting system. I can pull the 5th body mount bolt at the single C-pillar. Then remove two bolts on either side of the body and the entire cabin should pivot on the other body mounts. This can create a decent amount of additional under the floor space for access to things with minimal extra work. Pulling the entire tub shouldn't be too hard.

With the way this truck is built, the small cab size, and the fact that the trans/tcase are pretty far up into the body......I just don't see a clear path to a removable tunnel.
If anything, I think the tunnel almost needs to be removable AND have access panels to certain areas. That just sounds like a TON of work and complexity.

I do like the idea that I could create an all new flange for the tunnel and not have to weld to nasty old sheetmetal for multiple feet of welding.
I don't like the idea of the fasteners used to join the tunnel to the floor sticking up. I might have to look at some other options for that.....countersink or a flush fastener or ???
I don't really love captured nuts under the floor. They don't seem to hold up too well over time. Rivet nuts night work if the lineup can be close enough.
I think the gas pedal might have to mount near the tunnel....need to check that out a bit.
The seat mounts

Yuck. No 'fun'
 

Metcalf

Expedition Leader
I wonder what is under here....


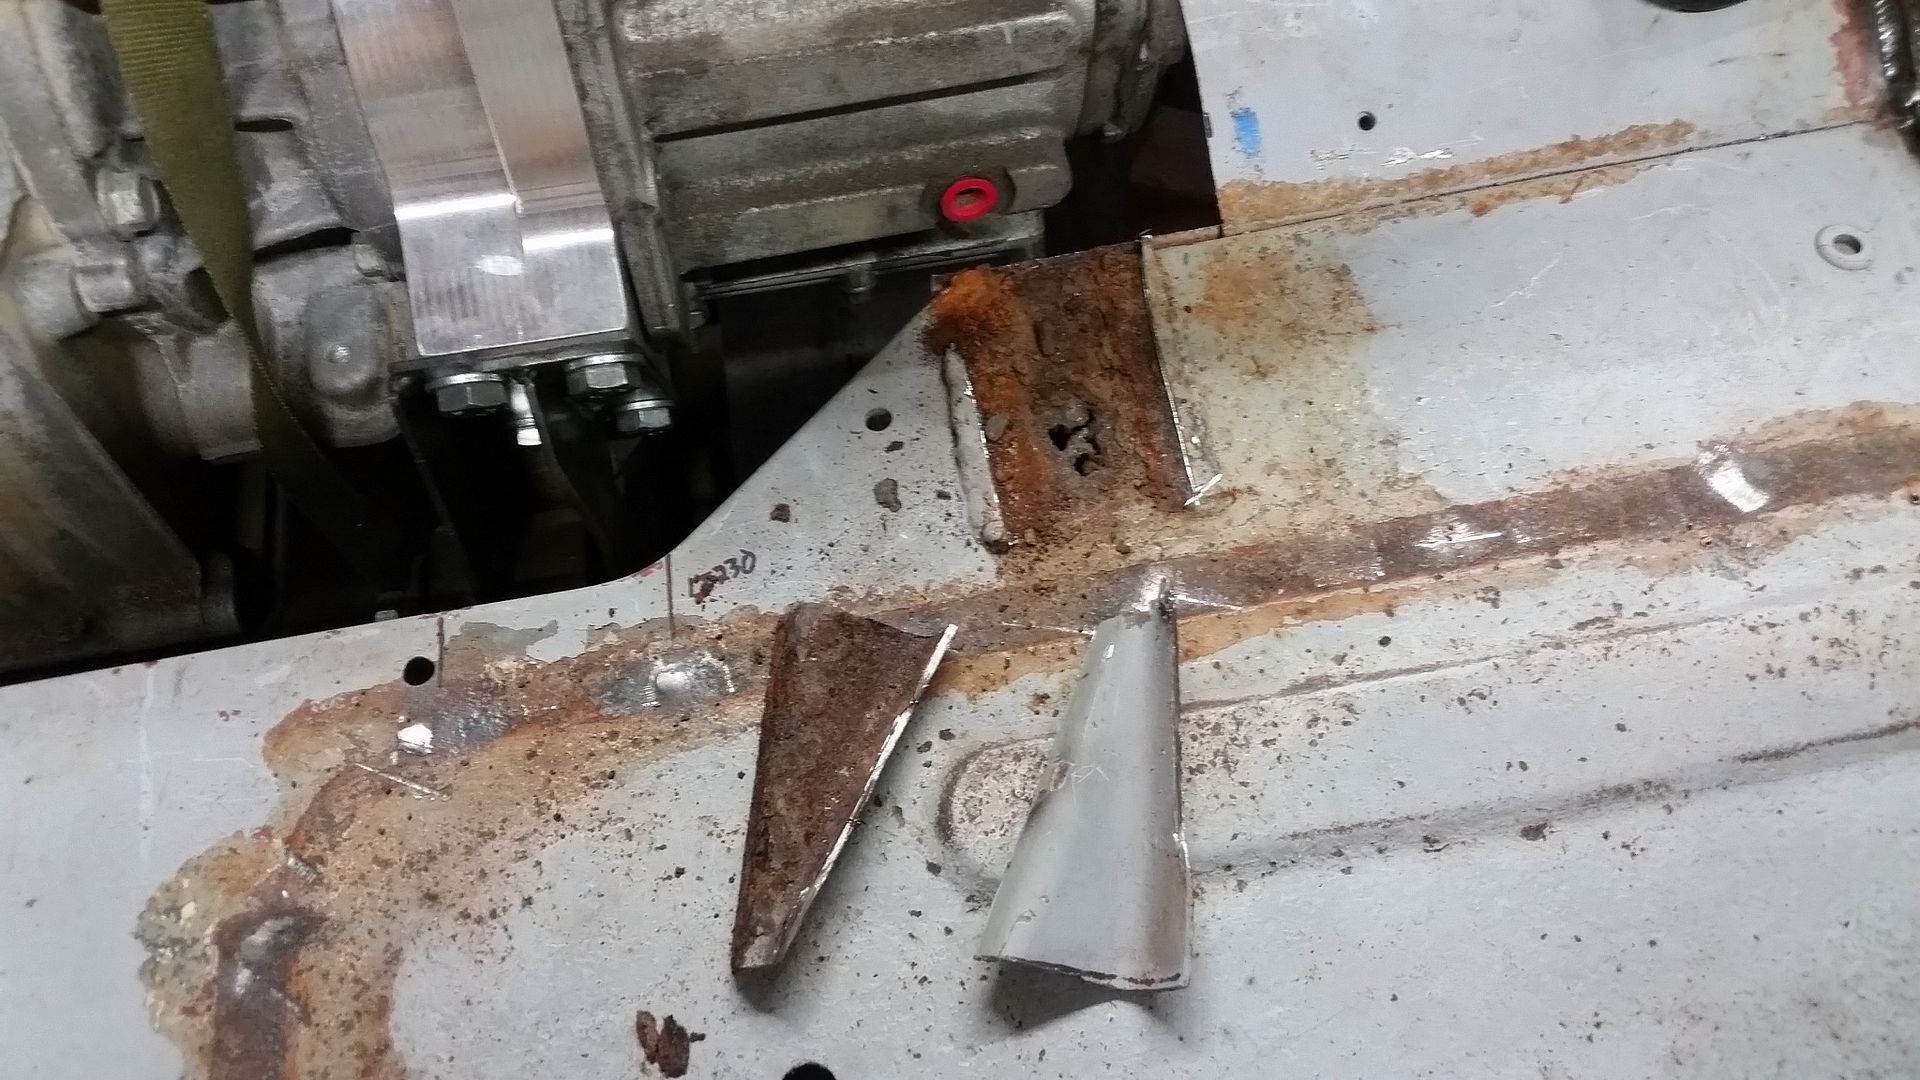
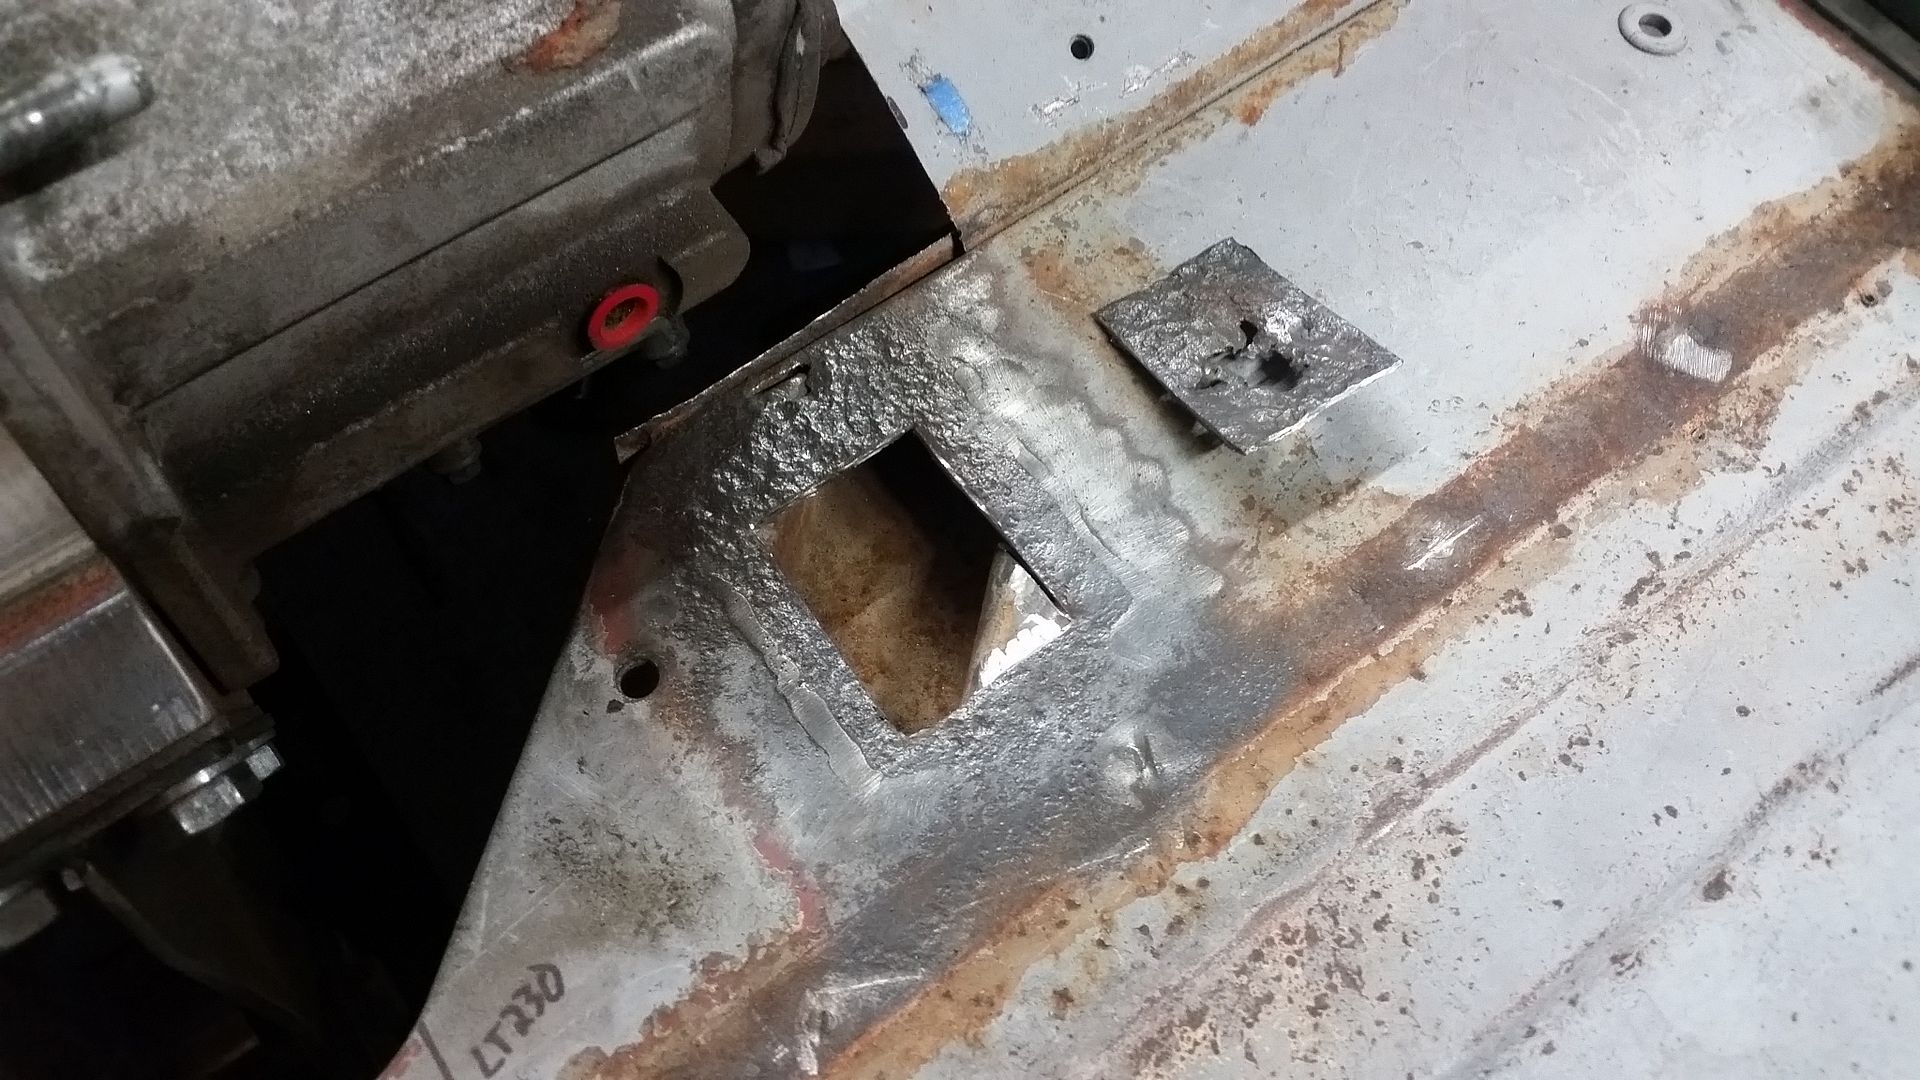
Well that sucks. I am glad I found it really, but yuck. It looks like it was just a water trap in the stock design. The metal on top was very rusted but the oem paint was still on the bottom.

I couldn't really cut out the entire area easily because this was over the top of one of the hat channels.

A few helpful tips....


Carefully cut out as much of the bad area as you can. I use a thin cut off wheel in the a 4.5" angle grinder when I can, but I had to use a dremel tool for most of this because of the tight quarters.


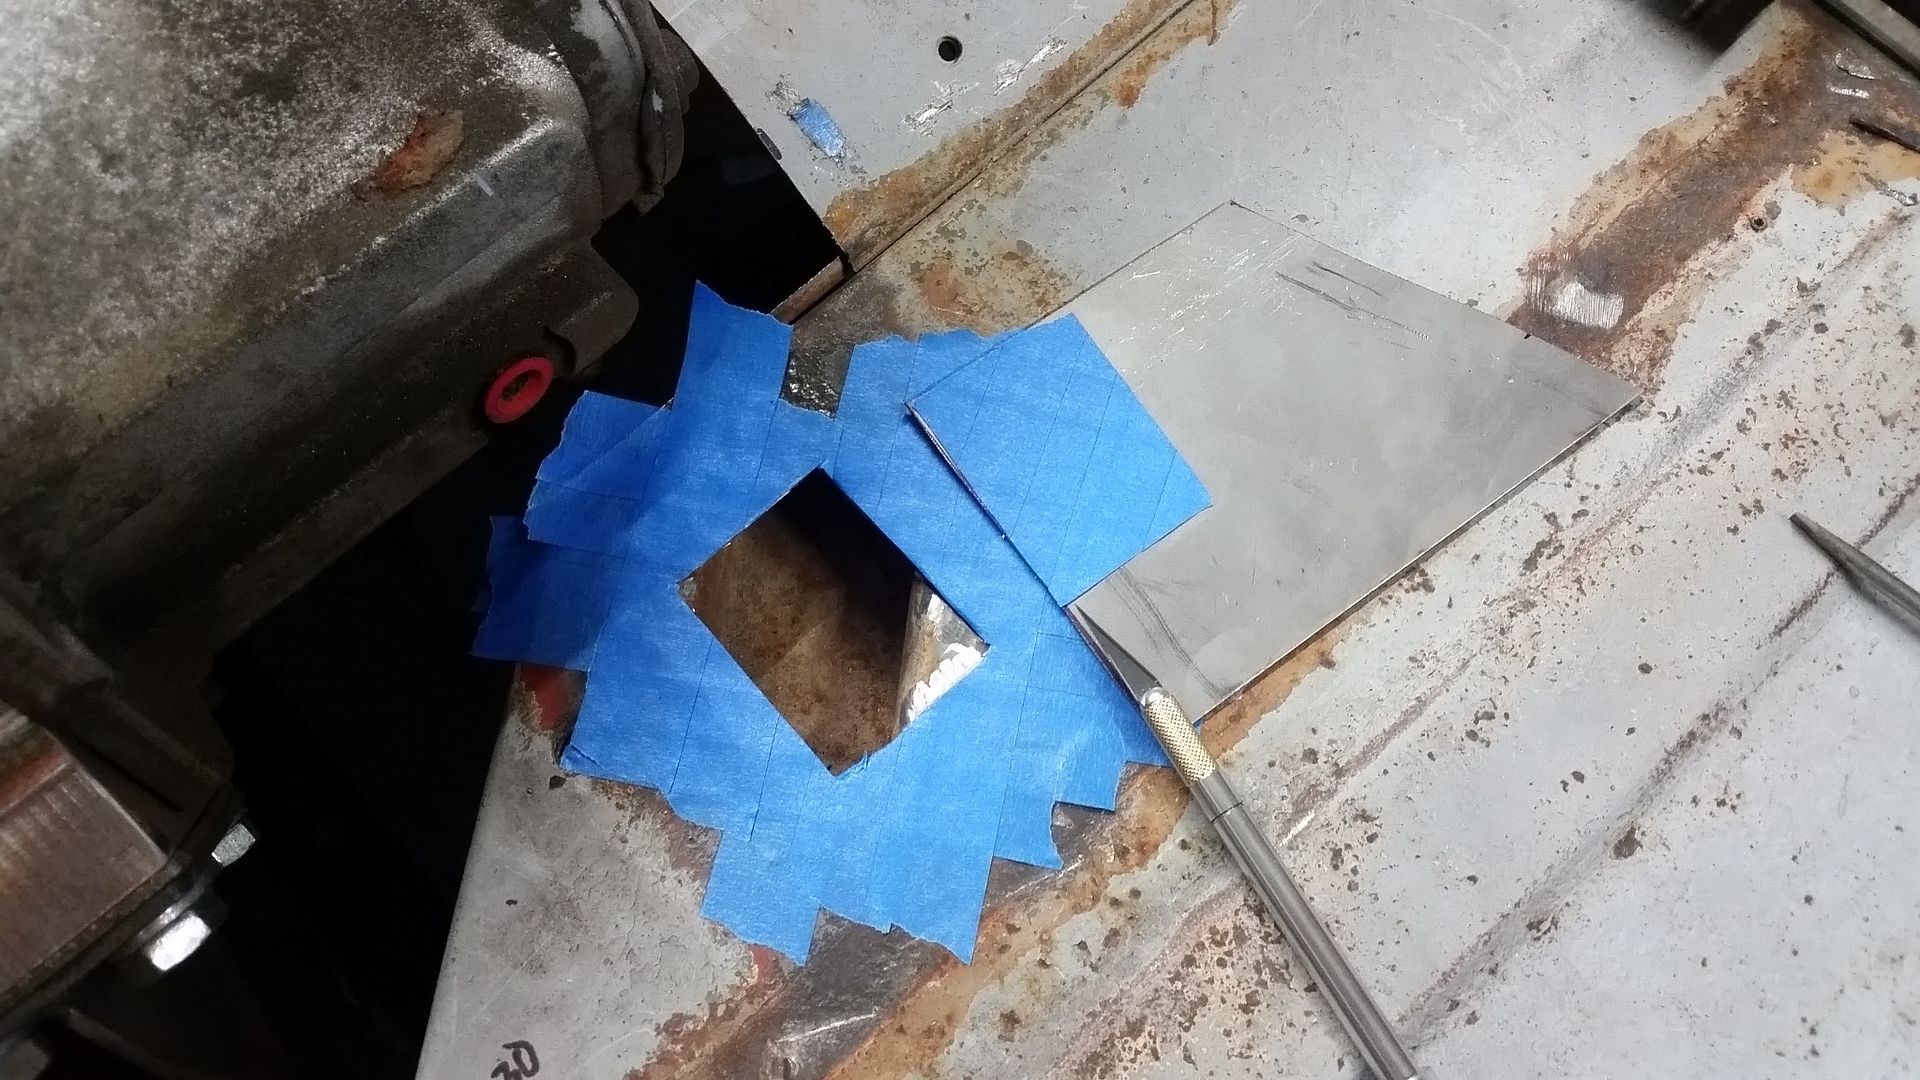
Need to make a template of a patch like this? I use two opposing layers of masking tape. Then you use a narrow razor knife to cut out the template. Stick the template to the metal you want to make the patch out of. You can cut a little big and trim if needed...


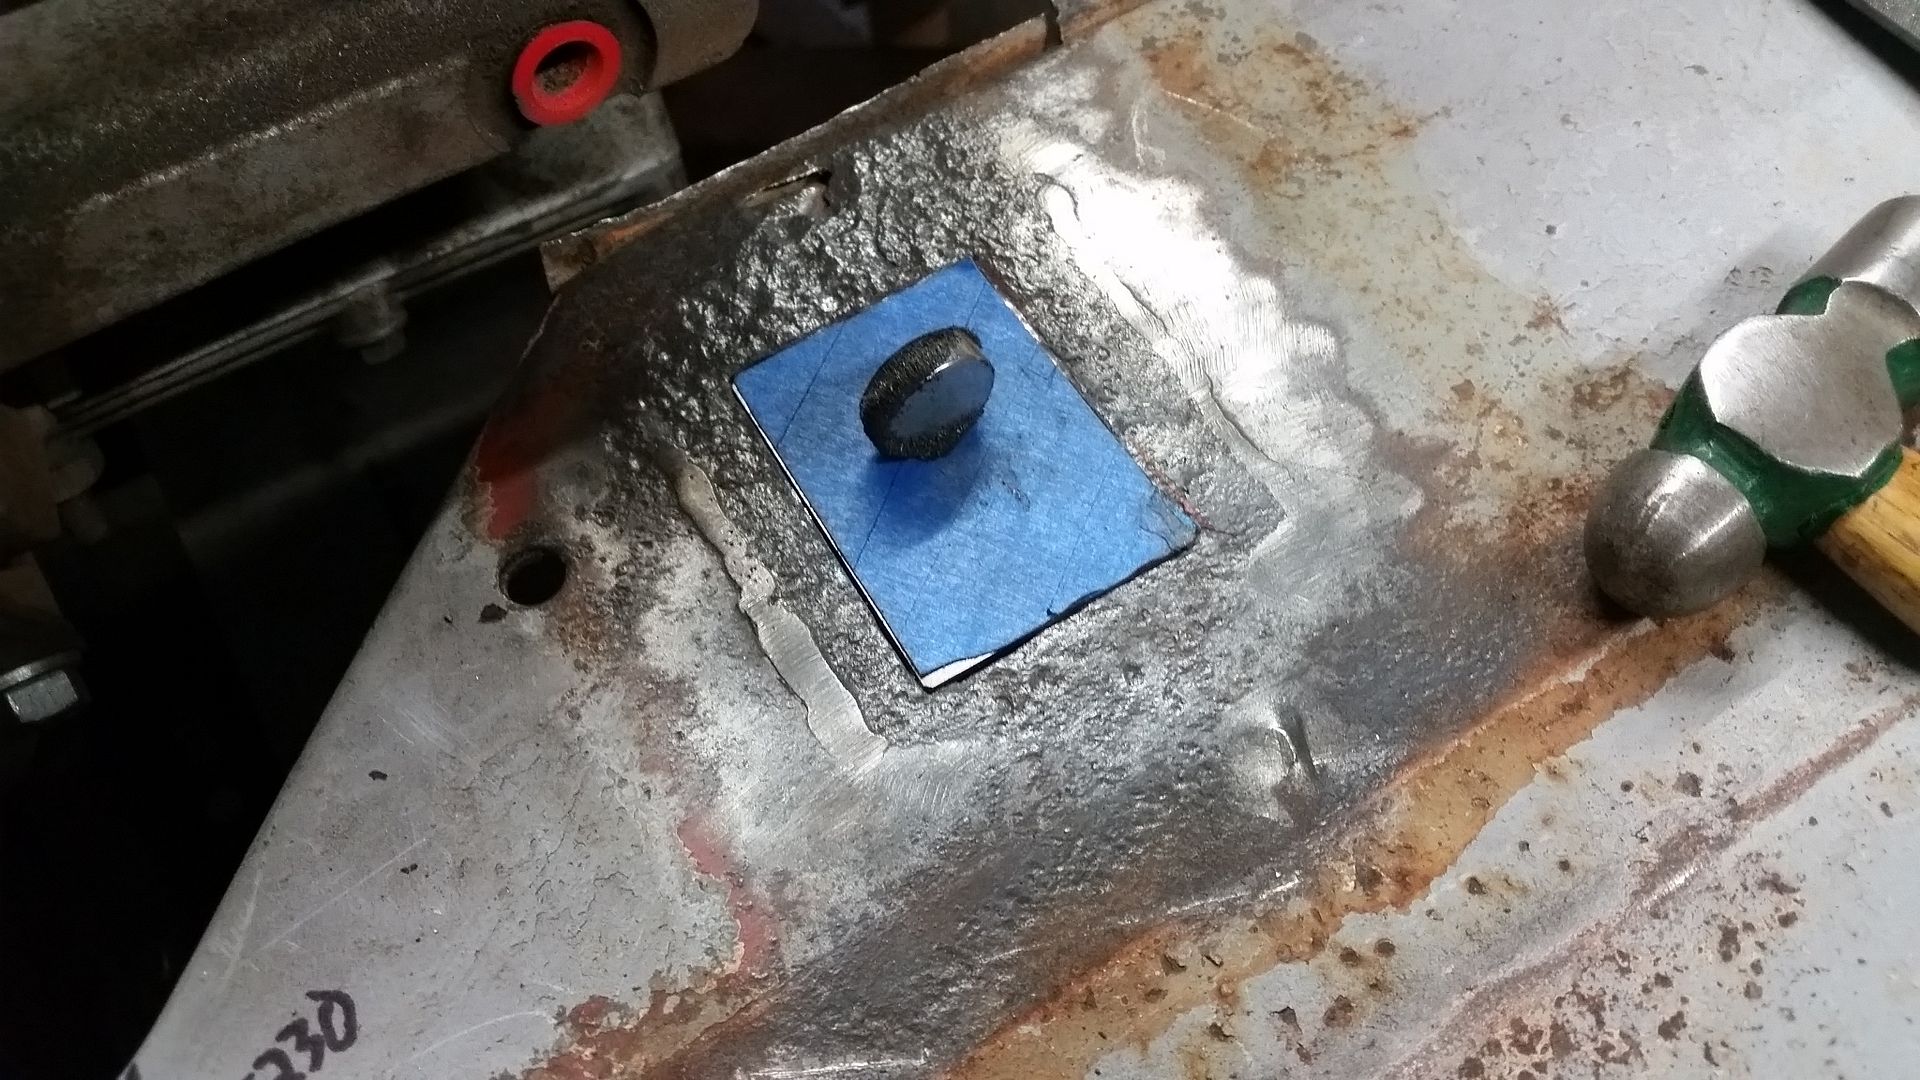
Need to hold a small patch like this? Use a magnet. Magnets also work well to level the edges if they are strong enough.


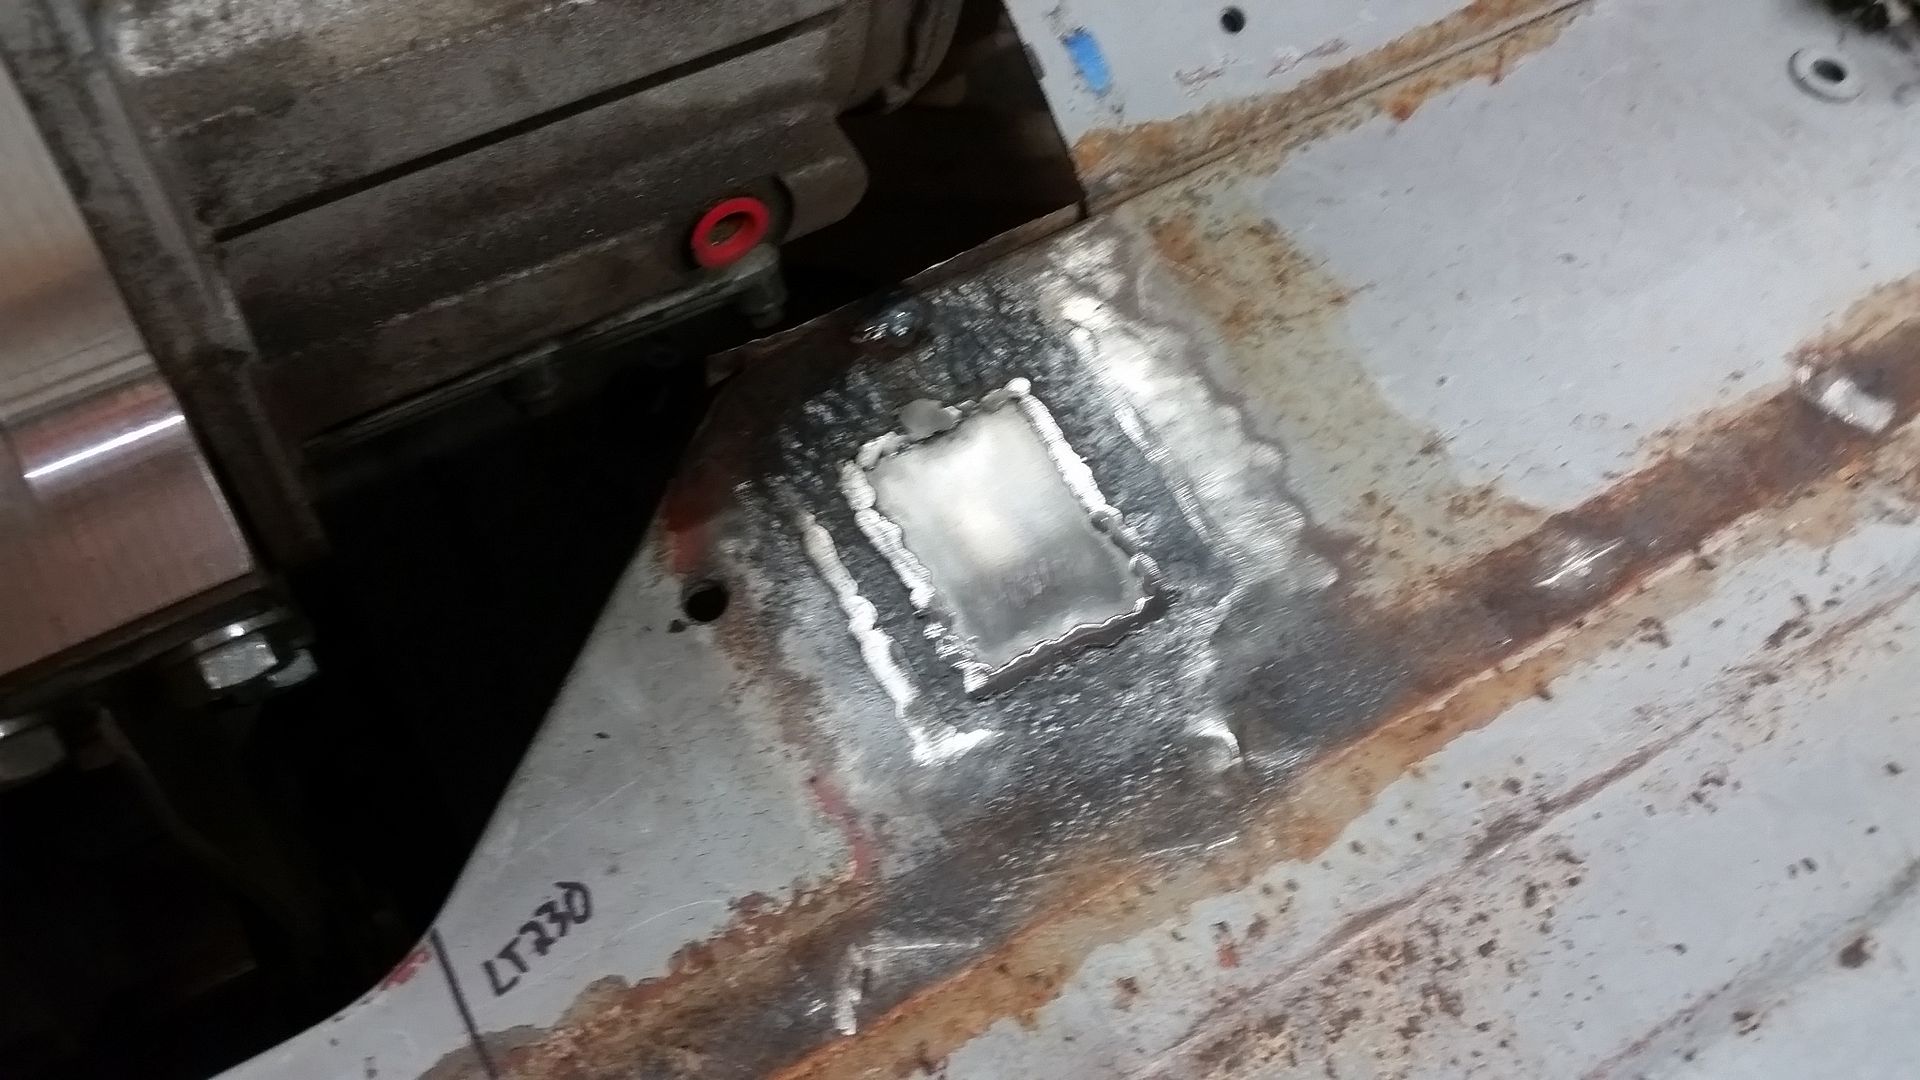
Welded in place....clean it up a bit. I tried not to get carried away yet since the base metal isn't the best on the one side.


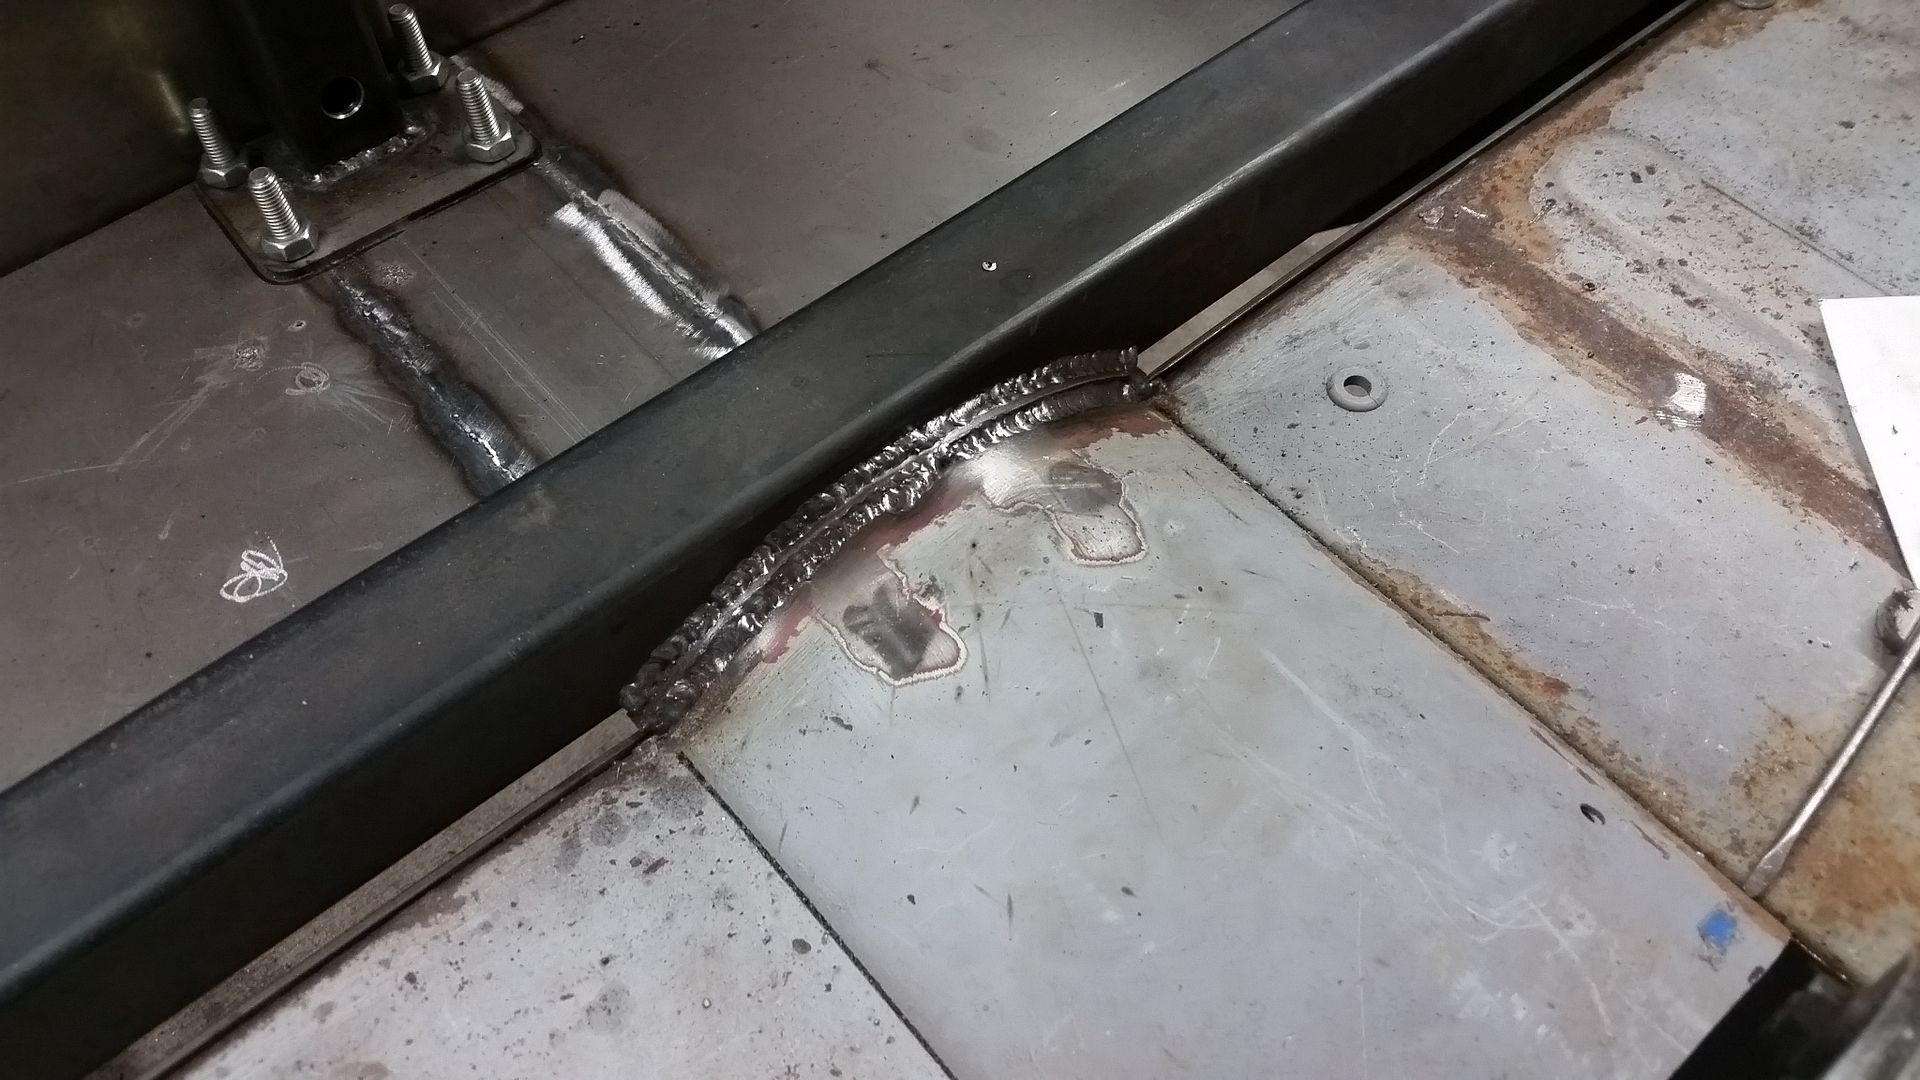
I also had to make a thin curved filler piece to weld the rear section of the floor to the B-pillar spreader. I had to use a little jack pressure on the 1" strap flange I had added to level things up into position. Once this was welded it REALLY firmed up the floor, especially on the drivers side. The floor on the passenger side is still kinda floppy. I need to add some kind of extra support if I want the tunnel to be removable.


I also cleaned up the patch under the drivers foot some more. I like how that turned out. That bump was dumb.


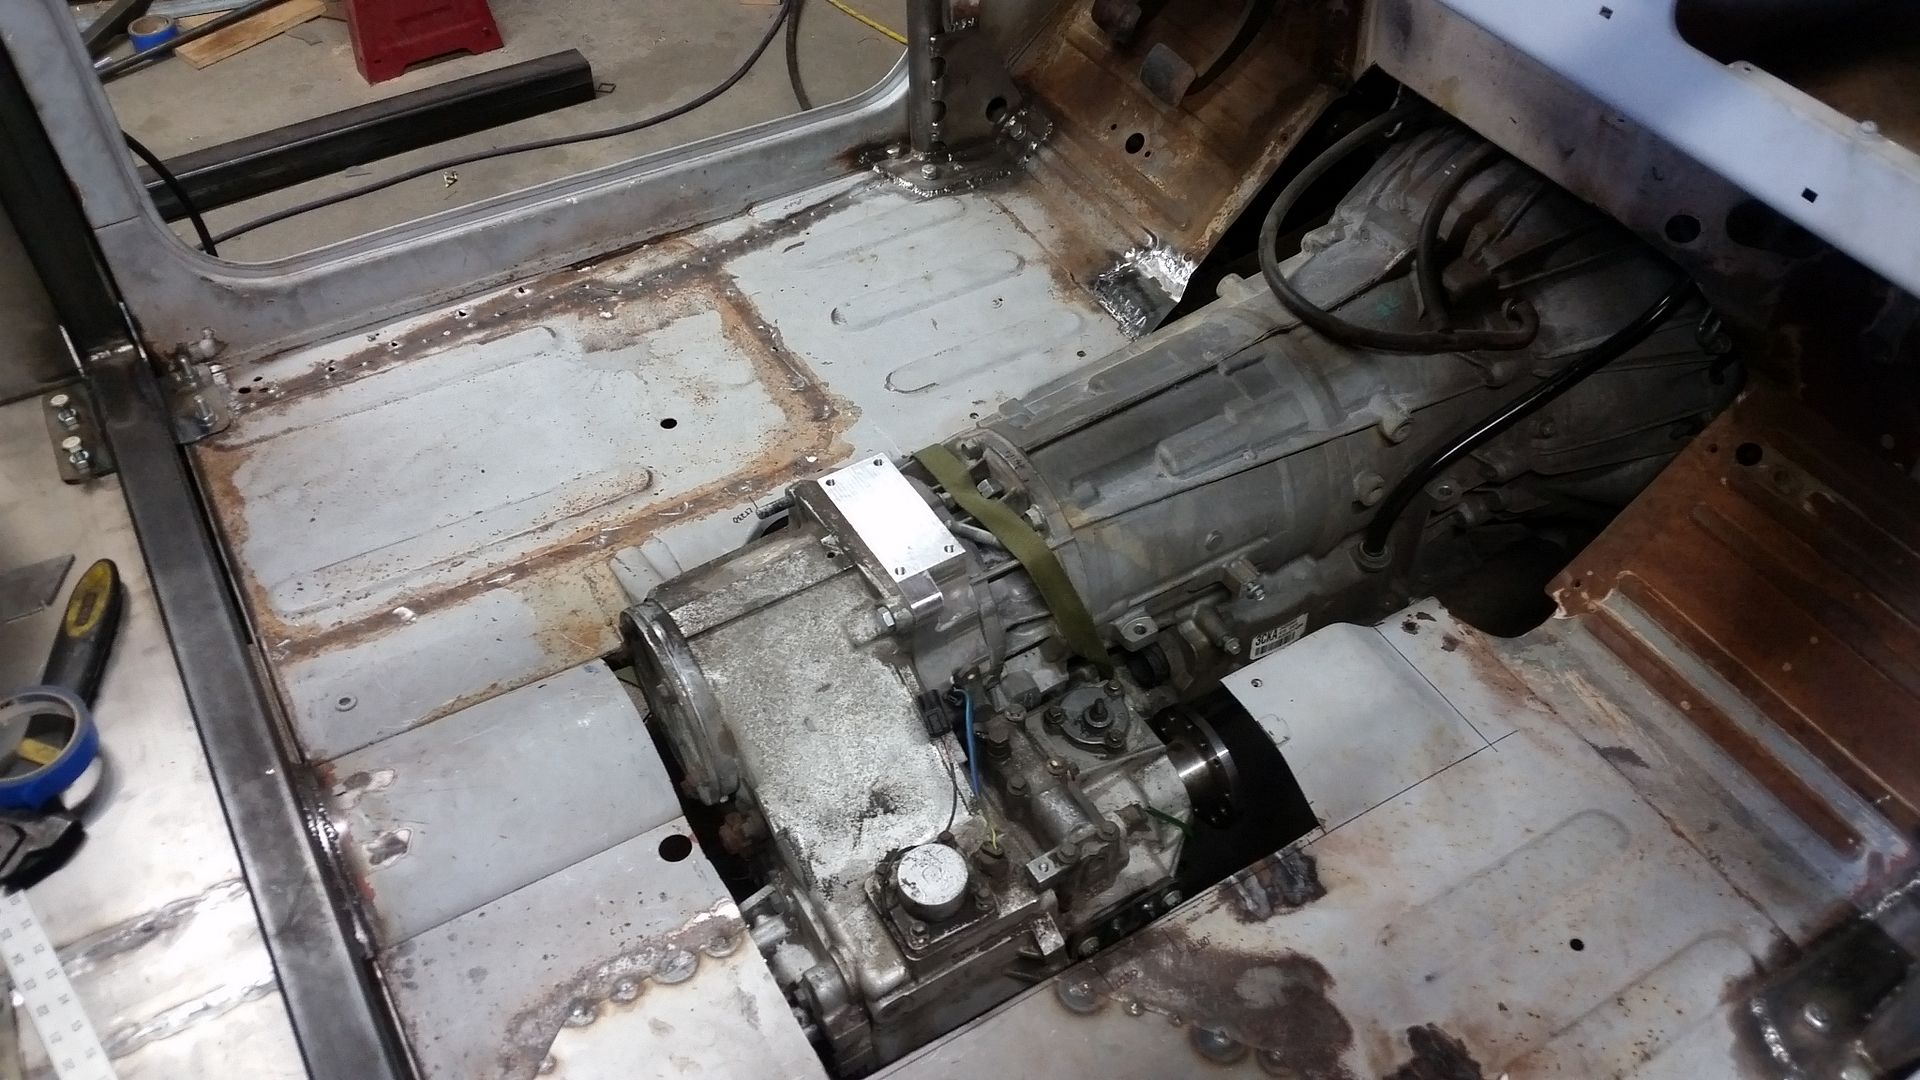
This is what I have to work with now. I am thinking I am going to remove the left over 'bump' where the transfer case was also. I think that just clutters up the floor. I think I can replace more of that with a flat piece or maybe a triangle of material back to the towards the transfer case.

I am still thinking about removing more material behind the transfer case to help removal perhaps. The crank centerline is above the level of the floor for sure.

Having the seat mounts tie into a removable tunnel might be interesting. I'm not sure I love that idea, but I should be able to have at least the rear part of both sides of the seats mounts tie into the B-pillar spreader. The outside forward mount for each seat can be on the floor panel. It would only be the inside forward seat mount that would need to be on the tunnel. So 1 out of 4 for each seat.

If I do make the entire tunnel removable, I think I still want to make a few access panels for little stuff. Maybe split the tunnel about where the transfer case adapters like in the example pictures I posted. I am most worried about having to pull the transfer case vs the transmission. The engine and trans are an OEM assembly with only 40K miles.

That does it for today.
 

justcuz

Explorer
Extra work but worth it in the long run would be to weld 1/4x20 nuts to the bottom side of the floor for your tunnel mounts. Then on top use serrated button head Allen screws.
Building the tunnel is going to involve lots of work, whether you make it removable or not.
Thanks for the updates.
 
Rust is one of those conundrums for me; I hate finding it, but I like the metal work to replace it.

As far as the tunnel goes, the last one I made, I did the work to make the new cutout around the t-case very strong,, with flanges as opposed to straight, cut edges. The tunnel cover itself was broken up into two pieces: the front half and the rear half. The rear half was built in place and welded to the floor, but the front half was removable. I used as much of the original cover as possible and it only took about 5 hours to get it in and fit.


Metcalf

Expedition Leader
Extra work but worth it in the long run would be to weld 1/4x20 nuts to the bottom side of the floor for your tunnel mounts. Then on top use serrated button head Allen screws.
Building the tunnel is going to involve lots of work, whether you make it removable or not.
Thanks for the updates.

But this truck is metric :ylsmoke:

I've tried the welding the nut thing and it doesn't seem to work for me. The best thing I have have found are 'Easy-Align Weld Nuts', which are very similar to what the factory uses. That said, I still don't love them....

http://www.mcmaster.com/#90955a101/=143dcvo

The big bonus to the this style of product is that they allow for some misalignment without having to open up the hole in the mating panel. I think I might even be able to make a little press tool to counter sink the sheet metal slightly on the mating panel to help flush the fastener. If I use something like a oval head machine screw that might make the floor look half way decent in the tunnel sections.

What I don't like about doing a tunnel fastening system like this (which is very similar to oem in a FJ40) is that all the delicate hardware that holds the tunnel is exposed to the bottom of vehicle in the 'wet' zone. Using stainless screws might help. Try and manage the thread length so they are not sticking down too much. Maybe use some anti-seize to keep things from fusing together. I do like in basically the dry salt free southwest, but still.

Oh I know the tunnel is going to be a lot of work, just like the rest of the project, but it is wise to try and manage that to a degree.....or else you never finish the project.

I feel much better about making the tunnel removable after last night. Once I welded the rear section of the floor to the B-pillar that fixed most of the floppy floor issues I was having. The drivers side is good to go now. The passenger side still needs work. I had to remove a LOT of structure from the passenger side to make room for the transfer case....I also removed the fuel tank sump area when I pie cut the floor for the door pinch.

I think I have a plan brewing, but I still have lots more prep work to do for sure. I need to see what I can do to firm up the passenger side of the floor. Right not it is floppy enough that it isn't even level under its own weight. Trying to add structure to the bottom from the top is going to be yucky. I really don't want to have to pull the tub at this point again. I will be pulling it later to clean it up after mockup and finish weld a few things....but that is months away likely.
 

Metcalf

Expedition Leader
Rust is one of those conundrums for me; I hate finding it, but I like the metal work to replace it.

As far as the tunnel goes, the last one I made, I did the work to make the new cutout around the t-case very strong,, with flanges as opposed to straight, cut edges. The tunnel cover itself was broken up into two pieces: the front half and the rear half. The rear half was built in place and welded to the floor, but the front half was removable. I used as much of the original cover as possible and it only took about 5 hours to get it in and fit.
]

Thank you for the pictures.
The factory tunnel seems to waste a TON of space? I've never seen a stock engine and transmission install, but dang....

I think with my narrowed tub, with the seats much closer together, I need to do everything I can to minimize the profile of the tunnel. The area under the drivers right foot is going to be most important. I have no idea why Toyota would have stuck an awkward bump right under the drivers right foot? LHD/RHD thing? I need as much space possible there for the DBW gas pedal also. I have a stock tunnel, but I have already ruled that out as a base. I think it would be way better to start from scratch....and maybe less work in my case with the transmission and t-case so high in the chassis. My crank centerline is actually above the floor.

I still have some prep work to do, then hopefully my new 'chipboard' style template material will be here. Seats/sliders and a new transmission shifter are inbound also. That should help me mock all this up better.
I am going to be mulling over a few things along the way....

Should I cut out the leftover part of the 'bump' on the passenger side? That is 80% yes at this point.

Should I cut back the floor behind the transfer case another 4-5" to allow the transfer case to be r&r'd easier....from the top or the bottom. That is 60% yes at the point. Even if I cut the floor back. I believe I can minimize the wasted space by making that section of the tunnel removable. The inboard forward seat mounts are also going to be in that area which complicates things with a removable panel. I have a wish list for seat mounting that will complicate things.

Much to think about.
 

Forum statistics

Threads
188,289
Messages
2,904,957
Members
229,961
Latest member
bdpkauai
Top