Blender, My LX450/FZJ80 + FJ45esk + GM + Land Rover crazy concoction

Metcalf

Expedition Leader
When in doubt, cut more out of the floor and drill more holes in everything!


I removed 4" of material behind the transfer case to help with the ability to r&r the transfer case in the vehicle. I also removed the rest of the old 'hump' in the floor....

In order to level the floor I decided to use a scrap of angle iron. I could have clamped it, but that would have only gotten in the way. I ended up adding a 2" pattern of 1/8" holes in the angle iron to give me a template to use some Cleco fasteners to hold the floor up level. That worked great! Now the floor is dead level front to back. Note: the missing Cleco's in the pattern are areas where there was an existing conflict with a hat channel.


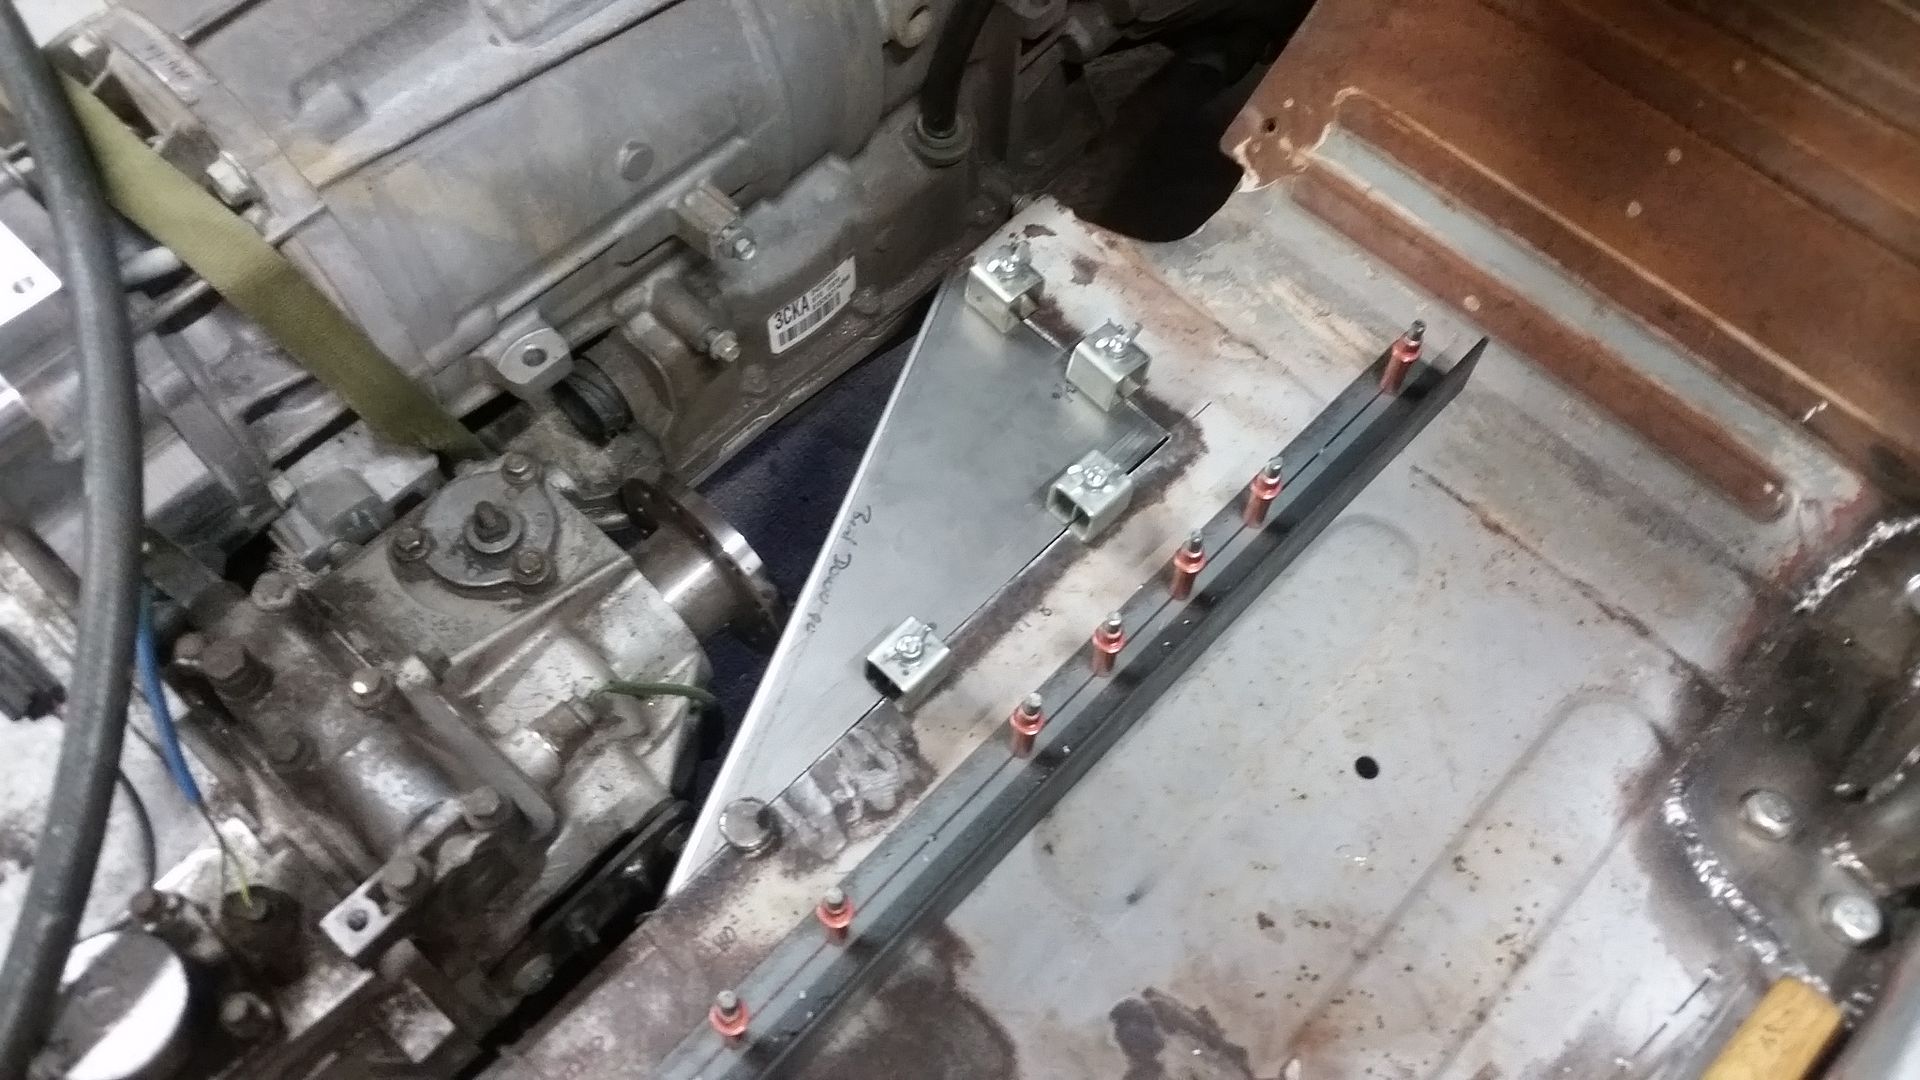
This is the panel I made to replace the 'hump' in the floor. It has a flange on the edge to provide support to the floor. That flange is welded to the existing flange on the front section....and to the left overs of the hat channel on the other end. This should help firm up the floor a lot on this side.


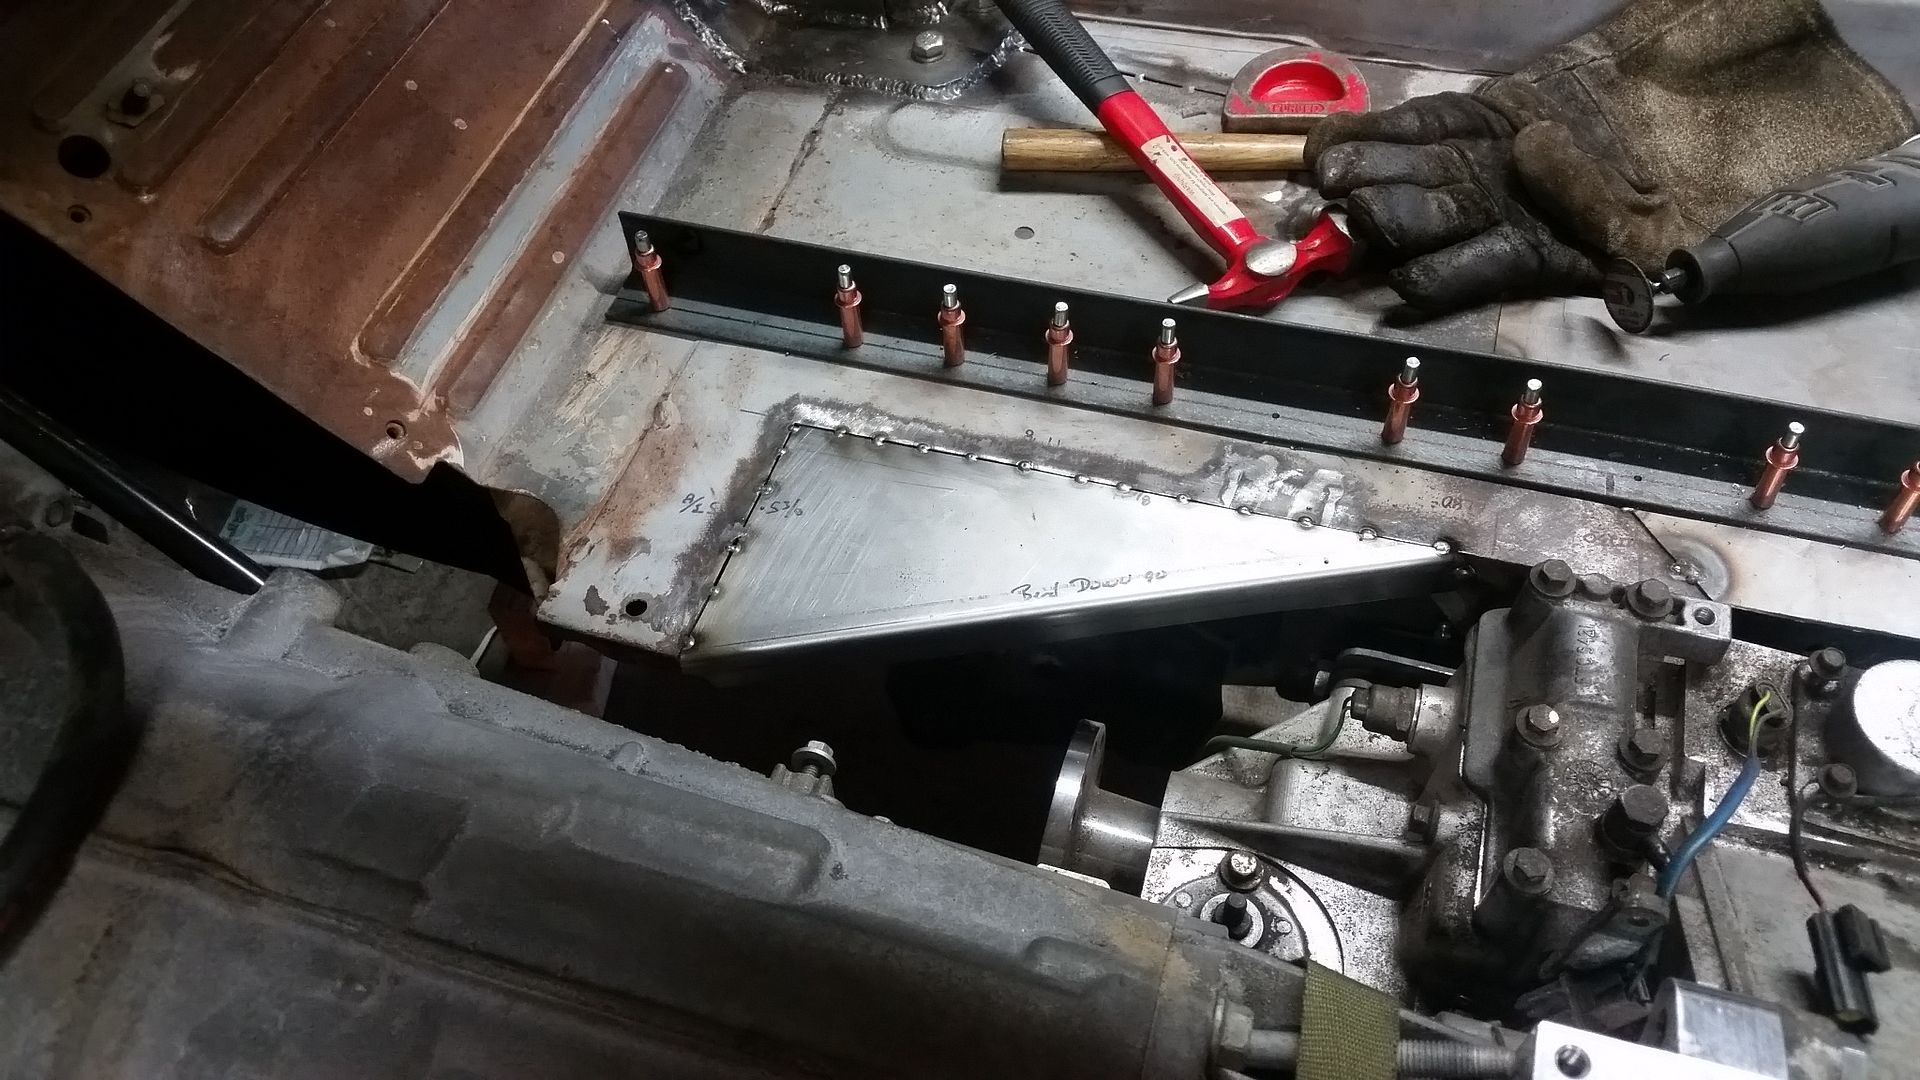
Same panel from the other side, tacked in place, and the clamps removed.

I am going to try to add a flange around the rest of the perimeter next. I don't think that will be too hard. I will just make some 3/4x3/4 L-flanges in my little press brake and fit them in place. I can even use the shrinker on a piece to fit the little hump in the floor. That should be fun. Use some clamps and/or cleco's to hold them in place. Then plug weld the holes. I think that will work.....

I think I have decided to make the tunnel a removable unit. I will likely split it into a front and rear unit. Then to make as much work as possible I will add some access panels in critical areas....transmission shifter, transfer case shifter, front driveshaft, etc.
 

brushogger

Explorer
Man I love this thread! And I always thought Rango was the $&@?. This is good going to be the best hybrid 4x ever!


Sent from my iPhone using Tapatalk
 

Metcalf

Expedition Leader
Man I love this thread! And I always thought Rango was the $&@?. This is good going to be the best hybrid 4x ever!

Sent from my iPhone using Tapatalk

I don't know about all that, but thank you very much.

It should be a really neat little truck when it's done. It will have a few short comings, but overall should be very good for not going all the way into the 'buggy' category. This built was one of opportunity that allows me to continue to develop my skills as a fabricator. I am trying to learn some new skills and try some new ideas. It is also pushing me to purchase and learn to use a few new tools....I like tools. With more tools I can continue to build more complicated vehicles. I have at least a dozen ideas for what might come next after this one.
 
Thank you for the pictures.
Should I cut out the leftover part of the 'bump' on the passenger side? That is 80% yes at this point.

During the build of the FJ above (the two pics I shared), I did all of the sheetmetal work around the t-case, and it was very similar to what you describe. Room behind the t-case for removal, deleting the bump on the passenger side, etc. The customer had his own sheetmetal guy do the rear floors and the rear portion of the tunnel, for whatever reason. When I got the truck back to finish it up, and make the trans tunnel cover, they had put back the passenger side bump...! I have no idea why they put it back, and since it was already in paint, I had to build the cover around it.

Anyway, back on topic here. Your ideas are all good and the proof is showing nicely in your pics.
 

justcuz

Explorer
Pffft. Nothing pisses me off more than dirty tools! My kid used to do that to mine. I used to make him wipe them off all the time. After he got out of the service, guess what, my tools when used by him are cleaned now.

It's an old habit, wild land guys constantly maintain our tools, every break, each evening, anytime it needs it.
 

Metcalf

Expedition Leader
My tools might be clean, but my shop usually looks like a tornado just went though. I have to devote at least a few dedicated hours a week to herding all the tools back into their homes....
 

Metcalf

Expedition Leader
Just a mini update....


I've been trying to remake a flange around the passenger side of the floor opening. It has been going slow.

I had to make a little 'bump' to go around an existing flange in the floor.....


Slice the end clamp in an offset block at the angle you need.


Hammer the flange down to create the clearance you need to get around the flange on the underside of the floor. File down the little bit of overlap at the corner to make the joint look nice.


Tig weld up the seam to make it all one part again.


Install with many plug welds. I did learn that the 1/8" holes for the cleco are not quiet big enough for the weld I would like. I might try going up to 3/16" holes for plug welds like that....or maybe try the TIG with minimum filler. It is nice that an 1/8" hole is easy to weld up however for non-plug weld use like the floor stiffer I am using. Those holes will be easy to fill. I should still probably build a copper backer magnet.....


I also got the hump removal plate seams welded up. Fun.

Hopefully tonight I can get the back section done and some little things finished up. My new template material should be here soon. My seats showed up also but I am still waiting on one slider. Transmission shifter should be here soon also. I see this phase of the build with the tunnel, seat mounts, and shifters taking a bit!
 

justcuz

Explorer
What are you using for a trans shifter? Flange construction looks nice, It really did not pull it back from square as much as I thought it would. Angle is just there to keep the floor rigid as I recall correct?
I had a thought about your rear fenders, take the contour and shape of the backside of the Toyota front fender and use it as a front and rear pattern with adjustments for tire width.
 

Metcalf

Expedition Leader
What are you using for a trans shifter? Flange construction looks nice, It really did not pull it back from square as much as I thought it would. Angle is just there to keep the floor rigid as I recall correct?
I had a thought about your rear fenders, take the contour and shape of the backside of the Toyota front fender and use it as a front and rear pattern with adjustments for tire width.

I am going to use a Gennie original style shifter. It is similar to a Lokar style shifter but uses a shifter gate instead of a push button on the knob. They don't REALLY have one for a 6L80E yet, so I am going to be fabricating it to fit my application. I decided against having a cable shift unit. I came close to going that way, but decided against it in the end. The cables don't have the best reputation for longevity, especially close to the exhaust and stuff.

The Gennie unit may open up some interesting options in the near future. I am going to be investigating the possibility of playing with the spring bias to make it centered instead of biased to one side only. If I can get that to work, which looks possible, I might be able to integrate the tap shift function into the movement of the shift lever when in the M position. Another option, since there is no push button in the shift knob, the shift cane can be hollow. This could allow me to run wires to a button(s) in the knob for the tap shift function.

Yes. The flange on the floor is to make it stiffer. I cut out a lot of structure with the big hole for the raised transfer case position.

Fenders. Yes, that is basically what I am going to do. The bed is going to be a 'stepside' design with bolt-on fenders that look related to the front. I don't have to worry about tire coverage however, and will keep them pretty small and out of the way. All that stuff is going to be aluminum also to save weight.
 

justcuz

Explorer
I think Volvo had the tap shifter. Bump shifter right for downshift and left for upshift. I could be wrong about the manufacturer, but pretty sure the operation was the way I stated or opposite right/up, left/down.
I'm sure you know that the GM factory shifter is a manual shift down out of D to M and a + - rocker switch for up and down shifting. It works sweet for mountain driving, hardly have to touch the brakes, just shift up and down between the gears and the back up to D when on the flat since 5 and 6 are overdrive anyway.

Every time I beat a curved flange it seems to stretch and get more wavy, I'm not doing something right. Lack of finesse most likely.

Had another thought on the roof, cut it into four pieces, front to back, side to side. Mount each of the corners and fill in the center with material, your metal skills should allow you to accomplish the needed crown and save building the mold for your original idea. Kick me in the nuts and tell me to pound sand if you want to do it your way.
 
Last edited:

Metcalf

Expedition Leader
I think Volvo had the tap shifter. Bump shifter right for downshift and left for upshift. I could be wrong about the manufacturer, but pretty sure the operation was the way I stated or opposite right/up, left/down.
I'm sure you know that the GM factory shifter is a manual shift down out of D to M and a + - rocker switch for up and down shifting. It works sweet for mountain driving, hardly have to touch the brakes, just shift up and down between the gears and the back up to D when on the flat since 5 and 6 are overdrive anyway.

Every time I beat a curved flange it seems to stretch and get more wavy, I'm not doing something right. Lack of finesse most likely.

What curved flange thing are you referring to? If it is getting wavy that generally means you need some shrinking.

Yes, the pickup shifter is just PRNDM with a +/- on the stalk. Some of the other applications of the 6L80E have it all in the shifter. I basically didn't want a cable operated shifter so that made me rethink a few things. I can have the switch for the tap shift function anywhere really. With this shifter I have a few options for sure. If I wasn't clear before, I could add switches that would only work in the M position for tap shift into the shifter mechanism...not control it somehow mechanically.
 

justcuz

Explorer
I was referring to a curved flange of a body panel like your rear panel.
The other applications of the 6L80E that have it all in the shifter, does that mean there are detents for all the gears?
I did understand about the switches for the M position. I mentioned the factory style shifters (Volvo) as a possibility to use as an example to study or maybe even use parts from to modify the Gennie shifter. I think the electric shift at a selected location is best with solid detents for PRNDM. That way any bouncing vehicle movement will not jostle the shifter and change gears inadvertently while in M. Once in M then you can electrically up/down shift.
 

Forum statistics

Threads
188,595
Messages
2,907,589
Members
230,704
Latest member
Sfreeman
Top