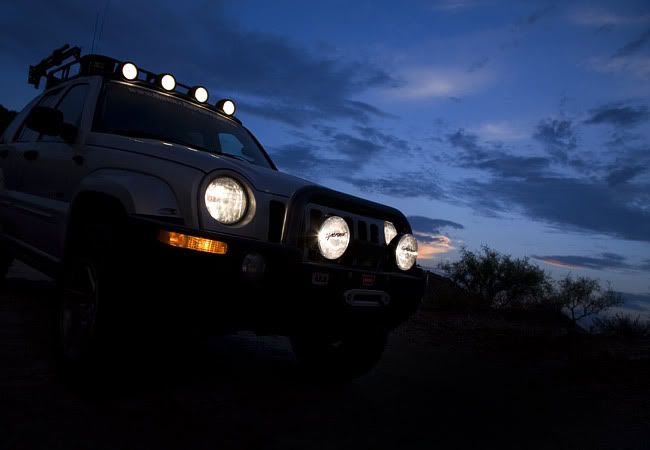
FlyingWen's 2002 Jeep Liberty KJ

articulate

Expedition Leader
This needs no stickers. More lights maybe.
jeep.jpg
 

Willman

Active member
FlyingWen said:
I am caving in and will be getting the body stickers that you and Wil have.

Soon...


Right on!!!!

The window stickers would be cool too!!....Don't have to worry about sun fade down there in AZ.....

;)
 

flyingwil

Supporting Sponsor - Sierra Expeditions
toyrunner95 said:
so heres my question. why is there a gap between the right front fender and the bumper?

Poor installation of the ARB. In order to install the ARB you need to trim the fenders on the KJ's. The previous owner apparently messed up on the passenger side. It's just cosmetic, so no worries on our part.
 

tommudd

Explorer
mine has that gap as well, when i was cutting the right side fender my wife walked into the garage to show me a new bra......very crooked cut!
 

flyingwil

Supporting Sponsor - Sierra Expeditions
Back up lights on!

Time:
Aprox 2 hours

Tools:
Basic tools required.

Since we were installing a BajaRack Mule in place of the Con-Ferr roofrack, a new rack subframe was fabricated by Built II Beat Fabrication. The goal was to keep the rack as low as possible and as you can see it was accomplished nicely.

Here is the rack subframe:

DSC01137.JPG


DSC01139.JPG


DSC01136.JPG


We decided on using two LightForce Stubby's as back-up lights. These light offer great light output and flexibility to redirect with ease. While the KJ was at the fabrication shop, we had them weld in two mounting plates for the Stubby's bases.

Here is the lights mounted to the rack:

DSC01131.JPG


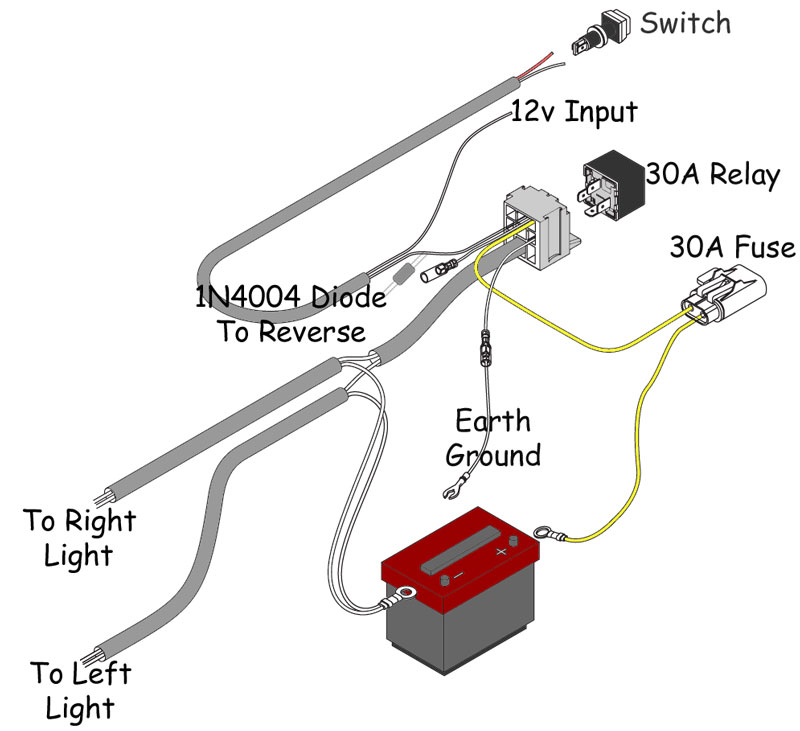
After the lights were installed, on to my favorite...wiring. We wanted to be able to use the lights in multiple situations, and toyed with many options from an on-off-on switch to just an on-off. For ease of installation we decided to base everything off the LightForce Wiring Harness, since they are very well built and the switch will match the front LightForce 170 switch on the KJ now. Below is my modified diagram of the LightForce harness:

KJ_Stubby_Wiring.jpg


Note:
I put a 1N4004 diode(*) in series with the OEM reverse light feed to the relay. This will isolate the OEM reverse light circuit from the aux switch, which is going to feed the same terminal on the relay. Then, when I activate the switch to turn the relay on, it will not backfeed the OEM reverse light circuit. Not that the latter is a bad thing, I just don't know how the OEM circuit works and it may not appreciate 12V being fed back into it. The effect of this isolation is that the OEM reverse lights (in the rear tail lamps) will not come on when I activate the switch.

(*) if you don't have a 1N4004 diode handy, try radio shack, a 1N4001 or 1N4002 will work as well. It's just that the 1N4004 type is near indestructible in an automotive application.


So now the big question, where to tap into the reverse lights? Looking at the FSM, I was able to dig up the following in regards to the reverse lights on 8Wa - 80 - 76:
KJ_Tail_Lamp.jpg


This led me to testing the Brown wire with the green stripe on the Drivers rear tail lamp connector. This wire goes into socket 4 (highlighted yellow). It tested good when the KJ was shifted into reverse. So I traced the Brown wire with a Green stripe to the cargo compartment just under the hinge for the rear door. I figured this would be as good of a place as any to mount the relay as the wires would need to be fed up to the roof.... ah, the next decision, how to run the wires?

So after a while of pondering and looking down on the roof of the KJ, I decided it was best to just drill a hole to feed the wires through. Since I would like to keep the rack removable, we decided that trailer wire extensions would make the perfect quick disconnects. I tested the wires through a bunch of groments from the toolbox and finally landed on the smallest one I could get, a 7/16".

DSC01142.JPG


So now where to drill the hole? Looking down on the roof, you can see that we have a nice ding with a tad bit of rust... So I was thinking that would be a good spot, however I want the disconnects to be as hidden as possible, so it was moved a bit rear ward of where the rust spot is.

DSC01140.JPG


Here you can see the hole drilled:

DSC01141.JPG


The hole was filed smooth, and treated with some touch up paint to prevent rust. While the paint was drying it was time to start running the wiring. I had to extend both the Positive and the Negative wires. I wanted to keep the Fuse for the positive as close to the battery as possible, so I kept that the stock length and spliced between the fuse and the relay, matching the gauge wire (12g). Fuses were mounted just below the drivers side battery strut as shown below:

DSC01160.JPG


I like to ground off the battery when possible, so since I was already runing one cable two wouldn't kill me. So I also did the same with a 12g ground wire. Since I was going to have the relay in the rear this was also the prime opportunity to run the wires for the switch. I drilled a new hole for the switch, and in it went. I feed the positive off the already fused positve input for the Lightforce 170's.
 

flyingwil

Supporting Sponsor - Sierra Expeditions
DSC01150.JPG


DSC01151.JPG


DSC01158.JPG


The Ground, and Positve (FUSED) wires were ran through the driver's side firewall grommet, I joined the switch wire into the harness under the diver kick panel and routed the harness though both door sills and to the rear under the plastics.

It was now time address the new hole in the roof now that the touch up paint was dry(er)and get the harness prepared for the lights. Since the trailer adapters were larger than the grommet and the hole, this took some planning. I removed the wires from the relay block so I had a free end to deal with when feeding the wires through the hole. I soldered every splice and connection for rigidity, plus I never have luck with crimp joints. I didn't have any shrink tubing, so I used a heavy dose of electrical tape.

Here you can see the light harness ready to be fed through the hole in the roof:

DSC01145.JPG


Once the wire was feed through the hole in the roof the wires were routed down the C Pillar to the relay.

DSC01149.JPG


In the above picture you can see a factory harness. I zip tied my harness along this strip to tie it to the Jeep and keep it from rattling when on/off the highway. The top exposed wires were treated with some RTV silicone to prevent water ingress through the grommet, and allowed to dry while I began wiring the the Stubby lights.

The Stubby's do not come with wire leads out of the lamp, so I soldered and crimped connectors on to the lights as shown below:

DSC01134.JPG


I routed the cable through some wire loom, and used UV Zip ties to connect it to the rack as shown below:

DSC01153.JPG


DSC01155.JPG


DSC01156.JPG


Now it was time to test it out. Every thing worked as planned, so every interior panel was re-snapped back on. By this time it was dark so I did not get a good shot of where I mounted the relay. I mounted the relay to the rear pillar just in front of the "vent".
 

flyingwil

Supporting Sponsor - Sierra Expeditions
Here's some night pics of the lights in action:

headlights on, switch on:
DSC01162.JPG


Headlights on, in reverse:
DSC01164.JPG


Final Thoughts:
The light output is great, and far better than stock. The lights wired in this manner, the lights automatically turn on when shifted into reverse (doesn't matter where the switch is, ie: on or off), and this feature is very nice, however once the rack is off this will mean that the trailer harness (my quick connects) are live any time shifted to reverse. A simple plastic cover remedy's this issue. The ability to switch on is going to be fun. Not just for tailgaters, but for setting up camp, loading and unloading at night, or just general light where and when needed. I am very pleased with the overall outcome of the installation.
 

Fergie

Expedition Leader
What kind fo material did you use between the rack feet and the top of the roof? Neoprene? Foam?

Looks good.
 

mr r2fj

Adventurer
nice writeup man! Just in time to help me do a full light install on the FJ! ;-) Which reminds me, I need some lights! =)
 

flyingwil

Supporting Sponsor - Sierra Expeditions
What kind fo material did you use between the rack feet and the top of the roof? Neoprene? Foam?

Looks good.

We used the foam tape designed for truck campers. We picked it up at Home depot of all places near the weather stripping. Its only temporary until the rack subframe can get powder coated along with my rear bumper. But then again will be re-applied.
 

Forum statistics

Threads
188,296
Messages
2,905,077
Members
229,959
Latest member
bdpkauai
Top