RoundOut
Explorer
Short term mods: "To do list"
I've been swamped with work and helping start a new Scout unit. Finally today, we came up for air and I finished the modification of the laptop mount foundation. My son and I wrapped it up after dark under our halogen work lights.
After removing the entire mount, I re-drilled the holes in the floor and the new ones for the third anchoring leg. We put 1/4 x 20 machine screws and nylock nuts on each hole in the floor flanges, replacing the sheet metal screws that allowed too much wiggle. It is MUCH stronger now.
:wings:
So, getting back after it, I am excited to start working on the rest of the new mods...
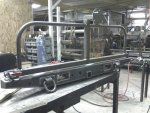
- Complete the sliders by reinforcing the mounting plates on the inside of the c-channel frame and finishing the rearmost support and mount on each side. When this is done, have them bead blasted then paint them with POR-15. Herculine the top surface when complete.
- Install my Icom 208h faceplate and the display unit for my new backup sensors (both will need a partial pull-down of the headliner and drivers pillar for the cleanest install, so we'll tackle them at the same time) DONE 11/5/07 - See Pics in post 48.
- Mount the Icom head unit under front seat. Done 11/5/07 - Pics to follow the next time I have to pull out my front seat for something, LOL. Installed antenna cable and run under driver's side scuff plates to the corner by the back seat. I am using a magnetic mount antenna and will mount it when using Ham and dismount when not, to remain invisible to envious eyes. Installed the power cable & run under driver's door scuff plate to area behind kick plate, through the firewall, along with two other future cable pairs, and on to a battery terminal setup I purchased at West Marine.
- Still deciding whether to power directly from battery or include a relay and interupt the direct power with a switch. Decided to go directly to battery and utilize in-line fuses from the manufacturer. DONE 11/26/07
- Still need to locate a remote microphone jack inside the console, visible only when the seat is removed. I am hoping to find a cat-6 wall-jack with a 90 degree socket so I can plug in from above, between the seat and console. (that may sound as clear as mud, but it's my best effort at describing it - pics will follow, for sure). CHANGED Design... Used a 24" Cat 6 cable and a female-female adapter. Icom wants about $80 for their microphone extension wire. I have $7 in this one and it works perfectly. DONE 11/26/07
- Do a head unit swap with a buddy (his 1-DIN for my 2-DIN to make room for a switch panel in the lower DIN slot) 11/29/07 Pulled my head unit to check the mating of the connectors I bought at Wallyworld. They didn't match. took some pics and will try again later.
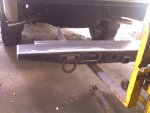
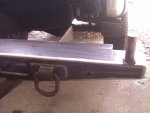
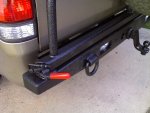
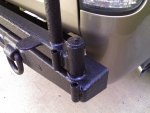
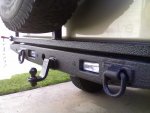
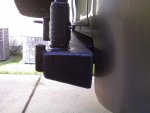
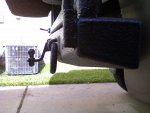
- Get the class III hitch receiver and Tough Country Economy Rear bumper off. I have already sold them to a TSer from Dallas who should come down in a couple weeks to pick them up. He's scheduled to pick it up on Nov. 19th. DONE 11/19/07
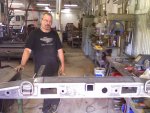
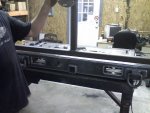
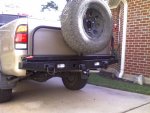
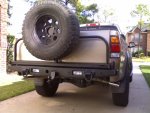
- Replace it with a new custom bumper with swing-out tire carrier... see first draft of plans in next post DONE - finished all accessory wiring today 11/29/07.
- Relocate primary and backup batteries to new location behind rear differential after bumper build is complete. Done, see later posts
- OUCH. I bought two runs of 2# Red and one run of 2/0# black. This was almost $300 just in cables. Changed to single red and single black by sealing and relocating my solenoid to the rear inside the battery box. Saved $100.
- I purchased two battery lockout switches capable of sustained 300 amp current from West Marine today 11/29/07...Another $50. The lockout is installed, and the auxiliary lockout still needs to be.
- Picked up some heat protective cover for the cables where they run near the exhaust manifolds, plus some exhaust wrap. I'll put it in the former, then wrap all three with the latter. Used the silicone sleeves, but not the exhaust wrap. Not only is the exhaust wrap overkill, it's $50.
- We're supposed to get to work on the battery compartment next Tuesday or Wednesday, Dec 4 or 5. ( <--- This was written on 11/30/07) Today is 1/5/08 and we still have not finished [maybe read: started :-( I don't know?? ] It's in!
- Finish the wiring of the backup sensors in the new bumper Done 11/29/07 - See pics & write-up on post #39
- Add a compressor system with appropriate supply lines, valves & fittings to fill the air tank integral in my bumper. CHANGED to use a proper air tank instead of the bumper. Too many things to go wrong with as many welds as we have in my bumper. My buddy at CE Offroad let me have an old air tank from a truck. I need to pressure test it and sandblast it right away. I went with a Viair 400C compressor and remote mounting kit. I got all the stuff already just before and after Christmas 2007. Cheesy (I thought it would work the first time) compressor mount is in (1/23/08), and will be replaced ASAP, before I do anything but test the system.
Last edited:
 ...paraphrased, it went "Nice ass, Gary!" :shakin:
 The point of no return! LOL. :Wow1: I'll be trimming my fenders today so my rear bumper can offer wrap around rear fender protection. :yikes:
")