You are using an out of date browser. It may not display this or other websites correctly.
You should upgrade or use an alternative browser.
You should upgrade or use an alternative browser.
The Plan...
- Thread starter dieselcruiserhead
- Start date
24HOURSOFNEVADA
Expedition Leader
Nothing can compare to tuning skis in the garage...
Cool music softly filling in behind the drip of melting wax on p-tex, accompanied with it's intoxicating aroma as you run the iron through it's course. Taking you back to your childhood memories of your dad performing the same ritual before your races the next morning. Now completed by your own 10 year old kid walking into the garage, double checking your work, giving a nod, followed by a smile and exiting. All while a half full pint glass sits just out of arms reach.
What can I say, my mom never baked, so the smell of dad tuning ski's is about as close to "Comfort Food" as I ever got.
Looks like you found a great girl and I'd bet my last dollar she thoroughly knows the meaning of "BlueBird."
Pskhaat
2005 Expedition Trophy Champion
...cool music softly filling in behind the drip of melting wax on p-tex
I have a scar the size of a quarter on one of my fingers as a child from a few errant ptex drips. Scraping that stuff off of young skin is...painful.
...I miss the mountains...
dieselcruiserhead
16 Years on ExPo. Whoa!!
OK updates guys, sorry for the delays just busy as hell...
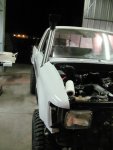
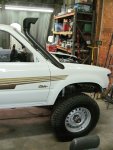
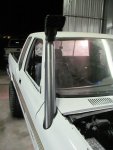
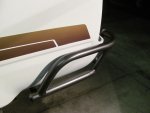
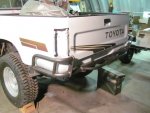
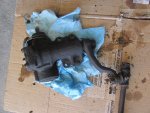
I got all sorts of awesome stuff back from Utah Powder Coatings which as usual is just top notch.. The bumpers and snorkel are all the same color...
The snorkel turned out awesome and the powder coating also covered the welds/grinding well...
I got all sorts of awesome stuff back from Utah Powder Coatings which as usual is just top notch.. The bumpers and snorkel are all the same color...
The snorkel turned out awesome and the powder coating also covered the welds/grinding well...
Attachments


dieselcruiserhead
16 Years on ExPo. Whoa!!
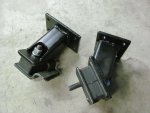
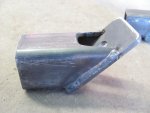
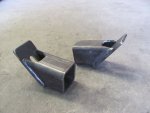
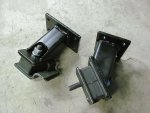
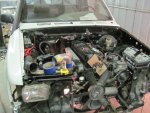
Once the crossmember was in place I could start working on the motor mounts. I used Anchor 2469 motor mounts which are a nice soft fairly universal motor mount that are only about $8 each at Napa. These are also the non-liquid motor mounts that are used on Cummins 4BTs and seemed about perfect for a nicer more heavy duty motor mount...
Here is the parts interchange so they are easy to find at any parts store (a big deal on nearly everything on this truck -- anything crucial can be easily found at a parts store)....
DODGE B100 VAN (1979 - 1980)
DODGE B100 VAN SPORTSMAN (1979 - 1980)
DODGE B150 VAN (1981 - 1994)
DODGE B150 VAN SPORTSMAN (1981 - 1994)
DODGE B1500 VAN (1995 - 1998)
DODGE B1500 VAN SPORTSMAN (1995 - 1997)
DODGE B200 VAN (1979 - 1980)
DODGE B200 VAN MAXI (1979 - 1980)
DODGE B200 VAN MAXI WAGON (1979 - 1980)
DODGE B200 VAN SPORTSMAN (1979 - 1980)
DODGE B250 VAN (1981 - 1994)
DODGE B250 VAN SPORTSMAN (1981 - 1994)
DODGE B2500 VAN (1995 - 1998)
DODGE B2500 VAN SPORTSMAN (1995 - 1997)
DODGE B300 VAN (1979 - 1980)
DODGE B300 VAN MAXI (1979 - 1980)
DODGE B300 VAN MAXI WAGON (1979 - 1980)
DODGE B300 VAN SPORTSMAN (1979 - 1980)
DODGE B350 VAN (1981 - 1994)
DODGE B350 VAN SPORTSMAN (1981 - 1994)
DODGE B3500 VAN (1995 - 1998)
DODGE B3500 VAN SPORTSMAN (1995 - 1997)
DODGE D100 PICKUP (1979 - 1989)
DODGE D150 PICKUP (1979 - 1993)
DODGE D150 PICKUP S 1991
DODGE D200 PICKUP (1979 - 1980)
DODGE D250 PICKUP (1981 - 1993)
DODGE D300 PICKUP (1979 - 1980)
DODGE D350 PICKUP (1981 - 1993)
DODGE RAM 1500 VAN (1999 - 2003)
DODGE RAM 2500 VAN (1999 - 2003)
DODGE RAM 3500 VAN (1999 - 2003)
DODGE RAMCHARGER (1979 - 1993)
DODGE RD200 1979
DODGE RD200 PICKUP 1980
DODGE W100 PICKUP (1986 - 1989)
DODGE W150 PICKUP (1979 - 1993)
DODGE W150 PICKUP S (1990 - 1991)
DODGE W200 PICKUP (1979 - 1980)
DODGE W250 PICKUP (1981 - 1993)
DODGE W300 PICKUP (1979 - 1980)
DODGE W350 PICKUP (1981 - 1993)
PLYMOUTH PB100 VOYAGER (1979 - 1980)
PLYMOUTH PB150 VOYAGER (1981 - 1983)
PLYMOUTH PB200 VOYAGER (1979 - 1980)
PLYMOUTH PB200 VOYAGER MX WAGON (1979 - 1980)
PLYMOUTH PB250 VOYAGER (1981 - 1983)
PLYMOUTH PB300 VOYAGER (1979 - 1980)
PLYMOUTH PB300 VOYAGER MX WAGON (1979 - 1980)
PLYMOUTH PB350 VOYAGER (1981 - 1983)
PLYMOUTH TRAILDUSTER (1979 - 1981)
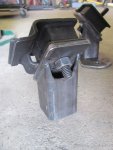
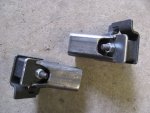
Here is the building approach I took. This is the motor side mount I came up with... I really wanted to try to slow down and make sure I could get some good welds with this new welder I have been borrowing...
I also love how these turned out hence all the pictures (I hope that is cool)..
Here is the parts interchange so they are easy to find at any parts store (a big deal on nearly everything on this truck -- anything crucial can be easily found at a parts store)....
DODGE B100 VAN (1979 - 1980)
DODGE B100 VAN SPORTSMAN (1979 - 1980)
DODGE B150 VAN (1981 - 1994)
DODGE B150 VAN SPORTSMAN (1981 - 1994)
DODGE B1500 VAN (1995 - 1998)
DODGE B1500 VAN SPORTSMAN (1995 - 1997)
DODGE B200 VAN (1979 - 1980)
DODGE B200 VAN MAXI (1979 - 1980)
DODGE B200 VAN MAXI WAGON (1979 - 1980)
DODGE B200 VAN SPORTSMAN (1979 - 1980)
DODGE B250 VAN (1981 - 1994)
DODGE B250 VAN SPORTSMAN (1981 - 1994)
DODGE B2500 VAN (1995 - 1998)
DODGE B2500 VAN SPORTSMAN (1995 - 1997)
DODGE B300 VAN (1979 - 1980)
DODGE B300 VAN MAXI (1979 - 1980)
DODGE B300 VAN MAXI WAGON (1979 - 1980)
DODGE B300 VAN SPORTSMAN (1979 - 1980)
DODGE B350 VAN (1981 - 1994)
DODGE B350 VAN SPORTSMAN (1981 - 1994)
DODGE B3500 VAN (1995 - 1998)
DODGE B3500 VAN SPORTSMAN (1995 - 1997)
DODGE D100 PICKUP (1979 - 1989)
DODGE D150 PICKUP (1979 - 1993)
DODGE D150 PICKUP S 1991
DODGE D200 PICKUP (1979 - 1980)
DODGE D250 PICKUP (1981 - 1993)
DODGE D300 PICKUP (1979 - 1980)
DODGE D350 PICKUP (1981 - 1993)
DODGE RAM 1500 VAN (1999 - 2003)
DODGE RAM 2500 VAN (1999 - 2003)
DODGE RAM 3500 VAN (1999 - 2003)
DODGE RAMCHARGER (1979 - 1993)
DODGE RD200 1979
DODGE RD200 PICKUP 1980
DODGE W100 PICKUP (1986 - 1989)
DODGE W150 PICKUP (1979 - 1993)
DODGE W150 PICKUP S (1990 - 1991)
DODGE W200 PICKUP (1979 - 1980)
DODGE W250 PICKUP (1981 - 1993)
DODGE W300 PICKUP (1979 - 1980)
DODGE W350 PICKUP (1981 - 1993)
PLYMOUTH PB100 VOYAGER (1979 - 1980)
PLYMOUTH PB150 VOYAGER (1981 - 1983)
PLYMOUTH PB200 VOYAGER (1979 - 1980)
PLYMOUTH PB200 VOYAGER MX WAGON (1979 - 1980)
PLYMOUTH PB250 VOYAGER (1981 - 1983)
PLYMOUTH PB300 VOYAGER (1979 - 1980)
PLYMOUTH PB300 VOYAGER MX WAGON (1979 - 1980)
PLYMOUTH PB350 VOYAGER (1981 - 1983)
PLYMOUTH TRAILDUSTER (1979 - 1981)
Here is the building approach I took. This is the motor side mount I came up with... I really wanted to try to slow down and make sure I could get some good welds with this new welder I have been borrowing...
I also love how these turned out hence all the pictures (I hope that is cool)..
Attachments

dieselcruiserhead
16 Years on ExPo. Whoa!!
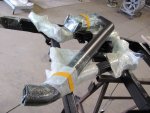
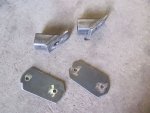
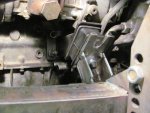
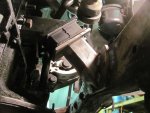
Next is getting them attached to the engine and then the other half attached to the truck. It was a little confusing with the timeframe here as I was doing a million things at once but these turned out well. Another of which was moving the car around and the shop for that matter so I could pull the engine in and out without having to have the door open. I had to tack the mounts in place with the engine in and then pull it to burn everything in with the welder. These are way beefier than what the truck or the benz came with for that matter so again I'm psyched...
I also love how the engine fits, like it was meant to be there.. (nice and tight, which is good and bad)")
I also love how the engine fits, like it was meant to be there.. (nice and tight, which is good and bad)
Attachments
dieselcruiserhead
16 Years on ExPo. Whoa!!
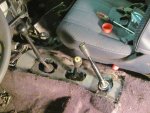
This allowed me to start tacking the shifter holes at which point I realized I definitely needed bucket seats, no debate, which I think I mentioned...
This basically got the first layer in place and I did heating and bending to get the shifter position right though I may not have needed to do all this work... Marlin Crawler also send this shifter with the trans which was just awesome of them as usual...
This basically got the first layer in place and I did heating and bending to get the shifter position right though I may not have needed to do all this work... Marlin Crawler also send this shifter with the trans which was just awesome of them as usual...
Attachments


dieselcruiserhead
16 Years on ExPo. Whoa!!
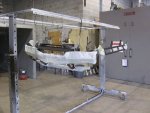
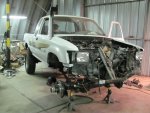
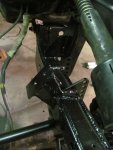
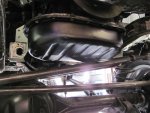
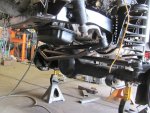
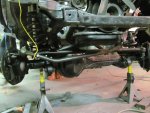
From here I basically pulled everything including the engine and suspension for final welding and then paint. On the driver's side I also added some gusseting that is probably total overkill but it works and I angled it so I could easily wrench/add remove these... I also added rosetted frame plates for extra beef as well which may also be unnecessary but good to have I figure.
I also probably could have painted with the suspension but it would have been ugly and I also needed to adjust the height of the suspension one more click on the adjustable height coil buckets as with the weight it came down a hair. I may need one more with the winch & ARB bumper and other accessories but currently it is sitting perfectly now (perfect height/stance)...
I also probably could have painted with the suspension but it would have been ugly and I also needed to adjust the height of the suspension one more click on the adjustable height coil buckets as with the weight it came down a hair. I may need one more with the winch & ARB bumper and other accessories but currently it is sitting perfectly now (perfect height/stance)...
Attachments
dieselcruiserhead
16 Years on ExPo. Whoa!!
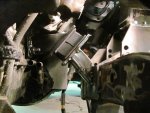
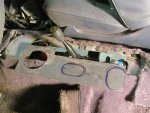
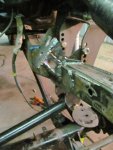
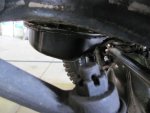
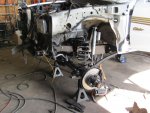
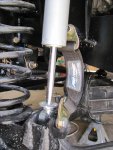
Next came a matter of interferance with the engine's oil pan even with the notching. I basically notched the pan as much as possible and this works for the tie rod (the rod that connects the two wheels) but the drag link (the link attached to the steering box that controls the steering) would interfere with the engine on compression. I really scratched my head and honestly thought I was "F'd" for a little while until I came up with a solution... Also luckily the steering linkages from 4x4labs are solid 1/4" thick wall aka ridiculously beefy.. ")
The interference. Not sure if this makes sense...
The interference. Not sure if this makes sense...
Attachments
dieselcruiserhead
16 Years on ExPo. Whoa!!
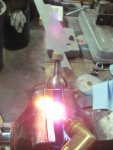
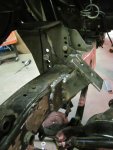
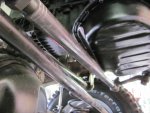
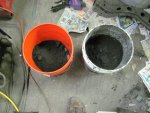
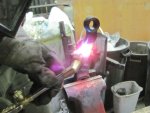
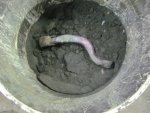
So along with some of the crazy trips getting ready in the week leading up to the "last week" came this crazy option.. I basically sourced a FJ60 power steering box for a 6 pack of some good beer and went to Kurt Williams (Cruiser Outfitters) and reamed it to the correct pattern that the 4x4 Labs kit uses (super beefy GM tie rod ends as already mentioned). I thought this would do the trick alone but it ended up not being enough drop. Pic 4 shows the interference with the Marlin arm hitting the oil pan at max flex. I tried to find a good dropped pitman arm that was Toyota splined but they are next to impossible to find. Everyone actually wants a flatter arm not a higher dropped so I was sort of screwed. So this is a technique that a lot of people have done but is generally not considered super kosher and I am totally aware of this. An old Land Cruiser shop in Oregon called Over The Hill 4x4 run by a guy named "W" used to do this a lot and even weld to forged steering arms by preheating, welding, and then slow cooling in sand. Lots of guys on Pirate4x4.com also do this. I think I could have done it as good as possible but it still is a hair sketchy for me so I'll run this for now and have to order a custom pitman from Sky Manufacturing also in Oregon that will be pretty sweet when its comes but this will work for a little while and I trust it. You can see the sand. I let it cool over night in the sand so a slow cool...
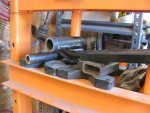
Even with all of the heat the forged Toyota arms are SO beefy that it took a 5 foot bar over the tip of the arm to bend it... These are so ridiculously beefy (look up Forged for anyone who doesn't know how this works)...
I then went to home at about 4AM that night and my engineering buddy Steve Chen who hammered out the interior that night also luckily agreed..
Attachments


Last edited:
dieselcruiserhead
16 Years on ExPo. Whoa!!
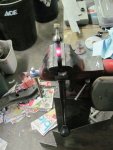
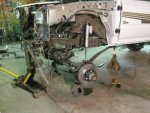
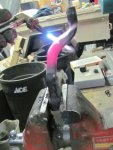
The following morning I hammered out the bent drag link it now needed. I actually learned a lot from the dimples from the ARB bumper bar and bending and kinking metal so this technique worked a lot better (using a bigger piece of steel to bend it, a plate between the bending piece and the piece to be bent, etc etc)...
The reason the bend is longer on the passenger side is because of how the axle cycles up and down. Because the drivers side is fixed on the steering box it stays up. I actually think this is pretty ************ and it also still keeps nice and high and tight. We'll see how it works in the real world.
Also luckily again this is 1/4" thick wall (very heavy duty). Dropping the pitman also worked out perfectly that even with the bends in the drag link I did not need a longer piece. This complicated alignment a hair because the drag link cannot be micro adjusted now. It can only be adjsuted in about 1/2 turns by having to remove the Tie Rod End (TRE) each time. But this is OK...
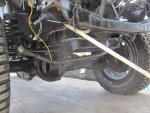
You can also see the suspension compressed in this last pic on the trailer from much later when I took it to exhaust. This is about as low as it will go indicating these bends also worked out great. I've talked extensively with Luke at 4x4Labs and he says his frombe steering will work even with the coil spring if for reason I decide at some point I don't like this, but so far so good I think...
The reason the bend is longer on the passenger side is because of how the axle cycles up and down. Because the drivers side is fixed on the steering box it stays up. I actually think this is pretty ************ and it also still keeps nice and high and tight. We'll see how it works in the real world.
Also luckily again this is 1/4" thick wall (very heavy duty). Dropping the pitman also worked out perfectly that even with the bends in the drag link I did not need a longer piece. This complicated alignment a hair because the drag link cannot be micro adjusted now. It can only be adjsuted in about 1/2 turns by having to remove the Tie Rod End (TRE) each time. But this is OK...
You can also see the suspension compressed in this last pic on the trailer from much later when I took it to exhaust. This is about as low as it will go indicating these bends also worked out great. I've talked extensively with Luke at 4x4Labs and he says his frombe steering will work even with the coil spring if for reason I decide at some point I don't like this, but so far so good I think...
Attachments
dieselcruiserhead
16 Years on ExPo. Whoa!!
I have a lot more photos to upload but at this point I really just need to take more / better pics so I'll hold off. The rest of the updates are wiring, things like this that photos can't really do justice.. The exhaust, etc etc..
So let me take these photos I'm realizing as I look at the photos I have right now and more updates to come.. And back at it tomorrow.. A week from today is Cruise Moab. I would be bummed if the truck wasn't ready for this..
So let me take these photos I'm realizing as I look at the photos I have right now and more updates to come.. And back at it tomorrow.. A week from today is Cruise Moab. I would be bummed if the truck wasn't ready for this..
jingram
Adventurer
An old Land Cruiser shop in Oregon called Over The Hill 4x4 run by a guy named "W" used to do this a lot and even weld to forged steering arms by preheating, welding, and then slow cooling in sand.
W is one of the hardcore. That man is a master fabricator and makes some rather amazing creations, although not in the typical expedition fashion.
dieselcruiserhead
16 Years on ExPo. Whoa!!
totally agreed... Nice to see people are actually reading all of my drivel..
Nice to see people are actually reading all of my drivel.. Similar threads
- Replies
- 4
- Views
- 875
- Replies
- 0
- Views
- 380
- Replies
- 2
- Views
- 123
- Replies
- 3
- Views
- 486