The Rolling Restoration & Customization Of My 88' Range Rover Classic

craig

Supporting Sponsor, Overland Certified OC0018
You're doing a waaaay better job of posting pictures than I am. The photos really make the thread come alive. Keep em coming!! :)
 

shultzie

Observer
Jon,
Hey man great write up on your RRC!! I have been looking for some time for one for myself. Its good to see how much pride goes into everything you have done. Cant wait for more updates and the finished product!!

good travels
 

rrclassicbt550

Farmer Jon
You're doing a waaaay better job of posting pictures than I am. The photos really make the thread come alive. Keep em coming!! :)

Craig,

Thank you! I am very happy to know that you like the pictures! :)

For me, visual aids make learning more effective and more interesting. Not to mention, my memory is not the greatest. I actually have my old outdated digital point and shoot camera now dedicated as my "garage/project camera". I keep it near me at all times when I am working on something so I can take reference pictures of EVERYTHING. Then when it comes to re-assembly I can always look back at the reference photos to see exactly where things are supposed to be and/or have before & after shots of the improvements I have made.
I think the number of reference photos is around 2500 and counting at this point. I figure that since I have all of these photos, they shouldn't go to waste by being put away in an album someplace. So I will post as many as I can for others to enjoy and hopefully help them out as well. Speaking of...if anyone needs some reference photos to help them with there own projects...feel free to ask and I will see if I have any pictures to help you out.

I have been following your thread as well and your Classic is really coming along. I have to admit that I am very jealous of your ARB roof rack and fridge!..lol

Do you mind if I ask why you chose to swap the Bilsteins out for OME's? The reason I ask is because I have a set of Bilsteins 5160 remote reservoir shocks for the rear and another set of non-remote reservoirs Bilsteins for the front on the shelf waiting to be installed. Did you do the swap because of personal preference or because of OME's are better?


Jon,Hey man great write up on your RRC!! I have been looking for some time for one for myself. Its good to see how much pride goes into everything you have done. Cant wait for more updates and the finished product!!

good travels

Shultzie,

Thank you very much for noticing the effort I put into everything. I always try to do the highest quality job that I can perform the first time because I really hate doing things twice, which is why it takes me so long to do everything. I also do my best to double and triple check everything to make sure its "done right", especially if it means I could be stranded due to something that could have been preventable.

I will definitely keep the updates coming so please keep checking back.
 

craig

Supporting Sponsor, Overland Certified OC0018
The Bilsteins I had were the non-reservoir version. I swapped them for Old Man Emu shocks because:

1. They were designed to be paired with the Old Man Emu springs in the truck.
2. They've been very reliable for me, and everyone I know that has them.
3. I don't really know a lot about the low end Bilstein's (I had 7100s in my last Land Rover) so I didn't know if they were any good or not.
4. I got them for free, and a friend needed a set of shocks. I had to decide which one's I preferred so he could have the other set. :) So, OME by a small not-so-educated margin.

20/20 hindsight, the truck does in fact drive better with the OMEs in. Tires stay on the ground better, and it bounces just a bit less even with more weight added.
 

rrclassicbt550

Farmer Jon
Replacing the master cylinder and brake servo

During the disassembly of my Rover, I found oil on the floor, then on a panel that surrounded the pedals, then on the back of the brake servo that is attached to the brake pedal arm. As you might be able to gather from the pictures, the brake servo needed to be replaced. As a precaution I also purchased a master cylinder at the same time. After I finished modifying the late model pedal assembly from the 96' Discovery I also began the replacement of the braking system.

I didn't post the re-assembly because it is really straight forward. It really is just the "reverse" of the disassembly. All I did was to make sure that there was a new O-ring on the back of the master cylinder and also made sure to use a little lithium grease on the end of the metal shaft that goes into master cylinder to help reduce the wearing between those pieces.

IMG_4169.JPGIMG_4170.JPGIMG_7065.jpgIMG_7066.JPGIMG_7067.JPGIMG_7068.JPGIMG_7069.JPGIMG_7070.JPG
Notice the cracks at the back of the old master cylinder? Those are why I am glad I ordered a new master cylinder along with the new brake servo.

IMG_7071.JPG
The end of this shaft is where I put a little lithium grease to help reduce wear.

IMG_7072.JPG
 
Last edited:

rrclassicbt550

Farmer Jon
IMG_7085.JPG
This is the O-ring that needs to be between the master cylinder and the brake servo. Also picture is the new one.

IMG_7073.JPG
Sometimes paint can hide rust...

IMG_7074.jpg
Like this. Although I must admit I was expecting to see worse rust than this.

IMG_7076.JPG
New master cylinder

IMG_7077.JPG
New brake servo

IMG_6743.JPG
Shiny new braking assembly in...

IMG_7087.JPG
I cannot emphasize enough how important these brake like wrenches are...

IMG_7084.JPG
All done and looking good!
 

rrclassicbt550

Farmer Jon
The modifications needed to make the throttle cable work

More modifications were need to make the 88' RRC throttle cable work with the 96' Disco throttle pedal. If you look at the pictures closely its like playing "spot the difference" because there are differences between the two assemblies but you have to pay attention to catch them all.

I used my fathers milling machine to elongate the hole to accommodate for the different throttle cable. Then cut up the old pedal assembly to get the bracket that holds the throttle cable in line with the pedal. I welded that bracket onto the 96' Disco pedal assembly and made sure the final alignment was ok. Once all of that was done I still had to make sure that it was both water and fume tight, so....I used Sugru for another purpose.


IMG_6640.JPGIMG_6641.JPGIMG_6644.JPGIMG_6670.JPGIMG_6680.jpgIMG_6682.jpgIMG_6686.JPGIMG_6688.JPGIMG_6689.jpgIMG_6692.JPG
 

rrclassicbt550

Farmer Jon
A quick freshening up of the windshield wiper arms

I believe that the little things make a big difference when they are all added up. So while I was in between tasks I decided to clean up the windshield wiper arms. After all, I live in the Pacific Northwest....if you haven't heard, it rains here... so refurbishing something that is within my field of vision the whole time I am driving is a moral boost for me.

Anyway, all I did to "refurbish" the wiper arms was to sand them down with a red Scotch Brite and then paint them with Duplicolor's Trim Paint. Here are the pictures...

IMG_6708.JPGIMG_6710.jpgIMG_7078.JPGIMG_7079.JPGIMG_7080.JPGIMG_7082.JPG
 

rrclassicbt550

Farmer Jon
Dashboard fitment has been interesting....

I had to do a little bit of "customizing" to make the early Classic dashboard fit with the 96' Disco structure. I had to cut off a little bit of the Disco structure, trim an area of the dash top with the saw, and re-drill the holes for the gauge cluster to mount it securely. To be honest, the toughest part of the whole thing was feeding the dash top back in underneath the windshield gasket...lol. My knowledge of "interesting" four letter words came in handy that night! ; )

I am currently re-running the heating ducts and putting the air conditioning unit back in. I will post some more updates in a couple weeks because I am headed down to Southern California for a week or so. I hope these updates will tide you all over for a little while.

Have a good one.

Jon

P.S.

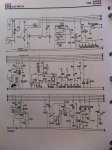
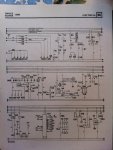
Oh by the way...does anyone have a color coded wiring diagram for the steering column wiring harness of an 1988 Range Rover Classic? I have got the 95' RRC column wiring all figured out as far as left and right turn signal, high beam, low beam, parking lights, decal cruise control, accel. cruise control, etc. but when it came time to use my ohm meter to figure out the 1988 column it stumped me. I couldn't get it to complete any circuit other than the horn. So what I am looking for is a color code for which wire is right turn signal, left turn signal, decal CC, Accel CC, etc. If anyone can help me out with this it would really help me finish this thing up. I have looked in my Rave manual and the big thick Land Rover manual, but have come up with nothing useful. Any help would be greatly appreciated. Thank you.

IMG_7006.JPG
I put felt underneath both sides of the mating surfaces to help reduce rattles too.

IMG_7007.JPGIMG_7008.JPGIMG_7010.JPG
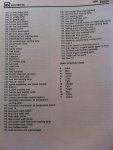
Not pictured....I put felt in here to help with reducing rattles.

IMG_7012.JPGIMG_7013.JPGIMG_7092.JPGIMG_7093.JPGIMG_7090.JPGIMG_7088.JPG
 
Last edited:

repete

Observer
I still have my 1988 workshop manual. Ill take at what's in there, and let you know.
I have found that rover was terrible with changing their wire colors every year! My brother just last week swapped a rear side door on his 94 lwb, with one form a 93. All the window motor wires were wrong.
 

repete

Observer
I will try to post up pictures taken with my phone. It might be better if I fax them to you, or I can scan and email them Monday. The drawings are very poor, so I hope you can get what you need from them.
 

repete

Observer
ImageUploadedByTapatalk1331412397.005003.jpg
 

Attachments

  • ImageUploadedByTapatalk1331412456.806748.jpg
    ImageUploadedByTapatalk1331412456.806748.jpg
    511.5 KB · Views: 13
  • ImageUploadedByTapatalk1331412499.939218.jpg
    ImageUploadedByTapatalk1331412499.939218.jpg
    516.9 KB · Views: 13
  • ImageUploadedByTapatalk1331412544.233169.jpg
    ImageUploadedByTapatalk1331412544.233169.jpg
    510.8 KB · Views: 12
  • ImageUploadedByTapatalk1331412583.659700.jpg
    ImageUploadedByTapatalk1331412583.659700.jpg
    511.1 KB · Views: 14
  • ImageUploadedByTapatalk1331412626.456555.jpg
    ImageUploadedByTapatalk1331412626.456555.jpg
    512.8 KB · Views: 16

repete

Observer
Ok that may have been a useless attempt! If you look at the images with a smart phone, you can zoom right up to what you are looking for. I'm a bit stunned that they were able to fit 3-1/2 pages of text onto 2pages of schematics!
But that's all that's in this book, and it must be at least 3" thick!
Hope it helps :)
 

craig

Supporting Sponsor, Overland Certified OC0018
I couldn't agree more about the "little things" making all the difference. :)
 

Forum statistics

Threads
186,626
Messages
2,888,236
Members
226,766
Latest member
Josh00333
Top