You are using an out of date browser. It may not display this or other websites correctly.
You should upgrade or use an alternative browser.
You should upgrade or use an alternative browser.
M416 trailer build my brother and I
- Thread starter Crush Jeep
- Start date
Crush Jeep
Adventurer
The only elements that I can think of is mud / dirt that might get into the hole. I'm not worried about anything getting into it right now so there is no plan. If it becomes an issue I'll work on something to fix it.How have you decided to keep the spout protected from the elements? Some kind of door on hinge?
Thanks, the tank is from Front Runner, it's a 50 liter tank (13.2 gallons), W 1000mm (39.4") x H 350mm (13.8") x L tapered 200mm (7.9") to 150mm (5.9"), it is actually designed to go behind a seat but it worked out well for me.Sweet Water tank? Where did you get it? Dimensions? It looks like a really nice addition to an already sweet build!
Cheers!
http://www.frontrunneroutfitters.co...nner-50l-water-tank-tapered.html#.UykdBLROVMs
Crush Jeep
Adventurer
I'll have my brother ring in on this he can give you the exact information. But the answer is yes we have changed things, it's a learning curve.Hi Crush since you and your brother are up to the 3rd generation did you change anything about the lid ?
What would you recommend material wise ? thickness,etc
sroth
Fabricator
As my brother said yes changes are in the works for Gen 3. I'm going with 18 GA for the top and 3/4 " square tube for the ribs instead of 1" square tube. Also on Gen 2 I went with a split top (this was for the purpose of housing the elect package), Gen 3 will have only one top but cover the same space as a split top. If I can talk my brother into it I'll have him add to the thread as the build evolves.
Michigan4x4
Observer
Awesome fab skills.... learned a lot just looking at your photos!!
Jeff
Jeff
Crush Jeep
Adventurer
Awesome fab skills.... learned a lot just looking at your photos!!
Jeff
Thanks, it has been a learning experience and the more we work on it the better we get, my brother is the one with the fab skills though.
I took the trailer to my brother's house last weekend for some more modifications. Here is a list of what we will be doing, first is a new roof rack. What's wrong with the current rack? There is nothing wrong with it but I'm getting a new tent it is 3 1/2 inches taller than the old one and it will not fit into the garage. The new rack will be flat on the top of the lid and extend the entire length of the lid, it will incorporate hard wired lights in the same place and one light inside the lid. There will be a switch panel on the tongue box to operate the lights. The tongue will be extended one foot to allow the tailgate to open.
I'll be posting pictures of the modifications.
Crush Jeep
Adventurer
Ok the new modifications are complete so here's a few pictures of what was done.
First the tongue was extended one foot, this was to allow the tailgate to open without hitting.

Next was to remove the old latches that held the top closed and put in a new one that gives a cleaner look.
The old one, you can see I had 2 latches on it.
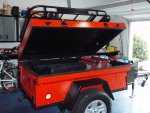
New one cleaner look easier to operate.


A new roof rack was added, it works better than the old one and gives me more room. This uses the entire roof for storage verses only using 2/3 of the space.


You may also notice the new tent on top (CVT group buy).
First the tongue was extended one foot, this was to allow the tailgate to open without hitting.

Next was to remove the old latches that held the top closed and put in a new one that gives a cleaner look.
The old one, you can see I had 2 latches on it.

New one cleaner look easier to operate.


A new roof rack was added, it works better than the old one and gives me more room. This uses the entire roof for storage verses only using 2/3 of the space.


You may also notice the new tent on top (CVT group buy).
Crush Jeep
Adventurer
Just a look at the latching system on the lid.
View attachment 228726
Could you post a picture of the other half of the lid latch? I have some similar that failed on the way to the Overland Expo. Currently I am using ratchet straps to keep my lid closed.
Crush Jeep
Adventurer
Here is a few close ups of the latch. Hope this helps out.Could you post a picture of the other half of the lid latch? I have some similar that failed on the way to the Overland Expo. Currently I am using ratchet straps to keep my lid closed.
Outside closed.

Top which is a bolt.

Inside latch, closed.

Inside latch open.

Another view inside closed.

JeepGoesBeep
New member
Awesome builds!
What kind/source of water and fuel cans where you using before you switched to the tank? They look like something I could use for mounting on the front of my trailer similar to the way you had yours originally. I'm trying to keep things off the side if I can...if I can get the weight to work out in my favor that is...I might end up having to put them on the side further back
What kind/source of water and fuel cans where you using before you switched to the tank? They look like something I could use for mounting on the front of my trailer similar to the way you had yours originally. I'm trying to keep things off the side if I can...if I can get the weight to work out in my favor that is...I might end up having to put them on the side further back
Crush Jeep
Adventurer
Awesome builds!
What kind/source of water and fuel cans where you using before you switched to the tank? They look like something I could use for mounting on the front of my trailer similar to the way you had yours originally. I'm trying to keep things off the side if I can...if I can get the weight to work out in my favor that is...I might end up having to put them on the side further back
Thank you, it's a work in progress. The 3rd build is getting ready to get started. Now that my brother has had two trailers to experiment on, he is ready to start his. The fuel and water cans are from Amazon (links below).
http://www.amazon.com/Scepter-Resis...=UTF8&qid=1403831900&sr=8-5&keywords=fuel+can
http://www.amazon.com/Scepter-04933...UTF8&qid=1403832112&sr=8-6&keywords=water+can
Crush Jeep
Adventurer
So here is the latest trip to Pilot Mountain last week. Packed up and ready to go.
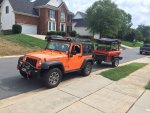
This was the second time taking out the new tent and it worked great, it kept the dog dry through a rain heavy storm the first night.
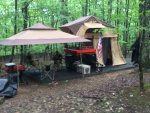
Had the party lights working on this trip also.
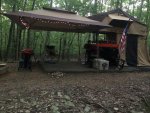
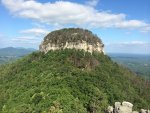
And a view of Pilot Mountain.
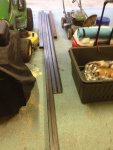
So now that you have seen a few shots of the latest trip here the big news, build number 3 is started. This trailer is for my brother, he's taken all the lessons learned from the first 2 builds and is applying it to his trailer. The trailer has to be ready to go by Oct 24 for a trip we will be taking. I will post some pictures up of the build as it progresses. Here's the raw materials.

This was the second time taking out the new tent and it worked great, it kept the dog dry through a rain heavy storm the first night.

Had the party lights working on this trip also.

And a view of Pilot Mountain.

So now that you have seen a few shots of the latest trip here the big news, build number 3 is started. This trailer is for my brother, he's taken all the lessons learned from the first 2 builds and is applying it to his trailer. The trailer has to be ready to go by Oct 24 for a trip we will be taking. I will post some pictures up of the build as it progresses. Here's the raw materials.

Similar threads
- Replies
- 3
- Views
- 1K
- Replies
- 20
- Views
- 5K
- Replies
- 27
- Views
- 5K
- Replies
- 6
- Views
- 3K


