Outfitting my Grenadier Trialmaster

jscherb

Expedition Leader
The craftsmen at Overland Outfitters factory also made two versions of the overhead gear panel that mounts to the blank space in the overhead console for testing. I installed them to verify the fit and they fit perfectly. One version has a pocket sized for things like sunglasses plus 4 elastic loops for small flashlights, tire gauges, pens, etc. and the other version has two pistol magazine sized pouches (I use one for a Leatherman-type multitool and the other for a lighter and magnesium fire starter, plus its got three elastic loops and a short section of MOLLE grid in the center (I hang a small tape measure there, as a designer I'm always needing to measure something). These install easily with the factory screws. I told OO these are ready for production.

PreproBuddyPocket1.jpgPreproBuddyPocket2.jpgPreproBuddyTactical1.jpg

PreproBuddies.jpg

And they made me a pair of final door pockets. They had made me a set of preproduction sample door pockets a few weeks back and now I've got a production-ready pair. There's only one small difference between the preproduction samples and the final version, so I could have kept the prepropduction set on my doors, but I swapped those out for the new production final ones. Photos attached.

DoorPocketFinalDRV.jpg

DoorPocketFinalPASS.jpg

Both the overhead panels and the door pockets are now ready for production and although they haven't given me a general availability date yet if anyone wants either of these soon I'm sure OO could be convinced to make some on a one-off basis if they production run hasn't happened when you need them.
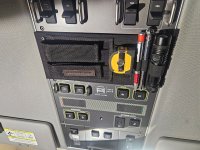
 

Attachments

  • PreproBuddyTactical2.jpg
    PreproBuddyTactical2.jpg
    1 MB · Views: 3

jscherb

Expedition Leader
I've been thinking about the best place to store a fire extinguisher in my Grenadier. In my Jeep Wranglers I have extinguishers mounted on the roll bars but there being no roll bar in the Grenadier, that's not an option. The only commercial options I've found for the Grenadier place the extinguisher under the front of the driver's seat, which I don't think is best for me, for two reasons - first, because it will likely get in the way of my feet as I fidget around to get comfortable on long drives, and second because I think the most likely place for a fire to start is in the back by the stove in my Trail Kitchen so I would like the extinguisher to be back there. I've attached several concept drawings of a fire extinguisher + pocket panel for the small rear door. I've drawn the concept in tan canvas but it could also be black. There's a pocket on the panel to stow gear and a strap to secure the extinguisher in its pocket and keep it from moving around on the trail. Installation would be very easy and non-invasive, the panel would attach using the factory screws. Another option would be a MOLLE grid in place of the pocket so any MOLLE pouch could be attached there instead, I've included some concept images with a leather MOLLE grid and a MOLLE pouch attached. I've made a CAD pattern for the panel and I think I'll sew a prototype and if it works out well I may suggest it to Overland Outfitters as a potential product. Not sure which version I'll sew though. Any thoughts about this idea in general or the specific variations? If I were to suggest it to Overland Outfitters as a product, would you want it without a provision for an extinguisher and perhaps with more pockets or MOLLE?

SmallDoorPanelConcept.jpgSmallDoorPanelConceptC.jpgSmallDoorPanelConceptM.jpgSmallDoorPanelConceptM2.jpgSmallDoorPanelPattern.jpg

Another fire extinguisher option could be mounting it on the L-track I put in the cargo area, but I have other, better uses for that space so I think I'll go with the small rear door panel shown above.

LTrackFireExtinguisher.jpg
 

Zeep

Adventurer
The rear cargo area seems to only have a small dome light. Do you find this adequate?
With the trail kitchen installed, I would think you would possibly have a need for better lighting !
 

jscherb

Expedition Leader
The rear cargo area seems to only have a small dome light. Do you find this adequate?
With the trail kitchen installed, I would think you would possibly have a need for better lighting !
I've got that covered... I made a set of clamp-on lights for use with the Trail Kitchen in the Jeeps, they work just fine in the Grenadier as well (https://forum.expeditionportal.com/threads/barn-door-for-jk-factory-hardtops.127687/post-3120588). They plug into the Grenadier's rear power outlet but for use with the kitchen I'd just plug them into the Trail Kitchen power box and avoid turning on all the Grenadier's accessory circuits - unfortunately the way the Grenadier is wired, if the ignition is off and you switch on the power outlets, they all get powered, not just the one you need so possibly more battery drain then necessary. Probably I would clamp one to the rack (which isn't on the Grenadier right now) and one on the rear door but for now they're both on the door. Check out the lighted area on the garage floor; aim that properly and the kitchen has all the light needed.

KitchenLights.jpg
 

jscherb

Expedition Leader
A lot of the switches on the Grenadier's center panels have guards around them and I don't know if these are supposed to be functional or if they're just cosmetic:

OverheadSwitchProtection.jpg

I was thinking that the rotary knob could use some guards (or cosmetic enhancement?) so I found some rack handles that are a reasonable match for the factory guards on the console switches. In these next photos they're just sitting in place:

RotaryKnobProtection1.jpg


RotaryKnobProtection2.jpg

These next photos show the procedure for installing them. To remove the panel around the rotary knob first remove the screws from the cup holder. The cup holder is also held in place with two clips at the bottom of the cup; they hold fairly tight but a pair of trim pry tools will pop them loose (first photo). Once the cup holder is out, remove the four screws from the rotary panel and remove the panel - the rotary panel is only held in by those screws and a lip that goes under the cup holder panel (which is why the cup holder gets removed first). The second photo shows what the underside of the panel looks like - the plastic chrome trim that encircles the rotary knob and its buttons has a flange around it; the combination of that flange and the panel results in a thickness of 1/4" where the guards will be installed, so there will be plenty of support for the guard. The third photo shows a guard sitting on the underside of the panel indicating roughly where the holes for the guard will be drilled. These guards are 2.3" between centers, which seems to be the optimum size for this application based on the structure under the panel - any longer and you wouldn't be able to attach them through both layers of plastic and the screw heads likely wouldn't fit in the recess below the panel.

RotaryKnobGuardInstall1.jpg

I did the above just before I had to leave on a trip to India and didn't have time to actually drill the holes and mount the guards. I'll show the installation in the next post.

The handles I used: https://www.mouser.com/ProductDetail/Hammond-Manufacturing/1427Q?qs=5EWClXN8%2BoJAq0x0t0xfwA==. They come with screws but will need slightly longer screws to reach through the 1/4" of plastic of the trim panel.
 

jscherb

Expedition Leader
Installing the guards... I made a drilling template on the computer to ensure accurate placement of the holes, drilled the holes, installed the guards and reinstalled the panel. It was a pretty quick project and I'm happy with the results. Photos of the drilling template and a few other in-process photos attached, more detail in my original post linked above.

Drilling template gets taped onto the panel:

GuardTemplate1.jpg

Center punching where the holes go for accuracy:

GuardCenterPunch.jpg

After drilling the holes, the guards get screwed in place: bottom view:

GuardScrews.jpg

Ready to reinstall the panel:

GuardsScrewedIn.jpg

Project complete:

GuardsInstalled1.jpgGuardsInstalled2.jpgGuardsInstalled3.jpgGuardsInstalled4.jpg
 
Last edited:

TCM

Adventurer, Overland Certified OC0006
Installing the guards... I made a drilling template on the computer to ensure accurate placement of the holes, drilled the holes, installed the guards and reinstalled the panel. It was a pretty quick project and I'm happy with the results. Photos of the drilling template and a few other in-process photos attached, more detail in my original post linked above.

Drilling template taped onto the panel:

View attachment 876045

Center punching where the holes go for accuracy:

View attachment 876038

After drilling the holes, the guards get screwed in place: bottom view:

View attachment 876039

Ready to reinstall the panel:

View attachment 876044

Project complete:

View attachment 876040View attachment 876041View attachment 876042View attachment 876043
Please post a downloadable copy of the drill template. That would make easy work of this project for other Grenadier owners.
 

Forum statistics

Threads
188,961
Messages
2,911,386
Members
231,449
Latest member
4ROAMER1
Top