You are using an out of date browser. It may not display this or other websites correctly.
You should upgrade or use an alternative browser.
You should upgrade or use an alternative browser.
Outfitting my Grenadier Trialmaster
- Thread starter jscherb
- Start date
jscherb
Expedition Leader
That's the factory dual battery controller. The inverter is behind the drivers side cargo area side trim panel.The pic you posted of under the seat, what is that in the center? Power inverter?
jscherb
Expedition Leader
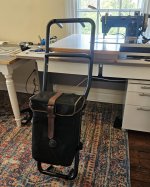
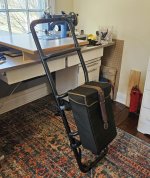
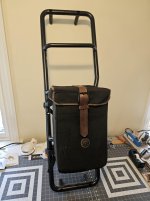
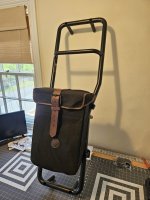
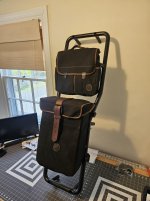
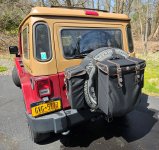
What's in my sewing room... the ladder from my Grenadier. It came with my TrialMaster but I didn't need it so it's been off the vehicle in my garage since I got the Grenadier. But I brought it to the sewing room to implement an idea - a cargo bag that mounts on the ladder. The bag matches the style of the Overland Outfitters SpareHopper (a photo of that is attached too); it's weatherproof and highly UV resistant. It's got a rear leather strap with a buckle but for quikc access there's a quick-release parachute buckle behind the belt. I sewed this by modifying an OO SpareSide Bag, I've got two of them on my JKU spare and they're very handle (photo of that attached too). We often use the SpareHopper bag on the spare for trash and one of the SpareSide bags for recycling when we're out in the wild. And when we return, both bags go through the automatic car wash just fine. Since I've found this bad useful on my Wrangler, I decided to adapt one to the Grenadier's ladder. If there's interest I could turn over the design mods to OO to see if they want to put it in production. I'll reinstall the ladder and post photos of the bag on the Grenadier when I get back from the trip I'm on right now.


jscherb
Expedition Leader
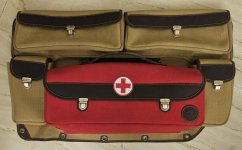
I've been at the Overland Outfitters factory this week, helping them finish up some preproduction samples. I've now got a preproduction Cargo Side Bag and a preproduction First Aid Bag for the rear door panel. Photos of both are attached. I've also attached a photo of the prototype Cargo Side Bag I've been testing in my Grenadier for reference, the preproduction sample is essentially identical to my prototype so as soon as I get home and test it I expect I'll be able to let them know it's ready for production (ignore the wrinkles in the fabric, they relax out in a few days).
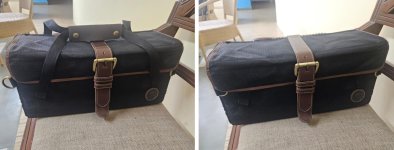
For reference:
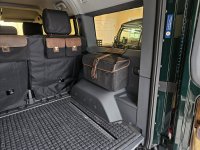
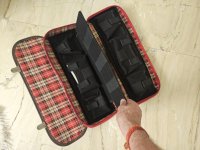
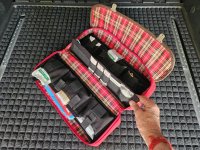
The First Aid Bag for the large rear door panel is almost identical to the cargo bag that zips into the same panel but it's got some special features for first aid supplies. It zips open to lie flat and inside are small and medium pockets for the supplies, behind those are larger pockets, and a center panel with elastic loops to hold even smaller medical supplies. Unlike most first aid bags, the organization inside this one is designed so one can find the needed supplies quickly in an emergency when time is of the essence.
For reference:
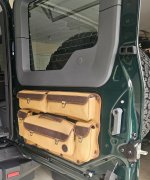
When I get home I'll install both of these in the Grenadier and I'll also load the first aid bag with supplies to show how the inside organization works. BTW it also zips onto the attachments on the seat backs and the cargo sides so if all one needs is a great first aid bag it can be hung in either of those places instead of on the rear door.
Monday they should have the sample panels for the small rear door ready for me.

For reference:

The First Aid Bag for the large rear door panel is almost identical to the cargo bag that zips into the same panel but it's got some special features for first aid supplies. It zips open to lie flat and inside are small and medium pockets for the supplies, behind those are larger pockets, and a center panel with elastic loops to hold even smaller medical supplies. Unlike most first aid bags, the organization inside this one is designed so one can find the needed supplies quickly in an emergency when time is of the essence.


For reference:

When I get home I'll install both of these in the Grenadier and I'll also load the first aid bag with supplies to show how the inside organization works. BTW it also zips onto the attachments on the seat backs and the cargo sides so if all one needs is a great first aid bag it can be hung in either of those places instead of on the rear door.
Monday they should have the sample panels for the small rear door ready for me.
Last edited:
jscherb
Expedition Leader
"Trials" are mostly a UK/Europe thing. They're offroad events where you must drive your 4x4 along a prepared course, staying within the confines of the course (often marked with cones). You lose points for going outside the course outlines and other infractions. The emphasis is on driving skill, following the correct line, etc. and they're generally slow-speed.I have an off-the-wall question. Do you have any idea why they chose to call it a TrialMaster, and not a TrailMaster?
From Google AI:
Offroad trials are events where vehicles navigate a challenging course of obstacles designed to test the driver's skill and the vehicle's ability. The emphasis is on ground-reading and driving technique rather than sheer power or vehicle durability.
Key aspects of offroad trials:
- Obstacles:
Courses feature various obstacles like steep slopes, water crossings, ruts, and side slopes, requiring careful maneuvering.- Gates:
Trials often involve "gates" – narrow passages that vehicles must navigate through.- Skill over Power:
The focus is on precise driving and understanding the terrain, rather than simply brute force.- Non-damaging (Ideally):
While the terrain can be challenging, well-designed trials are meant to be navigated without causing significant damage to the vehicles, especially with the proper technique.- Different Types:
There are various types of offroad trials, including RTV trials (for road-legal vehicles) and CCV trials (which may include non-road-legal vehicles).- Organizations:
Trial events are often organized by dedicated clubs or organizations, like the Association of Land Rover club in the UK.
A few references:
Rube2K6
Observer
Thanks for that!"Trials" are mostly a UK/Europe thing. They're offroad events where you must drive your 4x4 along a prepared course, staying within the confines of the course (often marked with cones). You lose points for going outside the course outlines and other infractions. The emphasis is on driving skill, following the correct line, etc. and they're generally slow-speed.
From Google AI:
The TrialMaster is so-named because it's supposed to be a master at winning these trials.
A few references:
jscherb
Expedition Leader
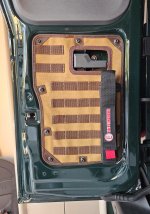
While at the Overland Outfitters factory last week I asked them to sew prototypes of two styles of panel for the small rear door. One version has pockets and it matches the pockets on the large rear door panel I posted the other day. The other version has a MOLLE/PALS grid. I'll install and photograph both of these panels when I get home and post more photos then.
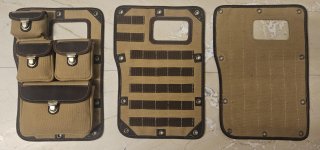
They also made an "unfinished" panel for the small rear door - the reason for the unfinished one is so that if other ideas come up, I can sew that one to suit whatever the idea is, which saves me the time and trouble of sewing the base panel from scratch. After I test these in the Grenadier, I'll make a recommendation to OO about which if any versions should go into production.
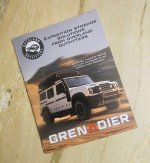
And OO's first Grenadier catalog has been printed, I picked up a couple of copies while at the factory.

jscherb
Expedition Leader
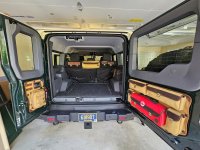
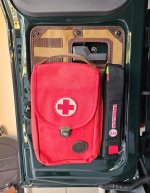
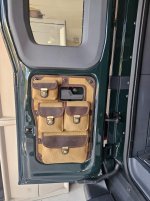
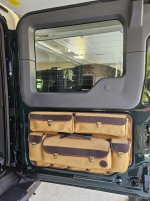
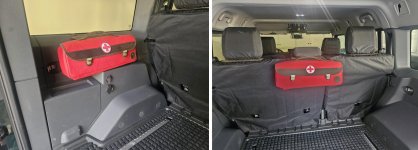
I'm back from the Overland Outfitters factory with some new pre-production samples to test. I brought back new pocket panels for both rear doors, a new First Aid bag to zip into the wide rear door pocket panel, a MOLLE panel for the narrow rear door and a cargo side bag. I tested them all for fit in the Grenadier today and after that I told OO that I think they're ready to go into production. The samples of the panels for the doors were done again in tan with brown leather; in production they would be offered in both tan and black. The first aid bag has pockets for medical supplies inside and it's designed to open to lay flat for easy and quick access to supplies. I've attached two photos of it open, in one photo it's still hanging on the rear panel and in the other it's sitting on the cargo area floor. It also can hang on the seat back or on the cargo side, photos of it on both locations are included.



jscherb
Expedition Leader
I was originally thinking of hanging a standard fire extinguisher to the MOLLE panel on the rear door so it could be handy to fight possible fires on the camp stove, but I decided that the Element extinguisher was a better use of space and probably better for fighting cooking fires anyway. But there's a problem with that idea...
The word "tactical" applied to a pouch or holder of some type often means it's intended to hang on a MOLLE/PALS grid, but the way the "tactical" mount that Element offers for their extinguishers is made it doesn't adapt well to hanging on most MOLLE panels, especially fabric ones. The webbing on the back runs vertically, and on most MOLLE panels the webbing runs horizontally, so there's an incompatibility:
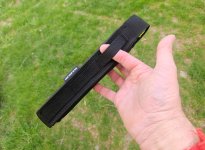
Here's how I attached an Element tactical pouch to a horizontal fabric MOLLE panel... begin with an ordinary wooden paint stirrer (or similar thin, flat piece of wood), available at any paint store, most often for free. Cut it to be slightly longer than the webbing on the back of the Element mount.
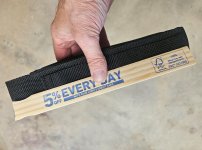
After cutting, I painted mine black, but you don't have to do that. The stick gets slipped into the MOLLE grid:
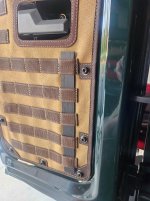
Using a zip tie, secure the Element pouch to the stick. The zip tie goes into the top loop of the webbing on the back of the Element:
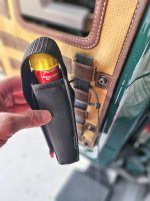
Pull the zip tie as tight as possible. Now add a few more zip ties, I used 3 in total.
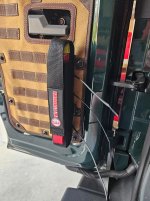
Clip off the long ends of the zip ties. Done.
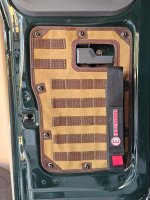
The word "tactical" applied to a pouch or holder of some type often means it's intended to hang on a MOLLE/PALS grid, but the way the "tactical" mount that Element offers for their extinguishers is made it doesn't adapt well to hanging on most MOLLE panels, especially fabric ones. The webbing on the back runs vertically, and on most MOLLE panels the webbing runs horizontally, so there's an incompatibility:

Here's how I attached an Element tactical pouch to a horizontal fabric MOLLE panel... begin with an ordinary wooden paint stirrer (or similar thin, flat piece of wood), available at any paint store, most often for free. Cut it to be slightly longer than the webbing on the back of the Element mount.

After cutting, I painted mine black, but you don't have to do that. The stick gets slipped into the MOLLE grid:

Using a zip tie, secure the Element pouch to the stick. The zip tie goes into the top loop of the webbing on the back of the Element:

Pull the zip tie as tight as possible. Now add a few more zip ties, I used 3 in total.

Clip off the long ends of the zip ties. Done.

jscherb
Expedition Leader
Picked up a preproduction sample cargo-side bag at the Overland Outfitters factory last week. It's basically identical to the prototype I've been testing for the past few weeks; I made the prototype and the craftsmen at OO made this preproduction sample. Since it's identical to what I made, I don't need to do any further testing so after installing it the other day I told them it's ready for production if they want to offer it. This bag hangs/removed very quickly with a zipper attachment to the cargo side; it also has a carry handle so you can take it with you if you need to.
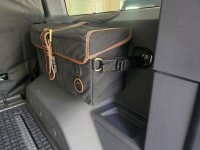
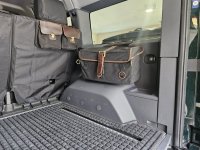
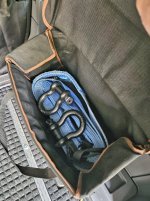
Also I'm testing a Ladder Bag. It's an adaptation an of Overland Outfitters bag called the Spareside Bag which is designed to hang on the side of the spare but because of the configuration of the spare and doors on the Grenadier, it isn't optimal there, so I altered its straps to suit hanging on the ladder. We use these bags (both the large SpareHopper and the smaller Spareside bags on expeditions - trash in the large SpareHopper and recycling in the Spareside bag. I keep the large SpareHopper on the Jeep (and now on the Grenadier) during daily driving as well - we live in a state where stores no longer provide bags for purchases so I keep a bunch of tote bags in there for shopping.
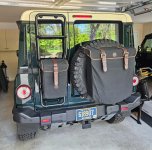
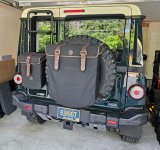


Also I'm testing a Ladder Bag. It's an adaptation an of Overland Outfitters bag called the Spareside Bag which is designed to hang on the side of the spare but because of the configuration of the spare and doors on the Grenadier, it isn't optimal there, so I altered its straps to suit hanging on the ladder. We use these bags (both the large SpareHopper and the smaller Spareside bags on expeditions - trash in the large SpareHopper and recycling in the Spareside bag. I keep the large SpareHopper on the Jeep (and now on the Grenadier) during daily driving as well - we live in a state where stores no longer provide bags for purchases so I keep a bunch of tote bags in there for shopping.


Kingsize24
Well-known member
Absolutely great looking and well outfitted. Love what you have done thusfar.
jscherb
Expedition Leader
Thank you very much. Lots more to do!Absolutely great looking and well outfitted. Love what you have done thusfar.
jscherb
Expedition Leader
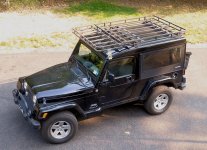
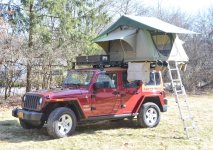
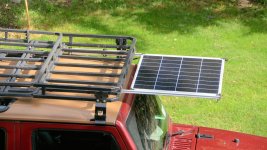
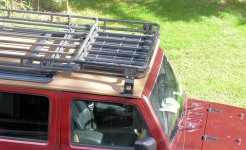
For years I've used a Garvin rack basket on both of my Jeeps. It's worked very well and I've developed the accessories I need to carry the range of items I take with me on expeditions, so I'd like to use the Garvin on top of the Grenadier as well. I've attached a number of photos of the various configurations and uses of the Garvin on both Jeeps, including a custom front basket extension I made with a pull-out solar panel underneath. The extension attaches to the rain gutters because the Cherokee rails I have on my homemade hardtops don't go that far forward on the roof. I want to install the same setup on the Grenadier. Photos of a few configurations of the rack on my Wranglers:
The pull-out solar panel under the rack:

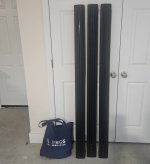
I need three load bars for the Grenadier - two for the main flat area of the roof to hold the Garvin basket, and one bar for the front to hold the front of the extension basket with the solar panel. I came across a person whose Grenadier came with factory rack bars and he decided not to use them, he offered a nice price so I sent him the money and he shipped me the rack. Unfortunately most likely due to an error at the pack & ship place he used and not his fault, I did not receive one of the legs. He offered to make good somehow, so I checked with Rhino and they told me that they don't make the legs - Ineos makes them, so I'd have to go to the dealer. I then called my local dealer (RDS in Devon, PA.) and asked them if replacement parts were available. It turned out that due to some warranty work (I think), they had an extra leg just lying around and they told me I could have it. I jumped in the Grenadier and headed for RDS. While I was there I showed them what I was planning to do and asked if they had enough random parts in their attic to make up the third crossbar I needed so they rummaged around for a bit and came up with almost everything to make up a third bar except for a few hardware bits (mostly bolts I was able to source easily). They sold me the parts for the third crossbar for an extremely reasonable price so now I've got the three crossbars I need.
All of the parts. The legs are in the tote bag.
All 3 bars assembled:

And while I was at the dealer picking up the rack parts, Tim, the sales person who helped my buy my Grenadier, gave me a Grenadier hoodie and the tote bag in one of the photos above.
Big shout out to RDS Grenadier - Tim was very helpful through the buying process, the service department was great resolving one technical problem it had immediately after delivery, and Dave in service was a great help to me in collecting all the parts I need for the rack bars.
I'll post photos when I get everything installed.


The pull-out solar panel under the rack:


I need three load bars for the Grenadier - two for the main flat area of the roof to hold the Garvin basket, and one bar for the front to hold the front of the extension basket with the solar panel. I came across a person whose Grenadier came with factory rack bars and he decided not to use them, he offered a nice price so I sent him the money and he shipped me the rack. Unfortunately most likely due to an error at the pack & ship place he used and not his fault, I did not receive one of the legs. He offered to make good somehow, so I checked with Rhino and they told me that they don't make the legs - Ineos makes them, so I'd have to go to the dealer. I then called my local dealer (RDS in Devon, PA.) and asked them if replacement parts were available. It turned out that due to some warranty work (I think), they had an extra leg just lying around and they told me I could have it. I jumped in the Grenadier and headed for RDS. While I was there I showed them what I was planning to do and asked if they had enough random parts in their attic to make up the third crossbar I needed so they rummaged around for a bit and came up with almost everything to make up a third bar except for a few hardware bits (mostly bolts I was able to source easily). They sold me the parts for the third crossbar for an extremely reasonable price so now I've got the three crossbars I need.
All of the parts. The legs are in the tote bag.

All 3 bars assembled:

And while I was at the dealer picking up the rack parts, Tim, the sales person who helped my buy my Grenadier, gave me a Grenadier hoodie and the tote bag in one of the photos above.

Big shout out to RDS Grenadier - Tim was very helpful through the buying process, the service department was great resolving one technical problem it had immediately after delivery, and Dave in service was a great help to me in collecting all the parts I need for the rack bars.
I'll post photos when I get everything installed.
Similar threads
- Replies
- 8
- Views
- 2K
- Replies
- 0
- Views
- 1K

