jscherb
Expedition Leader
Based on a recommendation from John Brindell of Agile Offroad, I installed one of their low range shift cable brackets. From the factory the cable is secured with a thin plastic support and a zip tie. Neither looks very strong, and John says these can break and if they do, the cable hits the bolt heads on the driveshaft CV joint and makes a big racket and could damage the cable, or at least the cable jacket:
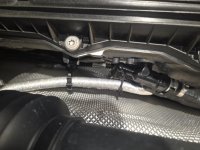
I slid under my Grenadier in the garage and looked at the factory plastic attachments and decided they probably weren't strong enough to guarantee the cable never came loose. I especially don't like the zip-tie wrapped around the plastic fitting (a later model "improvement" apparently when it was found that the single tie to the left could fail), there's a good amount of force on the shift cable and I worry that zip tie could also damage that fitting, so I ordered one of the Agile brackets.
Agile has a video showing the installation steps:
I'll add two comments to John's installation instructions based on my installation...
The bracket is a quick and easy install and not hard to do with the Grenadier on the ground. But a few comments... first, if you're not in the dry Southwest like John is, it's very likely the threads in the hole the bracket mounts to will be rusty and you'll need to clean them with a 10mm x 1.5 tap in order for the bolt to go in:
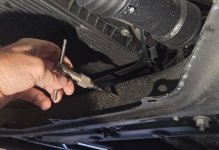
Many people probably won't have the necessary tap on hand, but they can be found at Home Depot: https://www.homedepot.com/p/Milwauk...Plug-Tap-and-R-Drill-Bit-49-57-5554/326247251
Second, John mentions in his install video that later models (like mine) have a shield on the cable, that's the silver foil covering you see on the cable in the first photo. Because this increases the thickness of the cable, the bracket pushes the cable very tightly into the underside of the body. I thought this might cause trouble in the future, possibly crushing the jacket and causing resistance in the operation of the shifter, so I bent the bracket towards the back of the vehicle so the cable is clamped to the bracket about an inch behind the lowest part of the body.
Installation done:
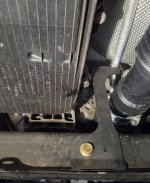
The bracket was only $30 and I had a free shipping coupon code so I consider this cheap insurance against a potential failure point. Bracket is here: https://agileoffroad.com/product/lo...ket-kit-for-ineos-grenadier-by-agile-offroad/

I slid under my Grenadier in the garage and looked at the factory plastic attachments and decided they probably weren't strong enough to guarantee the cable never came loose. I especially don't like the zip-tie wrapped around the plastic fitting (a later model "improvement" apparently when it was found that the single tie to the left could fail), there's a good amount of force on the shift cable and I worry that zip tie could also damage that fitting, so I ordered one of the Agile brackets.
Agile has a video showing the installation steps:
I'll add two comments to John's installation instructions based on my installation...
The bracket is a quick and easy install and not hard to do with the Grenadier on the ground. But a few comments... first, if you're not in the dry Southwest like John is, it's very likely the threads in the hole the bracket mounts to will be rusty and you'll need to clean them with a 10mm x 1.5 tap in order for the bolt to go in:

Many people probably won't have the necessary tap on hand, but they can be found at Home Depot: https://www.homedepot.com/p/Milwauk...Plug-Tap-and-R-Drill-Bit-49-57-5554/326247251
Second, John mentions in his install video that later models (like mine) have a shield on the cable, that's the silver foil covering you see on the cable in the first photo. Because this increases the thickness of the cable, the bracket pushes the cable very tightly into the underside of the body. I thought this might cause trouble in the future, possibly crushing the jacket and causing resistance in the operation of the shifter, so I bent the bracket towards the back of the vehicle so the cable is clamped to the bracket about an inch behind the lowest part of the body.
Installation done:

The bracket was only $30 and I had a free shipping coupon code so I consider this cheap insurance against a potential failure point. Bracket is here: https://agileoffroad.com/product/lo...ket-kit-for-ineos-grenadier-by-agile-offroad/

